How to Calculate Position Size in Forex (Position Sizing Formula + Examples)

Your position size decides how much you win or lose when price moves. Get it wrong and one trade can damage your account. Get it right and your risk stays consistent across pairs and setups.
This guide shows you how to calculate position size in forex using a simple formula based on three inputs, your account size, your risk per trade, and your stop loss in pips. You will learn how to convert pips into dollars using pip value, then turn that into the correct lot size for your broker. You will also see worked examples for different account sizes and stop distances, plus quick checks to avoid common sizing mistakes.
If you need a refresher on pip math, read our pips guide.
Key Takeaways
Summary:
- Use three inputs every time, your account size, your risk per trade, and your stop loss in pips.
- Risk per trade equals account size times your risk percent. This is your max loss in dollars.
- Convert your stop loss into dollars with pip value. Then size the trade so that stop loss dollars equal your risk dollars.
- Position size formula, lots = risk dollars ÷ (stop loss pips × pip value per lot).
- Wider stop equals smaller position. Tighter stop equals larger position. Your risk stays fixed.
- Recalculate pip value when the quote currency is not your account currency. EURJPY on a USD account needs conversion.
- Match the result to your broker’s lot steps. Round down to stay under your risk cap.
- Check the order ticket before you place the trade, pair, lot size, stop distance, and account currency.
- Use a fixed risk percent to avoid oversizing after wins and undersizing after losses.
- If pip value still feels slow, use this pip value calculator explained guide to speed up the math.
What Position Size Means in Forex (and Why It’s Not the Same as Leverage)
Position size vs lot size vs units
Position size is how big your trade is. It is the number of units you buy or sell. It controls how much money you gain or lose per pip and how much you can lose at your stop.
Lot size is a broker label for units. Most forex brokers quote size in lots, but the trade still equals units.
- 1 standard lot = 100,000 units of the base currency.
- 1 mini lot = 10,000 units.
- 1 micro lot = 1,000 units.
Example: If you buy 0.20 standard lots of EUR/USD, you trade 20,000 units of EUR. That is your position size.
Position size vs margin, leverage, and exposure
Exposure is the market value you control. It equals units times price. Exposure moves your profit and loss.
Margin is the deposit your broker locks to hold the position. Margin does not cap your loss. Your loss depends on exposure and stop distance.
Leverage is the ratio between exposure and margin. Higher leverage lowers required margin. It does not force you to take bigger positions, your lot size does.
This is the common mistake. Traders say they used “10x leverage” as if it defines risk. Risk comes from position size and stop loss, not from the leverage setting.
- You can use high leverage and still trade small, if you keep units small.
- You can use low leverage and still take oversized risk, if you trade too many units for your stop.
If you want the full breakdown, read our forex leverage explained guide.
| Term | What it measures | What it changes |
|---|---|---|
| Position size (units, lots) | How big your trade is | Pip value, P and L swing, stop loss dollars |
| Exposure | Notional value you control | P and L sensitivity to price moves |
| Margin | Collateral required | Free margin, margin call risk |
| Leverage | Exposure divided by margin | How much margin you post for a given size |
Why traders blow up without a sizing rule
Most account blowups follow the same patterns.
- They size the trade from margin. They pick a lot size because it “fits” the available margin. They ignore stop distance. One wide stop turns into a large dollar risk.
- They change size based on emotion. After a win, they increase lots to “press” it. After a loss, they try to win it back. Risk jumps without a plan.
- They average down with no cap. They add to a losing trade. Exposure grows while the market moves against them. A normal move becomes fatal.
- They treat leverage as a target. They aim to “use” leverage. They end up maximizing exposure, then a small price move wipes out weeks of gains.
- They ignore gap and slippage risk. Stops can fill worse than planned, especially in fast markets. Oversizing leaves no room for execution error.
A position sizing rule fixes this. You set risk first, then calculate units. You stay consistent across pairs, stop sizes, and volatility.
The Position Sizing Formula (Step-by-Step)
1) Choose a fixed risk per trade
Start with risk, not lot size.
- Risk in dollars: Risk ($) = Account balance x Risk %
- Example: $10,000 account, 1% risk. Risk = $10,000 x 0.01 = $100.
Keep the same risk rule across all pairs. Change the position size, not the risk.
2) Convert your stop-loss to pips
You need the stop distance in pips. Use the distance between entry and stop. Then account for trading costs and execution.
- Stop distance (pips) = |Entry price minus Stop price| converted to pips
- Add a buffer for spread and slippage if you size tightly.
- If you place stops near obvious levels, widen the stop or reduce size. Do not “force” size to fit a small stop.
If you need a refresher on pip math, read what pips are in forex.
3) Find pip value for the pair and your account currency
Pip value depends on the pair, your quote currency, and your account currency.
- If your account currency equals the quote currency (EUR/USD with a USD account), pip value per standard lot is about $10 per pip.
- If your account currency does not equal the quote currency (GBP/JPY with a USD account), pip value changes with the exchange rate. Most platforms show it in the order ticket.
Use your platform’s live pip value when possible. It reduces conversion errors.
4) Compute position size in units, then convert to lots
Use this core rule:
Position size (units) = Risk ($) / (Stop (pips) x Pip value per unit)
Or, if you already know pip value per lot:
Lots = Risk ($) / (Stop (pips) x Pip value per lot)
| Input | What you use |
|---|---|
| Risk | Fixed $ amount per trade |
| Stop | Pip distance including any buffer |
| Pip value | Per lot or per unit in your account currency |
Quick example with a USD account trading EUR/USD.
- Account: $10,000
- Risk: 1% = $100
- Stop: 25 pips
- Pip value: $10 per pip per 1.00 lot
- Lots = 100 / (25 x 10) = 100 / 250 = 0.40 lots
If you need a lot-size breakdown, see lot size in forex.
5) Apply rounding rules and broker constraints
You size first, then round down to what your broker allows.
- Minimum lot: Often 0.01 lots, sometimes 0.10.
- Lot step: Often 0.01. Some brokers use 0.001 on certain accounts.
- Maximum size: Broker caps can block large trades during news or low liquidity.
- Rule: Round down, not up. Rounding up increases risk beyond your plan.
- Reality check: After rounding, recalc risk using the rounded size. Confirm it stays at or below your target.
How to Calculate Pip Value Accurately (The Part Most Guides Skip)
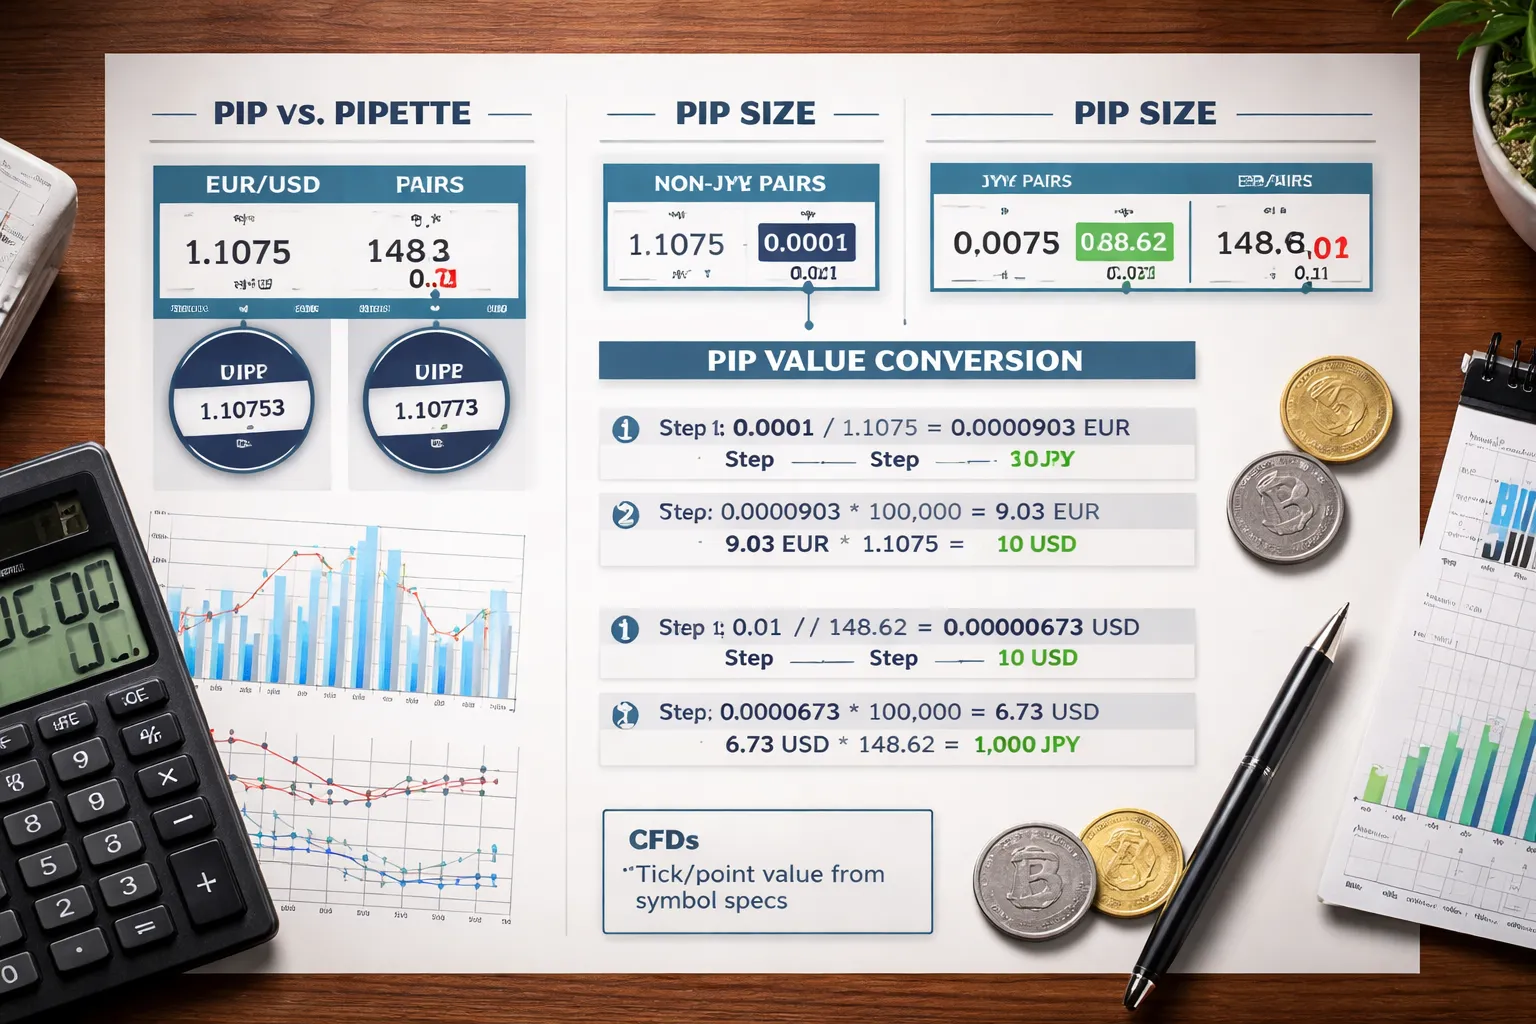
Pip vs pipette, precision changes your risk
A pip is the standard price step in FX.
- Most pairs: 1 pip = 0.0001
- JPY pairs: 1 pip = 0.01
Many brokers quote one extra digit.
- That extra digit is a pipette.
- 1 pipette = 0.1 pip.
- Example on EUR/USD: 0.00001 = 1 pipette.
Why it matters. Your stop can be 127.6 pips, not 128. If you round pips, you round risk. Use pips, not “points,” and convert pipettes to pips by dividing by 10.
Pip value when the quote currency matches your account, quick method
If your account currency equals the pair’s quote currency, pip value is fixed per lot size.
Formula
Pip Value = (Pip Size / Exchange Rate) × Contract Size × Lots
For most retail spot FX, contract size is 100,000 for 1.00 lot.
Quick result when quote = account
- EUR/USD in a USD account: 1 pip on 1.00 lot = $10
- 0.10 lot = $1 per pip
- 0.01 lot = $0.10 per pip
This works because the quote currency is USD, so the pip value lands in USD without conversion.
Pip value when your account currency is different, conversion method
If your account currency does not match the quote currency, you must convert the pip value.
Do it in two steps.
- Step 1: Calculate pip value in the quote currency.
- Step 2: Convert that amount into your account currency using the current conversion rate.
Example
- Trade: EUR/USD
- Account: EUR
- Size: 1.00 lot
- EUR/USD: 1.1000
Step 1. Pip value in USD for 1 lot on EUR/USD is $10 per pip.
Step 2. Convert USD to EUR by dividing by EUR/USD.
€ per pip = $10 / 1.1000 = €9.09 per pip
Now your risk math stays correct in your account currency.
Special handling for JPY pairs, the two-decimal pip rule
JPY pairs use a different pip size.
- Pip size on USD/JPY is 0.01, not 0.0001.
- Pipette size is 0.001.
Example
- Trade: USD/JPY
- Account: USD
- Size: 1.00 lot
- USD/JPY: 150.00
Pip value in JPY:
0.01 × 100,000 = 1,000 JPY per pip
Convert to USD by dividing by USD/JPY:
$ per pip = 1,000 / 150.00 = $6.67 per pip
This is where many traders blow the calculation. They assume $10 per pip on every major. JPY pairs break that assumption.
Gold, indices, and CFDs, you use point value, not pip value
Many brokers label every move “pips,” even on CFDs. Ignore the label. Use the instrument’s point or tick value.
- FX: pip value comes from contract size and pip size.
- CFDs: P&L comes from point value times contract multiplier.
- Gold: brokers often quote XAU/USD to 0.01 or 0.10. Your “pip” depends on their minimum price increment.
- Indices: the value per 1.0 index point depends on the broker’s contract specification.
Rule
Read the symbol spec in your platform. Find:
- Minimum price step (tick size)
- Tick value or contract size
- Currency of profit and loss
Then compute risk from point value, not a forex pip. Liquidity can widen spreads and change fills, so confirm the spec and your execution conditions during fast markets. See Forex liquidity for why this matters.
Worked Examples: Position Size Calculations for Real Trades
Example 1: EUR/USD with a USD account (simple pip value case)
Inputs
- Account currency: USD
- Pair: EUR/USD
- Account size: $10,000
- Risk per trade: 1% = $100
- Stop loss: 25 pips
- Lot type: standard (100,000)
Step 1, pip value
- For EUR/USD, 1 pip = 0.0001.
- On a standard lot, pip value is about $10 per pip.
Step 2, risk per 1.00 lot
- Risk = 25 pips × $10 = $250
Step 3, position size
- Lots = $100 ÷ $250 = 0.40 lots
Result
- You trade 0.40 lots (40,000 units).
- If your stop hits, you lose about $100, plus spread and any slippage.
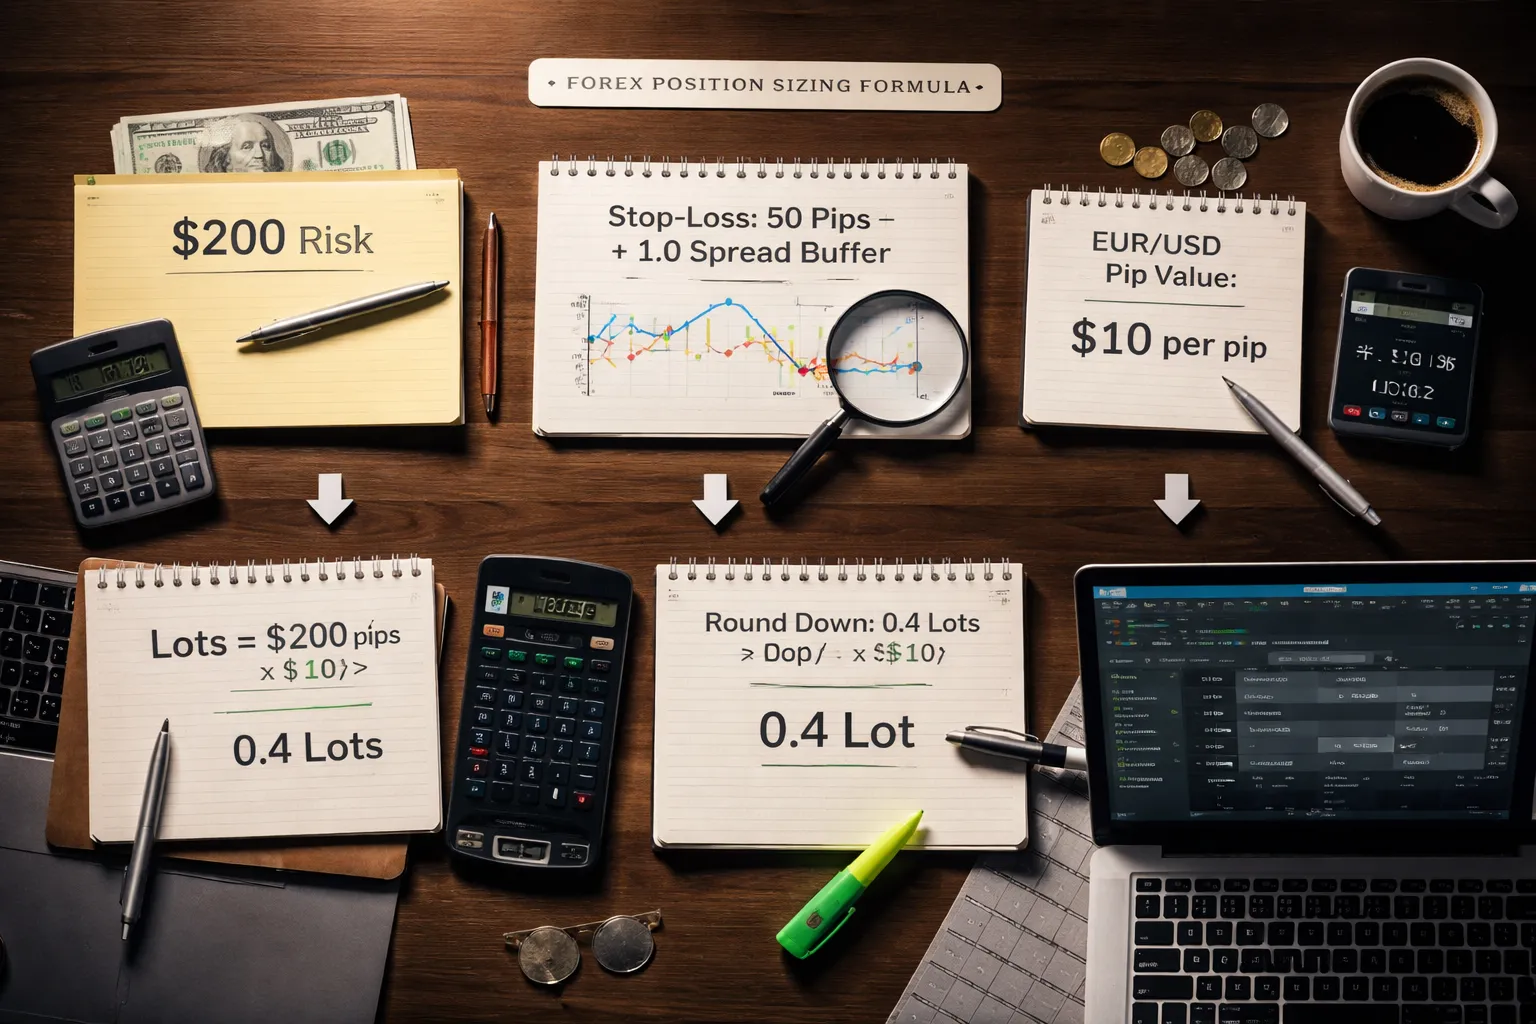
Example 2: GBP/JPY with a USD account (JPY pip + currency conversion)
Inputs
- Account currency: USD
- Pair: GBP/JPY
- Risk per trade: $200
- Stop loss: 40 pips
- Assumed prices: GBP/JPY = 190.00, USD/JPY = 150.00
- Lot type: standard (100,000)
Step 1, pip size and pip value in JPY
- For JPY pairs, 1 pip = 0.01 JPY.
- Pip value (JPY) per 1.00 lot = 100,000 × 0.01 = 1,000 JPY per pip
Step 2, convert pip value to USD
- Pip value (USD) = 1,000 JPY ÷ 150.00 = $6.67 per pip
Step 3, risk per 1.00 lot
- Risk = 40 pips × $6.67 = $266.80
Step 4, position size
- Lots = $200 ÷ $266.80 = 0.75 lots (rounded)
Result
- You trade about 0.75 lots (75,000 units).
- Notice the pip value depends on USD/JPY. It changes as USD/JPY moves.
Example 3: EUR/GBP with a EUR account (base/quote mismatch case)
Inputs
- Account currency: EUR
- Pair: EUR/GBP
- Risk per trade: €100
- Stop loss: 30 pips
- Assumed price: EUR/GBP = 0.8600
- Lot type: standard (100,000)
Step 1, pip value in quote currency (GBP)
- For EUR/GBP, 1 pip = 0.0001 GBP.
- Pip value (GBP) per 1.00 lot = 100,000 × 0.0001 = 10 GBP per pip
Step 2, convert GBP pip value to EUR
- You need a GBP to EUR rate. You can derive it from EUR/GBP.
- GBP/EUR = 1 ÷ 0.8600 = 1.1628
- Pip value (EUR) = 10 GBP × 1.1628 = €11.63 per pip
Step 3, risk per 1.00 lot
- Risk = 30 pips × €11.63 = €348.90
Step 4, position size
- Lots = €100 ÷ €348.90 = 0.29 lots (rounded)
Result
- You trade about 0.29 lots (29,000 units).
- This is the common trap. Your account currency drives the final conversion.
Example 4: Tight stop vs wide stop, how the lot size adjusts automatically
Same market, same risk, different stop
- Pair: EUR/USD
- Account: USD
- Risk: $100
- Pip value per 1.00 lot: $10 per pip
| Stop loss | Risk per 1.00 lot | Position size |
|---|---|---|
| 10 pips | $10 × 10 = $100 | $100 ÷ $100 = 1.00 lot |
| 25 pips | $10 × 25 = $250 | $100 ÷ $250 = 0.40 lots |
| 50 pips | $10 × 50 = $500 | $100 ÷ $500 = 0.20 lots |
What you should take from this
- You do not “feel” your way into a lot size. The stop sets it.
- Your risk stays fixed. Your exposure changes.
- Spread and slippage increase real risk when stops are tight. Read what spread is in forex if you size close to the market.
Example 5: Scaling in (multiple entries) while keeping total risk fixed
Goal
- You want 3 entries, but you want total max loss to stay at $150.
Setup
- Pair: EUR/USD
- Account: USD
- Total risk budget: $150
- Planned entries: 3
- Pip value per 1.00 lot: $10 per pip
Plan the risk per entry
- Risk per entry = $150 ÷ 3 = $50
| Entry | Stop loss | Risk budget | Risk per 1.00 lot | Position size |
|---|---|---|---|---|
| 1 | 30 pips | $50 | 30 × $10 = $300 | $50 ÷ $300 = 0.17 lots |
| 2 | 20 pips | $50 | 20 × $10 = $200 | $50 ÷ $200 = 0.25 lots |
| 3 | 15 pips | $50 | 15 × $10 = $150 | $50 ÷ $150 = 0.33 lots |
Rules you must follow
- If you open entry 1 and price moves against you, your remaining risk shrinks. Recalculate before adding.
- If your stops sit at the same level, you can size each entry off the same stop distance. If stops differ, size each entry separately.
- Your platform rounds lots. Always round down to stay under budget.
Position Sizing Using Risk-to-Reward and Strategy Context
How win rate and R-multiple distribution influence your risk percent
Your position size formula stays the same. Your risk percent changes based on your edge.
Two stats matter.
- Win rate, the percent of trades that hit your target.
- R-multiple distribution, how big your winners and losers are in units of 1R.
If your average win is large relative to your loss, you can run a lower win rate and still grow. If your winners are small, you need a higher win rate, and you must keep risk tight.
| Strategy profile | Typical R outcome | What it means for risk % |
|---|---|---|
| High win rate, small wins | Many +0.5R to +1R wins, steady -1R losses | Use smaller risk per trade. A few losses can erase many wins. |
| Lower win rate, big wins | Many -1R losses, fewer +2R to +5R wins | You can risk slightly more, but only if your drawdowns stay controlled. |
| Mixed results, unstable payouts | Wide spread of outcomes, frequent slippage, partial exits | Cut risk until your results stabilize. Your sizing inputs are less reliable. |
Keep your risk percent tied to your tested drawdown, not your confidence. If your backtest or journal shows long loss streaks, size for the streak, not the average.
Fixed fractional vs fixed dollar risk, when each fits
Fixed fractional means you risk a fixed percent of your account each trade. Fixed dollar means you risk a fixed cash amount each trade.
- Fixed fractional pros, it scales automatically as your balance changes, it limits risk after losses, it compounds after wins.
- Fixed fractional cons, your dollar risk drops during drawdowns, it can feel slow to recover, rounding can reduce size on small accounts.
- Fixed dollar pros, stable dollar swings, simple budgeting, easier to compare trade performance in cash terms.
- Fixed dollar cons, risk grows as a percent after losses, it can push you into oversized risk during drawdowns, it does not self-correct.
Use fixed fractional when you trade a systematic plan and you want risk to adapt to equity. Use fixed dollar when you must control cash swings, or when you trade a small number of high conviction setups and you accept that percent risk will vary.
If you use leverage, remember it changes your exposure, not your stop-based risk. Your stop distance still controls the loss, if you respect it. See how leverage works in forex if you need the mechanics.
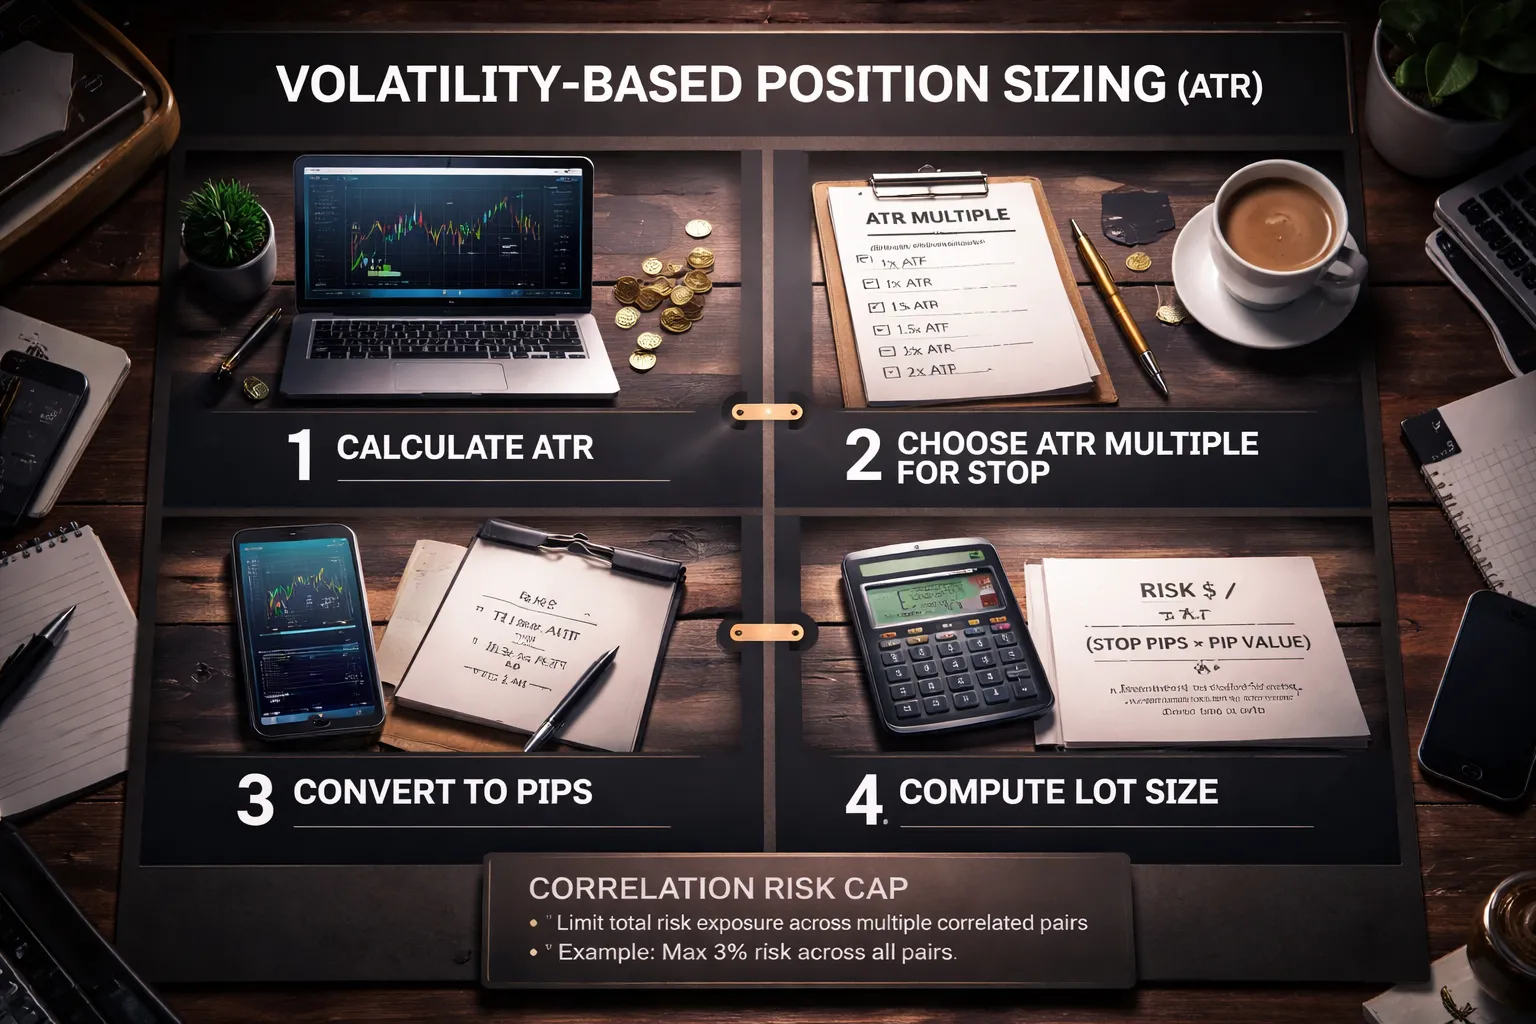
Volatility-based sizing with ATR stops, a practical workflow
Static stops break when volatility shifts. ATR-based stops adapt.
Use this workflow.
- Step 1, pick your ATR settings, common is 14-period ATR on your trading timeframe.
- Step 2, choose your stop multiple, examples are 1.5x ATR for tighter systems, 2x to 3x ATR for swing trades.
- Step 3, convert ATR to pips for your stop distance.
- Step 4, use the same position sizing formula, risk in dollars divided by stop pips times pip value.
- Step 5, recheck after entry if volatility expands, your planned stop may no longer match current conditions.
Example. Your account is $10,000. You risk 1%, so $100. ATR(14) is 12 pips. You use a 2.5x ATR stop, so 30 pips. On EUR/USD, 1.00 lot is about $10 per pip.
- Stop distance, 30 pips
- Risk per 1.00 lot, 30 × $10 = $300
- Position size, $100 ÷ $300 = 0.33 lots
ATR stops change your stop distance. They change your lot size. They keep your risk constant when the market speeds up.
Correlation awareness, size across multiple pairs without stacking risk
Pairs move together. If you size each trade at 1% and they correlate, you can end up risking 2% to 4% on the same idea.
Handle it with a portfolio risk cap.
- Step 1, group trades by exposure. Long EUR/USD and short USD/CHF often reflect similar USD risk. AUD/USD and NZD/USD often move together.
- Step 2, set a combined risk limit per group, example 1% total across all USD-long trades.
- Step 3, split risk across positions, example two correlated trades at 0.5% each instead of 1% each.
- Step 4, reduce size further if you share the same invalidation level, because one move can hit multiple stops fast.
Use the same recalculation rules from scaling in. When one position moves against you, your remaining risk budget shrinks. Adjust before you add or open the next correlated trade.
Practical Position Sizing Workflow (Checklist You Can Reuse)
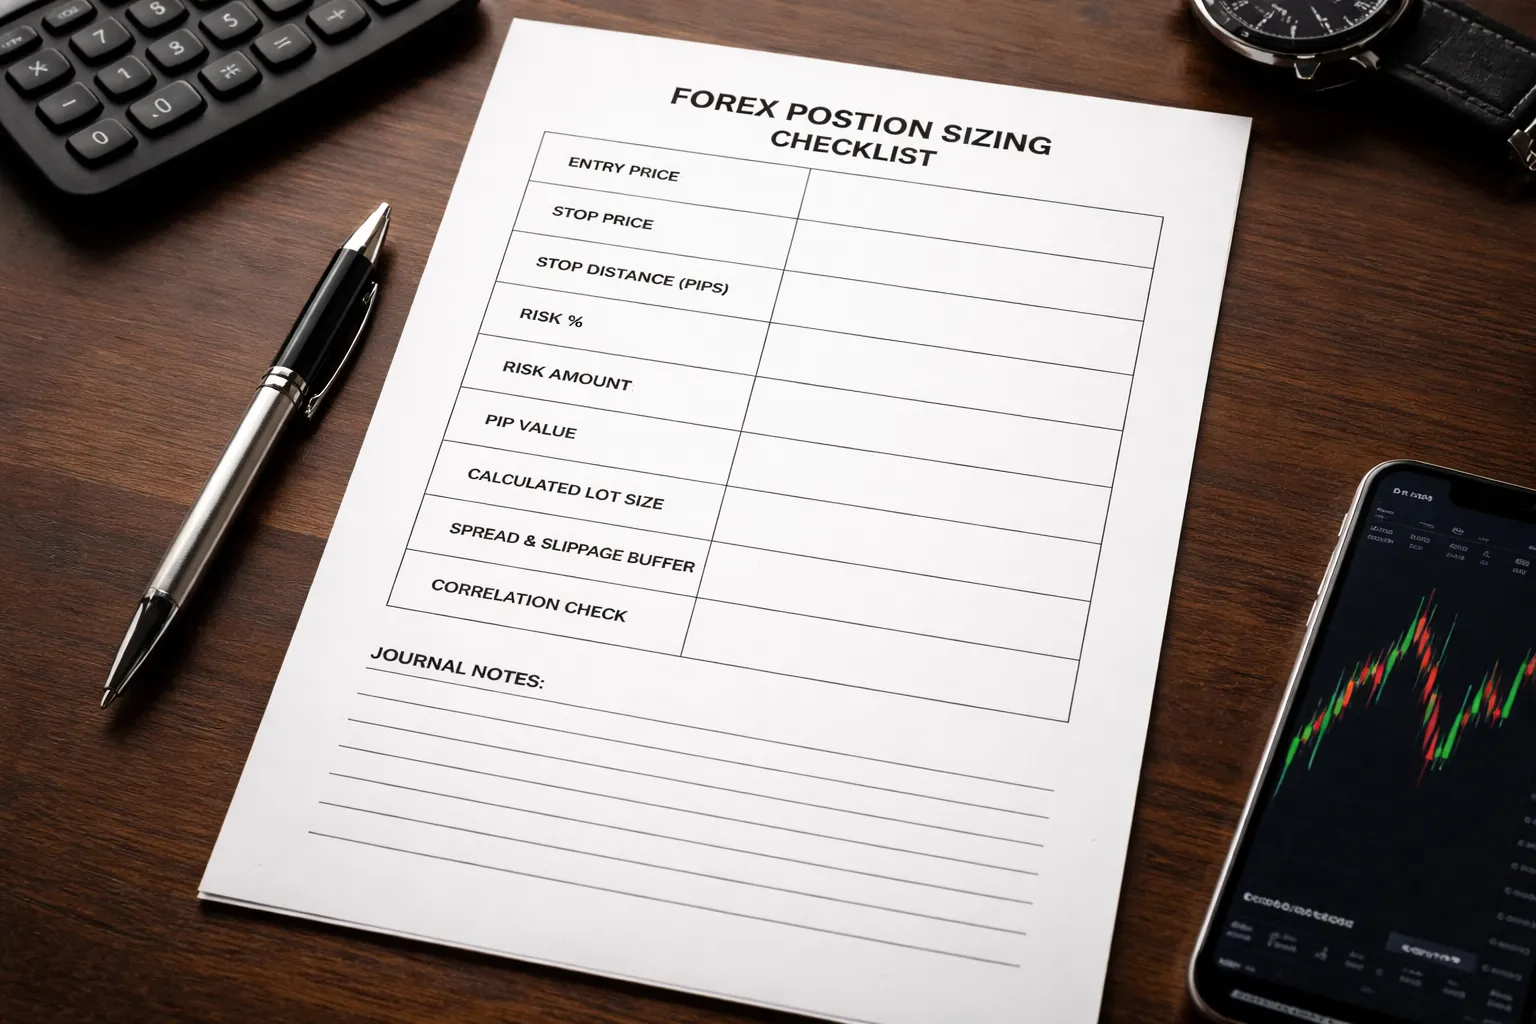
Pre-trade checklist (entry, stop, risk, lot size, invalidation)
- Define the setup. Write the pair, direction, and timeframe.
- Set your entry. Use the exact price. If you plan a limit order, record the limit price, not the current quote.
- Set your stop. Use a hard price level. No “mental stops.”
- State invalidation. Write why the stop is valid. Example, “Close below prior swing low.” If invalidation changes, the trade changes.
- Measure stop distance. Calculate stop size in pips or points from planned entry to stop.
- Choose risk per trade. Use a fixed percent or fixed cash amount. Keep it constant unless you change the plan.
- Check correlation exposure. If trades move together, split risk across them. If they share the same invalidation level, cut size again.
- Calculate pip value for your position. Confirm pip value per 1 lot for the pair in your account currency.
- Compute lot size. Lot size = (risk in account currency) / (stop distance in pips × pip value per 1 lot).
- Validate margin and leverage. Make sure free margin stays healthy after entry. Use your leverage plan, not the maximum allowed. See forex leverage explained.
- Round to tradable size. Respect your broker step size. Example, 0.01 lot increments.
- Recheck your numbers. If you change entry or stop, recalc. Do not “eyeball” the adjustment.
How to handle spread, slippage, and news volatility in sizing
- Spread at entry. Market orders fill at the ask for buys and the bid for sells. Your true entry includes the spread. If your stop distance is tight, spread can change the real risk. Use a limit order when you need exact pricing.
- Stop execution and slippage. Stops can fill worse than the stop price in fast moves. Add a slippage buffer to your stop distance when liquidity is thin. Common cases are session opens, rollovers, and risk events.
- News rules. If you trade during scheduled high impact news, assume wider spreads and more slippage. Either reduce risk, widen the stop and reduce size, or skip the trade.
- Volatility gap risk. Weekend gaps and sudden spikes can break fixed risk assumptions. If you hold through these windows, treat it as higher than planned risk and size down.
- Recalculate when scaling in. If price moves against your open position, your remaining risk budget shrinks. Adjust position size before you add. Do not stack correlated exposure without updating total risk.
Adjusting for different account types (standard vs cent vs prop evaluation)
- Standard accounts. Your balance and P and L are in full currency units. Use your normal percent risk. Confirm pip value and contract size for each symbol.
- Cent accounts. Your balance shows cents. A “10,000” balance can mean $100. Convert to real currency before you set risk. Then run the same formula. Do not risk a percent of the displayed number without conversion.
- Prop evaluation accounts. Size for the rules, not your ego. Map your risk per trade to the daily loss limit and max drawdown. If the daily limit is tight, your per trade risk must be smaller. Track floating drawdown. Open risk counts even before a stop hits.
- Symbol differences. Some prop feeds use different contract sizes, minimum lots, or tick values. Verify pip value inside the platform for that broker, then lock it into your worksheet.
Document the calculation in your journal for consistency
- Record inputs. Pair, direction, entry, stop, stop distance, account balance, risk percent, risk amount, pip value, lot size.
- Record exposure context. Note other open positions that correlate, and your total open risk after the new trade.
- Record execution. Planned entry vs filled entry, planned stop vs actual stop placement, and any slippage.
- Record changes. If you move the stop, scale in, or add a correlated trade, log the recalculation and the new total risk.
- Audit weekly. Compare planned risk vs realized loss on stopped trades. If slippage and spread keep pushing losses above plan, cut size or add a buffer.
Tools and Shortcuts: Calculators, MetaTrader, and Broker Tickets
When a position size calculator is reliable, and when it fails
A position size calculator works when its inputs match your broker’s symbol settings. That means the calculator uses the right contract size, lot step, pip size, and quote currency conversion.
Use a calculator for fast drafts. Validate it with a one-time spot check inside your platform.
Calculators fail most often on these instruments and setups:
- JPY pairs. Pip size is usually 0.01, not 0.0001.
- Gold, silver, indices, oil, crypto. “Pip” conventions vary. Contract size and tick size drive P&L.
- Cross pairs. Your account currency differs from the quote currency, so pip value needs conversion.
- Cent and micro accounts. Equity and pip value scale differently.
- Variable spread and slippage. Your fill price changes the real stop distance and the real risk.
How to calculate lot size inside MT4 and MT5, and what to verify
MetaTrader can confirm your assumptions fast. You just need the symbol specs and a pip value check.
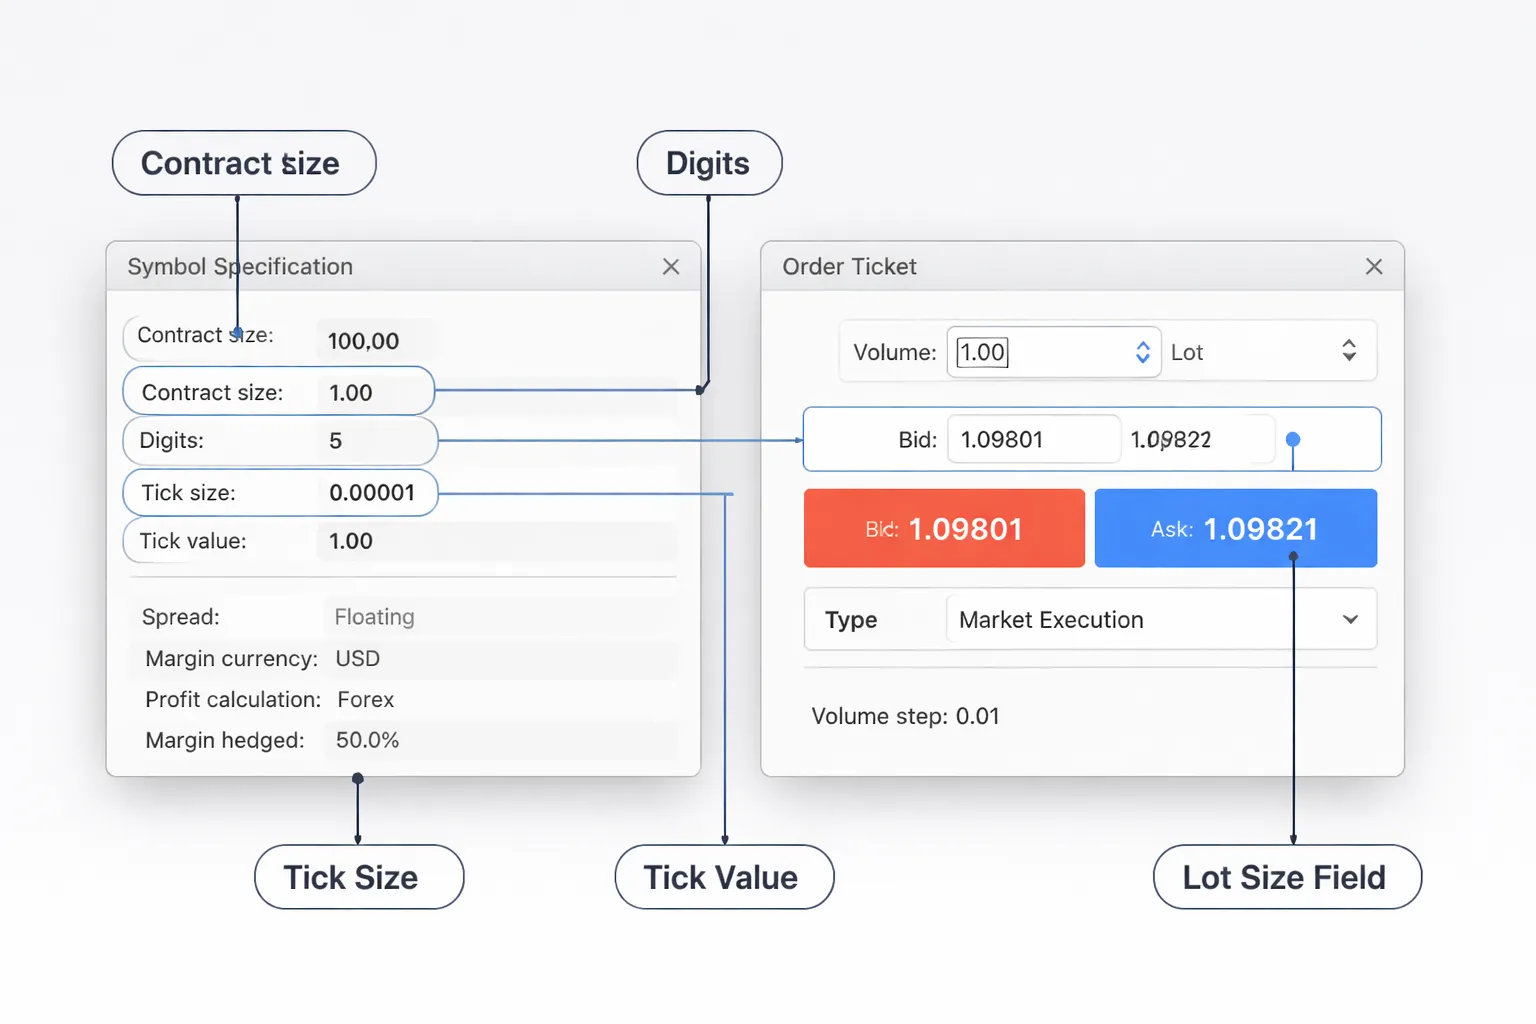
- Step 1, pull the symbol settings. In Market Watch, right-click the symbol, open Specification. Note contract size, digits, tick size, tick value, and volume step.
- Step 2, convert your stop to points. On a 5-digit EURUSD feed, 1 pip equals 10 points. On a 3-digit USDJPY feed, 1 pip equals 10 points.
- Step 3, estimate pip value per lot. Use the tick value from Specification. If tick size equals 1 point, then tick value equals value per point for 1 lot.
- Step 4, compute size. Lot size = (cash risk) / (stop distance in points × value per point per 1 lot).
- Step 5, sanity check on the ticket. Open a new order window and change volume. Confirm margin impact and that the platform accepts the lot step.
What to verify every time you switch symbols or brokers:
- Contract size. Forex is often 100,000 per standard lot, metals and indices often differ.
- Digits and point to pip mapping. Your stop in pips must match the platform’s points.
- Tick value currency. Some brokers show tick value already converted to your account currency, some do not.
- Min lot and lot step. Rounding can push risk above plan if you round up.
If you trade CFDs or metals, do not force pip-based assumptions. Use tick size and tick value from Specification, then size from cash risk.
Using TradingView, Excel, and Google Sheets templates for repeatability
You want a repeatable workflow. Templates reduce errors and make reviews easier.
- TradingView. Use the measuring tool to read the stop distance in price. Convert that to pips or points based on the symbol. Then plug the distance into your sheet or calculator.
- Excel or Google Sheets. Build a one-page position sizing sheet with locked cells and dropdowns for symbol type. Store contract size, pip size, and lot step per broker.
- Pre-trade checklist row. Pair, entry, stop, stop distance, cash risk, pip or point value, calculated lots, rounded lots, expected loss at stop.
Your sheet should output two numbers, the exact lot size, and the rounded lot size that matches your broker’s step. Log both.
Keep a separate tab for symbol specs. Update it if you change broker, account type, or platform feed.
Common calculator mistakes: contract size assumptions and symbol settings
- Wrong contract size. Many tools assume 100,000 units per lot. Gold and indices often use different contract sizes. Your result can be off by 10x or 100x.
- Wrong pip size. JPY pairs and many CFDs do not use the same pip definition. One digit mismatch changes stop distance and risk.
- Ignoring account currency conversion. On cross pairs, pip value is not constant in your account currency. It changes with price.
- Using ATR or “average stop” without recalculating. You must size from your actual stop distance, not a typical one.
- Rounding up lots. Round down to keep risk at or under plan. Rounding up breaks your limit.
- Confusing leverage and risk. Leverage changes margin, your stop distance and position size set your loss. Review your leverage settings if margin pressure forces bad sizing.
If you need a refresher on lot conventions, use this guide on lot size in forex.
Common Mistakes and Risk Warnings (Avoid These Traps)
Sizing From Margin Available Instead of Stop Loss Risk
Margin tells you what you can open. It does not tell you what you can lose.
If you size off “free margin,” you tie risk to leverage and broker settings. Your loss still comes from your stop distance and pip value.
- Size from risk first. Set your risk per trade in dollars.
- Use your planned stop loss distance in pips. Use the real distance, not a default.
- Check margin after. If margin is tight, reduce size or skip the trade.
- Do not “fix” a margin problem by moving your stop closer. That changes your system.
Ignoring Currency Conversion and Getting Pip Value Wrong
Pip value depends on the pair, the lot size, and your account currency. If you get it wrong, your risk math breaks.
- Account currency matches quote currency, pip value stays simple. Example: USD account trading EUR/USD.
- Account currency does not match quote currency, you need conversion. Example: EUR account trading USD/JPY.
- JPY pairs use different pip size. Most brokers treat 0.01 as 1 pip for JPY pairs.
- Do not assume “$10 per pip” for a standard lot on every pair.
Recheck pip definitions if you feel unsure. Use this guide on what pips are in forex.
Not Accounting for Stop Distance Changes After Placing the Trade
Your position size is only correct for your stop at entry. If the stop changes, your risk changes.
- If you widen the stop, you increase risk. You must cut size to keep risk constant.
- If you tighten the stop, you reduce risk. That can be fine, but it changes expectancy and stop-out rate.
- If slippage hits your stop, your real loss can exceed plan. Expect this in fast markets and around news.
- If spreads widen, your stop can trigger earlier. Your backtest stops may not match live trading.
| Change | What happens to risk | What you should do |
|---|---|---|
| Stop widened after entry | Risk increases | Reduce size or exit |
| Stop tightened after entry | Risk decreases | Accept or replan the trade |
| High volatility, slippage | Risk can exceed plan | Lower risk per trade, avoid illiquid times |
Over-Risking During Drawdowns and Martingale-Style Sizing
Drawdowns pressure your decision making. Many traders respond by increasing risk. That can end the account.
- Avoid doubling size after losses. That is martingale. It assumes recovery before failure.
- Do not “win back” a week in one trade. One trade can gap through your stop.
- Use a drawdown rule. Example: reduce risk per trade after a set equity drop.
- Track risk of ruin. If your edge is small, big position sizes erase it.
Risk warning: a string of losses is normal. If your sizing cannot survive a normal losing streak, it is too large.
Psychological Comfort vs Statistical Robustness (Finding a Sustainable Risk)
Risk must fit your system and your behavior. If either breaks, your plan fails.
- If risk feels too large, you will move stops, take profits early, or skip valid setups.
- If risk is too small, you may overtrade to “make it worth it.” That adds fees and errors.
- Pick a fixed risk per trade that you can follow across 50 to 100 trades.
- Keep it stable. Frequent changes make results hard to measure.
Risk warning: forex trading can produce losses larger than expected due to volatility, gaps, slippage, and execution delays. Use hard stops where possible, and keep risk per trade small enough to survive worst-case fills.
FAQ
What is position size in forex?
Your position size is how many units, lots, or contracts you trade. It sets your pip value and your dollar risk. You control it with lot size. You do not control it with leverage, leverage only changes required margin.
What is the position sizing formula?
Position size (units) = Account risk ($) divided by (Stop distance in pips times Pip value per 1 unit). First set risk per trade. Then set stop size. Convert to units or lots using the pair’s pip value.
How do I calculate position size with a $10,000 account?
Pick a fixed risk, like 1%. Account risk = $100. If your stop is 50 pips and pip value is $0.10 per micro lot pip, you trade 2 micro lots. Keep risk fixed, adjust size each trade.
How do I calculate pip value for position sizing?
If USD is the quote currency, pip value per standard lot is about $10 per pip. For other pairs, convert the quote currency pip value into your account currency using the current rate. Your broker contract specs override rules of thumb.
Does leverage change my risk per trade?
No. Your stop loss and position size set your risk. Leverage changes margin, not the loss at your stop. High leverage can still cause margin calls if price moves fast or spreads widen.
What if I trade a pair where USD is not the quote currency?
You must convert pip value into your account currency. Example, if pip value is in JPY, divide by USDJPY to get USD. If your account is in EUR, convert using EURUSD or your broker’s conversion rate.
How do I size positions for gold, indices, or oil?
Use the same risk formula, but use the instrument’s tick size, tick value, and contract size. Do not assume “pip” rules. Check your platform specs. Many brokers price metals and CFDs with different point values.
What stop loss should I use for position sizing?
Use a stop based on your setup and market structure. Then size your position to fit your fixed dollar risk. Do not move the stop just to trade bigger. That breaks your plan and increases variance.
Should I change risk per trade after a losing streak?
Keep risk stable across a large sample. If you must change it, do it by a rule, not by emotion. Cut risk in steps, like 1% to 0.5%, and keep it there for the next 50 trades.
How do spreads and slippage affect position sizing?
They increase real loss versus your spreadsheet. Add a buffer to stop distance or reduce size. Fast markets can skip your stop price. Read what slippage is if you trade news or thin sessions.
Why did my loss exceed my planned risk?
Gaps, slippage, stop execution delays, and spread spikes can increase fills beyond your stop. That risk rises around news and illiquid periods. Use hard stops, avoid oversized positions, and keep risk small enough to survive worst-case fills.
Conclusion
Conclusion
Position sizing turns risk into a number you can control. You set a fixed risk per trade, place a stop based on your setup, then calculate the lot size that matches both.
Use the same process every time. Recalculate when your stop distance changes, your account balance changes, or you trade a new pair with a different pip value. If you skip this step, you will drift into random risk.
Keep your risk small enough to survive bad fills. Spreads, slippage, and gaps can push losses past your plan, especially around news and thin sessions. Know your trading costs and check what spread is in forex before you size up.
- Lock one risk rule. Pick a fixed percent or dollar risk per trade and do not change it on impulse.
- Size from the stop. Wider stop means smaller size, tighter stop means larger size.
- Use live numbers. Use current spread, pip value, and margin, not assumptions.
- Round down. If your broker lot step forces rounding, round your size down to keep risk under your cap.
Final tip, build a one-line calculator in your notes or platform and use it before you click buy or sell. Make it a checklist item, not a choice.
-
Forex Leverage Explained: How It Works, Pros, Cons & Examples
1 month ago -
Forex Market Hours & Trading Sessions Explained (Best Times to Trade)
1 month ago -
What Is a Lot Size in Forex? Lot Types + Quick Examples
1 month ago -
What Are Pips in Forex? Definition, Examples & Why They Matter
1 month ago -
How Does the Forex Market Work? (Participants, Pricing & Execution)
1 month ago
-
-
- Example 1: EUR/USD with a USD account (simple pip value case)
- Example 2: GBP/JPY with a USD account (JPY pip + currency conversion)
- Example 3: EUR/GBP with a EUR account (base/quote mismatch case)
- Example 4: Tight stop vs wide stop, how the lot size adjusts automatically
- Example 5: Scaling in (multiple entries) while keeping total risk fixed
-
- Sizing From Margin Available Instead of Stop Loss Risk
- Ignoring Currency Conversion and Getting Pip Value Wrong
- Not Accounting for Stop Distance Changes After Placing the Trade
- Over-Risking During Drawdowns and Martingale-Style Sizing
- Psychological Comfort vs Statistical Robustness (Finding a Sustainable Risk)
-
- What is position size in forex?
- What is the position sizing formula?
- How do I calculate position size with a $10,000 account?
- How do I calculate pip value for position sizing?
- Does leverage change my risk per trade?
- What if I trade a pair where USD is not the quote currency?
- How do I size positions for gold, indices, or oil?
- What stop loss should I use for position sizing?
- Should I change risk per trade after a losing streak?
- How do spreads and slippage affect position sizing?
- Why did my loss exceed my planned risk?
-
-
- Example 1: EUR/USD with a USD account (simple pip value case)
- Example 2: GBP/JPY with a USD account (JPY pip + currency conversion)
- Example 3: EUR/GBP with a EUR account (base/quote mismatch case)
- Example 4: Tight stop vs wide stop, how the lot size adjusts automatically
- Example 5: Scaling in (multiple entries) while keeping total risk fixed
-
- Sizing From Margin Available Instead of Stop Loss Risk
- Ignoring Currency Conversion and Getting Pip Value Wrong
- Not Accounting for Stop Distance Changes After Placing the Trade
- Over-Risking During Drawdowns and Martingale-Style Sizing
- Psychological Comfort vs Statistical Robustness (Finding a Sustainable Risk)
-
- What is position size in forex?
- What is the position sizing formula?
- How do I calculate position size with a $10,000 account?
- How do I calculate pip value for position sizing?
- Does leverage change my risk per trade?
- What if I trade a pair where USD is not the quote currency?
- How do I size positions for gold, indices, or oil?
- What stop loss should I use for position sizing?
- Should I change risk per trade after a losing streak?
- How do spreads and slippage affect position sizing?
- Why did my loss exceed my planned risk?
-
Forex Lot Size Calculator: How to Use It to Size Trades Correctly
1 month ago -
Forex Leverage Explained: How It Works, Pros, Cons & Examples
1 month ago -
Margin vs Leverage in Forex: What’s the Difference?
1 month ago -
What Is Forex Trading? A Beginner’s Guide to How It Works
1 month ago -
How Does the Forex Market Work? (Participants, Pricing & Execution)
1 month ago
-
Forex Leverage Explained: How It Works, Pros, Cons & Examples
1 month ago -
Forex Market Hours & Trading Sessions Explained (Best Times to Trade)
1 month ago -
Is Forex Trading Legal in the United States? Rules, Regulators & What to Know
1 month ago -
What Is a Lot Size in Forex? Lot Types + Quick Examples
1 month ago -
Forex Trading Platforms Comparison: MetaTrader vs cTrader vs TradingView
1 month ago