How to Open a Forex Trading Account (Step-by-Step for Beginners)
Opening a forex trading account is a basic setup task. It decides what markets you can access, what you pay in spreads or commissions, and how fast you can place your first trade.
This guide walks you through the process from start to finish. You will learn how to pick a regulated broker, choose an account type, submit your ID, pass verification, fund your account, and set up your trading platform. You will also learn what details to check before you deposit, including leverage limits, minimum deposit, and fee structure.
If you want to compare pricing models first, read our spread vs commission breakdown.
Key Takeaways
Key Takeaways
- In het kort: Pick a regulated broker and confirm the license in the official register.
- In het kort: Choose your account type based on pricing and execution, standard or raw spread plus commission.
- In het kort: Submit your ID and proof of address, then finish KYC verification before you deposit.
- In het kort: Check leverage limits, minimum deposit, and all fees, spread, commission, swaps, and withdrawal costs.
- In het kort: Fund your account using a method you can withdraw to, then set up MT4, MT5, or the broker platform.
- In het kort: Start with small position sizes and use risk controls, stop-loss, margin level, and negative balance protection.
Open the account in this order, broker, account type, verification, funding, platform setup. Do not deposit until you confirm regulation, total costs, and leverage rules.
For a quick cost checklist, read our forex broker fees breakdown.
What a Forex Trading Account Is (and What You’ll Need Before Opening One)
What a Forex Trading Account Is
A forex trading account is your brokerage account for buying and selling currency pairs. It holds your cash balance, your open positions, and your profit or loss.
It also sets your trading rules. Your base currency, your leverage, and your margin requirements depend on the account settings and the broker.
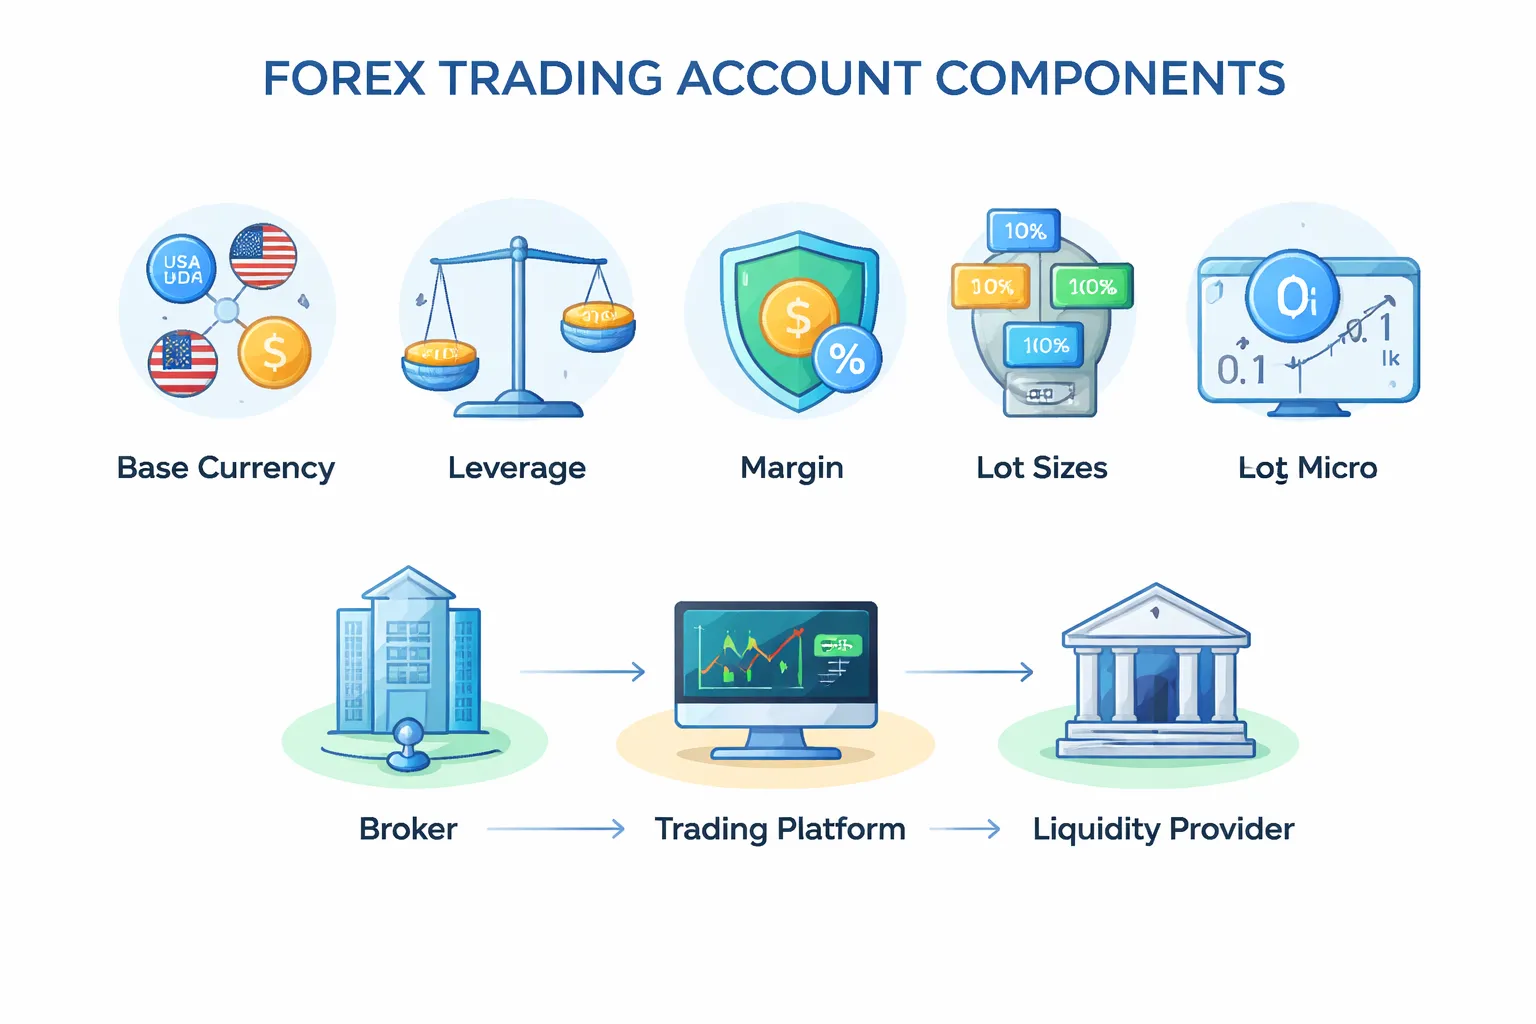
Forex Account Basics You Must Understand
- Base currency: The currency your account uses for balances, fees, and reporting. Common options are USD, EUR, and GBP. Pick one that matches your income and bank account to reduce conversion costs.
- Leverage: Borrowed buying power. With 30:1 leverage, a 1,000 account can control up to 30,000 of position value. Higher leverage increases both gains and losses, and can trigger faster margin calls.
- Margin: The amount your broker locks as collateral when you open a trade. Example: with 30:1 leverage, margin is about 3.33% of position value. If your equity falls too far, the broker can close positions.
- Lot size: The trade size unit. Standard lot is 100,000 units. Mini lot is 10,000. Micro lot is 1,000. Many brokers also support smaller units, often called fractional lots. Smaller lots let you control risk.
| Lot type | Units | What it means for you |
|---|---|---|
| Standard | 100,000 | Large position size, higher P and L swings |
| Mini | 10,000 | Mid size, common for small accounts |
| Micro | 1,000 | Lower risk sizing, best for learning live markets |
Broker vs Trading Platform vs Liquidity Provider
- Broker: Opens your account, holds your funds, sets margin and leverage limits, and routes your orders. The broker also sets key costs like spreads, commissions, swaps, and withdrawal fees.
- Trading platform: The software you use to place trades and manage risk. Examples include MT4, MT5, and proprietary web platforms. The platform shows prices, charts, and order tickets, but it is not the party holding your money.
- Liquidity provider: Banks and market makers that quote buy and sell prices. Some brokers connect you to external liquidity, others internalize more flow. This affects execution, slippage, and how spreads behave in volatile markets. For deeper detail, read our ECN vs STP vs Market Maker broker breakdown.
What You Need Before You Open an Account
- Government ID: Passport or national ID card. Some brokers accept a driver’s license.
- Proof of address: Utility bill, bank statement, or official letter. Many brokers require it to be recent.
- Tax details: Tax ID and tax residency declaration. Requirements vary by country.
- Funding method in your name: Bank transfer, card, or e-wallet. Name matching matters for compliance and withdrawals.
- A clear plan for account currency: Choose the base currency before you deposit, switching later can cost money.
Minimum Deposit Reality
Many brokers advertise low minimum deposits, sometimes 10 to 100. That does not mean you can trade safely with that amount.
Your real minimum depends on the lot sizes available, the margin needed at your leverage, and how wide your stop-loss must be for your strategy. A small deposit can force you into oversizing, which increases the odds of a fast margin stop-out.
Before you fund, confirm you can trade micro lots or smaller, and that you can place stop-loss orders without using most of your free margin.
Safety Essentials Before You Deposit
- Regulation: Use a broker regulated in a credible jurisdiction. Check the license number on the regulator’s website, not only on the broker site.
- Segregated client funds: The broker should keep client money separate from company operating funds. This lowers risk if the broker runs into financial trouble.
- Negative balance protection: This caps your loss at your account balance during extreme moves. Without it, a gap can put you in debt.
Confirm these protections, then fund your account. Treat leverage limits and total trading costs as part of your risk plan, not as fine print.
Step 1: Decide Your Trading Goals and Constraints
How much you can deposit (and what to do if it’s small)
Set a deposit amount you can lose without touching rent, debt payments, or an emergency fund.
If your deposit is small, trade smaller size. Keep your risk per trade fixed, not your lot size.
- Start with a micro account if possible. It lets you trade micro lots and keep position size tight.
- Avoid bonuses with volume conditions. They can push you into overtrading.
- Plan for trading costs. Spreads, commissions, and overnight swaps can matter more when your balance is small. Use a simple cost check before you fund the account.
Learn how spreads, commissions, and swaps work.
Risk tolerance and leverage, choosing a safe starting point
Define your maximum loss before you place a trade.
- Risk per trade: 0.25 to 1 percent of your account balance.
- Daily loss limit: 1 to 3 percent, then stop for the day.
- Weekly loss limit: 3 to 6 percent, then pause and review.
Start with low leverage even if your broker offers more. High leverage does not create edge, it magnifies mistakes.
Effective leverage means your total position value divided by your account equity. Keep it low until your results prove consistency.
Time available per day, select a trading style
Match your style to your schedule. Do not force frequent trading if you cannot monitor risk.
- Scalping: 1 to 3+ hours focused screen time, fast execution, tight spreads, strict discipline.
- Day trading: 30 to 120 minutes plus time around key sessions, you close positions the same day.
- Swing trading: 10 to 30 minutes most days, you hold for days to weeks, you must accept overnight risk and swaps.
If you work a full time job, swing trading usually fits better. It reduces decision volume and stress.
Markets you want to trade
Pick a small list. Fewer markets make it easier to learn behavior and control risk.
- Major FX pairs: EUR/USD, GBP/USD, USD/JPY, USD/CHF, AUD/USD, USD/CAD, NZD/USD. Often the tightest spreads and best liquidity.
- Minor FX pairs: EUR/GBP, EUR/JPY, GBP/JPY. Spreads can widen more than majors.
- Exotic FX pairs: USD/TRY, USD/ZAR, USD/MXN. Higher spreads, higher gap risk, sharper moves. Avoid at the start.
- Gold: XAU/USD. Can move fast, needs wider stops and smaller size.
- Indices CFDs: US30, US500, NAS100, DAX. Strong session moves, higher margin needs, frequent gaps around news.
Start with one or two major pairs. Add other markets only after you can size positions correctly and follow your loss limits.
Tooling needs, basic charts vs advanced features
Decide what you need before you choose an account type and platform.
- Basic setup: clean charts, market and limit orders, stop loss and take profit, alerts, mobile app.
- Advanced setup: one click trading, depth of market, custom indicators, backtesting, multi time frame layouts.
- EAs and automation: MetaTrader EAs or similar. You need stable execution, low slippage, and clear rules for downtime.
- APIs: for coding your own system. You need documentation, rate limits, and reliable market data.
- Copy trading: you still need risk limits, max drawdown rules, and control over position sizing.
If you are new, start with basic charts and strict risk controls. Add advanced tools after you prove you can follow a plan.
Step 2: Choose a Broker You Can Trust
Verify Regulation First, Then Verify the Entity
Start with the broker’s legal entity, not the brand name. A single brand can run multiple entities with different licenses and protections.
- Find the license details on the broker site. Look for the regulator name, license number, and the exact legal entity name.
- Check the regulator register. Match the license number, entity name, and website domain.
- Confirm the domain. Clone scams copy a real firm’s name and license, then use a different URL, email domain, or phone number.
- Check status and permissions. The register should show “Authorised” and permission to deal in derivatives or FX.
Common regulators you will see:
- UK: FCA
- Australia: ASIC
- EU (often Cyprus): CySEC
- US: NFA and CFTC
- Others you may see: MAS (Singapore), IIROC or CIRO (Canada), FMA (New Zealand), FSCA (South Africa), DFSA (DIFC)
If the broker pushes you to an offshore entity “for higher leverage,” treat it as a different risk profile. You get different dispute options, different protections, and often weaker oversight. For deeper red flags and license basics, read regulated forex brokers explained.
Use a Simple Cost Framework, Then Compare Like for Like
Most beginners fixate on spreads. Your real cost is the full stack.
| Cost Type | What It Is | What To Check |
|---|---|---|
| Spread | The gap between bid and ask. | Average spread on your pairs during your trading hours, not “from 0.0”. |
| Commission | Fee per lot, common on ECN style accounts. | Commission per side or round turn, and the account currency used for the quote. |
| Swap, financing | Overnight interest for holding positions. | Swap rates by symbol, and if the broker publishes a clear swap table. |
| Non-trading fees | Costs not tied to trades. | Deposit and withdrawal fees, inactivity fees, currency conversion, bank wire charges. |
Compare two brokers using the same pair, same lot size, same session, and the same holding time. If you scalp, spreads and execution dominate. If you swing trade, swaps and stable pricing matter more.
Execution and Slippage, Know What You Are Signing Up For
Execution quality shows up when the market moves fast. You feel it as slippage, requotes, and “off quotes” errors.
- Market maker: The broker may internalize your trade. You often get fixed or wider spreads and smaller minimum deposits. Watch for requotes and rejected orders during volatility.
- STP or ECN style: The broker routes orders to liquidity providers. You often see tighter spreads plus commissions. You still get slippage, but requotes should be rare.
What to verify before you fund:
- Order types supported: market, limit, stop, stop-limit, trailing stop.
- How stop orders trigger: bid or ask, and whether stops can gap in fast markets.
- Execution policy: “market execution” versus “instant execution,” and when requotes occur.
- Data transparency: whether the broker publishes average spreads and execution stats.
Account Protections, Read the Margin Rules Like a Contract
Most blowups come from leverage and margin rules, not from a bad chart setup. You need hard numbers.
- Margin closeout rule: The broker can start closing positions when margin level falls below a set point. Check the exact percentage and whether it closes worst positions first.
- Stop-out level: The level where forced liquidation happens. A higher stop-out can close you earlier and lock losses faster.
- Negative balance protection: If available, it caps losses to your deposit. Confirm it applies to your entity and account type.
- Risk warnings and product restrictions: Some regions cap leverage and require standardized warnings. Treat that as a safety feature, not a downside.
Also check whether the broker offers guaranteed stops. Most do not. Plan for gaps.
Support and Reputation Signals, Focus on Withdrawals and Transparency
You learn what a broker is when you withdraw.
- Withdrawal terms: processing times, cut-off hours, and required documents. Look for clear rules on card refunds, bank wires, and third-party payments.
- Complaint patterns: repeated reports of delayed withdrawals, surprise fees, or forced account migration.
- Longevity: years in business, consistent entity history, and stable licensing.
- Transparency: published legal documents, clear fee tables, public physical address, and reachable support lines.
- Support quality: fast answers on margin rules, fees, and execution policy. Slow or vague replies are a signal.
Choose the broker that makes rules easy to find and easy to confirm. If you cannot verify the entity, costs, and margin protections in one sitting, move on.
Step 3: Pick the Right Account Type
Step 3: Pick the Right Account Type
Your broker can offer several account types. Each changes your costs, position size, and risk. Pick the one that matches how you will trade now, not what you might do later.
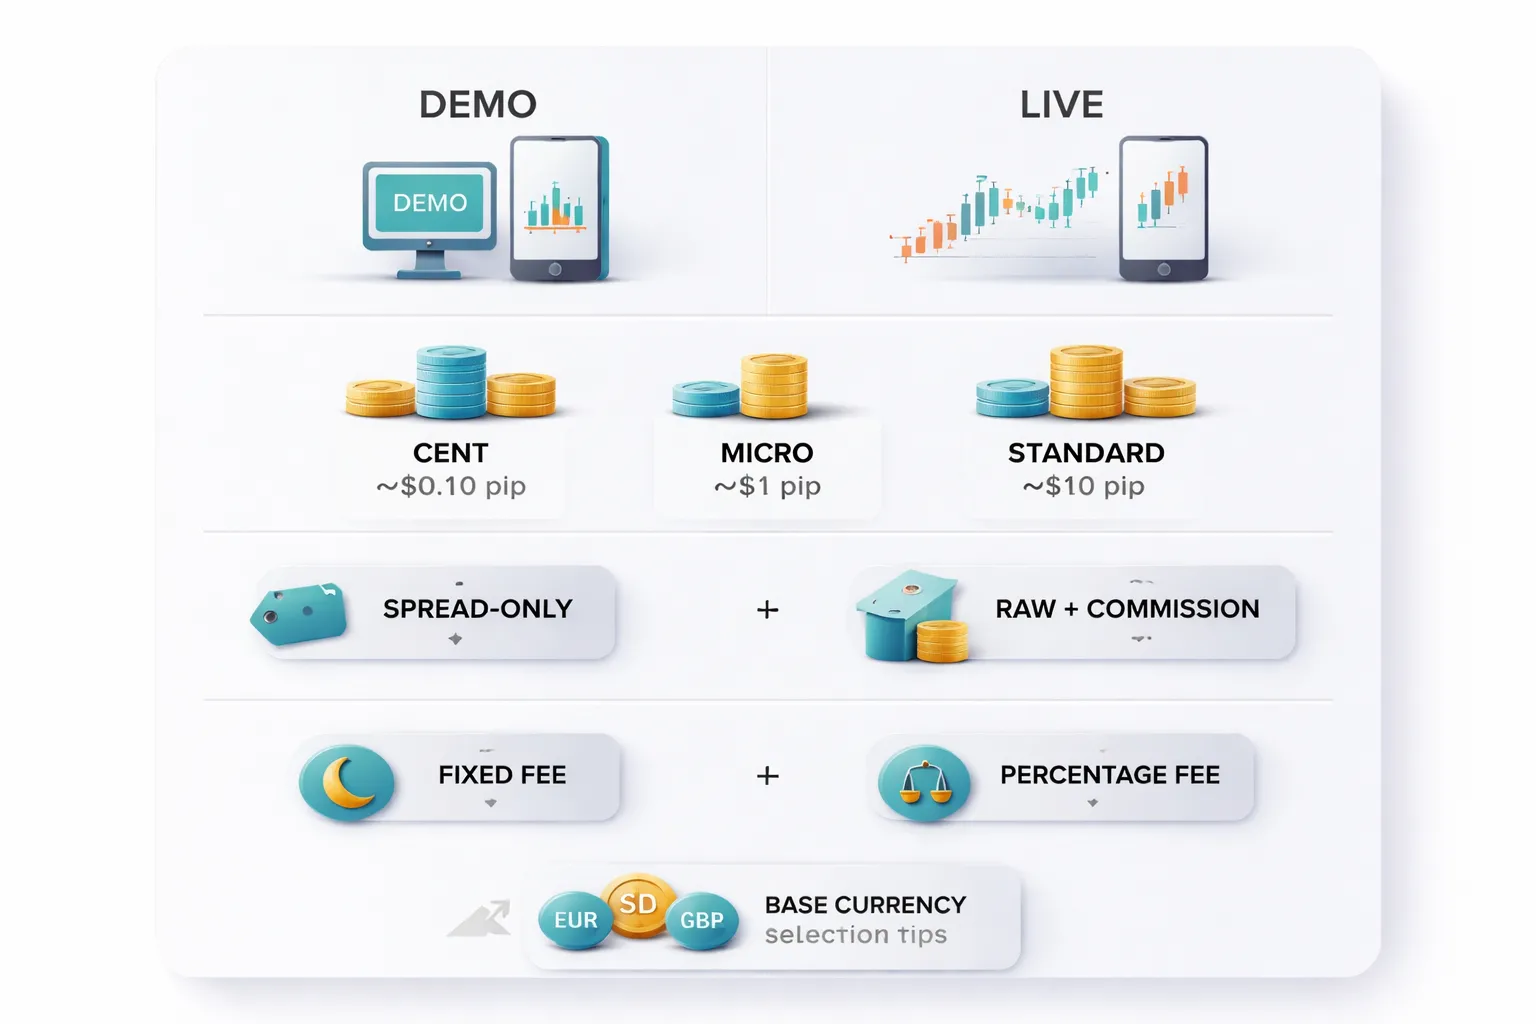
Demo vs live, when to switch and what demo can’t teach you
- Use a demo first to learn the platform, order types, chart tools, and margin math. Get to the point where you place, modify, and close trades without mistakes.
- Switch to live when you can follow a simple plan for at least 50 to 100 demo trades, and you understand how stop loss, take profit, and position size work.
- Start live small. Your first goal is execution practice with real money, not profit.
- Demo will not teach you real slippage, partial fills, variable spreads during news, and how you react when you can lose money.
- Demo prices can look cleaner than live during fast markets. Treat any demo result as a rough test, not proof.
Micro or cent vs standard accounts, align lot size with your bankroll
Account type sets your minimum trade size. That decides how much each pip is worth.
| Account type | Typical minimum trade | Approx pip value on EURUSD | Best use |
|---|---|---|---|
| Cent | 0.01 cent lot | Often around $0.001 per pip | Live practice with very low risk |
| Micro | 0.01 lot | About $0.10 per pip | Small accounts and tight risk limits |
| Standard | 0.10 to 1.00 lot | About $1 to $10 per pip | Larger accounts and stable sizing |
- Pick the smallest size that lets you control risk. If your stop loss is 30 pips and you want to risk $5, you need about $0.17 per pip. A micro account can do that. A standard-only account may force you to risk more than you want.
- Check lot size rules per symbol. Gold and indices often use different contract sizes and pip values than major FX pairs.
Spread-only vs raw spread plus commission, match pricing to your trade frequency
Your main trading cost is usually the spread or the spread plus commission. Compare both in total cost per trade. Use the same lot size and the same pair.
- Spread-only account bundles the broker’s charge into a wider spread. It can suit low trade frequency and longer holds because the cost stays simple.
- Raw spread plus commission uses tighter spreads with a fixed commission per lot. It often suits frequent trading because a small spread matters more when you enter and exit often.
Estimate cost like this, per round trip trade:
- Spread-only: spread in pips x pip value.
- Raw plus commission: spread in pips x pip value + commission to open + commission to close.
Example on 1.00 lot EURUSD, pip value about $10:
- 1.2 pip spread-only costs about $12 round trip.
- 0.2 pip raw costs about $2 in spread + commission. If commission is $3.50 per side, total is about $9 round trip.
If you want a deeper breakdown, see spread vs commission pricing.
Islamic swap-free accounts, eligibility and alternative fees to watch
- Ask the broker what you must provide. Some brokers require proof of faith. Some only require you to select swap-free status.
- Confirm how they replace swap. Many brokers use alternative charges such as a fixed nightly fee, a widened spread, or a holding fee after a set number of days.
- Check which symbols qualify. Some brokers offer swap-free on majors only. Others exclude metals, indices, or crypto.
- Read the time limits. A broker may allow swap-free for a few days, then apply a daily fee. Get the exact schedule in writing.
Base currency selection, cut conversion fees and reduce accounting errors
- Choose your account base currency to match your deposits. If you earn and deposit in USD, open a USD account when possible.
- Avoid repeated conversions. Converting on every deposit and withdrawal adds hidden cost through the broker’s FX rate markup.
- Keep reporting simple. Your P and L, fees, and withdrawals stay in one currency. That reduces mistakes when you track performance and taxes.
- Check funding rails. Some methods settle in a specific currency. A mismatch can trigger extra conversion at the payment provider.
Step 4: Complete the Application (KYC) Without Getting Rejected
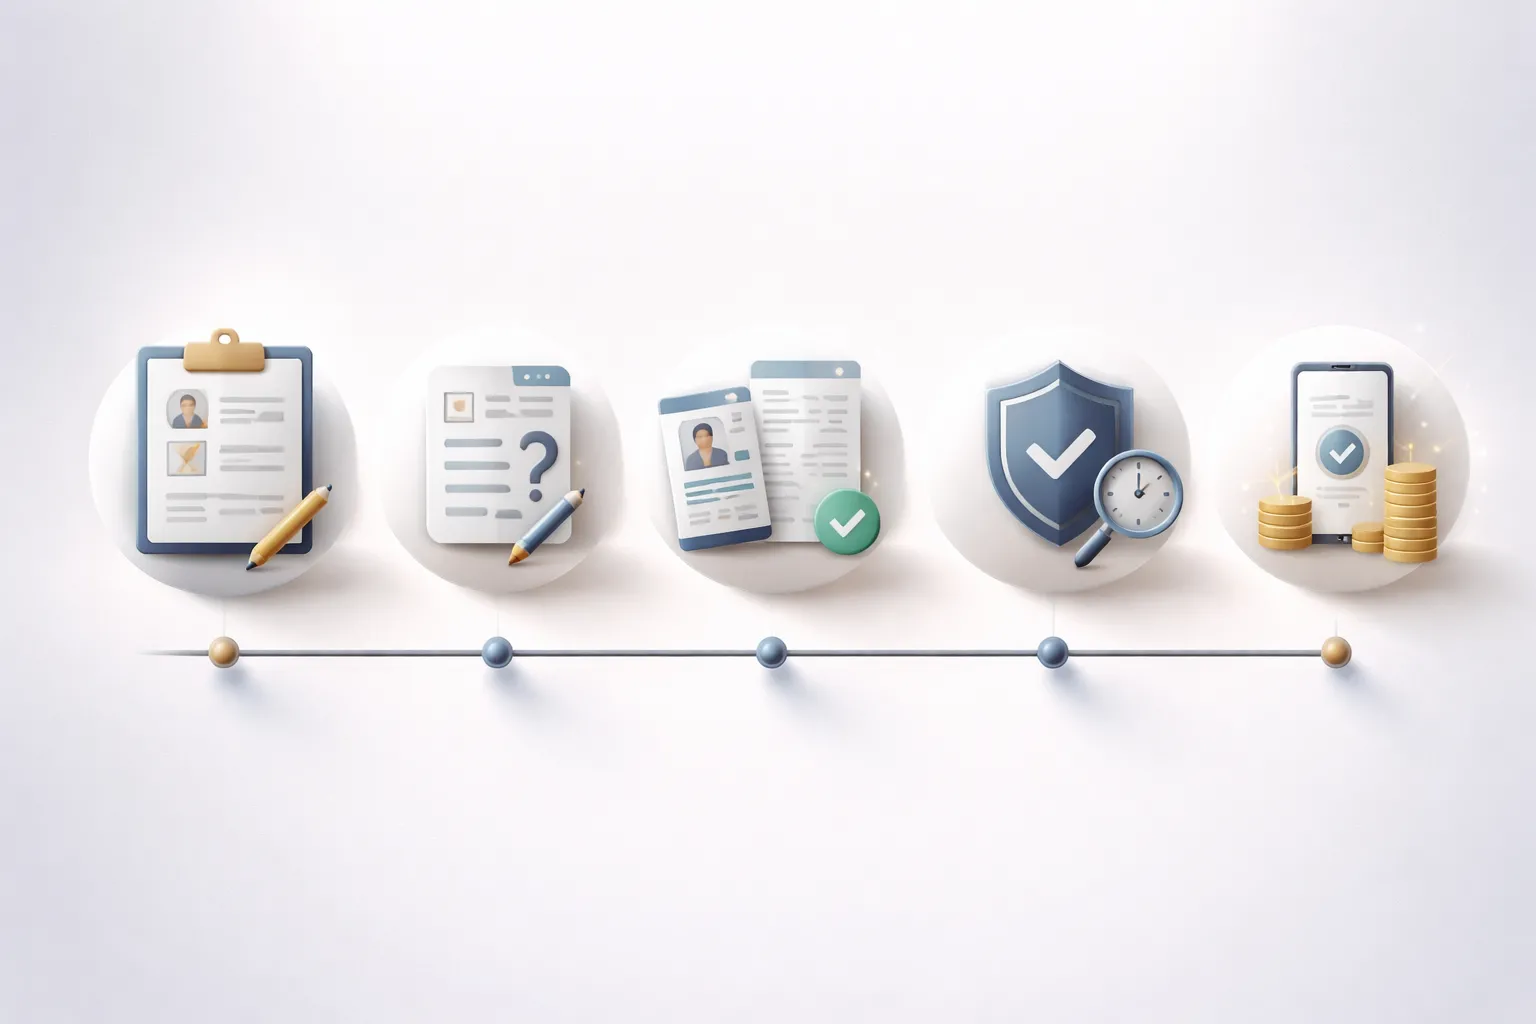
What brokers ask for
KYC means Know Your Customer. Brokers use it to meet anti-money laundering rules and to assess suitability. You fill in three blocks.
- Personal details. Full legal name, date of birth, nationality, tax residence, address, phone, email, and an ID number.
- Experience questionnaire. Years traded, product knowledge, typical trade size, leverage use, and how you learned to trade.
- Suitability checks. Employment status, income range, net worth range, source of funds, and risk tolerance.
Answer truthfully. Brokers log your responses. Big mismatches between “no experience” and “high leverage, large size” can trigger manual review.
Document upload tips that prevent rejection
- Use accepted formats. PDF, JPG, or PNG. Avoid HEIC. Do not upload screenshots unless the broker allows it.
- Send full-frame images. Show all four corners. No glare. No blur. No cropped edges. No fingers covering text.
- Match your name exactly. Use the same order and spelling as your ID. Include middle names if they appear on the ID.
- Match your address exactly. Same unit number and street format. Do not mix abbreviations across documents if it changes the meaning.
- Check expiry dates. Your ID must be valid. Many brokers reject documents that expire soon. Renew first if needed.
- Use a proper proof of address. Utility bill, bank statement, tax letter, or government correspondence. Most brokers require it to be recent, often within 90 days.
- Keep files clean. Do not edit, compress too hard, or watermark. Many systems flag modified images.
Typical verification timelines, and how to speed them up
Many brokers verify accounts the same day if your documents pass automated checks. Manual review can take longer during peak hours, weekends, or if your file needs a second look.
- Submit during business hours. You reduce queue time.
- Upload both ID and proof of address in one session. You avoid back-and-forth.
- Use high-resolution photos in good light. The system reads text better.
- Turn off VPNs if the broker flags them. Location mismatches can trigger review.
- Use the same country across profile, ID, and funding method. Cross-country signals slow approval.
Common rejection reasons, and fixes
- Blurry or cropped ID. Retake photo, include all edges, use daylight, tap to focus.
- Expired or soon-to-expire ID. Renew, then resubmit.
- Proof of address too old. Download a newer statement or bill with the issue date visible.
- Name mismatch. Update your profile to match your ID, or submit a supporting document that shows the legal name change.
- Address mismatch. Correct your profile address to the exact format on the document, then upload a matching proof.
- Unsupported document type. Use a standard bill or bank statement, not a parcel label, handwritten note, or invoice.
- Country restrictions. Some brokers do not onboard certain jurisdictions. You need a broker that accepts your residence and tax country. Use a practical broker checklist before you apply.
- Funding source concerns. If asked, provide clear source of funds details. Use your own bank card or account. Third-party deposits often get blocked.
If you get rejected, resubmit with one clear fix at a time. Do not spam uploads. If the portal does not explain the issue, contact support and ask for the exact rejection code or reason.
Privacy and security hygiene during KYC
- Use a password manager. Create a unique, long password for the broker portal.
- Enable 2FA. Use an authenticator app if available. Avoid SMS if the broker offers better options.
- Check the domain before you upload. Type the URL yourself or use a saved bookmark. Avoid links in emails and ads.
- Watch for phishing patterns. Urgency, threats, and requests for your full password or 2FA codes signal a scam.
- Upload on a trusted network. Avoid public Wi-Fi. Use your home network or a secured hotspot.
- Store copies safely. Keep your submitted files in encrypted storage. Delete them from shared devices.
Step 5: Set Up Your Trading Platform and Secure Your Account
Choosing a platform: MetaTrader 4/5 vs cTrader vs web and mobile
Your broker gives you one or more platforms. Pick based on how you trade.
- MetaTrader 4 (MT4): Common for forex. Large library of indicators and expert advisors. Older design. Some brokers limit new MT4 accounts.
- MetaTrader 5 (MT5): Newer than MT4. Faster tester. More order types and more markets on many brokers. Good default choice if your broker offers it.
- cTrader: Clean layout. Strong order entry and depth of market on supported brokers. Good for short term execution and level 2 style views.
- Web platform: No install. Fast setup. Fewer advanced tools on many brokers. Best as a backup.
- Mobile app: Best for monitoring and alerts. Worst for precision entries. Use it to manage risk, not to improvise trades.
Match the platform to your account costs. If you still compare pricing models, read spread vs commission before you commit.
Installing and logging in: live server selection and credential handling
- Download the platform from your broker portal or the official app store. Avoid third party download sites.
- Confirm you install the correct app. Many fake apps copy broker names and logos.
- During login, select the correct server. Brokers often list separate servers for demo and live. Picking the wrong server causes repeated login failures.
- Store your trading password in a password manager. Use a long, unique password.
- Do not save passwords in a browser on shared devices.
- Never share your investor password, API keys, or 2FA codes. Support does not need them.
Essential settings: time zone, one-click trading, default lot size, and alerts
- Time zone: Check platform time vs your local time. Platform candles often follow server time, not your location. Align your chart reviews to one clock and stick to it.
- One-click trading: Turn it off until you trust your process. If you enable it, set a rule to place stops first or immediately after entry.
- Default lot size: Set the smallest size you plan to use, often 0.01 lots on many accounts. This reduces fat finger risk.
- Order confirmations: Enable confirmations for market orders if the platform supports it.
- Alerts: Set price alerts at key levels. Add calendar alerts for major releases you trade or avoid.
Linking tools: economic calendar, news feeds, and trade journaling apps
- Economic calendar: Use your broker calendar or a trusted third party. Filter by currency and impact. Set alerts for events tied to your pairs.
- News feeds: Keep one feed. Too many sources create noise. Track scheduled releases and major central bank headlines only.
- Trade journal: Log every trade. Record entry, stop, target, size, reason, and result. Add a screenshot before and after. Review weekly.
- Data consistency: Use the same naming for setups and mistakes. This lets you count errors and fix one problem at a time.
Account security checklist: 2FA, withdrawal whitelists, device hygiene
- Enable 2FA: Use an authenticator app when possible. Avoid SMS if your broker offers app based 2FA.
- Turn on withdrawal protections: Use a withdrawal address whitelist if available. Lock withdrawals to preapproved bank accounts or wallets.
- Separate email: Use a dedicated email for trading. Protect it with its own 2FA.
- Device updates: Keep your OS, browser, and platform updated. Patch delays increase risk.
- Clean installs: Do not trade on devices with cracks, keygens, or unknown extensions.
- Network hygiene: Avoid public Wi-Fi. If you must connect, use a trusted VPN and do not log in on shared networks.
- Session control: Log out on web portals. Revoke old devices and active sessions in your account settings.
- Backups: Save platform templates, profiles, and your journal to encrypted storage.
Step 6: Fund Your Forex Account (Deposits) the Smart Way
Step 6: Fund Your Forex Account (Deposits) the Smart Way
Your first deposit sets your risk level. Pick a method you can control, track, and reverse if something goes wrong.
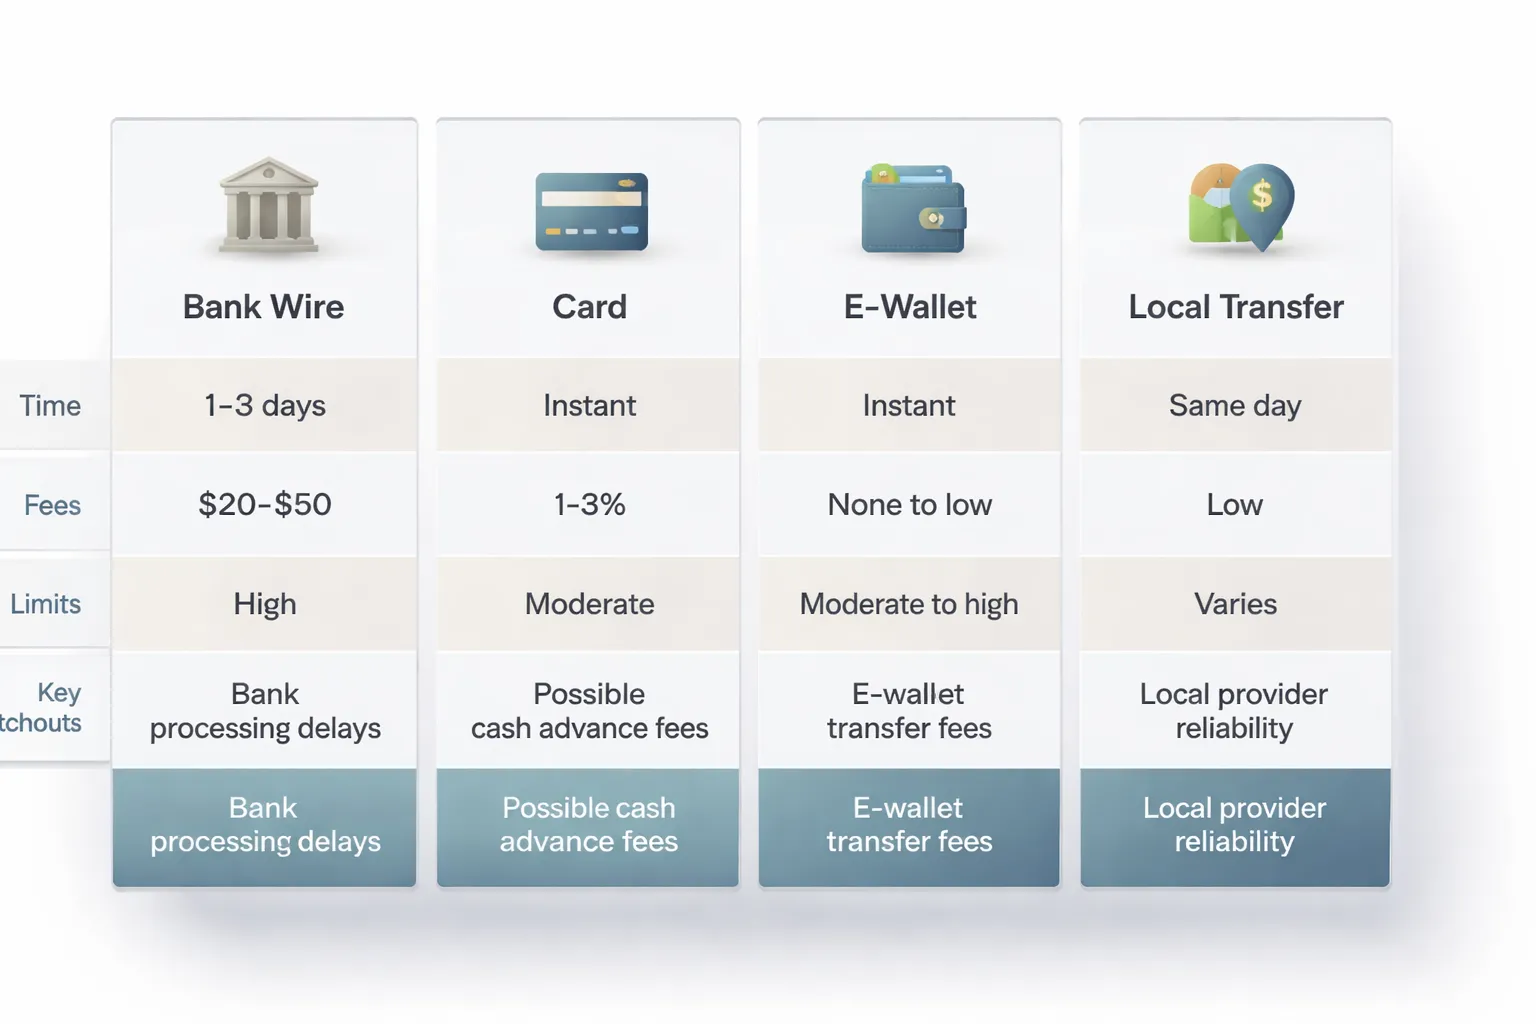
Payment methods compared
- Bank wire. Best for larger deposits. Strong audit trail. Hard to reverse. Slower.
- Debit or credit card. Fast funding. Chargebacks may exist, but brokers often restrict withdrawals back to the same card first.
- PayPal and e-wallets. Fast and convenient. Fees can stack up. Some brokers block e-wallet withdrawals until you verify identity.
- Local bank transfer. Often cheapest in your country. Good for recurring deposits. Speed depends on local rails.
| Method | Typical processing time | Typical deposit fees | Best use | Main watchouts |
|---|---|---|---|---|
| Bank wire | 1 to 5 business days | Broker often $0, bank fees can apply | Larger deposits, business accounts | Intermediary bank fees, wrong reference delays crediting |
| Card | Instant to 30 minutes | 0 to 3.5% common | Small to medium deposits | Refund rules, withdrawal routed back to card, higher FX rates |
| PayPal, e-wallets | Instant to a few hours | 0 to 4% common | Fast funding, frequent deposits | Extra wallet fees, name mismatch blocks withdrawal |
| Local transfer | Same day to 2 business days | Often low or $0 | Cost control, local currency deposits | Limited availability, cutoff times |
Fees and exchange rates that cut your starting balance
- Deposit fees. Some brokers charge a percentage on cards and e-wallets. Your bank can charge on wires.
- FX conversion spread. If you deposit in a currency your broker does not support, you pay a conversion rate. Cards and wallets often use wide rates.
- Intermediary bank fees. Wires can lose $10 to $40 mid-route, sometimes more. You see it only after the funds land short.
- Withdrawal friction. Many brokers follow strict refund rules. They send withdrawals back to the original funding method first. Plan around that.
Match your deposit currency to your trading account currency when you can. It reduces conversion losses. Then compare your trading costs too, see spread vs commission before you commit to a long-term setup.
Deposit limits, processing times, and confirming your funds
- Minimum deposit. Some accounts start at $10 to $100. Others require $500 or more. Check the account type rules.
- Maximum per transaction. Cards and e-wallets often cap deposits per day or per transaction. Banks may flag large transfers.
- Compliance holds. Your broker can delay crediting if your name, address, or payment source does not match your profile.
- Proof of payment. Save receipts, transaction IDs, and bank confirmations. You need them if funds go missing.
- How to confirm crediting:
- Check the broker portal balance and the platform account balance.
- Confirm the deposit shows as “completed” in transaction history.
- For wires, verify the payment reference matches what the broker requested.
- If the balance updates but you cannot trade, check for a “bonus” or “withdrawal locked” tag.
Bonus promotions and conditions
- Turnover requirements. Many bonuses require you to trade a large volume before you can withdraw bonus funds, sometimes before you can withdraw any funds.
- Withdrawal restrictions. Some promotions lock withdrawals until you meet rules, or they cancel profits if you withdraw early.
- Spread and leverage changes. Terms may allow the broker to change trading conditions on bonus accounts.
- Action step. Read the bonus terms line by line. If you do not understand the withdrawal clause, skip the bonus.
Do a small test deposit first
- Start with a small amount you can afford to lose.
- Confirm deposits, withdrawals, and support response times before you scale up.
- Test one full cycle. Deposit, place a small trade, then withdraw a small amount.
- Keep your proof. Save screenshots of the deposit status, timestamps, and transaction IDs.
Step 7: Place Your First Trade (Beginner-Safe Walkthrough)
Step 7: Place Your First Trade (Beginner-Safe Walkthrough)
Your first goal is execution, not profit. Keep the trade small. Use one major pair. Use clear risk limits.
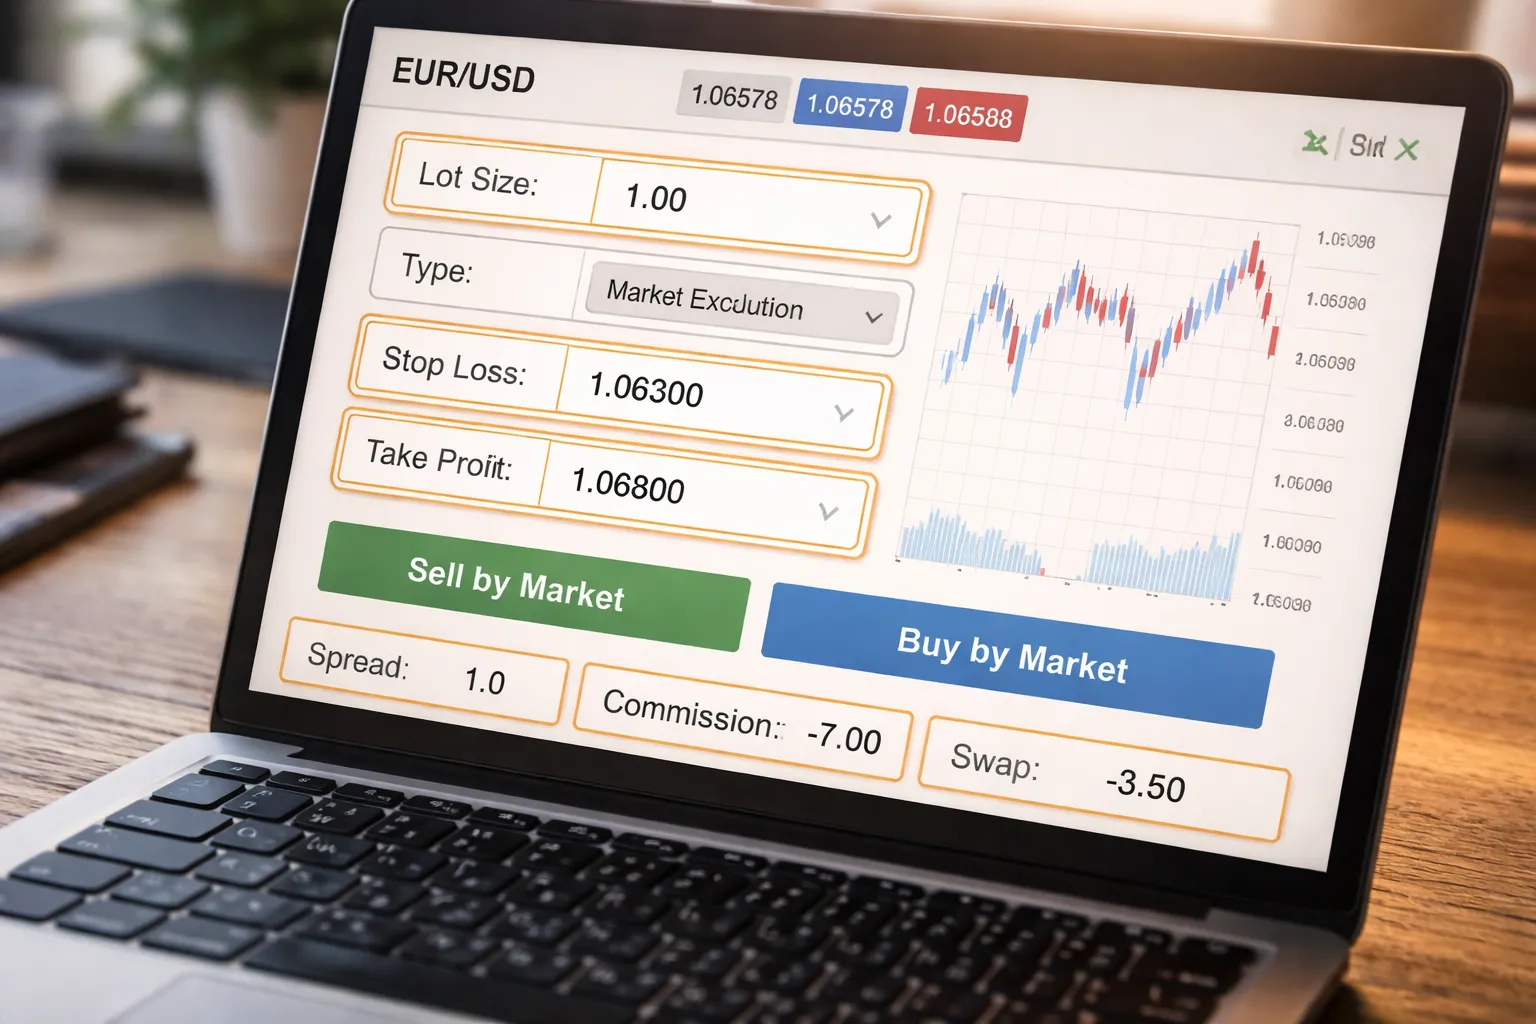
1) Choose one simple instrument (use EUR/USD)
Start with EUR/USD. It trades with tight spreads at most brokers. It has deep liquidity. Your order fills faster, with less slippage risk than many exotic pairs.
- Pair: EUR/USD
- Chart time frame: 15-minute or 1-hour. Keep it simple.
- Direction: Buy if you expect EUR/USD to rise, sell if you expect it to fall.
2) Pick an order type (plain language)
Use the simplest order that matches your plan.
- Market order: You buy or sell now at the best available price. This is the simplest for a first trade.
- Limit order: You buy lower than the current price, or sell higher than the current price. You set the price. It may never fill.
- Stop order: You buy above the current price, or sell below the current price. It triggers when price reaches your level. It can fill worse than your stop level in fast moves.
- Stop-limit order: A stop triggers a limit order. You control the worst price you accept. The trade may not fill if price jumps past your limit.
For a first trade, use a market order with a stop-loss and take-profit attached.
3) Set stop-loss and take-profit (risk dollars first, pips second)
Start with the amount you accept losing on the trade. Do not start with pips.
- Pick a small fixed risk, like $5 or $10.
- Set your stop-loss so the loss equals that dollar amount if price hits it.
- Set your take-profit so the potential gain is at least the same size as your risk, or higher. A simple starting point is 1:1 or 1:1.5.
| Item | Beginner-safe target |
|---|---|
| Risk per trade | 0.5% to 1% of your account |
| Dollar risk example | $10 risk on a $1,000 account (1%) |
| Reward target | $10 to $15 take-profit for a $10 risk |
Then convert your dollar risk into pips based on your position size. Your platform usually shows this in the order ticket.
4) Position sizing basics (lots, pip value, simple rule)
Forex uses lots. Your lot size controls how much you gain or lose per pip.
- Standard lot: 1.00 lot = 100,000 units
- Mini lot: 0.10 lot = 10,000 units
- Micro lot: 0.01 lot = 1,000 units
For EUR/USD, many brokers show roughly these pip values in USD accounts:
- 1.00 lot: about $10 per pip
- 0.10 lot: about $1 per pip
- 0.01 lot: about $0.10 per pip
Use a simple sizing rule:
- Set risk per trade at 0.5% to 1% of your balance.
- Choose a stop distance that makes sense on the chart.
- Adjust lot size so stop distance x pip value = your dollar risk.
Example: You risk $10. You plan a 20 pip stop-loss. You need $0.50 per pip to match your risk. That is roughly 0.05 lots on EUR/USD at many brokers. Your platform may show a slightly different value. Use the number shown in the ticket.
5) Check costs before you confirm (spread, commission, swap)
Costs can turn a small trade into a bad trade. Check them on the order ticket before you click confirm.
- Spread: The gap between buy and sell. You start the trade down by the spread. Tight spreads matter more on small targets.
- Commission: Some accounts charge a fee per lot. Your ticket should show the charge before you place the trade.
- Swap: Overnight financing. You pay or earn it if you hold past the broker’s rollover time. Many platforms show an estimated swap for long and short positions.
If you see costs you do not understand, pause and review your broker’s fee schedule. Use this guide on forex broker fees if you need a quick breakdown.
6) Execute the trade (simple checklist)
- Select EUR/USD.
- Choose market order.
- Set lot size based on your dollar risk.
- Set stop-loss first.
- Set take-profit second.
- Confirm spread, commission, and swap.
- Place the trade.
After entry, take screenshots of the filled price, stop-loss, take-profit, and costs. This gives you proof if fills look wrong. It also helps you review your execution later.
After You Open the Account: Risk Management and Next Steps
Create a basic trading plan
You need rules before you need more indicators. Keep your plan short and measurable.
- Markets and sessions: Pick 1 to 3 pairs. Trade one session window, for example London or New York. Avoid random hours.
- Entry criteria: Write exact conditions. Use yes or no checks, not feelings. Example: trend direction on your higher timeframe, one setup pattern, one confirmation trigger.
- Risk per trade: Set a fixed dollar amount or a fixed percent. Many beginners use 0.25% to 1.00% of account equity per trade.
- Exit rules: Define stop-loss placement logic and take-profit logic. Decide if you move stops, and when. Decide if you scale out, and how.
- Max daily loss: Set a hard stop for the day. Common limits are 2R to 3R, or 2% to 3% of equity. If you hit it, you stop trading. No exceptions.
- Max trades per day: Cap it. Example: 1 to 3 trades. This blocks overtrading.
Use a trading journal
Your broker history shows fills. Your journal shows decisions. You need both.
- Before the trade: date, time, pair, session, setup name, entry plan, stop level, take-profit level, position size, dollar risk, reason for the trade.
- At execution: entry price, spread at entry, commission, swap terms if held overnight, slippage if any. Attach your screenshots.
- After the trade: exit price, realized P&L, R multiple, notes on mistakes, notes on what you did right.
Review weekly. Do not “study” every day for hours. Run a simple checklist.
- Count total trades. Compare to your max-trades rule.
- Calculate win rate, average win, average loss, and expectancy in R.
- List your top 3 error types. Write one fix for each.
- Mark your best setups. Trade those more, ignore the rest.
Avoid common beginner mistakes
- Overtrading: You take low quality trades to feel active. Fix it with a max trades per day rule and a written setup checklist. If the checklist fails, you do not trade.
- Revenge trading: You try to win back a loss fast. Fix it with a daily loss limit and a cooldown rule. After a full stop-out or two losses in a row, step away for 30 to 60 minutes.
- High leverage: Leverage is not the problem. Oversized positions are. Fix it by sizing from dollar risk and stop distance. If your stop needs to be wider, your lot size must drop.
Scale up responsibly
Increase size only when your process stays stable. Do not scale because you feel confident.
- When to increase size: you followed your rules for at least 30 to 50 trades, your drawdowns stayed within your plan, and your results are positive in R, not just in dollars.
- How to increase: raise risk per trade in small steps, for example from 0.25% to 0.35%, or 0.50% to 0.60%. Keep your daily loss limit proportional.
- When not to increase: after a big win, during a losing streak, when you changed strategy, or when your life schedule changed and you trade less focused.
Tax and recordkeeping basics
Taxes depend on your country. Your broker will not do this for you in many jurisdictions. Start clean from day one.
- Save statements: download monthly and annual account statements. Keep trade confirmations and funding records.
- Track realized P&L: realized P&L comes from closed trades. Unrealized P&L changes with price. Taxes often focus on realized results, but rules vary.
- Track costs: spreads, commissions, and swaps reduce net returns. Store them with your trade data.
- Know jurisdiction differences: some regions tax forex as capital gains, some as ordinary income, some apply special rules by instrument type. If you trade across brokers or accounts, reporting can get messy fast.
- Get help if needed: if you plan to trade size or withdraw regularly, use a tax professional familiar with trading in your country.
Pros, Cons, and Red Flags to Watch For
Advantages of Opening a Forex Account
- High liquidity: Major pairs often trade with tight spreads and fast fills, especially during London and New York sessions.
- Easy access: You can open an account online, fund it quickly, and trade from desktop or mobile.
- Flexible position sizing: Many brokers support micro and mini lots, so you can risk smaller amounts per trade.
- Long or short is standard: You can buy or sell most pairs without special borrowing steps.
- Many ways to execute: Market, limit, stop, OCO, and bracket orders help you plan entries and exits.
Downsides and Risks
- Leverage cuts both ways: A small move against you can trigger a margin call. You can lose more than you planned if you size too large or hold through gaps.
- Volatility spikes: News releases and central bank events can move prices fast. Spreads can widen and stops can fill worse than expected.
- Costs add up: Spreads, commissions, swaps, and deposit and withdrawal fees reduce your net return. Small accounts feel this most.
- Behavioral mistakes: Overtrading, revenge trading, and moving stops can turn a controlled loss into a large one. Leverage makes this faster.
- Market hours tempt you: Forex trades 24 hours during the week. Your sleep and focus become risk factors.
Broker Red Flags
- Unrealistic promises: Guaranteed profits, “risk-free” trading, or fixed high monthly returns. Walk away.
- Pressure tactics: Urgent deposit deadlines, bonus traps, or a “manager” pushing you to add funds to recover losses.
- Opaque fees: No clear page for spreads, commissions, swaps, inactivity charges, and withdrawal fees.
- Weak regulation story: No license number, no regulator link, or a license that does not match the company name and domain.
- Hard withdrawals: Delays, new documents after you request a payout, or forced “verification” loops.
Use this forex broker checklist if you want a simple way to screen brokers before you deposit.
Platform Red Flags
- Price spikes that do not match the market: Your chart shows a wick that other brokers and data feeds do not show. Screenshot it and compare.
- Repeated requotes: You click to enter or exit and the platform keeps rejecting the price. This can ruin risk control in fast markets.
- Unexplained slippage: Some slippage happens in volatile conditions. A pattern of negative slippage without positive slippage can signal poor execution.
- Frequent disconnects: Platform outages during busy periods can trap you in open trades.
- Missing execution details: No clear fill price, time stamp, and order history export.
When to Consider Alternatives
- ETFs: Better if you want simpler taxes and fewer platform variables. You can get currency exposure or broad market exposure without trading spot FX.
- Currency futures: Better if you want a centralized exchange, visible order flow, and standardized contracts. You still face leverage risk.
- Investing over trading: Better if you cannot commit time to a repeatable process. Long-term investing reduces decision frequency and execution noise.
FAQ
How much money do you need to open a forex account?
Some brokers let you start with $10 to $100. Your real minimum is higher. You need enough margin to keep trades open during normal price swings. Many beginners start with $200 to $1,000 to reduce forced liquidations.
Do you need a broker to trade forex?
For spot forex, yes. You open an account with a broker to access pricing, leverage, and order execution. If you want exchange-traded exposure, you can use currency futures through a futures broker instead.
What documents do you need to open an account?
You usually need government ID, proof of address, and basic tax details. Some brokers ask for a selfie or short video check. If your name and address do not match across documents, expect delays.
How long does approval take?
Many accounts get approved the same day. Some take one to three business days if the broker needs manual review. Funding time depends on method. Cards are often instant, bank wires can take one to five days.
Can you open a forex account as a beginner?
Yes. You still need to pass onboarding questions about experience and risk. Use a demo first, then trade micro or nano sizes if available. Keep leverage low until you have consistent execution and risk control.
What account type should you choose?
Start with the simplest option that supports small position sizes. Choose a standard retail account with transparent pricing. Avoid high minimum deposits and complex tiers. If you need guidance, use this forex broker checklist.
What leverage should you use?
Use the lowest leverage that fits your strategy. High leverage increases liquidation risk. Many beginners stay near 2:1 to 10:1 effective leverage. Your broker may offer higher, but you control your position size.
What fees will you pay?
You pay the spread, or spread plus commission. You may also pay swap or financing if you hold positions overnight. Deposits, withdrawals, and inactivity can add costs. Read the fee schedule before you fund.
Is forex trading legal in your country?
Rules vary by country. Some markets restrict leverage, marketing, or broker licensing. Trade only with a broker licensed to serve your jurisdiction. If a broker bypasses local rules, you take higher counterparty risk.
Can you lose more than your deposit?
It depends on broker policy and your market. Some brokers offer negative balance protection. Fast moves and gaps can still cause losses beyond margin in extreme cases. Avoid oversized positions and keep stop losses realistic.
Should you trade spot forex or use alternatives?
Spot forex gives flexible sizing and access. ETFs reduce platform complexity but add fund structure and market hours. Futures give exchange pricing and standardized contracts but still carry leverage risk. Choose the product you can manage consistently.
Conclusion
Conclusion
Opening a forex account is simple. Running it well takes discipline.
Pick a regulated broker, complete verification, fund the account, and test your setup on a demo or small live size. Set your leverage and margin limits before you place the first trade.
Your edge comes from control. Keep position size small, use stop losses, and track fees. Spreads, commissions, and swaps can erase gains in slow markets, so compare costs before you commit. Use this guide on spread vs commission pricing if you need a quick filter.
- Start with a fixed risk rule. Cap loss per trade, then size positions from the stop loss distance.
- Keep leverage low. Increase it only after months of consistent execution.
- Log every trade. Track entry, stop, exit, slippage, and total cost.
- Withdraw regularly. Prove you can turn paper profits into real cash flow.
Final tip. Treat your first month as a systems test. If you cannot follow your rules with small size, bigger size will not fix it.
-
Regulated Forex Brokers Explained: Licenses, Safety & Red Flags
3 months ago -
Spread vs Commission: Which Forex Account Type Is Cheaper?
3 months ago -
Best Forex Brokers for Beginners (Top Picks + What to Look For)
3 months ago -
Forex Broker Fees Explained: Spreads, Commissions, Swaps & More
3 months ago -
Forex Demo Account Guide: What It Is, How It Works & How to Use It
3 months ago
-
- Step 3: Pick the Right Account Type
- Demo vs live, when to switch and what demo can’t teach you
- Micro or cent vs standard accounts, align lot size with your bankroll
- Spread-only vs raw spread plus commission, match pricing to your trade frequency
- Islamic swap-free accounts, eligibility and alternative fees to watch
- Base currency selection, cut conversion fees and reduce accounting errors
-
- Choosing a platform: MetaTrader 4/5 vs cTrader vs web and mobile
- Installing and logging in: live server selection and credential handling
- Essential settings: time zone, one-click trading, default lot size, and alerts
- Linking tools: economic calendar, news feeds, and trade journaling apps
- Account security checklist: 2FA, withdrawal whitelists, device hygiene
-
- Step 7: Place Your First Trade (Beginner-Safe Walkthrough)
- 1) Choose one simple instrument (use EUR/USD)
- 2) Pick an order type (plain language)
- 3) Set stop-loss and take-profit (risk dollars first, pips second)
- 4) Position sizing basics (lots, pip value, simple rule)
- 5) Check costs before you confirm (spread, commission, swap)
- 6) Execute the trade (simple checklist)
-
- How much money do you need to open a forex account?
- Do you need a broker to trade forex?
- What documents do you need to open an account?
- How long does approval take?
- Can you open a forex account as a beginner?
- What account type should you choose?
- What leverage should you use?
- What fees will you pay?
- Is forex trading legal in your country?
- Can you lose more than your deposit?
- Should you trade spot forex or use alternatives?
-
How to Place a Forex Trade Step by Step (Your First Trade Explained)
1 month ago -
Forex Trading vs Crypto Trading: Which Market Is Better for Beginners?
1 month ago -
Forex Lot Size Calculator: How to Use It to Size Trades Correctly
3 months ago -
How to Calculate Position Size in Forex (Position Sizing Formula + Examples)
3 months ago -
Forex Leverage Explained: How It Works, Pros, Cons & Examples
3 months ago
-
Is Forex Trading Legal in the United States? Rules, Regulators & What to Know
3 months ago -
Forex Market Hours & Trading Sessions Explained (Best Times to Trade)
3 months ago -
Forex Trading Platforms Comparison: MetaTrader vs cTrader vs TradingView
3 months ago -
Forex Leverage Explained: How It Works, Pros, Cons & Examples
3 months ago -
What Is a Lot Size in Forex? Lot Types + Quick Examples
3 months ago