How to Place a Stop Loss in Forex (Beginner-Friendly Guide)

A stop loss is the order that caps your downside on a forex trade. Without it, one fast move can erase weeks of gains. You place the stop at a price level that proves your trade idea wrong, then you size the position so the loss stays within your limit.
In this guide, you will learn what a stop loss does in forex, the main stop order types, and where to place your stop based on structure and volatility. You will also learn how to calculate stop distance, set risk per trade, avoid common placement mistakes, and pair your stop with a realistic target using a risk-reward ratio.
Key Takeaways
Key Takeaways
- In het kort: A stop loss caps your downside per trade. You set it before you enter.
- In het kort: Place your stop where your trade idea breaks, not where it “feels safe”. Use market structure.
- In het kort: Match stop distance to volatility. Tight stops fail fast in volatile sessions.
- In het kort: Set risk per trade first, then calculate position size. Risk stays constant, stop distance changes lot size.
- In het kort: Avoid obvious levels. Stops clustered at round numbers and equal highs and lows get hit more often.
- In het kort: Pair the stop with a realistic target. Use a clear risk-reward ratio and skip trades that do not meet it.
- In het kort: Use the right order type. Stop-loss for protection, stop-limit only if you accept slippage risk and non-fills.
- In het kort: Review every stop-out. Track whether structure failed or your stop sat inside normal noise.
If you need a clean workflow from setup to execution, follow a step-by-step trade process and set your stop before you click buy or sell.
What a stop loss is (and why it matters in forex)
Stop loss definition in trading terms
A stop loss is your pre-set exit price where you accept a loss and get out. It turns an unknown loss into a known one.
In platform terms, it usually triggers a market order when price hits your stop level. That means you define the risk point first, then you size the trade around it.
Your stop loss has one job, limit how much your account can lose on one idea.
Why it matters in forex, leverage and fast markets
Forex uses margin. Small price moves can create large percentage swings in your account.
A stop loss caps damage when price moves fast, news hits, or liquidity thins out. Without a stop, the market decides your exit. That is how small mistakes become large losses.
- Leverage magnifies losses. A tight plan matters more than a perfect entry.
- Speed reduces control. Spikes can hit your level before you react.
- Discipline improves. You stop “hoping” and start executing a plan.
Stop loss vs take profit vs alert, key differences
| Tool | What it does | What it does not do |
|---|---|---|
| Stop loss | Exits the trade to limit loss if price moves against you. | Guarantee an exact exit price in fast moves. |
| Take profit | Exits the trade to lock profit at a target level. | Protect you if price drops while you wait for target. |
| Alert | Notifies you when price reaches a level. | Exit the trade for you. It needs manual action. |
If you want a deeper breakdown with examples, see stop loss vs take profit.
Why your stop loss may not fill at your exact price
Stops trigger when price trades at your level. The fill can come later if the market moves too fast.
- Slippage. Your stop triggers, but the best available price is worse than your stop level. This happens in news, low liquidity, or sudden spikes.
- Gaps. Price can jump over your stop level. Your order fills at the next available price, not the skipped price.
- Widened spreads. Around rollover or events, spreads can expand and hit stops earlier than expected on the quote.
You can reduce these risks by avoiding major releases, trading liquid sessions, and sizing smaller when volatility rises.
Stop-loss order types you can use in forex
Stop market vs stop limit
Stop market triggers a market order when price hits your stop level. You get execution priority. You do not control the final fill price.
Use a stop market when your main goal is to exit. This matters most in fast moves, news spikes, and thin liquidity.
Stop limit triggers a limit order when price hits your stop level. You set the worst price you will accept. You control price. You risk no fill.
Stop limit can fail when price gaps or runs through your limit. Your position stays open. Losses can grow past your plan.
| Order type | What you control | Main risk | Best use |
|---|---|---|---|
| Stop market | Exit certainty | Slippage | Risk control first |
| Stop limit | Max exit price (for a sell stop) | No fill | Slow markets, tight spread, high liquidity |
Trailing stop
A trailing stop moves in your favor as price moves. It does not move against you. It locks in profit without you changing the stop by hand.
- If you are long, the trailing stop rises as price rises.
- If you are short, the trailing stop falls as price falls.
- Most platforms let you trail by pips, points, or a percent. Some brokers support ATR-based trails.
Trailing stops can backfire in choppy markets. A normal pullback can hit the trail and stop you out before the trend continues.
They also react badly to spread widening. Your stop triggers off the quote, so a wider spread can tag your trail even if the mid price never reached it.
Keep your trail wider in volatile pairs and around rollover. If you want rules for pairing stops with targets, see how to set stop loss and take profit.
Guaranteed stop-loss (GSLO)
A guaranteed stop-loss fills at your stop price. The broker takes the slippage risk. You pay for that protection.
- Cost: usually a premium added to the spread or charged as a separate fee per trade.
- Availability: not all brokers offer GSLOs. Some only allow them on certain pairs or account types.
- Rules: brokers often require a minimum distance from current price. They may restrict changes near major events.
GSLOs make sense when slippage would damage your account. Common cases include holding through high-impact news, trading around market opens, or holding over weekends where gaps can hit.
Avoid paying for a GSLO on small positions where normal slippage would not change your risk much.
OCO and bracket orders
OCO means one cancels the other. You place a stop loss and a take profit at the same time. When one fills, the other cancels.
A bracket order wraps your entry with both exits. You define your risk and reward before you enter.
- Use OCO for breakouts and ranges where you want a clear exit on both sides.
- Confirm your platform attaches both orders to the same position, not as separate orders that can double your exposure.
- Check how partial fills work. Some platforms cancel the remaining leg only after the full position closes.
Before you place a stop: the 3 inputs that determine the right level
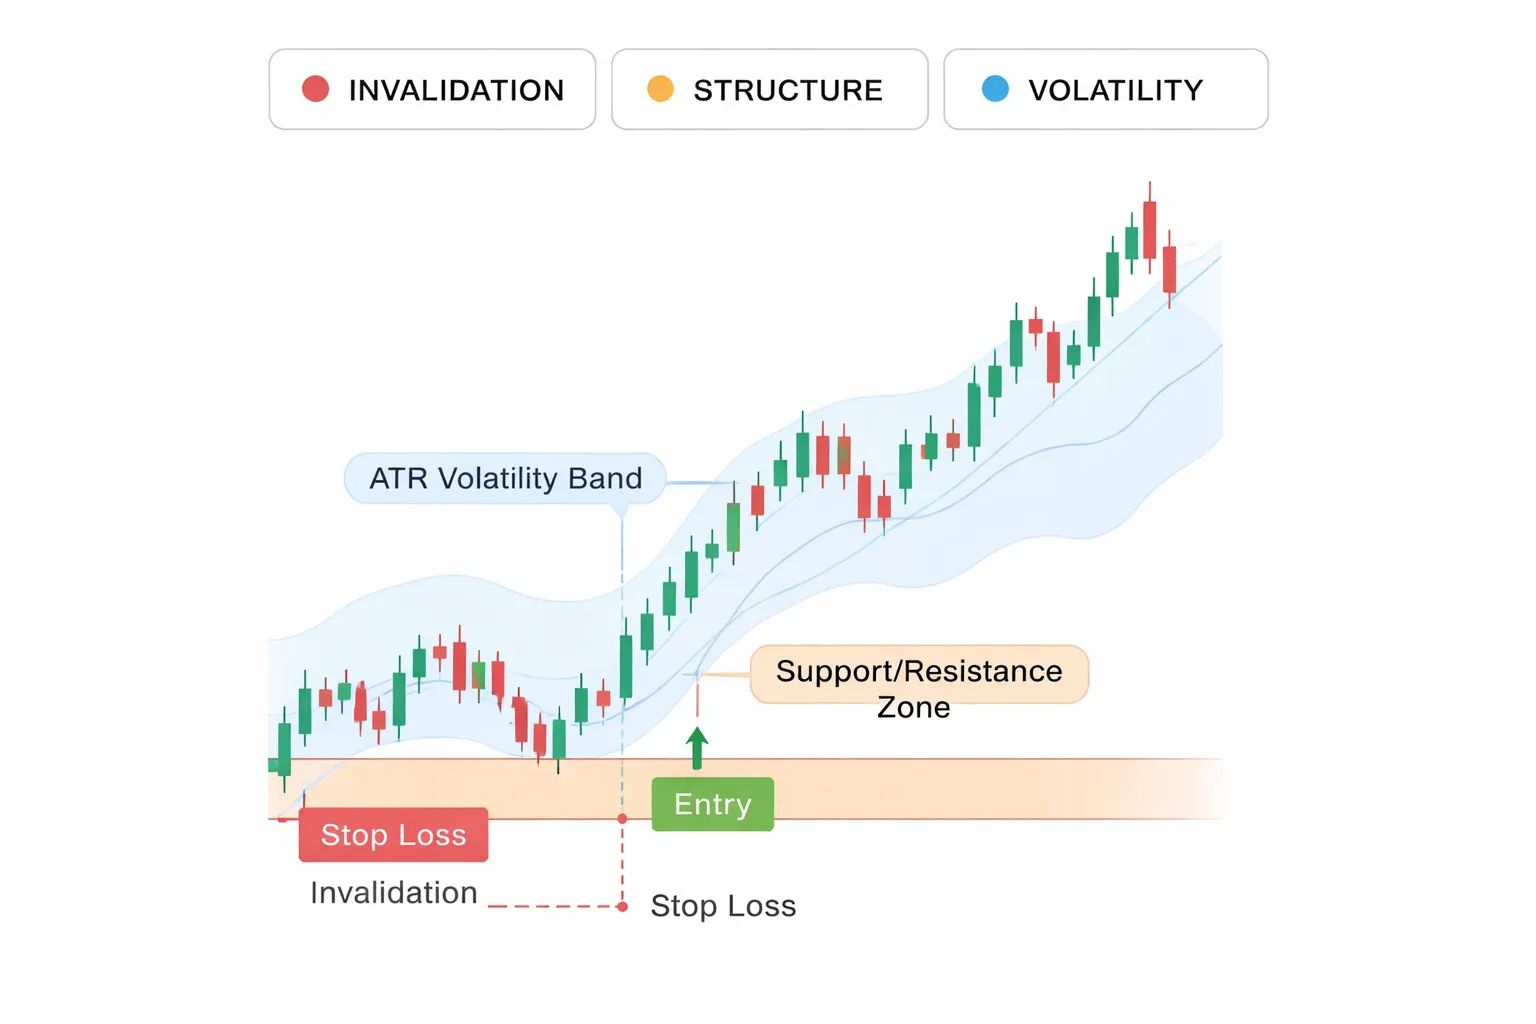
Trade invalidation point, define what proves your idea wrong
Your stop starts with your invalidation level. This is the price level that breaks your setup. When price hits it, you exit. No debate.
- Write your trade idea in one line. Example, “I am buying because price holds above support and the trend stays up.”
- Pick the one condition that kills it. Example, “Support breaks and holds below it.”
- Place the stop beyond that level. If the level is real, price should not trade there for long. If it does, your idea failed.
Do not place the stop at the point you feel pain. Place it at the point your reason for entering stops being true.
Market structure, use swings, support, resistance, and trend context
Use the chart to find levels other traders see. These levels create the “lines in the sand” where setups fail.
- Swing lows for long trades. If you buy, a common invalidation level sits below the most recent swing low. A lower low often signals the move changed.
- Swing highs for short trades. If you sell, a common invalidation level sits above the most recent swing high. A higher high often signals the move changed.
- Support and resistance zones. Stops work better beyond a zone, not inside it. Zones get tested. Edges break.
- Trend context. In an uptrend, place stops where an uptrend would stop being an uptrend, below a prior higher low. In a downtrend, place stops above a prior lower high.
Match structure to your timeframe. A stop based on a 4-hour swing often makes no sense for a 1-minute scalp.
Volatility and noise, tight stops get hit more often
Price moves in bursts. Spreads widen. News hits. Even clean trends pull back. Tight stops sit inside this noise and get tagged.
- Measure current volatility. Use ATR or recent average candle size on your trading timeframe.
- Give the trade room to breathe. If your stop is smaller than normal fluctuation, you increase stop-outs even when your direction is right.
- Respect session changes and news. London open, New York open, and high-impact releases raise volatility. Your stop must reflect that, or you reduce size or skip the trade.
- Account for spread. A stop placed too close can trigger from spread alone, especially on volatile pairs or during off-hours.
| Input | What you look at | What it changes |
|---|---|---|
| Invalidation | The price level that breaks your setup | Where the stop must be to keep the trade logical |
| Structure | Swings, support, resistance, trend | The “line in the sand” other traders defend or attack |
| Volatility | ATR, candle size, sessions, news, spread | How much room you need to avoid noise-based stop-outs |
If these three inputs conflict, fix the trade. Use a different entry, a wider stop with smaller size, or no trade.
How to place a stop loss in forex (step-by-step for beginners)
Step 1: Choose trade direction and identify your entry
Decide if you will buy or sell. Then pick your entry type.
- Market entry: you enter at the current price.
- Limit entry: you enter at a better price, after a pullback.
- Stop entry: you enter after price breaks a level and continues.
Write the exact entry price you plan to use. If you cannot name the level, skip the trade.
Step 2: Mark the invalidation level on the chart
Your stop loss goes at the price where your idea becomes wrong. This is your invalidation level.
- Long trade (buy): invalidation usually sits below the most recent swing low, below support, or below the structure that should hold.
- Short trade (sell): invalidation usually sits above the most recent swing high, above resistance, or above the structure that should cap price.
Do not place stops at obvious round numbers or exact highs and lows. Give the level room for spread and normal noise.
- Add a small buffer beyond the level.
- Increase the buffer when volatility rises, during active sessions, or around news.
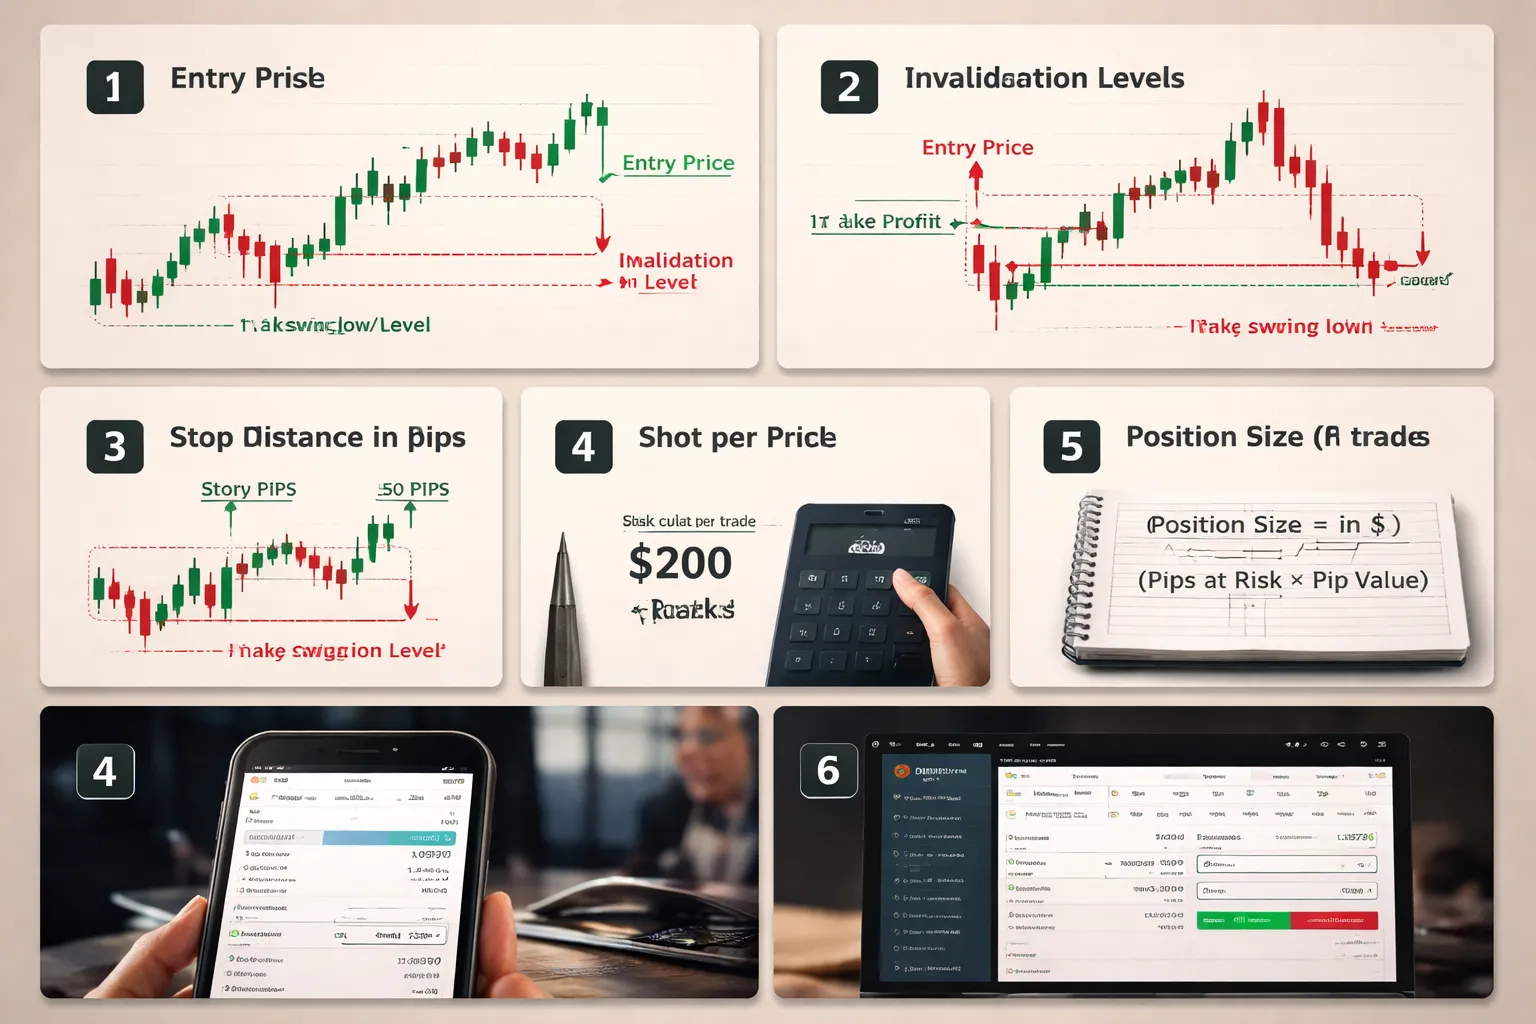
Step 3: Convert the stop level into pips and account currency risk
Calculate stop distance in pips.
- Stop distance (pips) = |Entry price minus Stop price| divided by pip size.
- Most pairs have pip size 0.0001.
- JPY pairs have pip size 0.01.
Pick a fixed risk per trade in your account currency. Use a small, consistent number.
- Common range for beginners: 0.5% to 1% of account balance per trade.
- Risk ($) = Account balance times Risk %.
Example: $2,000 account, 1% risk. Risk = $20.
Step 4: Calculate position size from risk per trade (simple formula)
You need the pip value to convert pips into money. Most platforms show pip value in the order ticket. If not, use a broker calculator.
Use this simple sizing rule.
Position size (lots) = Risk ($) divided by (Stop distance (pips) times Pip value per 1 lot ($/pip))
Quick reference for many USD-quote pairs like EURUSD, with a USD account:
- 1.00 lot ≈ $10 per pip
- 0.10 lot ≈ $1 per pip
- 0.01 lot ≈ $0.10 per pip
Example: Risk $20, stop 25 pips, pip value $10 per pip at 1 lot.
- Lots = 20 / (25 × 10) = 0.08 lots.
If the size is too small for your broker minimum, or too large for your comfort, fix the trade. Do not move the stop to force a bigger position.
Step 5: Set the stop order on MT4/MT5 (desktop and mobile)
MT4/MT5 desktop:
- Open the symbol chart.
- Open New Order, or use One-Click Trading.
- Set Volume to your calculated lot size.
- For a market order, set Stop Loss to your stop price before you click Buy or Sell, if your platform allows it.
- If you already entered, right-click the open position, click Modify or Delete, then enter the Stop Loss price and confirm.
MT4/MT5 mobile:
- Tap Trade, then tap the open position.
- Tap Modify or Edit.
- Enter the Stop Loss price, then confirm.
Use the exact stop price, not a rounded guess. Match the invalidation level you marked.
Step 6: Set the stop order on popular web platforms (cTrader and TradingView-style workflow)
- Open the symbol and timeframe you used for your setup.
- Place the trade from the order panel.
- Set size first. Then set Stop Loss by price, pips, or currency risk.
- If the platform supports it, drag the stop line on the chart to your stop level, then fine-tune the price in the ticket.
- Confirm the order. Re-check the stop price after the trade opens.
On chart-driven platforms, the fastest workflow is drag-and-check. Drag to the invalidation zone. Then check the exact price and risk number in the ticket.
Step 7: Double-check spread, minimum stop distance rules, and margin impact
- Spread: on buys, the stop triggers on the bid. On sells, it triggers on the ask. Wide spreads can hit tight stops.
- Minimum stop distance: some brokers require stops to be a minimum number of points away from current price. If you get an error, widen the stop or change entry, then reduce size to keep risk fixed.
- News and session changes: spreads can widen and slippage can increase. Avoid placing stops too close during these periods.
- Margin: confirm your free margin stays comfortable after you open the position. A correct stop does not protect you from a margin call if leverage and size are too high.
Final check. Entry price, stop price, stop distance, risk in money, lot size. If one number breaks your plan, adjust size or skip the trade. For deeper examples of how stops and targets work together, read stop loss vs take profit.
Where to place your stop loss: proven methods (with examples)

Structure-based placement, beyond the last swing (trend and range)
Structure beats guesswork. Place your stop where your trade idea fails. That usually sits beyond the last clear swing point.
- Uptrend long: Put the stop a few pips below the most recent swing low.
- Downtrend short: Put the stop a few pips above the most recent swing high.
- Range buy at support: Put the stop below the range low, not in the middle of the box.
- Range sell at resistance: Put the stop above the range high.
Add a buffer. Markets probe obvious levels. Your buffer should cover typical “wick” noise for that pair and timeframe.
| Scenario | Entry | Structure level | Buffer | Stop | Stop distance |
|---|---|---|---|---|---|
| EURUSD long in uptrend | 1.0860 | Swing low 1.0830 | 5 pips | 1.0825 | 35 pips |
| GBPUSD short in downtrend | 1.2710 | Swing high 1.2760 | 8 pips | 1.2768 | 58 pips |
| USDJPY range buy | 147.20 | Range low 146.80 | 10 pips | 146.70 | 50 pips |
Keep the swing clear. If you place the stop inside the last swing, you invite stop-outs from normal pullbacks.
Indicator-based placement, ATR multiple (and how to pick the multiplier)
ATR stop placement uses recent volatility. It helps when structure looks messy or when you trade breakouts.
- Find the ATR value on your trading timeframe.
- Multiply ATR by a number.
- Place your stop that distance from entry, past the invalidation side.
Example: You buy EURUSD at 1.1000. ATR(14) on H1 reads 0.0008 (8 pips). You choose 2.5x ATR. Your stop distance is 20 pips. Stop goes at 1.0980.
Pick the multiplier based on your holding time and how tight your entries are.
- 1.0x to 1.5x ATR: Very tight. Fits precise entries. Stops out often in choppy periods.
- 2.0x to 3.0x ATR: Common for day trades and swing entries. Gives price room to breathe.
- 3.0x to 4.0x ATR: Wider. Fits longer holds. Forces smaller position size.
Do not use ATR as an excuse to oversize. A wider stop needs a smaller lot size. Your money risk stays fixed.
Timeframe alignment, use higher-timeframe levels
Stops fail when you ignore the bigger chart. A level on H4 or D1 can override your M15 setup.
- Mark the nearest higher-timeframe swing high and swing low.
- Mark major support and resistance, and clean breakout levels.
- Place your stop beyond that level if it sits close to your trade idea.
Example: You short GBPUSD on M15 at 1.2600. The last M15 swing high sits at 1.2620. But H4 resistance sits at 1.2645. If you stop at 1.2625, a normal push into H4 resistance can take you out. A more robust stop sits beyond 1.2645, with a buffer. If that makes the stop too wide for your risk, skip the trade or drop your size.
This also helps you avoid placing stops right on obvious intraday levels. Liquidity often sits there.
Percentage-of-price method, when it works and when it fails
This method sets your stop as a fixed percent of price, like 0.5 percent or 1 percent.
It works when:
- You trade many instruments and need a quick baseline.
- You trade longer timeframes where small noise matters less.
- Volatility stays stable for the pair and period.
It fails when:
- Volatility changes fast, news days, rate decisions, surprise data.
- You scalp or day trade. A fixed percent often becomes too wide or too tight.
- Structure sits close. A percent stop can land inside the invalidation zone.
Example: EURUSD at 1.1000. A 0.5 percent stop equals 55 pips. If your setup invalidates at 20 pips, a 55 pip stop delays the exit. If your setup needs 70 pips to survive normal swings, a 55 pip stop cuts it short. Use percent as a starting point, then confirm it matches structure or ATR.
Session-aware placement, London and New York vs Asian range
Volatility changes by session. Your stop should match the session you trade.
- Asian session: Often range-bound on many pairs. Stops inside the range get hit less, but breakouts can spike fast. If you fade the range, place stops beyond the range edge. If you trade the breakout, use structure plus ATR so a small fakeout does not clip you.
- London open: Fast expansion is common. Place stops beyond the pre-London range plus a buffer, or beyond the last swing on your trading timeframe.
- London and New York overlap: Highest liquidity and large moves. Tight stops get punished. If you need a tight stop, trade only clean structure with clear invalidation.
- New York afternoon: Momentum can fade. Ranges form again. Move stops only if your rules say so, not because price slows.
Example: You trade EURGBP during London. The pre-London range is 18 pips. If you place a 10 pip stop inside that box, the open can take you out on noise. A better plan places the stop beyond the opposite side of the box, then sizes the position so your money risk stays fixed. For a simple, repeatable framework that ties entries, stops, and management together, see our swing trading forex strategy for beginners.
Stop loss and position sizing: risk management that actually works
Stop loss and position sizing: risk management that actually works
Your stop decides where you are wrong. Position size decides how much you lose when you are wrong. You need both. You set the stop based on price structure and volatility. You set the lot size based on a fixed money risk.
Choose a risk-per-trade percentage
Beginners do best with small, fixed risk. Use a percent of your account balance. Keep it the same on every trade.
- 0.25% to 0.5% per trade. Conservative. Helps you survive mistakes.
- 1% per trade. Common training wheels setting.
- 2% per trade. High for most beginners. Small losing streaks hurt.
If you feel pressure to “make it back” after a loss, your risk is too high. Lower it.
Pip value, the part that makes sizing work
You size positions with pip value. Pip value depends on the pair, your lot size, and your account currency.
- Most non-JPY pairs. 1 pip = 0.0001.
- JPY pairs. 1 pip = 0.01.
For a USD account, these are useful rules of thumb:
- Majors where USD is the quote currency like EURUSD, GBPUSD, AUDUSD. A 1.00 standard lot is about $10 per pip. A 0.10 lot is about $1 per pip.
- Pairs where USD is the base currency like USDCHF, USDJPY. Pip value changes with price. Your platform calculates it, but it stays close to $10 per pip per standard lot most of the time.
- Crosses like EURGBP. Pip value depends on the quote currency and the conversion rate into USD. Your platform calculates it. Do not guess.
Use the position size calculator in your platform. Check the pip value before you place the trade. Then your stop distance turns into a known dollar risk.
Position sizing formula you can repeat
Use this simple math.
- Money risk = Account balance × Risk %
- Lot size = Money risk ÷ (Stop in pips × Pip value per 1.00 lot)
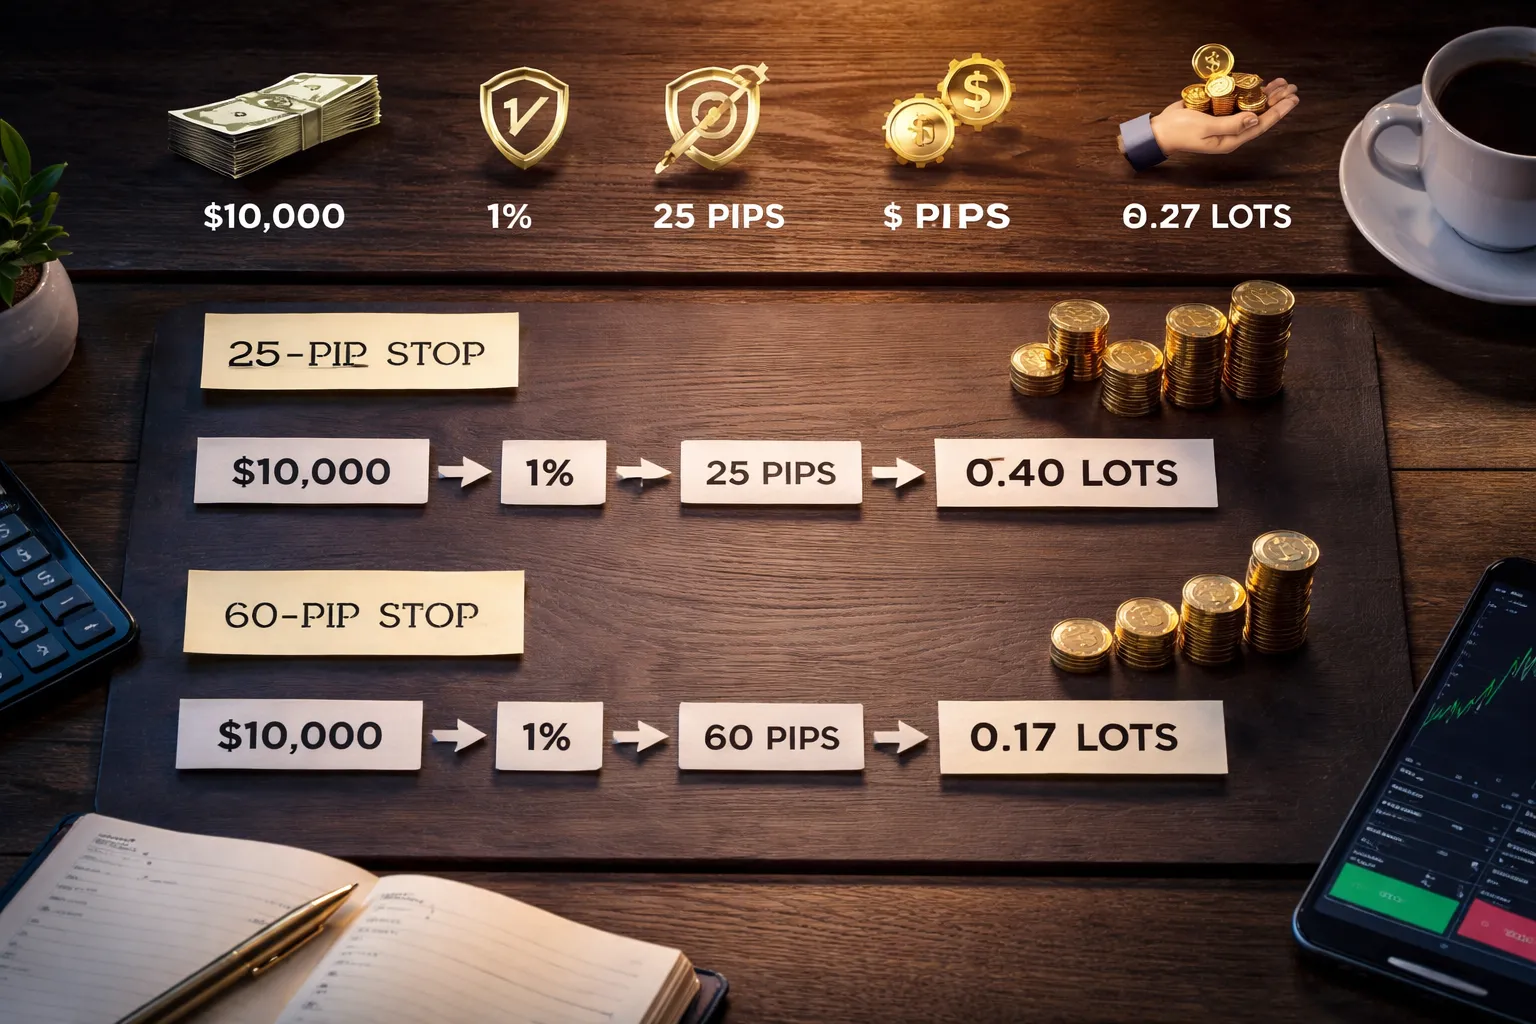
Worked examples, 1% risk with different stop sizes
Assume a $10,000 account. Risk is 1%, so money risk is $100. Use EURUSD so pip value is simple. A 1.00 lot is about $10 per pip.
| Stop size | Money risk | Implied lot size | $ per pip at that size |
|---|---|---|---|
| 25 pips | $100 | 0.40 lots | $4.00 |
| 60 pips | $100 | 0.17 lots | $1.70 |
Same account. Same risk. Different stop. Your size changes. That is the point. A wider stop is not “more risk” if you cut the lot size.
Risk drift, what happens when you change the stop but keep the lot size
Most beginners blow risk control here. They widen stops but keep the same lot size.
Example. You trade 0.40 lots on EURUSD.
- At a 25 pip stop, risk is 25 × $4.00 = $100.
- At a 60 pip stop, risk is 60 × $4.00 = $240.
Your risk jumps from 1% to 2.4% without you noticing. A few “small adjustments” like this stack fast. You end up trading big when conditions get choppy.
Portfolio risk, limit correlated exposure
Pair correlation can turn two trades into one oversized bet. EURUSD and GBPUSD often move in the same direction because both include USD and both react to USD moves.
- If you risk 1% on EURUSD and 1% on GBPUSD at the same time, your combined USD exposure can act like one 2% trade.
- Set a rule for “same theme” trades. Example. Max 1% total across highly correlated USD pairs, or max 1.5% if you must split it.
- Watch shared drivers. USD news, risk-on risk-off moves, and central bank events can push correlated pairs together.
If you want a simple way to spot this, start with forex correlation and treat strongly positive pairs as one position for risk limits.
Common stop-loss mistakes (and how to avoid them)
Placing stops at obvious levels (liquidity zones) without a buffer
Many beginners put stops on the same prices. The exact swing high or swing low. A clean round number like 1.2000. The prior day high. These levels attract orders.
Price often spikes into these zones, tags clustered stops, then reverses. Your stop becomes easy liquidity.
- Add a buffer. Place your stop beyond the level, not on it. Use a small distance that fits the pair and timeframe.
- Use structure, then confirm with volatility. If you use a swing low, check that your stop also sits outside normal noise for that session.
- Avoid “pretty” numbers. If your level is 1.2000, consider 1.1987 or 1.2013, based on your chart and volatility.
Setting stops too tight for the timeframe and pair volatility
A 10 pip stop can make sense on some pairs and setups. It can also be random. Volatility changes by pair and time of day. GBP pairs and gold often need wider room than EURUSD. London and New York often move more than Asia.
If your stop sits inside normal fluctuation, you will get stopped out often, even when your idea is right.
- Match the stop to the chart. If you trade H1 or H4, your stop must survive typical swings on that timeframe.
- Use a volatility measure. ATR is common. A practical baseline is 1.0 to 1.5 times ATR of your entry timeframe, adjusted to fit market structure.
- Size the position to the stop. Do not shrink the stop to force a bigger lot size. Keep risk per trade fixed, then let the position size change.
Moving stops farther away to “avoid being wrong”
This breaks your risk plan. One trade can wipe out weeks of steady work. The market does not care that you “need it to come back.”
- Set the stop at entry and accept it. If price hits it, your setup failed.
- Only adjust stops with rules. Move a stop tighter as the trade proves itself, never wider.
- If you must re-enter, do it clean. Take the loss, reassess, then place a new trade with a new stop and correct sizing.
Ignoring news risk, CPI, NFP, central bank decisions, and spread widening
Scheduled releases can move FX fast. Slippage increases. Spreads can widen. Your stop may fill worse than your level. That turns planned risk into larger real loss.
- Know your calendar. Track CPI, NFP, rate decisions, press conferences, and key speeches for the currencies you trade.
- Reduce exposure before the event. Cut size, tighten risk across correlated pairs, or stay flat.
- Do not place stops too close right before major news. Spreads can hit them without a true move.
- Assume slippage is possible. Plan risk with a cushion on high impact events, or avoid holding through them.
Over-relying on trailing stops in choppy markets
Trailing stops help in trends. In range conditions they can cut winners early. You get clipped on minor pullbacks, then price continues without you.
- Use trailing stops only when conditions support it. Clear trend, clean swings, rising momentum.
- Trail behind structure, not price ticks. Trail behind swing lows or highs, or behind a trend filter you already use. A simple option is a moving average as a regime filter. Use this only as a rule, not a prediction. moving averages in forex
- Combine with partial exits. Take some profit at a planned level, then trail the rest. This reduces the urge to trail too tight.
Not accounting for swaps and rollover on longer holds
If you hold trades overnight, you pay or receive swap. It can be small or meaningful, depending on the pair and broker. On longer holds it affects your net result. Wednesday rollover can apply multiple days of swap on many brokers.
- Check the swap rate before you enter. Know if you pay or earn.
- Include swap in your plan. If your target is small and your holding time is long, swap can reduce expectancy.
- Watch for triple swap days. Avoid holding marginal trades through rollover if swap works against you.
Advanced (but beginner-safe) stop management techniques
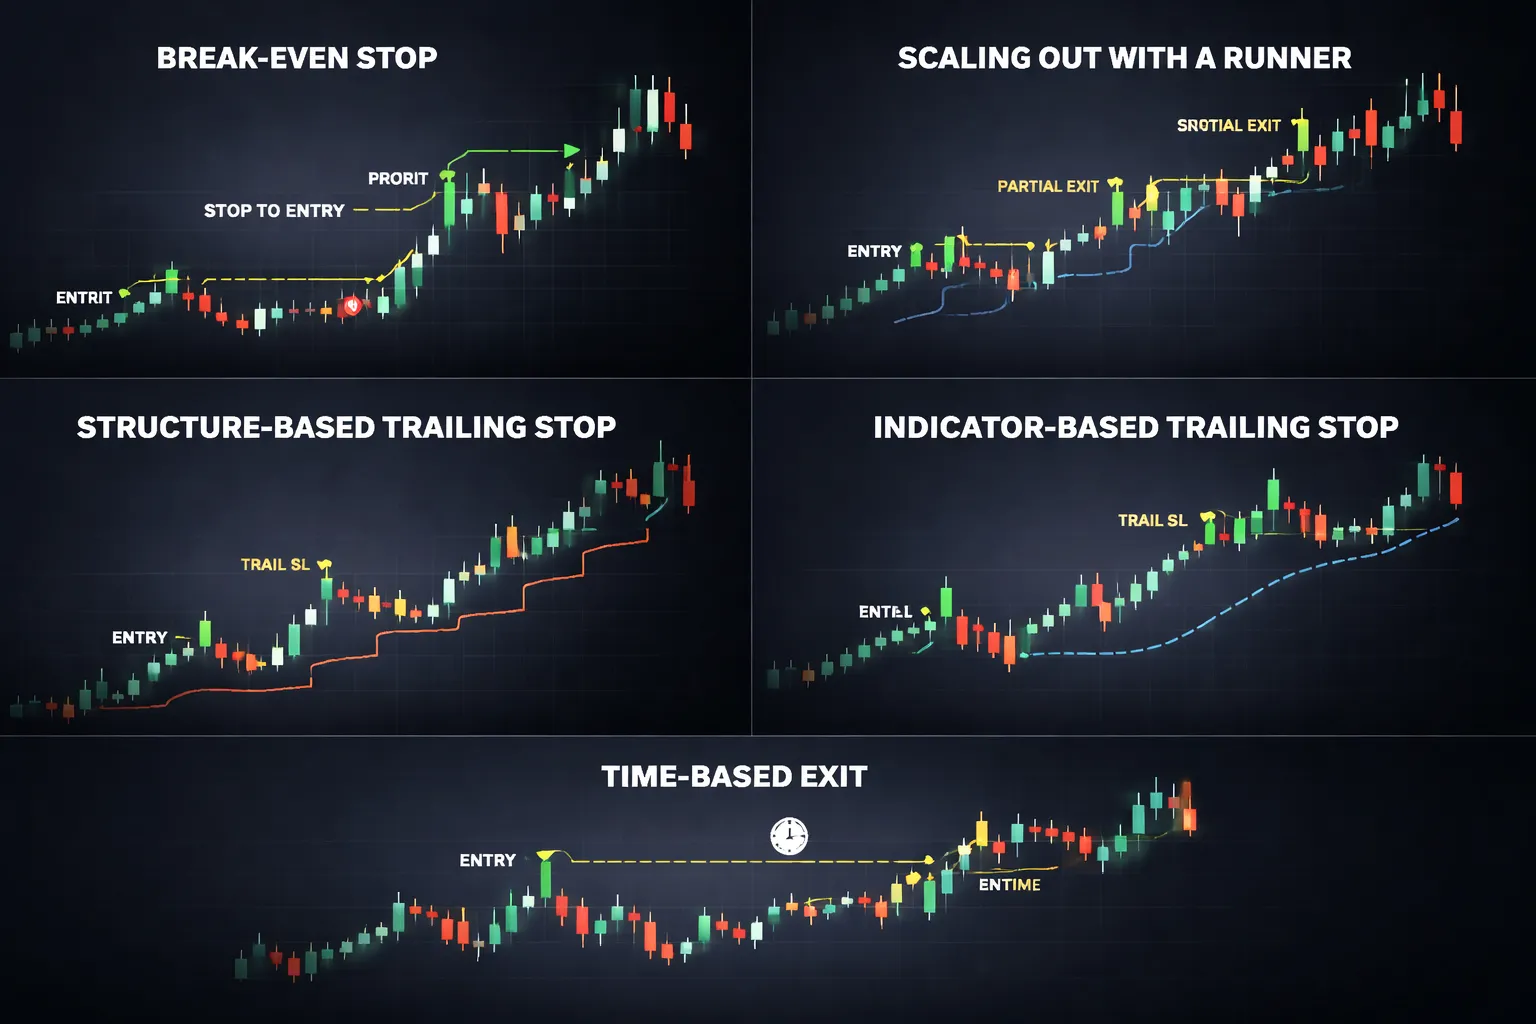
Break-even stops
A break-even stop moves your stop loss to your entry price. It cuts risk to near zero. It also increases the chance you get stopped out on normal pullbacks.
When it helps
- You trade news spikes or fast momentum, and you want to remove downside quickly.
- Your setup has a clear continuation trigger, and price already moved beyond it.
- Your trade has high swap cost, and you do not want to hold through rollover without protection.
- You trade correlated pairs, and another position increases your total exposure. Manage that exposure with tighter protection and correlation awareness. Use forex correlation explained as a risk check.
When it reduces expectancy
- You move to break-even too early, before price clears the noise zone.
- Your strategy needs room. Mean reversion and swing setups often retest entry.
- You turn winners into many small scratches, while losers still hit full stops.
Beginner-safe rule
- Only move to break-even after price moves at least 1R in your favor, or after it breaks and closes beyond a key level you used for entry.
- Add costs. A true break-even needs spread and commission covered. If your platform allows it, place break-even at entry plus costs.
Scaling out, partial profits plus a protected runner
Scaling out means you close part of your position at a planned level. You keep the rest to aim for a bigger move.
Simple framework
- Take partial profit at 1R. Common splits are 50 percent or 70 percent.
- Move the stop on the remaining position to a logical protective level, often break-even plus costs, or behind the last swing.
- Let the runner target the next structure level, not an arbitrary number.
Pros
- You bank profit earlier. This reduces emotional pressure.
- You can hold longer without widening your stop.
Cons
- You reduce average win size. Your big winners get smaller.
- You add complexity. More decisions means more mistakes.
Beginner-safe rule
- Use one scale-out point and one runner plan. Do not add extra layers.
- Track results by logging R-multiples for the full trade, not just the first take profit.
Trailing by structure vs trailing by indicator
Trailing stops lock in profit as price moves. You can trail using market structure or an indicator.
Structure trailing
- Method: trail the stop behind swing highs and lows, or behind a broken level that should act as support or resistance.
- Pros: matches how price actually moves. It adapts to volatility.
- Cons: requires chart skill. You can move it too tight if you misread swings.
Indicator trailing
- Method: trail using a fixed rule like ATR multiple, moving average, or a channel.
- Pros: easy to execute. Rules stay consistent.
- Cons: indicators lag. A fixed formula can trail too close in choppy markets, or too far in slow trends.
Beginner-safe approach
- Pick one trailing method. Do not switch mid-trade.
- Move the stop only after a candle close. This reduces random stop moves during spikes.
- If you trail by structure, trail behind the last confirmed swing, not the most recent wick.
Time-based exits
Some trades do not fail fast. They also do not work. Time-based exits cut these trades before they waste margin, focus, and swap.
How to set it
- Define a time limit at entry. Use candles, not hours. Example: close the trade if it has not reached 0.5R within 6 candles.
- Use a separate rule for day trading vs swing trading. Short timeframes need shorter limits.
When it helps
- Your setup expects quick follow-through, like breakouts or momentum entries.
- Swap works against you and the trade stagnates near entry.
When it can hurt
- Your strategy often consolidates before moving. You may exit right before the move.
Use alerts for discretionary exits without removing your stop
Alerts let you manage trades actively while keeping your stop loss in place. Your stop stays as the fail-safe. Your alerts trigger review points.
Alert types that work
- Price reaches 1R. Review for break-even, scale-out, or hold.
- Price touches a key structure level. Decide if you take partial profit.
- Price closes back inside a broken level. Consider an early exit if your setup depends on that break holding.
- Time alert. Review at your time-based exit limit.
Rules that keep you safe
- Do not cancel your stop to “give it room”. If you need more room, you should have used a wider stop with smaller position size.
- Do not widen stops after entry. Only tighten, or exit.
- Write your alert actions before you place the trade. Treat alerts as prompts to follow your plan.
Broker and platform considerations that affect stop losses
Minimum stop distance and freeze levels
Your broker can block how close you place a stop. Two limits matter.
- Minimum stop distance, the smallest number of points or pips between the current price and your stop. If your stop sits inside this buffer, the platform rejects it.
- Freeze level, a no-change zone near the current price. Inside this zone you cannot modify or delete orders. Some brokers apply it around news and at rollover.
Read these values in the symbol specs. Platforms show them as “Stops level” and “Freeze level,” often in points. Convert to pips for your pair. On a 5-digit EURUSD quote, 10 points equals 1 pip.
If you trade tight stops, these limits decide if your plan is executable. If the broker needs a 2 pip minimum and you plan a 1 pip stop, you do not have a setup. You have a problem.
Execution model basics you need to know
Stops do not guarantee a price. They trigger an order. The fill depends on execution.
- Stop-loss as market. When price hits your stop level, the platform sends a market order. You get the next available price. This can slip.
- Stop-loss as limit. Some platforms let you attach a stop with a limit price. You cap slippage but you can miss the exit in a fast move.
- Dealing desk vs STP or ECN. With a dealing desk, the broker can internalize flow and apply rules like wider stops or freeze levels. With STP or ECN routing, fills depend more on liquidity and spread. Either way, your stop can slip during fast markets.
Also know the order type. A “stop” triggers above or below price. A “stop limit” adds a limit. A “guaranteed stop” exists at some brokers, usually with a fee and wider minimum distance.
Spread, liquidity, and stop-outs
Stops trigger on bid or ask, not on the mid price. This matters.
- For a long, your stop triggers on the bid.
- For a short, your stop triggers on the ask.
When spreads widen, the bid drops and the ask rises. Your stop can trigger without the mid price reaching your level.
Spreads widen most during:
- Rollover and daily swap time.
- Market opens and session transitions.
- Major news releases and surprise headlines.
- Thin liquidity pairs and exotic crosses.
Risk control needs spread awareness. If you set stops right on obvious levels, a normal spread spike can take you out. If you trade around news, assume wider spreads and slippage. If you must trade those windows, use smaller size and wider stops.
Also watch margin stop-out rules. A broker can close positions when your margin level hits a threshold. That exit ignores your technical stop. High leverage and multiple positions make this worse.
Stop-loss hunting, myths and microstructure
“Stop hunting” usually means one of three things.
- Liquidity seeking. Large orders need liquidity. Clusters of stops sit above highs and below lows. Price often pushes into those areas, fills orders, then reverses.
- Spread spikes. A wider spread prints a bid or ask that touches your stop. This looks like a “hunt” on the chart.
- Slippage in fast markets. Your stop triggers, but the next tradable price is worse.
Focus on what you can control. Avoid placing stops at the exact obvious level. Place them beyond the level, where the trade idea fails. Use structure and volatility, not fear. If you use volatility, tie your stop width to ATR and size down. See ATR-based stop loss.
Demo vs live, slippage, fills, and psychology
Demo results can mislead you. Live trading adds friction.
- Slippage. Demo often fills at your stop price. Live fills at the next available price. This shows up most in news and thin markets.
- Partial fills. Less common in small retail size, but it can happen on some execution setups.
- Requotes and delays. Some brokers and platforms reject fast changes or delay execution during volatility.
- Behavior. Live losses feel different. You may cancel stops, widen stops, or hesitate. Your rules must survive stress.
Test your stop behavior in live conditions with small size. Track three numbers per trade, planned risk, actual loss, and slippage in pips. If actual loss often exceeds planned risk, widen stops, cut size, avoid illiquid hours, or change broker.
Mini checklist: placing a stop loss with confidence
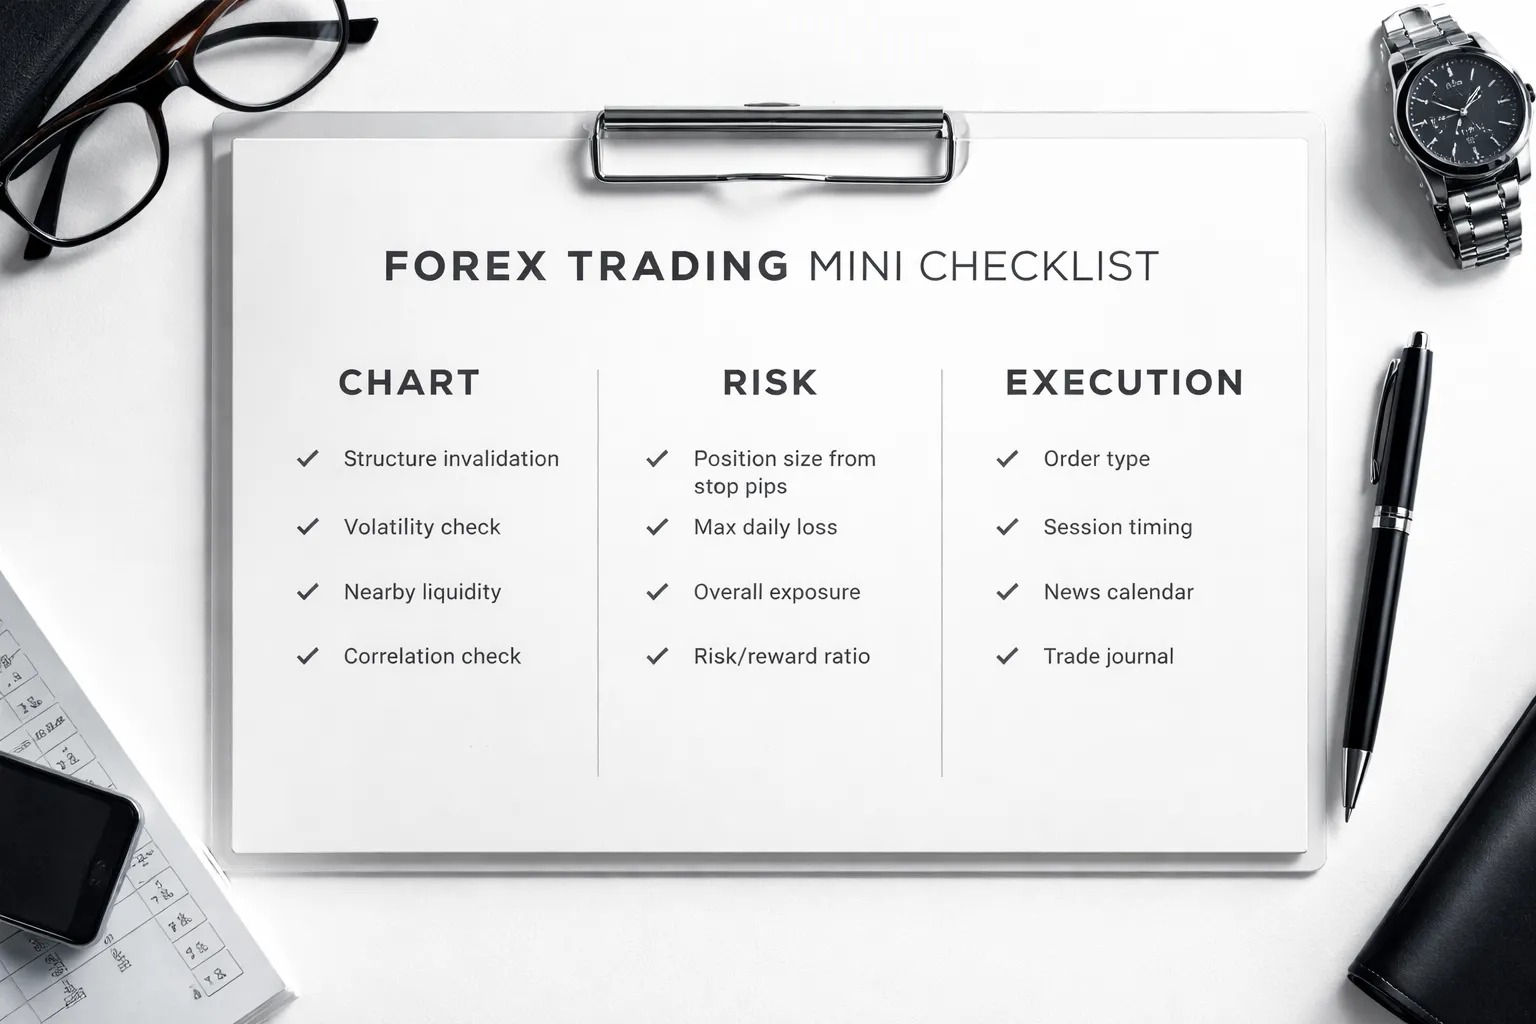
Chart checklist: structure, volatility, and nearby liquidity
- Mark your invalidation level. Put the stop where your trade idea breaks. Use swing high, swing low, or the range boundary.
- Check nearby liquidity. Avoid placing the stop on obvious round numbers and recent equal highs or lows. Those areas attract stops.
- Measure current volatility. Compare your stop distance to the last 20 to 50 candles. If price often moves that far within your holding time, your stop is too tight or your target is too close.
- Respect structure first. If structure needs a wider stop, cut position size. Do not force a tight stop to fit your desired lot size.
- Match stop logic to setup type. Breakouts need room for retests. Ranges need stops outside the range, not inside it. If you trade breakouts, follow the rules in breakout trading strategy.
Risk checklist: position size, max daily loss, and correlation
- Set risk per trade in dollars first. Decide the dollar loss you accept if the stop hits. Keep it fixed.
- Convert stop pips to position size. Wider stop means smaller size. Tight stop means larger size, but only if the stop sits beyond structure.
- Cap your daily loss. Set a hard limit, such as 2R or a fixed dollar amount. Stop trading for the day when you hit it.
- Limit total open risk. Add up risk across all open trades. Keep the sum inside your daily limit.
- Check correlation exposure. If you hold EURUSD and GBPUSD long, you often run the same USD short trade twice. Cut size or take one position.
- Plan for slippage. Add a small buffer to expected loss during fast markets. If your data shows 1 to 3 pips typical slippage, include it in your risk math.
Execution checklist: order type, session timing, and news calendar
- Use a real stop order. Place the stop in the platform. Do not rely on mental stops.
- Choose the right order type. Use a stop loss attached to the position. Use a stop entry with a stop loss for breakouts. Avoid manual exits during spikes.
- Place the stop first, then the size. Set the stop location, confirm stop pips, then calculate lots.
- Trade liquid sessions. Expect tighter spreads and cleaner fills during London and New York overlap. Reduce size or skip thin hours.
- Check the news calendar. Know the next high impact release for your pair. If news hits inside your holding window, widen the stop and cut size, or stay flat.
- Record your execution. Log planned risk, actual loss, and slippage in pips. Review weekly and adjust rules based on your numbers.
| Before you click buy or sell | Minimum you must confirm |
|---|---|
| Structure | Stop sits beyond invalidation, not inside noise |
| Volatility | Stop distance fits recent swing size for your timeframe |
| Risk | Position size matches fixed dollar risk, daily loss cap set |
| Correlation | Total exposure across similar pairs stays within limits |
| Execution | Stop placed on platform, session and news checked |
Frequently Asked Questions
What is a stop loss in forex?
A stop loss is an order that closes your trade if price hits a level you set. It caps your loss on that position. You place it when you open the trade or right after. Your platform executes it automatically once price reaches the stop.
Where should you place your stop loss?
Place your stop beyond your trade invalidation level. Use a recent swing high or swing low, or a clear structure break point. Do not place it inside normal noise. Match the stop distance to your timeframe’s typical swing size.
How many pips should my stop loss be?
No fixed number works. Use structure first, then check volatility. Many traders use a recent swing plus a small buffer, or an ATR-based distance. If your required stop feels too wide, reduce position size, not stop quality.
How do I calculate position size from my stop loss?
Pick a fixed dollar risk per trade. Measure stop distance in pips. Use your pip value to size the trade so a stop-out equals your dollar risk. Most platforms have a position size calculator. Keep a daily loss cap.
Should I use a hard stop or a mental stop?
Use a hard stop on the platform. It protects you during spikes, disconnects, and fast moves. Mental stops fail when you hesitate. If you must manage manually, do it only with strict rules and low leverage.
Can I move my stop loss?
Move your stop only for a rule-based reason. Examples include trailing behind new swing points or reducing risk after a planned milestone. Do not widen your stop to avoid a loss. If the setup invalidates, exit.
What is stop hunting and how do I avoid it?
Some price moves sweep obvious levels like equal highs and lows. Avoid placing stops at the exact swing point. Add a small buffer and use levels that break your idea, not levels everyone sees. Trade only clean structure.
Will a stop loss always fill at my price?
No. In fast markets, you can get slippage. News, gaps, and low liquidity increase it. A stop loss triggers a market exit, so fill depends on available prices. Reduce risk around major releases and thin sessions.
Should I set my stop loss before or after entry?
Set it before entry, or place it immediately after you enter. You should know your stop location and position size in advance. If you cannot define invalidation, you do not have a trade.
What is the difference between stop loss and take profit?
A stop loss limits downside. A take profit locks in gains at a target. Both are exit orders. You use them to plan risk and reward before you enter. You can also scale out, but keep total risk controlled.
How do stops work in breakout trades?
In breakouts, place the stop where the breakout fails. Often this sits beyond the breakout base or the last swing inside the range. Give room for a retest if your rules allow it. See our breakout trading strategy guide for setups and stop rules.
Can I place one stop for multiple open trades?
You can, but you should control total exposure. Correlated pairs can stop you out together. Track combined risk across EUR, GBP, and USD-heavy pairs. Keep total open risk within your limits, not per-trade only.
What stop loss types should beginners use?
- Stop market, simplest, exits when level hits, can slip.
- Stop limit, controls price, but may not fill in fast moves.
Most beginners should use stop market and manage risk with smaller size.
Conclusion
A stop loss is your risk limit. Place it before you enter. Size your position so the loss stays small if price hits that level.
- Set the stop at a level that proves you wrong. Use structure like recent swing highs and lows, or a volatility buffer like ATR. Do not place it at a round number by default.
- Set risk per trade first. Many beginners use 0.5% to 1% of account equity. Then calculate lot size from stop distance. Do not move the stop wider to avoid a loss.
- Use stop market orders. They fill fast. Expect slippage in fast markets, then reduce size to keep risk controlled.
- Track total exposure. Correlated pairs can stack the same bet. Cap total open risk across related trades.
Final tip. Write your stop rule and your risk rule on your trade checklist. Follow it on every trade, then review results after 20 to 50 trades and adjust only one variable at a time.
To improve timing, combine your stop plan with a simple trend filter like moving averages.
-
How to Start Forex Trading Step by Step (Beginner Roadmap)
1 month ago -
Forex Order Types Explained: Market vs Limit vs Stop Orders
1 month ago -
Stop Loss vs Take Profit: Differences, Examples & Best Practices
1 month ago -
How to Set Stop Loss and Take Profit (Step-by-Step)
1 month ago -
How to Place a Forex Trade Step by Step (Your First Trade Explained)
1 month ago
-
- Step 1: Choose trade direction and identify your entry
- Step 2: Mark the invalidation level on the chart
- Step 3: Convert the stop level into pips and account currency risk
- Step 4: Calculate position size from risk per trade (simple formula)
- Step 5: Set the stop order on MT4/MT5 (desktop and mobile)
- Step 6: Set the stop order on popular web platforms (cTrader and TradingView-style workflow)
- Step 7: Double-check spread, minimum stop distance rules, and margin impact
-
- Structure-based placement, beyond the last swing (trend and range)
- Indicator-based placement, ATR multiple (and how to pick the multiplier)
- Timeframe alignment, use higher-timeframe levels
- Percentage-of-price method, when it works and when it fails
- Session-aware placement, London and New York vs Asian range
-
- Stop loss and position sizing: risk management that actually works
- Choose a risk-per-trade percentage
- Pip value, the part that makes sizing work
- Position sizing formula you can repeat
- Worked examples, 1% risk with different stop sizes
- Risk drift, what happens when you change the stop but keep the lot size
- Portfolio risk, limit correlated exposure
-
- Placing stops at obvious levels (liquidity zones) without a buffer
- Setting stops too tight for the timeframe and pair volatility
- Moving stops farther away to “avoid being wrong”
- Ignoring news risk, CPI, NFP, central bank decisions, and spread widening
- Over-relying on trailing stops in choppy markets
- Not accounting for swaps and rollover on longer holds
-
- What is a stop loss in forex?
- Where should you place your stop loss?
- How many pips should my stop loss be?
- How do I calculate position size from my stop loss?
- Should I use a hard stop or a mental stop?
- Can I move my stop loss?
- What is stop hunting and how do I avoid it?
- Will a stop loss always fill at my price?
- Should I set my stop loss before or after entry?
- What is the difference between stop loss and take profit?
- How do stops work in breakout trades?
- Can I place one stop for multiple open trades?
- What stop loss types should beginners use?
-
-
Forex Lot Size Calculator: How to Use It to Size Trades Correctly
1 month ago -
How to Calculate Position Size in Forex (Position Sizing Formula + Examples)
1 month ago -
Forex Leverage Explained: How It Works, Pros, Cons & Examples
1 month ago -
Margin vs Leverage in Forex: What’s the Difference?
1 month ago -
What Is Forex Trading? A Beginner’s Guide to How It Works
1 month ago
-
Forex Leverage Explained: How It Works, Pros, Cons & Examples
1 month ago -
Is Forex Trading Legal in the United States? Rules, Regulators & What to Know
1 month ago -
Forex Market Hours & Trading Sessions Explained (Best Times to Trade)
1 month ago -
Forex Trading Platforms Comparison: MetaTrader vs cTrader vs TradingView
1 month ago -
How to Calculate Position Size in Forex (Position Sizing Formula + Examples)
1 month ago