Stop Loss vs Take Profit: Differences, Examples & Best Practices
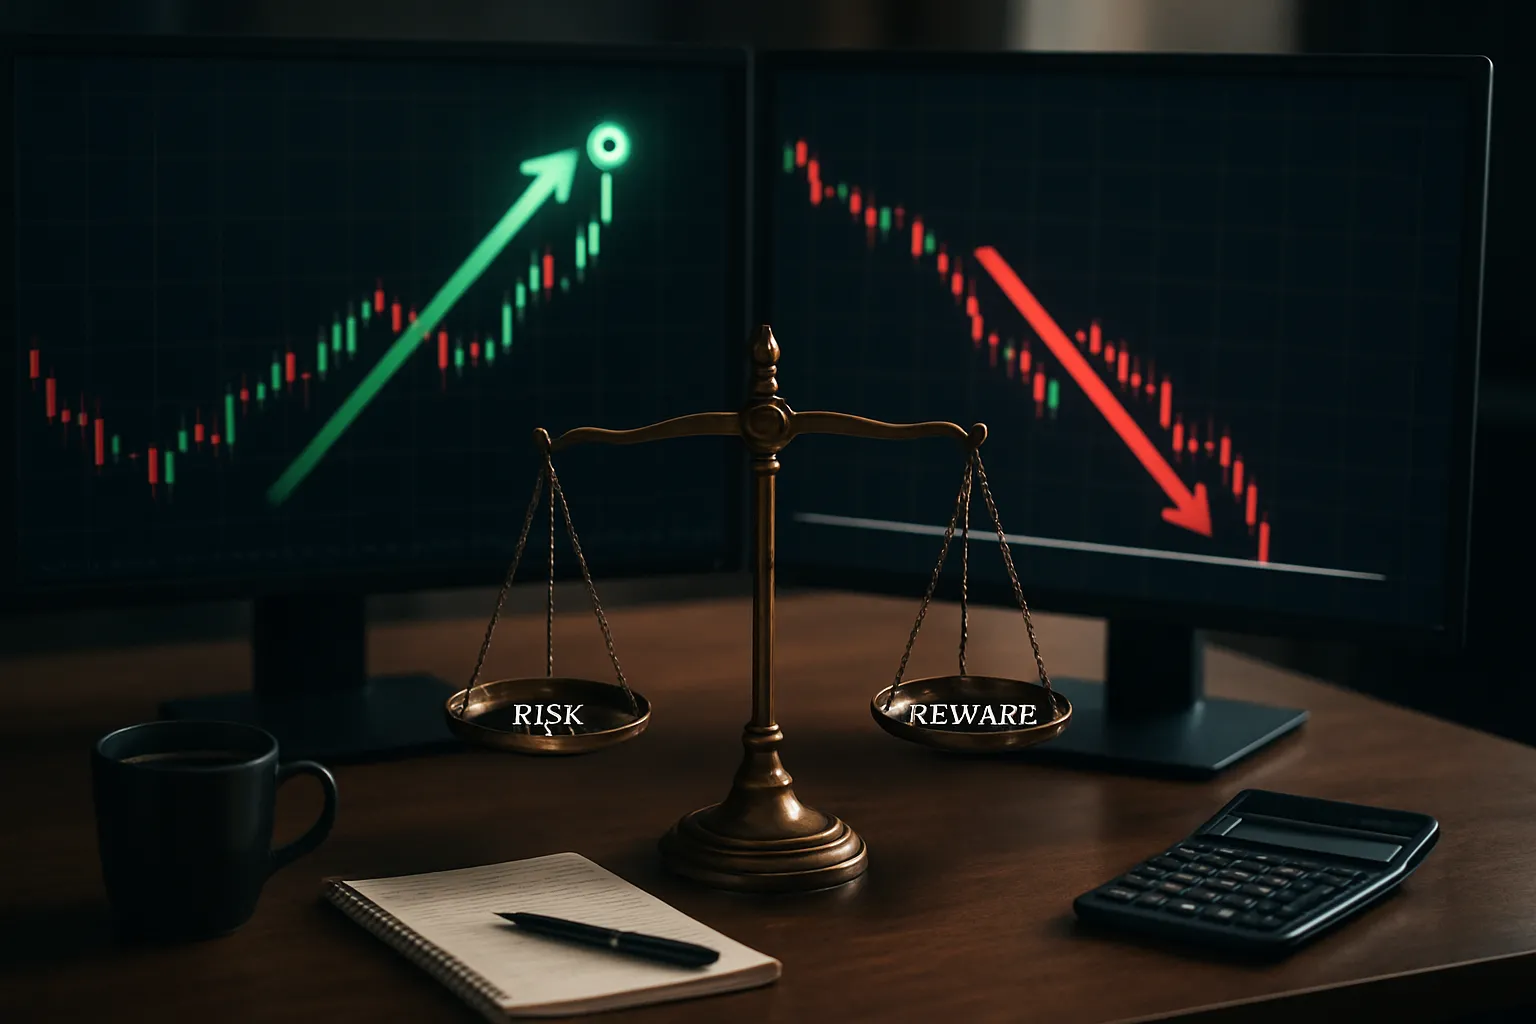
One bad trade can erase weeks of gains. Stop loss and take profit orders help you control that risk. A stop loss closes your trade at a preset loss. A take profit closes your trade at a preset gain. Both orders define your exit before emotions take over.
In this guide, you will learn the key differences between stop loss and take profit, when to use each, and how they work in real trades. You will see simple price examples, common mistakes that widen losses or cut winners short, and best practices for setting levels based on structure and risk. You will also learn how to pair both orders so your risk stays fixed and your reward stays planned.
If you want a deeper, step-by-step method, read our How to Place a Stop Loss in Forex guide.
Key Takeaways
- In het kort: Stop loss limits your loss, take profit locks in your gain.
- In het kort: A stop loss sits where your trade idea breaks, a take profit sits where price likely stalls.
- In het kort: Set both before you enter, so your risk stays fixed and your reward stays planned.
- In het kort: Use market structure, not feelings, to pick levels.
- In het kort: Keep position size tied to stop distance, not to how confident you feel.
- In het kort: Avoid tight stops and close targets that get hit by normal volatility.
Key Takeaways
- Stop loss: Your exit for a wrong trade. It caps downside. Place it past a level that proves your setup failed.
- Take profit: Your exit for a right trade. It captures upside. Place it near a likely reaction zone, prior high or low, supply or demand, or a measured move target.
- Pair orders: Plan the stop first, then set the target. If the target does not justify the stop, skip the trade.
- Match size to risk: Wider stop means smaller position. Tight stop means larger position, but only if structure supports it.
- Use a minimum R multiple: Many strategies aim for at least 1:2. Your edge depends on win rate and average R, so track both.
- Account for costs: Spread and commissions reduce your real reward and can trigger tight stops. Leave room for them.
- Avoid common errors: Do not move your stop farther to avoid a loss. Do not cut winners early because of fear. Do not set targets inside obvious liquidity zones unless your plan expects a quick scalp.
- Keep it repeatable: Use the same process on every trade, then review results. For rules and sizing basics, read our risk management in forex guide.
Stop Loss vs Take Profit in Forex: Core Definitions and Purpose

What a stop-loss order does in a live forex position
A stop-loss sets a price where your broker closes your trade if price moves against you. It caps the loss on that position, based on where you place the stop.
In a live forex market, your stop triggers when bid or ask touches the stop price, depending on your direction. It then becomes a market order, or a stop-market execution. Your fill can differ from the stop price during fast moves.
- Long trade: your stop-loss usually triggers on the bid. Price drops to your stop, the position closes.
- Short trade: your stop-loss usually triggers on the ask. Price rises to your stop, the position closes.
- Key point: a stop-loss controls risk, it does not control the exact exit price.
What a take-profit order does and how it closes trades automatically
A take-profit sets a price where your broker closes your trade when price moves in your favor. It locks in gains without you needing to watch the chart.
Like a stop, a take-profit triggers on the relevant quote side, then closes the trade. In normal conditions, fills often land near your target. In thin liquidity or news spikes, you can see slippage.
- Long trade: your take-profit triggers when bid reaches your target.
- Short trade: your take-profit triggers when ask reaches your target.
- Common setup: you place stop-loss and take-profit together. Your platform treats them as linked exits on one position.
Why these orders matter in leveraged markets (margin, drawdowns, and survival)
Forex uses leverage. Small price moves create large percentage swings in your account. Stops and targets turn that leverage into a controlled bet.
- Margin control: a defined stop helps you avoid margin calls by limiting how far a losing trade can run.
- Drawdown control: smaller, planned losses keep your equity curve stable. Large drawdowns demand larger returns to recover.
- Execution discipline: predefined exits reduce impulse decisions, especially during volatility and spread widening.
- Consistency: stops define risk per trade. targets define expected payoff. Together they make your results measurable. For planning target distance versus stop distance, see our risk-reward ratio guide.
Common misconceptions
- “Guaranteed fill”. Standard stop-loss and take-profit orders do not guarantee your price. Gaps, news spikes, and low liquidity can cause slippage.
- “Set-and-forget”. You still need a plan for spread changes, rollover, news, and trade invalidation. Automation helps, it does not replace review.
- “Always 1:2 risk-reward”. A fixed ratio does not fit every pair or setup. Let structure and volatility drive placement, then verify the ratio makes sense for your win rate and costs.
| Order | Primary purpose | What triggers it | Main risk |
|---|---|---|---|
| Stop-loss | Limit loss on one position | Price reaches your stop level | Slippage in fast markets, wider spreads can trigger earlier |
| Take-profit | Lock profit automatically | Price reaches your target level | Early exit if trend extends, slippage in thin liquidity |
Key Differences Between Stop-Loss and Take-Profit Orders
Risk management vs reward management
Stop-loss controls downside. It defines how much you will lose if the trade fails. It protects your account, position sizing, and max daily loss rules.
Take-profit controls upside capture. It defines how much you will take if the trade works. It protects realized gains from reversals and from you changing your plan mid-trade.
They do different jobs. Your stop-loss sets your risk per trade. Your take-profit sets your expected payoff. Together, they define your risk to reward ratio before you enter.
How each order behaves in fast markets
Both orders can fill worse than your level when liquidity thins or price moves fast. The gap between your level and your fill is slippage.
- Stop-loss risk: A fast drop can skip your stop level and fill lower. News spikes and market opens increase this risk. Wider spreads can also hit stops early, especially on thin pairs or off-hours.
- Take-profit risk: A fast push through your target can fill slightly worse, or partially fill in thin liquidity. Your bigger risk is execution at a smaller profit than planned, then price keeps running without you.
Plan for slippage where it matters. Place stops beyond noise zones, not on obvious round numbers. Use tighter size if you must keep a tight stop.
Emotional impact on your decisions
Stop-loss reduces panic exits. You know the max loss before the trade starts. You do not freeze when price moves against you.
Take-profit reduces greed-driven holdouts. You lock a gain without watching every tick. You avoid turning a winner into a scratch or a loss.
Use both to remove decision points during stress. Decisions made under pressure tend to break your rules.
Using one without the other, and why it can be risky
- Stop-loss without take-profit: You let winners run, but you risk giving back large open profit in fast reversals. This gets worse if you do not trail stops or scale out.
- Take-profit without stop-loss: You cap upside, but you leave losses open-ended. One large loss can erase many small wins, especially with leverage.
If you trade short-term, define both levels before entry. A simple framework helps, see this day trading forex strategy for beginners guide.
Order Types in Forex: How SL/TP Are Placed and Triggered

Stop vs Stop-Limit Orders: Execution Differences and Trade-Offs
A stop order becomes a market order when price hits your stop level. You get filled at the best available price. In fast moves, news spikes, or thin liquidity, you can get slippage. Your loss can exceed your planned amount.
A stop-limit order becomes a limit order when price hits your stop level. You set a stop price and a limit price. You control the worst fill price. You also risk no fill if price gaps through your limit.
- Use stop (market) for exits you must take. You accept slippage risk.
- Use stop-limit for exits where price control matters. You accept fill risk.
- For tight risk around news, stop-limit can fail. Price can skip your limit and keep running.
Limit Orders and Take-Profit Mechanics
Take-profit usually uses a limit order. You tell the broker to close at your price or better. That fits the goal of locking in a minimum profit.
Limit orders can still miss fills. If price touches your level but liquidity is thin, you may get a partial fill or no fill. Some platforms show a TP hit on the chart, but your order sits behind other orders at the same price.
- TP as limit: fill at your price or better.
- Stop-loss as stop: exit quickly, accept slippage.
- TP can be partial: common in volatile pairs or large position sizes.
Bid, Ask, and Spread: Which Price Triggers Your SL/TP
Forex has two prices. Bid is where you sell. Ask is where you buy. The spread is the difference. Your SL or TP triggers off bid or ask based on your position and the order type.
| Position | Your exit is a | Triggers on |
|---|---|---|
| Buy (long) | Stop-loss sell | Bid |
| Buy (long) | Take-profit sell limit | Bid |
| Sell (short) | Stop-loss buy | Ask |
| Sell (short) | Take-profit buy limit | Ask |
Spread widening can hit stops without the chart mid-price reaching your level. This shows up most at rollover, during news, and on low-liquidity sessions. Place stops where spread noise cannot reach them.
Broker and Platform Nuances: Server-Side Orders, OCO, and Time-in-Force
Platforms handle SL and TP in two main ways. Server-side orders sit on the broker server. Client-side orders depend on your terminal, VPS, or phone staying connected. Prefer server-side for protection during outages.
- Server-side SL/TP: keeps working if your device disconnects.
- Client-side SL/TP: can fail if your platform freezes or loses connection.
- OCO: one cancels the other. When TP fills, the SL cancels, and vice versa.
- GTC: good till canceled. Your orders stay until filled or removed.
- Day order: cancels at session end or broker cutoff time.
Check your platform rules for minimum stop distance, freeze levels, and order modification limits near price. These can block tight stops or prevent quick edits. Build levels from structure first, then size the trade. Use trend lines and channels to place stops beyond clean swing points, see trend lines and channels.
Practical Examples: Stop Loss and Take Profit in Real Forex Trades

Long Trade Example (EUR/USD), Stop Below Structure, Take Profit at Resistance
You buy EUR/USD after a pullback holds above a clear swing low.
- Entry: 1.0840 after price rejects a support zone.
- Structure point: prior swing low at 1.0815.
- Stop loss: 1.0808, below the swing low and below the zone. Risk equals 32 pips.
- Take profit: 1.0904 at a prior resistance swing high. Reward equals 64 pips.
- Logic: if price breaks 1.0815 cleanly, your long idea fails. If price reaches the prior high, sellers often show up again.
Short Trade Example (GBP/JPY), Stop Above Swing Highs, Take Profit via Measured Move
You sell GBP/JPY after a lower high forms and price breaks the last minor support.
- Entry: 188.40 after a breakdown and retest fails.
- Structure point: latest swing high at 189.10.
- Stop loss: 189.22, above the swing high and above the rejection wick. Risk equals 82 pips.
- Measured move: last impulse drop equals 160 pips, from 189.10 to 187.50.
- Take profit: 186.80, projecting the 160-pip move from the 188.40 entry area. Reward equals 160 pips.
- Logic: if price takes the swing high, your short thesis breaks. A measured move gives you a target tied to recent momentum.
Risk-Reward Walkthrough With Numbers (Pips, Lot Size, Dollar Risk)
Start with your dollar risk. Then convert it to position size from your stop distance.
- Account: $10,000.
- Risk per trade: 1%, you risk $100.
- Example setup: EUR/USD stop distance equals 25 pips.
- Approx pip value: 1.00 lot on EUR/USD equals about $10 per pip.
- Dollar risk per 1.00 lot: 25 pips x $10 = $250.
- Position size: $100 / $250 = 0.40 lots.
- Take profit planning: if you target 50 pips, expected reward equals 50 x $10 x 0.40 = $200.
- Risk-reward: $100 risk to make $200, you run 1:2.
If your platform enforces minimum stop distance, widen the stop to a valid level and reduce lot size. Do not force the stop tighter to fit a bigger size. For a step-by-step method, see how to set stop loss and take profit.
Two Outcomes, One Hits TP and One Reverses to SL
Trade A, hits take profit. EUR/USD enters at 1.0840, stop at 1.0808, take profit at 1.0904. Price pulls back, holds above 1.0815, then grinds into resistance and fills TP. You followed structure and let the trade work. You sized the trade from the stop, so the pullback did not push you into a bad decision.
What to learn: when your stop sits beyond a clean invalidation point, normal noise stays inside your risk. When your TP sits at a known reaction level, you avoid holding through a common reversal area.
Trade B, reverses and hits stop loss. GBP/JPY sells at 188.40, stop at 189.22. Price drops 60 pips, then spikes on news and runs above 189.10. Your stop triggers. The setup fails because the market reclaimed the swing high and broke your bearish structure.
What to learn: you can do everything right and still lose. Your job is to keep the loss planned. If you often see price move in your favor then reverse, consider partial profit at the first trouble area, or move TP closer to the next support instead of forcing the full measured move.
How to Set Stop Loss and Take Profit Levels (Step-by-Step Methods)

Market structure approach (swing highs, support and resistance, invalidation)
Start with a clear trade idea. Define what must stay true for your setup to work.
- Step 1, mark structure: Identify the most recent swing high and swing low on your trading timeframe. Use clean pivots, not minor noise.
- Step 2, find the invalidation point: Pick the level that proves you wrong. For a long, that is often below the last swing low. For a short, it is often above the last swing high.
- Step 3, place the stop beyond the level: Put your stop a small buffer past the invalidation point. You want price to break structure, not just tag it, to stop you out.
- Step 4, map targets from trouble areas: Set take profit at the next clear support or resistance zone, prior swing, or supply and demand area. Do not skip the first obvious barrier.
- Step 5, check the math: Measure risk in points or pips, then measure reward to your target. If reward does not justify risk, adjust the entry, target, or skip the trade.
- Step 6, plan management: If price often reverses after the first push, take partial profit at the first trouble area and leave the rest for the next level.
This method fits price action well. If you need a structure refresher, read price action trading forex for beginners.
| Setup | Stop loss logic | Take profit logic |
|---|---|---|
| Long after higher low | Below higher low, beyond the swing | Next resistance, then prior high |
| Short after lower high | Above lower high, beyond the swing | Next support, then prior low |
Volatility-based approach (ATR multiples, session volatility)
Use volatility when structure looks messy or when you trade instruments that expand and contract fast.
- Step 1, read ATR: Use a common setting like 14 periods on your trade timeframe.
- Step 2, set stop distance: Place the stop at 1.0 to 2.0 ATR from your entry, aligned with your directional bias. Lower multiples stop you out more. Higher multiples reduce stop-outs but increase risk size.
- Step 3, set take profit from the same unit: Choose 1.5 to 3.0 ATR as a starting range. Tie it to your required risk to reward, not hope.
- Step 4, adapt to the session: During high-volatility sessions, widen stops or reduce position size. During slow sessions, tighten targets or skip trades that need big moves.
- Step 5, avoid mismatches: Do not use a tight stop with a wide target in a low-range session. The move will often not have time to reach your TP.
Indicator-based approach (moving averages, Bollinger Bands, channels)
Indicators can standardize exits. You still need a rule that defines failure.
- Moving averages: Use an MA as a trend filter and trailing reference. For a long, place the stop beyond the MA plus a buffer, or beyond the last swing low, then trail under the MA as price trends. For TP, scale out at prior highs or use a fixed multiple of risk.
- Bollinger Bands: In mean reversion, you can set TP near the middle band or opposite band. Put SL beyond the outer band plus a buffer, but only if your setup expects reversion. In trends, price can ride the band, so avoid using the opposite band as the only target.
- Channels: If you trade a channel, set SL outside the channel boundary beyond the last swing. Set TP at the opposite channel line, then consider partial profit before the line if price stalls.
| Tool | Stop loss rule | Take profit rule |
|---|---|---|
| Moving average | Beyond MA plus buffer, or beyond swing | Prior high, fixed R multiple, or trail |
| Bollinger Bands | Beyond outer band plus buffer | Middle band or opposite band |
| Channel | Outside channel plus swing buffer | Opposite channel line |
Time-based exits (holding period, news windows)
Time stops reduce drawn-out losses and protect you from event risk.
- Step 1, set a maximum hold time: Tie it to your timeframe. Example, if you trade a 15 minute chart, define a maximum number of candles you will hold.
- Step 2, require progress: If price does not move in your favor by a set amount within a set time, exit or reduce size. Stagnation often signals weak follow-through.
- Step 3, define a news rule: Decide if you will close, hedge, or widen stops before major releases. Do not decide mid-trade.
- Step 4, align TP with time: If your holding window is short, place TP at closer structure. Do not aim for multi-hour targets on a 10 minute plan.
Strategy alignment (scalping, day trading, swing trading)
Your SL and TP logic must match how long you plan to hold and how far price typically moves.
- Scalping: Use tight invalidation. Place SL beyond the nearest micro swing or liquidity level, with a small buffer. Set TP at the next intraday level, often the first trouble area. Consider partials fast. Slippage and spread matter, so avoid stops inside the noise.
- Day trading: Anchor SL to intraday structure, such as the last swing on the 5 minute to 30 minute chart. Set TP at key levels like prior session high or low, VWAP zones if you use them, or clear support and resistance. Align exits with the session close if you do not hold overnight.
- Swing trading: Use higher timeframe invalidation, often the daily or 4H swing. Stops need room. Reduce position size instead of forcing a tight stop. Set TP at higher timeframe levels, then scale out as price reaches major zones.
Calculating “Best” SL/TP: Risk-Reward, Win Rate, and Expectancy
Pick a risk-per-trade rule first
Start with how much you risk per trade, not how many pips you want to “allow.” Your stop distance changes by pair, volatility, and timeframe. Your risk rule stays stable.
Common ranges sit between 0.5% and 2% of account equity per trade. Smaller keeps you in the game during drawdowns. Larger grows faster but breaks faster.
- 0.5% to 1%, best for new systems, higher leverage products, or when you trade often.
- 1% to 2%, best when you have a proven edge and strict execution.
- Above 2%, hard to sustain. A losing streak can cut your equity fast.
Then build the trade around that risk. You set SL where the idea fails. You size the position so the loss equals your chosen percentage.
Use R-multiples to standardize SL and TP
R is your planned risk per trade. If your stop is 40 pips and that equals $100, then 1R = $100.
- If you hit your stop, you lose -1R.
- If you take profit at twice the stop distance, you make +2R.
- If you scale out, you track the total result in R, like +0.8R or +1.6R.
R-multiples let you compare results across pairs and sessions. EUR/USD and GBP/JPY can have different pip values and volatility. R keeps your stats clean.
Expectancy, win rate, and SL/TP
Expectancy tells you what you earn per trade on average, in R.
Expectancy (in R) = (Win rate × Avg win in R) − (Loss rate × Avg loss in R).
- Loss rate = 1 − win rate.
- Avg loss in R often sits near 1R if you respect stops.
- Avg win in R depends on your TP plan and how you manage exits.
Example. You win 40% of trades. Your average win is +2R. Your average loss is -1R.
Expectancy = (0.40 × 2) − (0.60 × 1) = 0.20R. If you risk $100 per trade, you average $20 per trade over a large sample.
This is why “best” SL/TP is not one ratio. It is the combo your execution can deliver. Higher reward targets often lower win rate. Tighter targets often raise win rate but cap payoff.
Break-even win rate by risk-reward
Break-even win rate is the win rate you need so expectancy equals zero, before costs and slippage. You can use it to sanity-check your SL/TP plan.
| Risk-Reward (R:R) | Break-even win rate |
|---|---|
| 1:1 | 50.00% |
| 1:1.5 | 40.00% |
| 1:2 | 33.33% |
| 1:3 | 25.00% |
Trading costs push the real break-even higher. If your strategy barely clears break-even on paper, spreads can flip it negative.
Avoid curve-fit SL/TP targets
Do not “optimize” your SL and TP until backtests look perfect. Markets shift. Volatility expands and contracts. Trends appear and vanish. A fragile target fails fast.
- Anchor SL to invalidation, structure, volatility, or both. If you use volatility, keep it simple and stable, like an ATR-based stop loss.
- Use a small set of R targets, like 1R, 1.5R, 2R, 3R. Avoid dozens of settings.
- Test on different regimes, trending periods, ranges, high and low volatility.
- Track distribution, average win, average loss, win rate, max drawdown, and worst losing streak in R.
- Keep rules consistent, same entry type, same session, same management. Changing many parts at once hides the real driver.
Your goal is a rule set that survives. You want positive expectancy with enough margin to handle costs, slippage, and bad weeks.
Best Practices for Stop Loss vs Take Profit in Forex
Place Stops Where Your Trade Is Wrong
Your stop loss should sit at the price level that breaks your setup. If price reaches that point, your reason for the trade no longer exists. Exit.
- Structure-based stops. Place stops beyond the swing high or swing low that defines your entry idea.
- Level-based stops. If you buy a breakout above resistance, your invalidation often sits back below the broken level, plus a buffer.
- Time-based stops. If your edge needs momentum, set a rule that exits after X candles if price does not move. Stagnation kills R.
Avoid “pain stops.” A stop based on comfort usually sits inside normal noise. You get stopped out, then price moves without you.
Use Position Sizing to Match Stop Distance
Fix your risk in dollars or account percent. Let lot size change. Do not force a fixed pip stop across all pairs and sessions.
- Pick a risk unit, for example 0.25% to 1.00% per trade.
- Measure stop distance in pips from entry to invalidation.
- Size the position so a stop-out equals your chosen risk.
| Method | What stays fixed | Common result |
|---|---|---|
| Fixed pips | Stop distance | Risk swings trade to trade, drawdowns spike in volatility |
| Fixed dollar risk | Loss at stop | Stable risk, cleaner stats, easier optimization |
Plan Exits Before Entry, Use Pre-Commitment Rules
Decide your stop loss and take profit before you click buy or sell. Write rules you can follow when price moves fast.
- Set SL and TP at entry. Use OCO orders when your platform supports them.
- Define one management plan. Example, fixed TP, or partial at 1R then trail. Do not mix plans mid-test.
- Move stops only by rule. Example, move to break-even only after price closes beyond a prior swing and you bank partial profit. No “I feel like it” moves.
If you want more detail on target selection, use this guide on how to set take profit.
Adjust for Spread and Volatility Spikes
Forex costs and microstructure can hit stops and targets even when the chart looks safe. Build buffers for real execution.
- Spread buffer. On tight stops, a wider spread can trigger your stop without a true break. Add a buffer beyond invalidation, sized to typical spread for that session.
- Session opens. London open and New York open often bring fast moves and wick spikes. Do not place stops at obvious levels with no room.
- Rollover. Around broker rollover, spreads can widen. Avoid new entries near rollover if your stop is close.
- News windows. If you trade through red-flag events, assume slippage. Widen stops and reduce size, or stay flat.
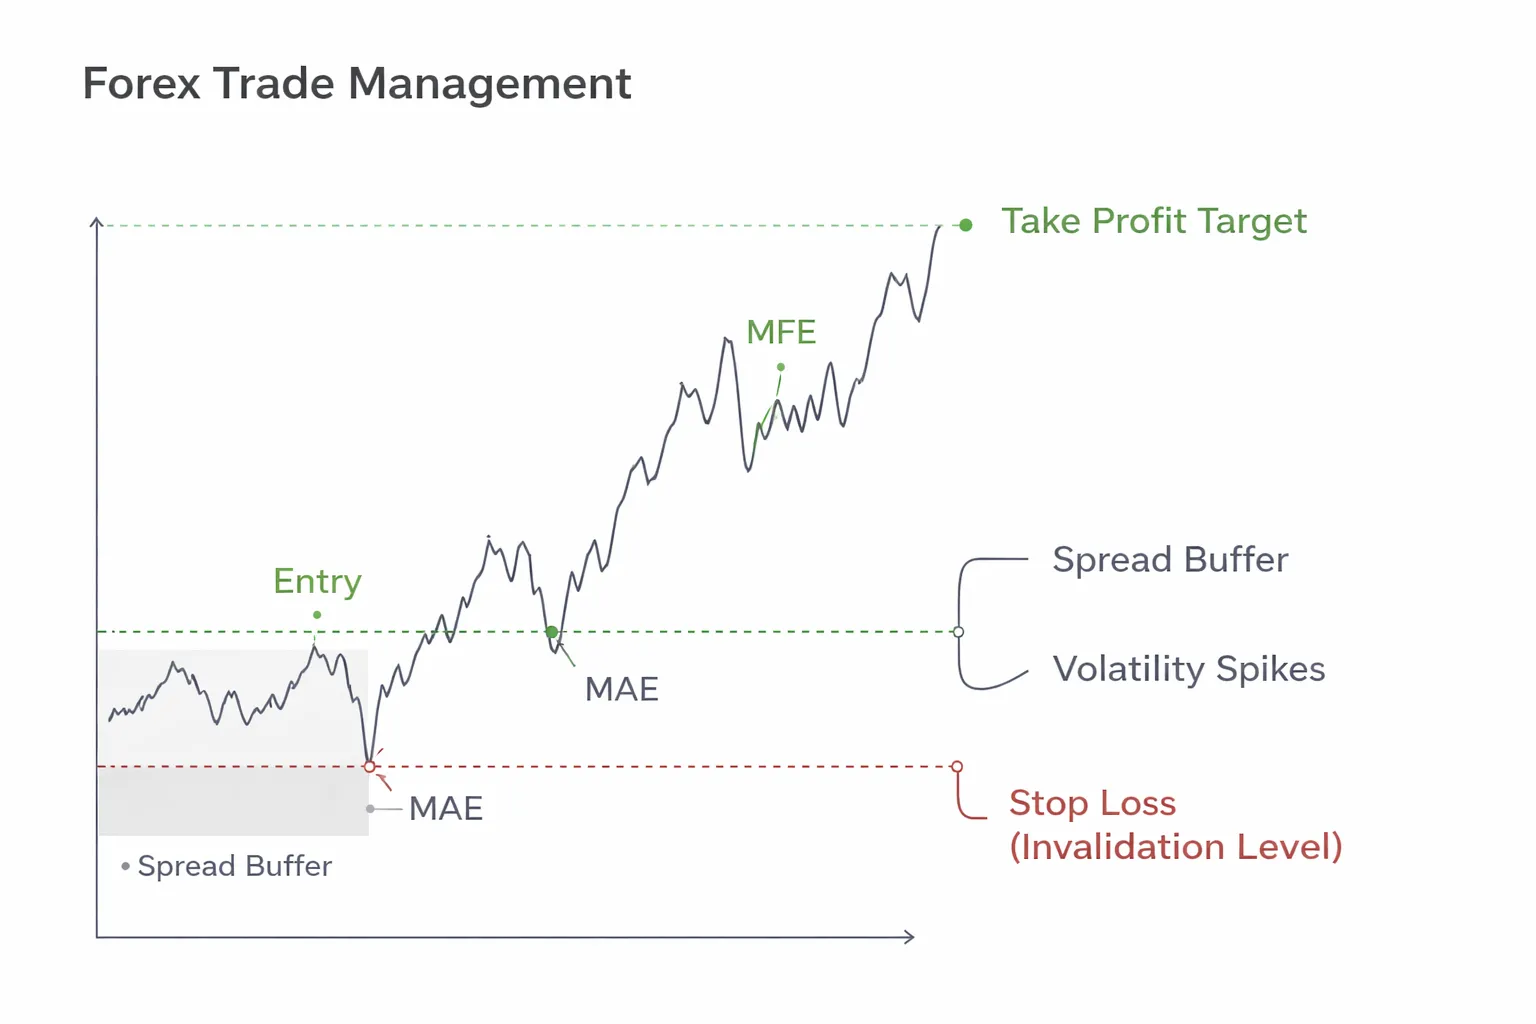
Journal-Based Optimization With MAE and MFE
Use your trade log to tighten stop loss and take profit logic. Track MAE and MFE for every trade.
- MAE. Maximum adverse excursion, how far price went against you before exit.
- MFE. Maximum favorable excursion, how far price went your way before exit.
Review your last 50 to 200 trades. Group them by setup and session. Look for repeatable numbers.
- If most winners stay within 0.6R MAE, your stop may be too tight if you often see 0.8R MAE before price runs.
- If many trades reach 1.5R MFE but you take profit at 1.0R, test a higher TP or partial exits.
- If losers show small MFE and large MAE, your entry timing may be late. Do not “solve” it with a wider stop.
Change one variable at a time, then re-test. Your goal stays the same, stable expectancy after spread, slippage, and bad weeks.
Advanced Exit Management Techniques (Beyond Basic SL/TP)

Trailing Stops (Fixed Pip, ATR Trail, Structure-Based)
Trailing stops help you reduce giveback on strong moves. They also increase stop-outs in choppy markets. Use them when your edge depends on catching extended runs.
- Fixed-pip trail. Move your stop a constant distance behind price, for example 30 pips. Keep the trail larger than normal noise, or you will exit early. Fixed trails fit markets with stable volatility. They fail when volatility expands.
- ATR trail. Trail by a multiple of ATR, for example 2.5 x ATR(14). This adapts to volatility. Use the same timeframe you trade. If your ATR jumps after news, your stop will widen, so cap your max risk at entry. Do not add risk mid-trade.
- Structure-based trail. Move your stop behind the last swing low in an uptrend, or swing high in a downtrend. You can also use prior support and resistance. This method aligns with market structure, but it needs clear swing rules. Define what counts as a swing and when you update the stop, for example only after a candle close.
| Method | Best when | Main risk | Basic rule |
|---|---|---|---|
| Fixed pip | Volatility stays steady | Too tight in noisy conditions | Stop = High water mark minus X pips |
| ATR | Volatility shifts often | Too loose after spikes | Stop = High water mark minus k x ATR |
| Structure | Clean trends with clear swings | Late updates, larger giveback | Stop behind last confirmed swing |
Scaling Out (Partial Take-Profits, Move SL to Break-Even)
Scaling out reduces variance. It often lowers average R per winner. You need data to see if the smoother curve is worth the smaller upside.
- Partial take-profit. Example, take 50% off at 1R, then trail the rest. This pays you on average moves and keeps exposure for the rare trend day.
- Break-even stop. Move your stop to entry after a defined trigger, for example after 1R is hit or after a close above a structure level. Break-even protects capital, but it can cut off trades that need room. Many systems perform worse with instant break-even.
- Use rules, not feelings. Define the exact trigger, the exact new stop level, and whether you include spread. Test both versions, break-even at 0.5R, 1R, and never.
If you trade support and resistance, tie scaling decisions to levels, not fixed numbers. Use clean zones and consistent level rules. See range trading strategy for a structured approach.
Dynamic Targets (Let Winners Run, Cap Downside With Trend Filters)
Dynamic targets replace a fixed TP with a rule that exits only when conditions change. You still cap downside with your initial stop. You do not widen it.
- Trend filter. Hold trades only when your trend filter stays aligned, for example price above a moving average on your trading timeframe. Exit when the filter flips. This keeps you in trends and forces exits in transitions.
- Time stop. Exit after N bars if price does not progress, for example no new high after 10 bars. This cuts dead trades that tie up risk.
- Volatility stop. Combine a trailing method with a max giveback rule, for example exit if price retraces 40% of the move from entry to peak. This limits profit erosion.
Dynamic targets work best when your winners show large MFE. They fail when your edge comes from quick mean reversion. Match the exit to the system type.
Multiple Take-Profit Levels (TP1, TP2, TP3) for Different Conditions
Multiple targets let you monetize both common and rare outcomes. You can set TP1 for frequent moves, TP2 for strong moves, and TP3 for extensions.
- TP1. Place at the nearest logical objective, often 0.5R to 1R or the next minor level. Use it to reduce exposure.
- TP2. Place at a higher-quality level or 1.5R to 2.5R. This should hit on your better setups.
- TP3. Leave for trend continuation. Use a trailing stop or a trend-filter exit. Expect low hit rate.
| Market condition | TP plan | Stop management | What to measure |
|---|---|---|---|
| Range | Heavier TP1, lighter TP3 | Tighter trail, quicker exit at edges | TP1 hit rate, average win, scratch rate |
| Trend | Lighter TP1, heavier TP3 | Structure or ATR trail | Average MFE, giveback, win tail size |
| High volatility | Wider spacing between targets | ATR-based stops with risk fixed | Slippage, stop distance, net R |
Keep sizing consistent. If you split into 3 targets, decide the fractions upfront, for example 40% at TP1, 40% at TP2, 20% at TP3. Then test. Track expectancy, max drawdown, and the percent of winners that would have hit TP2 and TP3 if you had not scaled out.
Advantages and Disadvantages of Stop-Loss and Take-Profit Orders
Benefits of stop-loss orders
- Capital protection. You cap the loss per trade. You keep one bad move from turning into a large drawdown.
- Consistency. You can standardize risk in R, for example 1R per trade. This makes results easier to track and compare across setups.
- Cleaner position sizing. With a fixed stop distance, you can calculate size before entry. This keeps your risk stable even when volatility changes.
- Reduced stress. You stop watching every tick. You avoid panic exits and revenge decisions.
Limitations of stop-loss orders
- Whipsaws. Tight stops get hit in noise. This shows up most in ranges, news spikes, and low liquidity sessions.
- Gaps. Price can jump over your stop. Your fill can land far worse than planned, especially on indices, single stocks, and weekend crypto moves.
- Slippage. Fast markets fill at the next available price. Your real loss can exceed your model, so track average slippage per instrument.
- Stop hunting myths. Most stop outs come from volatility and liquidity, not targeted attacks. The fix is better placement, better timing, and realistic stop distance, not paranoia.
- Execution risk. A stop order becomes a market order when triggered. In thin books, you can get poor fills.
Benefits of take-profit orders
- Locks profits. You bank gains when price hits your level. This matters when reversals happen fast.
- Removes hesitation. You do not need to decide in real time. You avoid giving back profit because you froze.
- Better discipline. You can enforce your plan, like taking partials at TP1 and TP2, then trailing the rest. This keeps your process repeatable.
- Improves data quality. Fixed profit targets make backtests and journaling cleaner. You can measure hit rate, average R, and payoff ratio with less discretion.
Limitations of take-profit orders
- Caps upside. A hard target can cut your winners. A few large trend trades often drive long term returns.
- Misses trends. You may exit before the main move. This risk rises in strong directional markets and higher timeframes.
- Premature exits in volatile moves. Price can tag your TP, then run much further. If your plan depends on runners, use scaling and a trailing component.
- Poor placement can distort expectancy. If TP sits inside normal noise, you get small wins and frequent re-entries. If TP sits too far, hit rate collapses. Match targets to structure and volatility, then validate with your stats.
Use stops to define risk. Use profit targets to define payoffs. Keep both aligned with market structure and volatility. If you trade pullbacks, align exits with your trend context, see our pullback trading strategy guide.
Common Mistakes Traders Make With SL/TP (and How to Fix Them)
Stops Set Too Tight
Tight stops fail when they sit inside normal price noise. You get stopped, then price continues without you. Your stats show it as a high loss count and low average win.
Give your stop “room to breathe” with a volatility and structure check.
- Structure rule: Place SL beyond the swing high or swing low that invalidates your setup. If that level breaks, your idea is wrong.
- Volatility rule: Size the buffer with ATR. Common ranges: 1.0 to 1.5 ATR beyond the invalidation level for intraday, 1.5 to 2.5 ATR for slower timeframes.
- Quantify it: Track how often price hits your SL, then reaches your original entry direction by +0.5R or more within the next N bars. If this “stop-out then move” rate is high, your stop sits in noise.
If you want a consistent method, use an ATR-based stop framework, see our ATR indicator guide.
Targets Set Arbitrarily
Random TPs create random outcomes. A fixed 20 pips on every trade ignores structure and volatility. It also makes your expectancy unstable across sessions and pairs.
- Use structure first: Set TP at the next clean liquidity area. Prior swing high or low, daily high or low, range boundary, or unfilled imbalance zone you can mark on your chart.
- Use volatility second: Check if the distance to that level fits current ATR. If your target needs a 3 ATR move in a 1 ATR session, you will miss often.
- Use R-multiples third: Set a minimum payoff rule. Many systems need at least 1.2R to 2R on average to survive spread and slippage. Your backtest decides the number.
Moving the Stop-Loss Further Away
Widening SL after entry turns a planned risk into an unplanned loss. It also breaks position sizing logic. One “just this once” exception becomes a habit.
- Risk spiral: You widen the stop, your loss grows, you need a bigger win to recover, you take worse trades, you widen again.
- Hard rule: Your SL can move only in one direction, toward breakeven or toward profit. Never away from your entry.
- Fix for genuine new info: If the setup changes but you still want in, close the trade and re-enter with a fresh plan, fresh SL, and correct size.
Ignoring High-Impact News
CPI, NFP, and rate decisions can blow through both SL and TP. Spreads widen, liquidity thins, and slippage rises. Your stop becomes a market order in a fast market.
- Know the schedule: Mark CPI, NFP, central bank rate decisions, and press conferences for your traded currencies.
- Reduce exposure: Cut size or close positions before the release if your edge does not include news volatility.
- Adjust SL/TP logic: If you trade through events, widen SL based on event volatility and reduce leverage. Expect worse fills. Avoid tight targets that rely on clean spreads.
- Use time-based rules: Example: no new entries 15 to 30 minutes before, and wait for the first impulse and retrace after the release before setting fresh levels.
Confusing Pip Value Across Pairs
Pip value changes across pairs, account currencies, and lot sizes. If you assume pip value stays constant, you over-risk without noticing.
- Common error: You size EURUSD correctly, then copy the same lots on GBPJPY. Your stop distance and pip value differ, so your dollar risk jumps.
- Fix: Always size from money risk, not lots. Use this workflow: Risk per trade in $ divided by stop distance in pips divided by $ per pip equals position size.
- Platform check: Confirm the symbol’s pip size and contract specs. JPY pairs often quote with different pip conventions, and indices and metals use point values, not pips.
- Audit rule: Before you place the order, read your platform’s estimated loss at SL. If it exceeds your planned risk, reduce size until it matches.
| Mistake | What it causes | Fix |
|---|---|---|
| Stops set too tight | Frequent stop-outs, low follow-through capture | SL beyond invalidation level plus ATR buffer, measure stop-out then move rate |
| Arbitrary targets | Unstable hit rate and expectancy | TP at structure, verify distance against ATR, enforce minimum average R |
| Moving SL wider | Unplanned losses, broken risk model | One-way stop rule, close and re-plan if conditions change |
| Trading through CPI, NFP, rates | Slippage, spread spikes, blown levels | Schedule awareness, reduce exposure, event-specific rules |
| Pip value confusion | Accidental over-risking | Size by $ risk, validate estimated loss at SL before entry |
Risk Warnings, Trading Psychology, and E-E-A-T Considerations
Leverage and margin call risk, why SL is not optional
Leverage compresses your error budget. A small price move can erase your usable margin and trigger forced liquidation.
Your stop loss limits damage to a pre-set dollar amount. Without it, your broker can close positions at the worst price available when margin runs low.
- Know your liquidation trigger. Check margin level rules, stop-out level, and how your broker defines used margin.
- Risk in dollars, not in pips. Set SL first, then size the position so the loss at SL matches your plan.
- Assume gaps happen. Weekend gaps and news spikes can jump past your SL. Your actual loss can exceed your planned loss.
- Limit correlated exposure. Multiple trades on the same USD theme can act like one oversized position.
Execution reality, slippage, requotes, and liquidity limits
Stops and targets are orders. They do not guarantee fills at your exact level.
- Slippage. Fast moves can fill your SL worse than expected and your TP better or worse depending on order type and venue.
- Spread expansion. A wider spread can hit your SL even if the chart price never touches your level.
- Liquidity holes. Thin sessions, rollovers, and major releases can skip prices. Your order fills at the next available quote.
- Requotes and rejects. Some dealing desk models may reject or reprice market orders during volatility. Plan for delayed entries and missed exits.
- Partial fills. Larger size can fill in pieces. Your average fill can differ from your intended price.
Build a buffer into your risk model. Estimate worst-case slippage for your instrument and session, then reduce size.
Psychology checklist, patterns that distort SL and TP
- Moving SL wider. You avoid being wrong. You convert a small planned loss into an unplanned one.
- Cutting winners early. You take profit to feel relief. You break your risk-reward and starve expectancy.
- Letting losers run. You anchor to entry and wait for break-even. You trade hope, not price.
- Revenge trading. You increase size after a loss. You chase recovery, not edge.
- Over-tight SL. You fear drawdown. You place SL inside normal noise and get stopped repeatedly.
- TP worship. You set TP at a round number with no structure. You ignore where orders may sit.
Use rules you can execute. Pre-commit to SL and TP before entry. If conditions change, close and re-plan. Do not negotiate mid-trade.
If you need help defining realistic targets, link them to structure and a consistent risk model, see risk-reward ratio.
Compliance-style disclaimer guidance, education vs financial advice
This content is educational. It does not account for your objectives, financial situation, or risk tolerance. It is not investment advice or a recommendation to buy or sell any instrument.
- Use risk capital only. Do not trade with money you need for living expenses or debt payments.
- Expect losses. Many retail accounts lose money trading leveraged products. Leverage can magnify losses fast.
- Test before you scale. Use a demo, then small size. Track results, slippage, and drawdowns.
- Document your plan. Define entry, SL, TP, max daily loss, and event rules. Follow it or stop trading.
FAQ
What is the main difference between stop loss and take profit?
A stop loss closes a trade to cap your loss. A take profit closes a trade to lock in your gain. Stop loss targets risk. Take profit targets reward. You set both before entry so you do not manage exits under pressure.
Do you need both a stop loss and a take profit?
Use a stop loss on most trades. It protects your account from one bad move. Add a take profit when you have a clear target, such as a prior swing, range edge, or measured move. If you trail profits, you may skip a fixed TP.
Where should you place a stop loss?
Place it where your trade idea fails. Use structure first, such as below a swing low for longs, above a swing high for shorts. Then check distance in pips and dollars. Size your position so the loss fits your risk limit.
Where should you place a take profit?
Set TP at a level price often reacts to, such as prior highs or lows, support or resistance, or a range boundary. Avoid placing it in the middle of noise. If the target sits too close, skip the trade or reduce position size.
What risk to reward ratio should you use?
Start with 1:1.5 to 1:3 for trend setups. Do not force a ratio. A high ratio with low win rate can still lose money after spreads and slippage. Track your results, then adjust based on your actual expectancy.
Should your stop loss be a fixed number of pips?
A fixed pip stop ignores volatility. Use market structure and volatility. Many traders use ATR to avoid stops that sit inside normal price swings. Fixed stops can work only if you trade the same pair, session, and setup with stable behavior.
What is the difference between a stop order and a stop loss?
A stop order is an entry tool. It triggers a new trade when price hits a level. A stop loss is an exit tool. It closes an open trade when price hits your risk limit. See forex order types for details.
Can stop loss and take profit fail to fill at your price?
Yes. Fast markets can cause slippage. Gaps can skip levels. News spikes can fill you worse than planned. Limit this by trading liquid sessions, avoiding major news, and using smaller size. A guaranteed stop can help if your broker offers it.
What is a trailing stop, and when should you use it?
A trailing stop moves your stop as price moves in your favor. It helps you stay in trends and reduce giveback. Use it when price trends and pulls back in steps. Do not trail too tight. Tight trailing stops cut winners early in choppy markets.
Should you move your stop loss after entry?
Move it only by rule. Common rules include moving to breakeven after a clean break and retest, or after price reaches 1R. Do not widen stops to avoid a loss. That turns a planned loss into an account level problem.
What are common stop loss and take profit mistakes?
- Placing SL at obvious levels with no buffer, then getting tagged by spread or wicks.
- Setting TP too close, then paying spread for small gains.
- Moving TP farther when price nears it, then watching profits vanish.
- Using stops so tight you need an unrealistic win rate.
Conclusion
Stop loss and take profit do different jobs. Your stop loss caps damage. Your take profit locks results. You need both, or you rely on hope.
Keep your process simple. Define your entry. Place your stop where your trade idea fails, not where it feels comfortable. Set your take profit where price has room to reach, based on structure, not emotion. Size the position so the stop loss hit costs a small, fixed percent of your account.
- Risk first: decide the account percent you can lose on one trade, then calculate position size from your stop distance.
- Place SL with intent: set it beyond the invalidation level, add room for spread and normal wicks.
- Set TP from structure: aim for logical targets like prior highs and lows, or clear support and resistance.
- Do not move the goalposts: predefine rules for moving SL or taking partial profits, then follow them.
- Track outcomes: log R multiple per trade, then adjust your SL and TP rules based on your data.
Final tip. Write one sentence before each trade, “This trade is wrong if price hits X.” Put your stop at X. Everything else becomes easier.
-
Forex Trading Psychology Tips: How to Stay Disciplined and Consistent
5 months ago -
Forex Order Types Explained: Market vs Limit vs Stop Orders
5 months ago -
How to Set Stop Loss and Take Profit (Step-by-Step)
5 months ago -
How to Start Forex Trading Step by Step (Beginner Roadmap)
5 months ago -
Risk Management in Forex for Beginners (Rules That Keep You in the Game)
5 months ago
-
- Market structure approach (swing highs, support and resistance, invalidation)
- Volatility-based approach (ATR multiples, session volatility)
- Indicator-based approach (moving averages, Bollinger Bands, channels)
- Time-based exits (holding period, news windows)
- Strategy alignment (scalping, day trading, swing trading)
-
- What is the main difference between stop loss and take profit?
- Do you need both a stop loss and a take profit?
- Where should you place a stop loss?
- Where should you place a take profit?
- What risk to reward ratio should you use?
- Should your stop loss be a fixed number of pips?
- What is the difference between a stop order and a stop loss?
- Can stop loss and take profit fail to fill at your price?
- What is a trailing stop, and when should you use it?
- Should you move your stop loss after entry?
- What are common stop loss and take profit mistakes?
-
-
How to Place a Forex Trade Step by Step (Your First Trade Explained)
3 months ago -
Forex Trading vs Crypto Trading: Which Market Is Better for Beginners?
3 months ago -
Forex Lot Size Calculator: How to Use It to Size Trades Correctly
5 months ago -
How to Calculate Position Size in Forex (Position Sizing Formula + Examples)
5 months ago -
Forex Leverage Explained: How It Works, Pros, Cons & Examples
5 months ago
-
Forex Trading Platforms Comparison: MetaTrader vs cTrader vs TradingView
5 months ago -
Is Forex Trading Legal in the United States? Rules, Regulators & What to Know
5 months ago -
Forex Market Hours & Trading Sessions Explained (Best Times to Trade)
5 months ago -
Forex Leverage Explained: How It Works, Pros, Cons & Examples
5 months ago -
Best Forex Trading Journal Tools (Top Picks Compared)
5 months ago