How to Set Stop Loss and Take Profit (Step-by-Step)

Stop loss and take profit decide how much you lose, and how much you make, on every trade. You set both before you enter. You follow them when price moves fast.
This guide shows you how to place stop loss and take profit step by step. You will learn how to pick levels using market structure, volatility, and a fixed risk-per-trade rule. You will learn how to size positions from your stop distance, so you risk the same amount each time. You will learn how to set realistic profit targets based on risk to reward, and how to adjust when the setup changes.
If you use indicators to confirm exits, start with a simple approach like a MACD indicator forex strategy and keep your risk rules the same.
Key Takeaways
Key Takeaways
- In het kort: Place your stop loss where your trade idea breaks, not where it feels comfortable.
- In het kort: Size your position from the stop distance, so you risk the same amount on every trade.
- In het kort: Set take profit from a clear risk to reward target, then manage it if price action changes.
- In het kort: Use volatility and structure, like swing highs and lows, to avoid stops that sit inside normal noise.
- In het kort: Move stops only with rules, not emotions. Never widen a stop to avoid a loss.
- In het kort: Keep exit confirmation simple if you use indicators, and keep your risk rules fixed.
- In het kort: Check related markets before you place orders, especially when pairs move together. Use forex correlation to reduce surprise exposure.
Your stop loss controls your downside. Your position size controls how much you lose when you are wrong. Your take profit defines the upside you can expect, based on your setup and your risk to reward.
| Decision | Rule you follow |
|---|---|
| Stop loss | Put it beyond the level that invalidates your setup. Keep it outside normal volatility. |
| Position size | Calculate from stop distance and fixed risk-per-trade. Do not adjust risk because you feel confident. |
| Take profit | Set targets using a defined risk to reward. Reduce or extend only when structure changes. |
| Adjustments | Tighten stops as price moves in your favor. Do not widen stops. Re-plan if the setup changes. |
What stop loss and take profit orders are (and when they work best)
What a stop loss is
A stop loss is an exit order you place in advance. It triggers when price reaches your stop level. You use it to cap the loss on a trade.
- Market stop (stop-loss order). When price hits the stop, your broker sends a market order. You get filled at the best available price. You can get slippage in fast markets.
- Stop-limit. When price hits the stop, your broker sends a limit order at your limit price. You control the worst price you accept. You risk no fill if price gaps through your limit.
- Stop vs alert. An alert notifies you. A stop executes. Use stops when you cannot watch the chart.
What take profit is
A take profit closes your position at a predefined profit level. Most traders place it as a limit order. It fills at your price or better, but it may not fill if price touches briefly and liquidity is thin.
- Take profit as a limit order. You set a sell limit for longs, buy limit for shorts. You control the price. Execution depends on available liquidity at that level.
- Bracket orders. You place stop loss and take profit together. One opens with your entry. This reduces missed exits.
- OCO orders. One-cancels-the-other. If your take profit fills, your stop cancels. If your stop fills, your take profit cancels. This prevents double fills in whipsaw moves.
Execution reality, spreads, liquidity, gaps
Your stop and target live inside the market microstructure. Spreads, liquidity, and gaps decide your real results.
- Spread widens your effective stop distance. A long stop triggers on the bid, not the mid. In wide spreads, price can hit your stop without the chart close looking “wrong.” Keep stops outside normal spread expansion.
- Thin liquidity increases slippage. Market stops slip more when the order book is shallow. This happens around session opens, session closes, and sudden spikes.
- Gaps bypass stops. If price gaps past your stop, a market stop fills at the first tradable price. A stop-limit can fail to fill. Plan for gap risk if you hold through major events.
- Targets can miss by 0.1. Limit orders need a match. If price tags your level with low volume, you can get partial fills or no fill. In fast moves, consider scaling out or placing targets where liquidity sits, not at exact “perfect” levels.
When stops and targets work best
- Stops work best when volatility is stable, spreads are normal, and your stop sits beyond the structure that invalidates your trade.
- Targets work best when price moves in clean swings and respects prior highs, lows, and obvious liquidity zones.
- Bracket and OCO work best when you want rules-based execution and you cannot manage the trade tick by tick.
When not to use tight stops
Tight stops fail when noise becomes the signal. Avoid tight stops in these conditions.
- High-impact news. CPI, NFP, rate decisions, speeches. Spreads jump, price gaps, slippage spikes. If you trade it, size down and widen the stop to match event volatility.
- Low-liquidity sessions. Late Friday, holidays, rollover periods, and quiet Asian hours for some pairs. You get more spread expansion and random wicks.
- High-volatility events. Breakouts from compression, sudden risk-off moves, and flash spikes. Let volatility settle or base stops on ATR and structure, not on comfort.
- Pairs with frequent spread spikes. Exotics and some crosses. Tight stops turn into spread stops. Trade them with wider risk bands or avoid them.
If you want a consistent way to define invalidation, risk, and exit rules, document it inside your forex trading plan.
Step-by-step: how to set stop loss and take profit before entering a trade
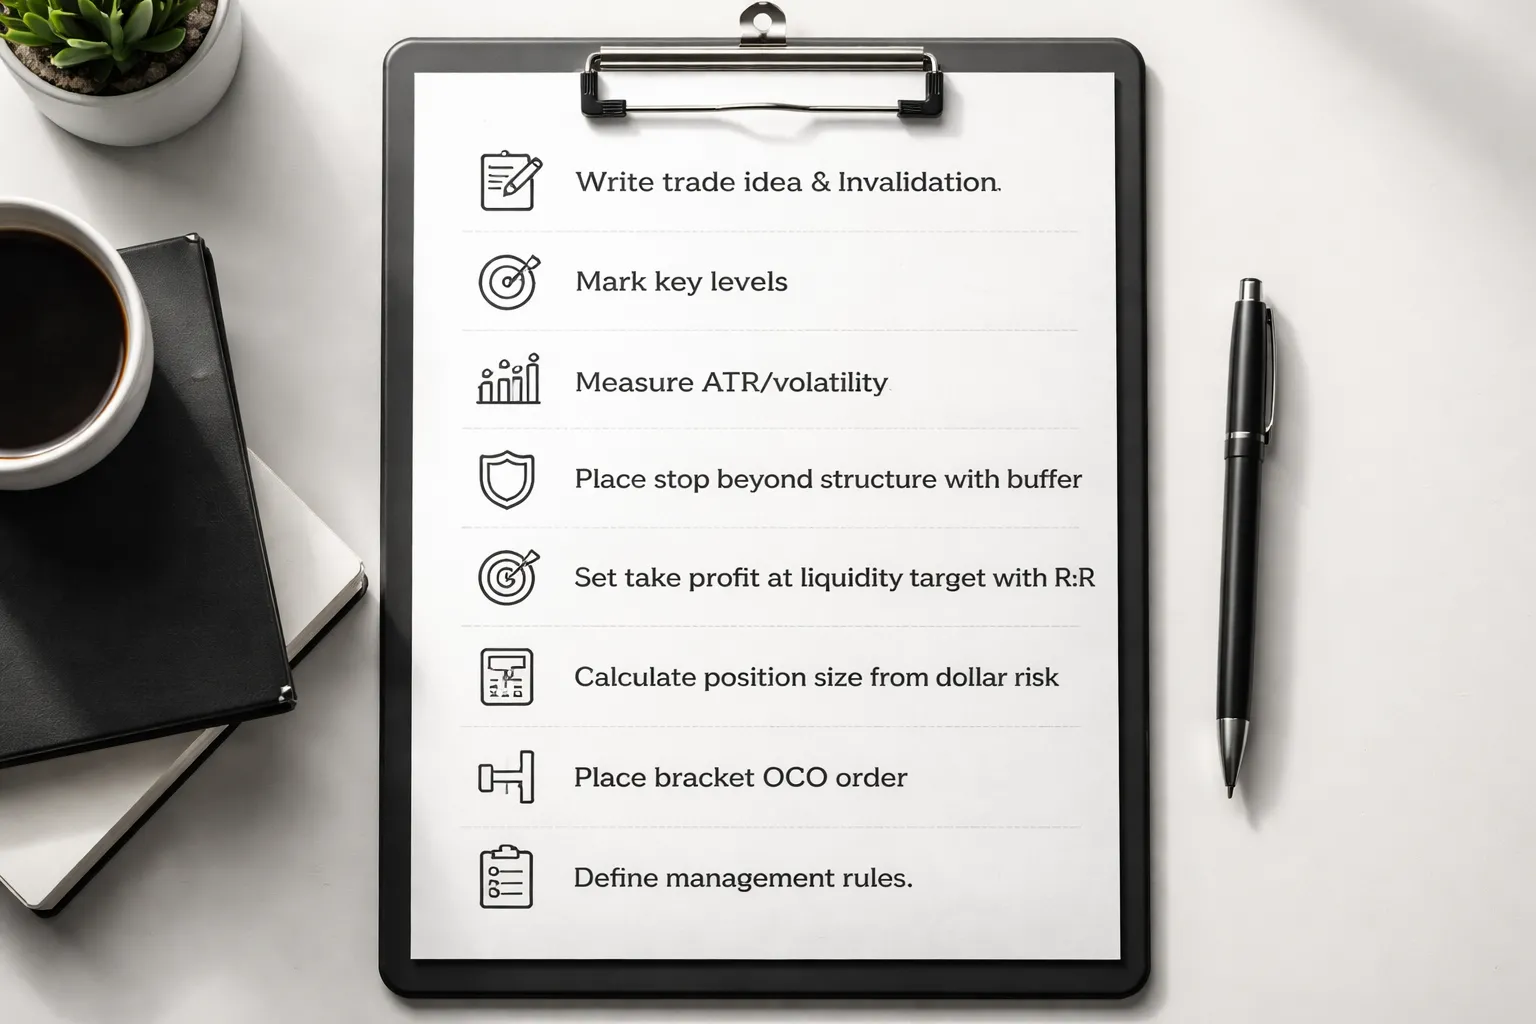
Step-by-step: how to set stop loss and take profit before entering a trade
Step 1: Write the trade idea and the invalidation point
Write one sentence for your setup. Then write what must be true for the trade to work.
- Trade idea: Direction, trigger, and context. Example, “Buy EURUSD on a pullback in an uptrend after a higher low holds.”
- Invalidation: The price point that proves your idea wrong. If price hits it, you exit. No debate.
- Time condition: If your setup needs momentum, add a deadline. Example, “If price does not move in my favor within 6 candles, I exit.”
Step 2: Identify key levels that define structure
Mark the levels that traders react to. Build your stop and target around them.
- Nearest support and resistance zones.
- Most recent swing high and swing low.
- Consolidation range boundaries and breakout levels.
- Session highs and lows if you trade intraday.
Keep levels clean. One strong level beats five weak ones. If you need a refresher, use this guide to support and resistance.
Step 3: Measure volatility so you do not place “noise stops”
Use a volatility yardstick. You want your stop outside normal movement.
- ATR: Check ATR(14) on your trading timeframe. Record the value in pips.
- Recent ranges: Measure the average range of the last 10 to 20 candles.
- Event risk: If a major release is close, expect wider spikes and spread changes.
Rule: if your planned stop distance is smaller than recent typical candle range, you will get clipped often.
Step 4: Place the stop beyond structure with a buffer
Your stop goes where your idea is invalid. Put it beyond the structure level, then add a buffer.
- Structure first: Below the swing low for longs. Above the swing high for shorts. Outside the consolidation range if you trade breakouts.
- Buffer next: Add space for spread and normal volatility.
- Buffer methods: Fixed pips, a percent of price, or a fraction of ATR.
| Buffer type | How to set it | When it fits |
|---|---|---|
| Fixed pips | Add X pips beyond the level | Stable pairs, consistent sessions |
| ATR fraction | Add 0.2 to 0.5 ATR beyond the level | Volatile markets, variable conditions |
| Percent of price | Add 0.1% to 0.5% beyond the level | Higher priced instruments, long holds |
Do not place stops on obvious round numbers or exact highs and lows. Put them past those points.
Step 5: Set the take profit using risk-to-reward and liquidity targets
Start with structure, then check the math.
- Primary target: Next clear liquidity area, prior swing, range boundary, or major support or resistance.
- Risk-to-reward check: If your plan requires 2R, your target must be at least 2 times your stop distance.
- Feasibility check: If the next realistic target gives you 0.8R, skip the trade or reduce stop by changing the entry, not by tightening below structure.
Keep one main target. Add a second target only if you have a written scale-out rule.
Step 6: Calculate position size from dollar risk
Set your risk in dollars first. Then size the trade from your stop distance.
- Dollar risk: Account size times your risk percent.
- Stop distance: Entry price to stop price in pips.
- Position size: Dollar risk divided by stop distance and pip value.
| Input | Example |
|---|---|
| Account size | $10,000 |
| Risk per trade | 1% = $100 |
| Stop distance | 25 pips |
| Allowed $ per pip | $100 ÷ 25 = $4 per pip |
Use your broker’s pip value for the pair and lot size. If the pip value changes with quote currency, calculate it before you place the order.
Step 7: Use bracket orders (OCO) so stop and target go live together
Place entry, stop loss, and take profit as one package.
- Use a bracket order or OCO where supported.
- If one side executes, the other cancels. This prevents unprotected trades.
- Double-check order type. Market, limit, stop, and stop-limit behave differently during fast moves.
Step 8: Define management rules before clicking buy or sell
Write the rules now. Follow them later.
- Move to breakeven: Define the exact trigger. Example, “At 1R and after a close beyond resistance.”
- Trailing stop: Trail by structure, by ATR, or by a moving average. Pick one method. Define the update frequency.
- Scale out: If you take partial profits, specify the percent and the level. Example, “Take 50% at 1R, hold the rest to the next swing high.”
- Time stop: Exit if price stalls. Example, “Exit if not at least 0.5R after 10 candles.”
- No-touch rule: Do not widen your stop. If conditions change, exit and reassess.
Choosing stop loss placement methods (pick one that matches your strategy)
Market structure stops
Use structure stops when you trade price action. You place the stop where your idea breaks.
- Long trades: Put your stop below the most recent swing low that formed your setup.
- Short trades: Put your stop above the most recent swing high that formed your setup.
- Buffer: Add a small offset beyond the swing to avoid stops hit by noise. Keep it consistent, for example 0.1 to 0.3 ATR, or a fixed pip buffer for that pair.
- Update frequency: Update only when a new swing forms in your direction. Do not move the stop on every candle.
This method fits trend pullbacks and breakout retests. It fails in chop where swings flip fast.
Indicator-based stops (MA, VWAP, Supertrend)
Use indicator stops when your edge depends on staying on the right side of a line.
- Moving average stop: Exit when price closes beyond the MA you use for bias. Example, long trades exit on a close below the 20 EMA.
- VWAP stop: Best for intraday mean reversion. Exit when price closes past VWAP plus your chosen band, or when it holds the other side for N candles.
- Supertrend invalidation: Exit when Supertrend flips. Do not override the flip.
- Update frequency: Indicators update every bar. Your rule should still be fixed, close-based, not wick-based.
Indicator stops keep decisions simple. They can stop you out late on fast reversals and too early in noisy markets.
Volatility stops (ATR and Chandelier logic)
Use volatility stops when price moves vary by session, pair, or regime. You size the stop to current volatility.
- ATR stop: Set stop at entry minus K times ATR for longs, or entry plus K times ATR for shorts. Common K values range from 1.5 to 3.0 depending on timeframe and style.
- Chandelier-style stop: Long stop trails from the highest high since entry minus K times ATR. Short stop trails from the lowest low since entry plus K times ATR.
- Update frequency: Update once per candle close. For intraday, pick a fixed cadence, for example every 15 minutes, then stick to it.
ATR-based stops adapt fast when volatility expands. They can sit too tight in quiet periods if you choose a small K. Use one consistent ATR length, then test it. For a deeper walkthrough, see how to set stop loss using ATR volatility.
Time-based stops
Use time stops when your setup should move fast. You exit if it does not.
- Rule: Exit if price has not reached a minimum progress level within a fixed number of candles.
- Example: Exit if not at least +0.5R after 10 candles.
- Update frequency: Check only at candle closes. Avoid mid-candle decisions.
Time stops cut dead trades and reduce opportunity cost. They can cut winners that start slow, so pair them with setups built for quick follow-through.
Percentage stops
Use percentage stops only when volatility stays stable and you trade the same instrument class with similar behavior.
- Acceptable: Very liquid large-cap stocks with consistent daily ranges, or portfolios where you need a simple rule for many positions.
- Fails: FX during news, small caps, crypto, and anything with volatility regime shifts. A fixed 1% stop can be too tight one week and too wide the next.
- Fix: If you insist on percent stops, tie it to ATR percent of price, not a flat number.
Hard stop vs mental stop
A stop method is useless if you do not execute it. Choose the stop type that matches your discipline and market access.
- Hard stop (stop order): You place it with the broker. Pros, automatic execution, protects you from freezes and hesitation. Cons, can get slipped in fast markets, visible stop placement can get tagged in thin markets.
- Mental stop: You hold the level in your head and exit manually. Pros, you can avoid some stop hunts and use close-based rules. Cons, you must act fast, you will hesitate under stress, you risk large losses during spikes or disconnects.
- Discipline rule: If you use mental stops, you still need a hard “disaster stop” far enough to survive normal noise but close enough to cap account damage.
Pick one placement method for your main stop. Write the exact rule. Define when you update it. Then follow the no-touch rule, never widen the stop.
Choosing take profit methods (how to set targets with realistic probabilities)
Choosing take profit methods (how to set targets with realistic probabilities)
Your take profit needs a reason. Price must have a clear path to reach it. Set targets where other traders will act, or where volatility can realistically carry price.
Start with structure. Then check if the target fits your risk in R and the current volatility. If it fails either check, adjust the trade or skip it.
Support and resistance targets
Use obvious levels because they attract orders. Your target should sit before the level, not on it. You want fills, not hope.
- Prior highs and lows: Target the last swing high for longs, last swing low for shorts. Place your take profit a few ticks or pips in front.
- Range boundaries: If price trades inside a range, target the opposite side. Treat the middle of the range as a possible partial exit.
- Supply and demand zones: Mark the origin of the last sharp move. Target the front edge of the zone first. Expect reactions there.
Probability rule: the more times a level held, the more traders will defend it, and the more likely price stalls there. That increases the chance you need to exit early.
Measured moves
Measured moves work best when price moves in clean legs. They fail most in choppy conditions.
- Range breakout target: Measure the range height. Project that distance from the breakout point.
- Pattern projection: For flags and channels, project the prior impulse leg. For simple double tops and bottoms, use the neckline height.
- Extensions: Use extensions when a trend runs. Keep them secondary. You need confirmation from structure and volatility.
Reality check: if the projected target sits inside heavy structure, reduce it to the nearer level. Structure wins over geometry.
Risk-reward targets and expectancy thinking
Fixed R targets keep you consistent. They do not guarantee a good trade. You still need a target that price can reach.
- 1R: Higher hit rate. Lower payoff. Useful in ranges and mean reversion.
- 2R: Balanced choice. Works when your entry aligns with structure and momentum.
- 3R: Lower hit rate. Needs trend conditions and clean space to the target.
Think in expectancy. You want the combination of win rate and average win to beat average loss.
| Target plan | Example win rate | Average win | Average loss | Expectancy per trade |
|---|---|---|---|---|
| 1R target | 55% | +1R | -1R | +0.10R |
| 2R target | 40% | +2R | -1R | +0.20R |
| 3R target | 28% | +3R | -1R | +0.12R |
Do the math for your system. If your 3R target drops your win rate too far, it reduces expectancy even if it looks good on paper. For deeper coverage of the metric, read what risk-reward ratio in trading means.
Scaling out (partial profits plus runners)
Scaling out lowers variance. It can also cut your winners. Use it with a clear rule.
- Base rule: Take partial profits at 1R. Move stop to break even only if your plan supports it.
- Runner rule: Keep the rest for the next structure target, measured move, or trail.
- Size rule: Common splits are 50 50 or 70 30. Pick one and keep it stable for review.
Use scaling out when you trade mixed conditions, or when first resistance sits close but trend potential remains.
Trailing profit techniques
Trailing works when price trends. It fails when price ranges. Trail only after price proves direction.
- Moving average trail: Exit when price closes beyond your chosen moving average. Use a single setting and test it.
- Swing trail: For longs, trail below higher swing lows. For shorts, trail above lower swing highs. This matches market structure.
- ATR trail: Set a stop at entry plus a multiple of ATR, then trail it with new highs or lows. Use the same ATR length across trades.
Trail rule: never loosen the trail. Only tighten it when the market prints new structure in your favor.
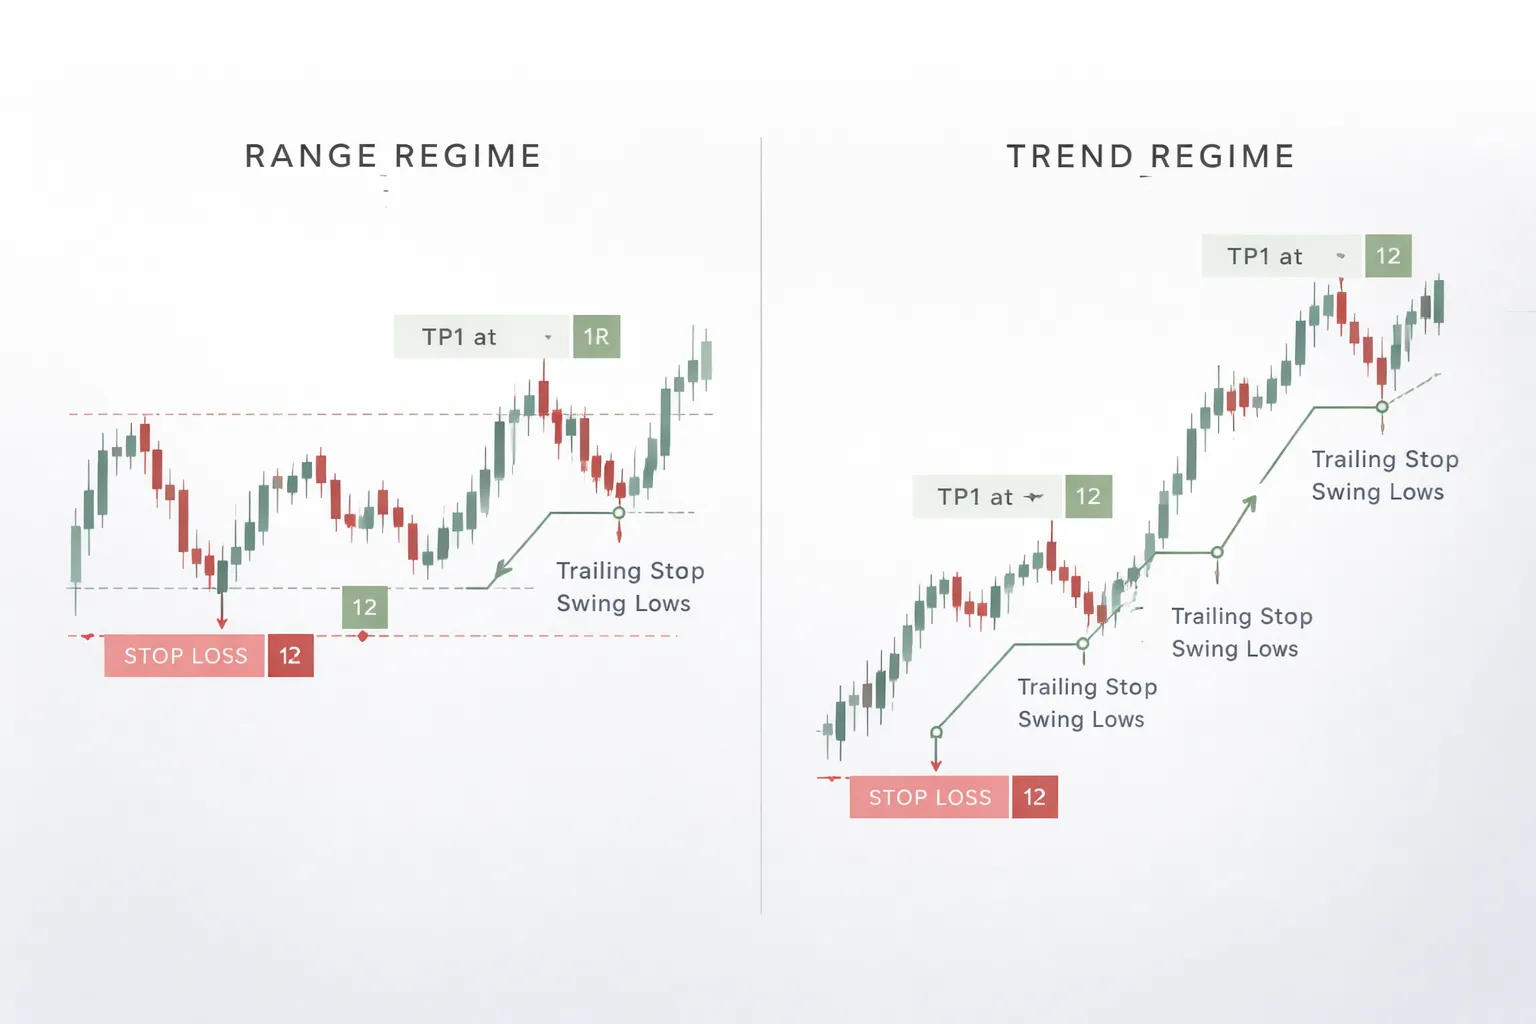
Use multiple targets for different market regimes
Ranges pay you fast. Trends pay you big. Match your take profit to the regime.
- Range regime: Take profit at the opposite range boundary. Favor 1R to 2R. Consider full exit or heavy scale out.
- Trend regime: Use a first target at a nearby structure level, then trail the rest. Let winners run with a defined trail method.
- Hybrid plan: TP1 at 1R or nearest structure. TP2 at measured move or next major level. Runner with a swing or ATR trail.
Probability filter: if your target requires price to cross multiple recent swing points, reduce the target or trade smaller. Each swing point adds friction and lowers reach odds.
Practical examples (long and short) with simple numbers
Example 1: Long trade using a swing-low stop and 2R take profit
You buy a breakout retest in an uptrend.
- Entry: 100.00
- Swing low: 98.00
- Stop loss: 97.80, below the swing low
- Risk per unit (1R): 100.00 to 97.80 = 2.20
- 2R take profit: 100.00 + (2.20 x 2) = 104.40
If you risk $100 on the trade, your position size is $100 divided by 2.20 = 45.45 units. Round down to 45 units.
- Max loss: 45 x 2.20 = 99.00
- Profit at 2R: 45 x 4.40 = 198.00
Check friction. If price must break above two recent swing highs before 104.40, cut the target to the nearest clean level, or trade smaller.
Example 2: Short trade using a structure stop and target at prior support
You short into a downtrend after a pullback fails at resistance.
- Entry: 50.00
- Resistance structure: 51.20
- Stop loss: 51.40, above the structure
- Risk per unit (1R): 51.40 to 50.00 = 1.40
- Prior support target: 47.50
- Reward per unit: 50.00 to 47.50 = 2.50
- R multiple: 2.50 divided by 1.40 = 1.79R
If you risk $200, size is $200 divided by 1.40 = 142.85 units. Round down to 142 units.
- Max loss: 142 x 1.40 = 198.80
- Profit at target: 142 x 2.50 = 355.00
Use the probability filter. If 47.50 sits behind several recent swing lows, expect more stalling. Take partial profit earlier, or move the target up to the next support.
Example 3: ATR-based stop and trailing take profit in a strong trend
You trade a trend continuation and want room for noise.
- Entry: 200.00
- ATR(14): 3.00
- Initial stop: 2 x ATR = 6.00 points
- Stop loss: 200.00 minus 6.00 = 194.00
- Initial risk (1R): 6.00
- TP1: 1R = 206.00, take partial
Now trail the rest with a simple rule. Use a 2 x ATR stop from the highest close.
- Highest close moves to: 212.00
- Trail stop updates to: 212.00 minus 6.00 = 206.00
- Highest close moves to: 220.00
- Trail stop updates to: 220.00 minus 6.00 = 214.00
This plan avoids guessing the top. It also locks profit as the trend extends. If price chops and hits the trail, you exit with a defined result.
Example 4: Range trading with tight invalidation and conservative targets
You trade a clear box. You keep targets inside the range. You keep stops tight and logical.
- Range support: 1.1000
- Range resistance: 1.1100
- Entry (long at support): 1.1010 after a bounce
- Invalidation level: below support
- Stop loss: 1.0985
- Risk (1R): 1.1010 to 1.0985 = 25 pips
- Conservative target: mid-range at 1.1055
- Reward: 45 pips
- R multiple: 45 divided by 25 = 1.8R
Do not target the exact top at 1.1100. Front-run the level. Ranges reject early. If price must cross multiple minor swings to reach 1.1055, cut the target or reduce size. For more range execution rules, see range trading strategy.
Risk management rules that make stop loss and take profit actually effective
Risk per trade and daily, weekly loss limits
Stop loss and take profit only work if your position size fits your account.
Set a fixed risk per trade. Most traders use 0.25% to 1% of equity. Use less if you trade often.
- Risk per trade: Equity x risk %. Example, $10,000 x 0.5% = $50 risk.
- Stop distance: Your planned stop in pips, points, or dollars.
- Position size: Risk dollars divided by stop distance and instrument value per unit.
Add hard loss limits so one bad session does not snowball.
- Daily loss limit: 2R to 3R. Hit it, stop trading.
- Weekly loss limit: 5R to 8R. Hit it, reduce size or pause until next week.
- Max consecutive losses: 3 to 5. After that, stop. Review execution.
| Rule | Common setting | What you do when hit |
|---|---|---|
| Risk per trade | 0.25% to 1% | No changes mid-trade, reduce if volatility jumps |
| Daily loss cap | 2R to 3R | Flat. No revenge trades |
| Weekly loss cap | 5R to 8R | Cut size or pause |
Portfolio correlation multiplies risk
Two trades can act like one bigger trade. Correlated markets move together. You can lose on both at once.
- Long EURUSD and long GBPUSD often stack USD short risk.
- Long NASDAQ and long high beta tech stocks stack the same factor.
- Long BTC and long crypto altcoins often stack one risk bucket.
Use a portfolio risk cap.
- Same theme cap: Keep total open risk on correlated trades to 1R to 2R combined.
- Reduce size: If you take a second correlated trade, cut size so total risk stays inside the cap.
- Avoid clones: If the second setup looks the same and triggers for the same reason, treat it as the same trade.
Expectancy basics, win rate vs average win and loss
You do not need a 1:2 take profit to make money. You need positive expectancy.
Use this simple form.
Expectancy (in R) = (Win rate x Avg win in R) - (Loss rate x Avg loss in R)
- If your average loss is 1R, your average win and win rate decide the outcome.
- Tight stops can raise your win rate drop. They also increase stop outs from noise.
- Wide targets can raise R. They also lower your win rate.
| Win rate | Avg win | Avg loss | Expectancy |
|---|---|---|---|
| 40% | 2.0R | 1.0R | 0.20R |
| 55% | 1.2R | 1.0R | 0.21R |
| 65% | 0.9R | 1.0R | 0.24R |
Match stop loss and take profit to your setup type. Mean reversion often wins more but pays less. Breakouts often win less but pay more. Track your own numbers. Adjust targets based on real results, not rules you heard.
Gaps and overnight risk, stocks vs FX vs crypto
Stops do not guarantee your fill price. Gaps and fast markets can skip your level. You get slippage.
- Stocks: Highest gap risk. Earnings and premarket can jump over stops. Plan for overnight moves.
- FX 24/5: Less gap risk during the week, still gaps over the weekend. Liquidity drops at rollover and during shocks.
- Crypto 24/7: No close, but thin liquidity can hit stops with slippage. Large moves can happen anytime.
Rules that reduce gap damage.
- Do not hold full size through known binary events. Reduce or exit.
- Use smaller size for overnight holds in stocks. Treat it as a different trade.
- Assume slippage in your risk. If your stop is 1R, plan that a real loss can be 1.2R in fast conditions.
- Place stops at invalidation. Do not place them at obvious single tick levels where liquidity hunts cluster.
News and earnings, reduce size, widen stops, or stay flat
High impact events change your trade math. Spreads widen. Liquidity drops. Stops slip. Targets can fill then reverse.
Pick one rule set and apply it every time.
- Stay flat: Best for CPI, NFP, rate decisions, earnings, and major guidance calls. Avoids random outcomes.
- Reduce size: Cut risk to 0.25R to 0.5R if you must trade around news.
- Widen stop, reduce size: If volatility rises and your setup still holds, widen the stop to the same structure level and reduce size so risk stays constant.
- Do not widen without reducing size: That breaks your risk cap.
- Do not tighten into news: Noise spikes can stop you out before the real move.
After the event, reassess structure. If the level that defined your stop no longer matters, exit. If the move creates a new base, rebuild the plan with a new stop and target.
Common mistakes to avoid (and what to do instead)
Placing stops at obvious levels where liquidity hunts occur
Obvious stops sit on round numbers, clean swing highs and lows, and the exact support or resistance line. Price often sweeps these zones, then reverses.
- Mistake: You place your stop on the exact low, high, or round number.
- What to do instead: Place your stop where your trade idea breaks, beyond the structure level, plus a buffer.
- Buffer rules: Use a volatility measure, not a fixed pip guess. If your market expands, your buffer must expand.
- Execution rule: If the only valid stop location sits inside the noise range, skip the trade or drop size and widen to the next structure level.
Build stops around structure, not around where everyone can see them. If you need help defining structure levels, use support and resistance zones, not single lines.
Moving the stop farther away to avoid taking a loss
Widening the stop after entry turns a planned loss into an uncontrolled one. It also kills your reward to risk.
- Mistake: You move the stop farther once price goes against you.
- What to do instead: Keep the stop fixed unless structure changes in your favor.
- If you must widen: Move it to a new, valid structure level and cut position size so your dollar risk stays the same.
- Hard rule: Never widen a stop to “give it room” with the same size.
Setting take profit too close and choking the strategy
Small targets can look safe. They often reduce expectancy. You win more often but you win too little.
- Mistake: You set take profit at the nearest minor level, then price tags it and runs without you.
- What to do instead: Set targets at the next meaningful liquidity zone. Aim for a target that fits your strategy’s required reward to risk.
- Practical check: If you cannot reasonably reach at least 1.5R to 2R before hitting major structure, the trade quality is low. Pass or wait for a better entry.
- Alternative: Scale out. Take partial profit at the first objective, then hold the rest for the main level with a rule-based trail.
Ignoring fees, spread, and slippage in tight-stop systems
Tight stops fail when costs eat your edge. This hits hardest in scalping and news-driven entries.
- Mistake: You backtest or plan using mid price, then trade the live spread.
- What to do instead: Add spread and expected slippage to your stop and target math.
- Minimum distance rule: Your stop distance should be several times the typical spread. If the spread is 20 percent of your stop, your stop is too tight.
- News rule: Expect spread to widen and fills to slip. Either widen and cut size, or do not trade the event.
Using the same stop and target rules across all timeframes and instruments
Each market has its own volatility, liquidity, and behavior. Timeframe changes the noise level. One-size rules break fast.
- Mistake: You use the same 20 pip stop, or the same 1:2 target, on every pair and every chart.
- What to do instead: Scale stops to volatility and structure on that instrument and timeframe.
- Calibration routine: Record average swing size, typical pullback depth, and spread during your trading hours. Build rules from those numbers.
- Consistency rule: Keep the method consistent, but adjust inputs. Structure stays structure, the distances change.
Overleveraging, why correct stops don’t fix bad position sizing
A perfect stop does not protect you if your position size is too large. Leverage turns normal variance into account damage.
- Mistake: You risk too much per trade and rely on the stop to save you.
- What to do instead: Size every trade from a fixed risk cap. Use your stop distance to calculate position size, not your profit goal.
- Control point: If you feel pressure to move your stop, your size is too big for your plan.
- Survival rule: Keep risk small enough to take the next trade. Your edge needs repetition.
Tool-specific setup: where to place stop loss and take profit on popular platforms
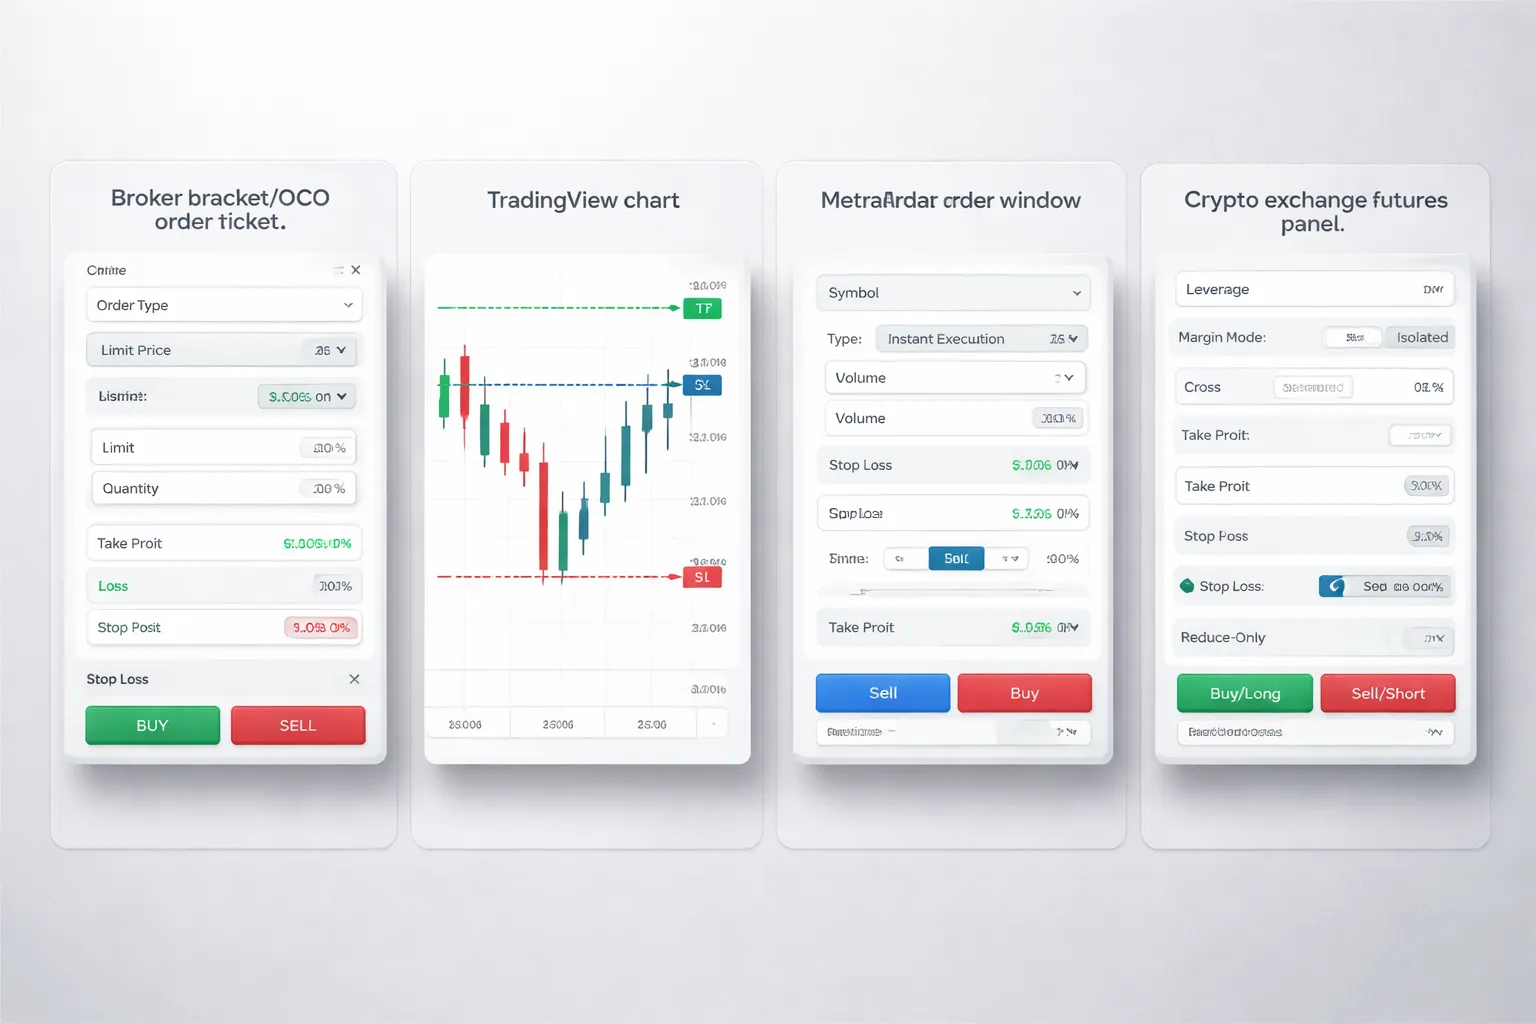
Using bracket (OCO) orders on broker platforms, what to look for in the order ticket
A bracket order links your entry with a stop loss and a take profit. The platform cancels the other exit when one fills. Look for OCO, Bracket, or Attached orders in the ticket.
- Order type: Market, Limit, Stop, Stop Limit. Match it to your entry plan. Use Limit for planned entries, use Market only if you accept slippage.
- Quantity: Set size from your risk cap. Then place your stop. Do not reverse the sequence.
- Stop loss field: Choose price, points, percent, or ticks. Use price if you already marked a level on the chart.
- Take profit field: Choose price or R multiple if available. Prefer a fixed price level, it removes ambiguity.
- Time in force: Day or GTC. If you swing trade, use GTC but review open orders daily.
- Trigger rules: Last, Bid, Ask, Mark, Mid. For long trades, stops often trigger on Bid. For shorts, on Ask. Pick the rule that matches how your broker triggers stops.
- OCO linkage: Confirm the stop and target sit under the same parent order. If you see two separate working orders, you do not have OCO.
- Stop type: Stop Market fills fast but can slip. Stop Limit controls price but can miss the exit. Use Stop Market for risk control.
- Fees and partial fills: If your entry fills in parts, confirm the attached orders resize automatically. Some platforms require manual adjustment.
| Ticket item | What you set | Why it matters |
|---|---|---|
| Stop trigger | Bid, Ask, Last, Mark | Wrong trigger can stop you out early or late |
| Stop type | Stop Market vs Stop Limit | Market guarantees exit, limit does not |
| Attachment | Bracket, OCO | Prevents double exposure after one exit fills |
| TIF | Day, GTC | Stops that expire leave you unprotected |
TradingView workflow, planning levels and translating them into orders
TradingView helps you plan levels. Execution depends on your connected broker or exchange. Keep the workflow tight.
- Mark your entry, stop, and target on the chart: Use Horizontal Ray or Price Line. Use exact prices, not rough zones.
- Measure the stop distance: Use the ruler. Record points, percent, or pips. This number drives position sizing.
- Store the plan: Write the entry, stop, target, and invalidation in a note. Keep it in the same chart layout.
- Place the order: If your broker supports brackets, place an entry with attached SL and TP. If it does not, place the entry, then immediately place the stop and target as OCO if possible.
- Match symbols and sessions: Confirm you trade the same ticker, contract, and market hours. Futures and CFDs often have similar symbols.
- Check price basis: If your stop triggers on Bid or Ask, your chart may show Last. Add Bid and Ask lines so you can see the spread.
- Set alerts as backup: Add an alert at the stop level and at the target level. Alerts do not replace orders.
MetaTrader (MT4/MT5) basics, setting SL and TP in pips and modifying orders safely
In MT4 and MT5, you set stop loss and take profit as prices. Many traders think in pips, so convert pips to price before you place the trade.
- Open the order window: New Order, then pick symbol and volume.
- Set SL and TP before you click Buy or Sell: Enter the stop loss price and take profit price in the fields. This prevents unprotected exposure.
- Convert pips to price: For most pairs, 1 pip is 0.0001. For JPY pairs, 1 pip is 0.01. If your broker uses 5 digit quotes, 1 pip equals 10 points.
- Respect minimum stop distance: Some brokers enforce a minimum distance from current price. If the platform rejects your stop, widen it or use a pending order.
- Modify safely: Right click the position, Modify or Delete. Change SL and TP, then confirm. Do not drag levels in fast markets unless you accept slippage risk.
- Partial profits: MT4 and MT5 do not manage multiple take profits automatically unless you split the position into separate orders. If you want TP1 and TP2, open two smaller positions with different TPs.
- Trailing stop: It runs on your terminal, not on the broker server in many setups. If your platform closes, the trailing logic can stop. Use it only if you monitor it.
| Term | What you see | What it means for SL and TP |
|---|---|---|
| Pip | 0.0001, or 0.01 on JPY | Planning unit, convert to price for orders |
| Point | Smallest quote step | Often 10 points per pip on 5 digit brokers |
| Modify | Change SL, TP | Updates the order on the server after confirm |
Crypto exchanges, reduce-only take profit, isolated vs cross margin implications
Crypto platforms differ, but the risks stay the same. Your biggest mistakes come from margin mode and order flags.
- Use reduce-only for take profit: Reduce-only prevents the TP from opening a new position if your position already closed. Turn it on for every TP on perpetuals.
- Check close-on-trigger options: Some exchanges label this as Close, Close Position, or Close All. Use it for stop loss and take profit when available.
- Pick isolated margin for cleaner risk: Isolated limits the loss to that position margin. Cross margin can pull funds from your whole wallet to keep the position alive, which can override your risk plan.
- Know your liquidation buffer: If your stop sits too close to liquidation, slippage can liquidate you before the stop fills. Add distance or reduce leverage.
- Trigger price type: Last price can spike. Mark price reduces noise but can delay triggers. Use the trigger that matches your exchange rules and your instrument.
- TP and SL as OCO: If the exchange offers TP/SL as an OCO pair, use it. If not, you must cancel the remaining order after one fills.
- Spot trading: Your stop is usually a stop limit or stop market sell. You cannot lose more than you hold, but gaps and thin books still cause slippage.
- Perps and futures: Fees matter. Funding and taker fees can change your net R. Include them when you set targets.
If you use hedged mode, confirm each exit order targets the correct side. Otherwise your stop can close the wrong leg. If you hedge, read what hedging in forex looks like in practice and apply the same order labeling discipline.
Advanced considerations (optional, but powerful)
Volatility regime changes, adapt when ATR changes
Stops and targets must match current volatility. ATR gives you a fast read.
- If ATR expands: widen your stop or reduce your size. Keep the same % risk. Do not keep a tight stop and hope.
- If ATR contracts: tighten your stop or extend your target only if structure supports it. Low ATR often means slower follow-through.
- Use a fixed ATR multiple: set stop distance at 1.0 to 2.5 ATR from entry, based on your setup. Set target at a multiple that keeps your planned R.
- Recheck at new volatility highs: if ATR jumps after entry, your original stop may sit inside normal noise. Either accept higher stop distance and cut size, or exit early and re-enter later.
Write the rule before you trade. Then follow it. Use a simple risk framework, like the one in a solid forex trading plan.
Market microstructure, stop placement around obvious levels
Many stops cluster at round numbers and clean swing points. Price often probes them.
- Avoid exact round numbers: 1.2000, 1.2050, 1900, 50,000. Place stops a few ticks beyond the level that matters.
- Respect session highs and lows: Asia range high, London high, New York high. Stops just outside these levels get hit often during liquidity grabs.
- Use structure first, then padding: put the stop beyond the swing high or low, then add a small buffer tied to spread and current ATR.
- Account for spread at the stop: in some markets your stop triggers on bid or ask. Place it where the trigger price makes sense, not where the chart line looks neat.
Use alerts and conditional orders to reduce panic decisions
Panic exits come from late decisions. You fix that with automation.
- Set two alerts: one at “decision price” before your stop, one at your target zone. The first alert gives you time to act without rushing.
- Use OCO brackets: stop loss and take profit placed at entry. One cancels the other. You remove the temptation to widen the stop.
- Use conditional logic where available: move stop to breakeven only after a defined trigger, like a close above a level, or +1R reached.
- Use reduce-only on derivatives: prevent accidental position flips when volatility spikes.
Backtest your exit rules, measure what matters
You do not need complex backtests. You need clean records and consistent metrics.
- R-multiples: record every trade in R. This lets you compare setups across pairs and timeframes.
- MAE: maximum adverse excursion. How far price went against you before your exit. This shows if your stop sits inside normal noise.
- MFE: maximum favorable excursion. How far price went in your favor. This shows if your target is too close, or if you leave too much on the table.
- Time to target and time to stop: how long trades take to resolve. Long time with low MFE often signals a bad regime for your strategy.
- Exit reason tags: stop hit, target hit, manual exit, time stop, trailing stop. If manual exits dominate, you do not have a real exit rule.
FAQ
What is the best stop loss method?
Use a technical stop that matches your setup, then size your position to keep risk fixed. Place the stop beyond the level that proves your idea wrong, not at a random percent. If the stop sits inside normal noise, you will get chopped.
How far should my stop loss be?
Set it at the invalidation point of your setup. Measure recent volatility and structure so your stop sits outside typical swings. Then calculate position size from stop distance and your risk per trade. Do not widen the stop without reducing size.
How do I set take profit targets?
Start with a clear target level, prior high or low, supply or demand zone, or measured move. Check if the target gives a positive expectancy with your win rate. Track result in R so you compare targets across trades.
What risk-reward ratio should I use?
Pick R based on your edge, not a rule. Many strategies work at 1R, 2R, or higher. Your win rate must support your R. Use a journal to compute expectancy. Learn the basics in risk-reward ratio.
Should I use a trailing stop?
Use it only if your data shows better expectancy than fixed exits. Trailing stops often cut winners in choppy regimes. Define the trail rule in points, ATR, or structure. Tag exit reasons so you know if the trail helps or harms.
Where should I place stops and targets in forex?
Use the same logic as other markets. Place the stop past structure on your entry timeframe, then confirm higher timeframe context. Avoid stops near obvious round numbers during high volatility. Always account for spread and typical slippage.
How do I avoid getting stopped out too often?
Fix the root cause. Either your stop sits inside normal volatility, your entry is late, or the market regime changed. Track MAE and MFE. If MAE clusters near your stop, adjust the setup or timeframe, not your discipline.
Do I set stops and targets before or after entering?
Set them before you enter. You need a stop price, target price, and planned R in advance. If you cannot define invalidation and reward, skip the trade. After entry, you should only follow pretested rules, not emotions.
What common mistakes ruin stop loss and take profit?
Moving the stop wider, taking profit early without rules, using one percent stops for every setup, ignoring fees and spread, and changing targets mid-trade. Another big one is manual exits without tags. If you cannot label exits, you cannot improve them.
What journal data helps improve exits fastest?
Track result in R, MAE, MFE, and exit reason tags. Add stop distance, target distance, fees, and slippage. Segment by setup, session, and news flag. Then compare distributions of MFE and time in trade for stop hit vs target hit.
Conclusion
Your stop loss protects your account. Your take profit protects your edge. Set both before you enter. Size the trade so a stop hit costs a fixed amount of R. Place the stop where your setup breaks. Place the target where price has room to move.
- Pre-trade: mark the invalidation level, set the stop, calculate position size, set the target, place both orders.
- In-trade: do not widen the stop. Do not move targets without a rule you can repeat.
- Post-trade: log R, MAE, MFE, time in trade, and an exit reason tag. Review weekly.
Final tip. Start with one exit rule and keep it for 50 trades. Then use your journal to change one variable at a time. If you want a simple way to set targets from levels and structure, read how to set take profit in forex.
-
Stop Loss vs Take Profit: Differences, Examples & Best Practices
5 months ago -
Forex Trading Psychology Tips: How to Stay Disciplined and Consistent
5 months ago -
Forex Order Types Explained: Market vs Limit vs Stop Orders
5 months ago -
How to Start Forex Trading Step by Step (Beginner Roadmap)
5 months ago -
Risk Management in Forex for Beginners (Rules That Keep You in the Game)
5 months ago
-
- Step-by-step: how to set stop loss and take profit before entering a trade
- Step 1: Write the trade idea and the invalidation point
- Step 2: Identify key levels that define structure
- Step 3: Measure volatility so you do not place “noise stops”
- Step 4: Place the stop beyond structure with a buffer
- Step 5: Set the take profit using risk-to-reward and liquidity targets
- Step 6: Calculate position size from dollar risk
- Step 7: Use bracket orders (OCO) so stop and target go live together
- Step 8: Define management rules before clicking buy or sell
-
- Placing stops at obvious levels where liquidity hunts occur
- Moving the stop farther away to avoid taking a loss
- Setting take profit too close and choking the strategy
- Ignoring fees, spread, and slippage in tight-stop systems
- Using the same stop and target rules across all timeframes and instruments
- Overleveraging, why correct stops don’t fix bad position sizing
-
- Using bracket (OCO) orders on broker platforms, what to look for in the order ticket
- TradingView workflow, planning levels and translating them into orders
- MetaTrader (MT4/MT5) basics, setting SL and TP in pips and modifying orders safely
- Crypto exchanges, reduce-only take profit, isolated vs cross margin implications
-
- What is the best stop loss method?
- How far should my stop loss be?
- How do I set take profit targets?
- What risk-reward ratio should I use?
- Should I use a trailing stop?
- Where should I place stops and targets in forex?
- How do I avoid getting stopped out too often?
- Do I set stops and targets before or after entering?
- What common mistakes ruin stop loss and take profit?
- What journal data helps improve exits fastest?
-
-
How to Place a Forex Trade Step by Step (Your First Trade Explained)
3 months ago -
Forex Trading vs Crypto Trading: Which Market Is Better for Beginners?
3 months ago -
Forex Lot Size Calculator: How to Use It to Size Trades Correctly
5 months ago -
How to Calculate Position Size in Forex (Position Sizing Formula + Examples)
5 months ago -
Forex Leverage Explained: How It Works, Pros, Cons & Examples
5 months ago
-
Forex Trading Platforms Comparison: MetaTrader vs cTrader vs TradingView
5 months ago -
Is Forex Trading Legal in the United States? Rules, Regulators & What to Know
5 months ago -
Stop Loss vs Take Profit: Differences, Examples & Best Practices
5 months ago -
Forex Market Hours & Trading Sessions Explained (Best Times to Trade)
5 months ago -
Forex Leverage Explained: How It Works, Pros, Cons & Examples
5 months ago