How to Start Forex Trading Step by Step (Beginner Roadmap)

Forex trading lets you buy one currency and sell another. You trade price moves in pairs like EUR/USD. It runs 24 hours a day, five days a week. Most retail traders lose money, mainly because of leverage and poor risk control. Some brokers report loss rates around 70% for CFD accounts.
This roadmap shows you how to start step by step. You will learn how the market works, what you need to open an account, how to pick a pair, how to size positions, and how to place your first trade with a stop loss and a take profit. You will also learn the minimum routines that keep beginners from blowing up an account. If you want a safe place to begin, start with how to practice forex trading effectively before you risk real money.
Key Takeaways
- In het kort: Learn how forex works before you trade, price moves, pips, spreads, sessions, and why leverage cuts both ways.
- In het kort: Open the right account for your level, start with demo, then go live small with a regulated broker and clean pricing.
- In het kort: Trade one or two major pairs first, focus on liquidity and tighter spreads, skip exotic pairs until you have a track record.
- In het kort: Use a simple plan, entry trigger, stop loss, take profit, and a max risk per trade you follow every time.
- In het kort: Size positions from your stop loss, not from your feelings, your lot size must match the distance to your stop.
- In het kort: Place the stop loss and take profit when you open the trade, do not trade without an exit.
- In het kort: Expect losses, most retail accounts lose money, many CFD brokers disclose loss rates around 70% plus, your edge comes from risk control.
- In het kort: Track every trade, review weekly, fix one mistake at a time, consistency beats more indicators.
Keep your process tight. Pick a pair. Define your setup. Set your risk. Execute. Log the result. Repeat.
If you need structure, use a simple checklist and a written plan. Use this guide to build it: how to build a forex trading plan.
What Forex Trading Is (and What It Isn’t)
How currencies are quoted and why pairs move
Forex trades one currency against another. You always trade a pair.
In EUR/USD, EUR is the base currency. USD is the quote currency. If EUR/USD is 1.1000, 1 euro costs 1.10 dollars.
Price moves because relative demand changes. That demand shifts fast when new information hits.
- Interest rate expectations: Higher expected rates usually support that currency.
- Inflation and growth data: CPI, jobs, GDP, PMIs. Markets reprice on surprises, not headlines.
- Central bank signals: Statements, forecasts, press conferences.
- Risk sentiment: Fear and stress can push flows into USD, JPY, CHF. Calm can push flows out.
- Order flow and positioning: Stops and large hedges can move price even without news.
Most of your trades will not depend on one data point. They depend on how price reacts, and how you manage risk when it does.
Spot FX vs CFDs vs futures, what beginners should know
You can trade currencies through different products. They look similar on a chart. The rules under the chart differ.
| Product | What you trade | Main beginner takeaway |
|---|---|---|
| Spot FX | OTC market price via a broker, not an exchange | Costs come from spread, and sometimes commissions. Broker execution quality matters. |
| Forex CFDs | A contract that tracks a FX rate | Leverage is high, losses can come fast. Many brokers disclose that most retail accounts lose money. |
| FX futures | Standardized contracts on an exchange | Transparent exchange volume, defined contract size, set trading hours, and clear fees. |
For your first months, focus less on the label and more on these checks. Spreads at your trading hours. Commissions. Overnight financing or swaps. Slippage during news. Margin rules and stop-out behavior.
Key participants and how liquidity works
Forex is the largest financial market. It runs 24 hours from Monday to Friday, across major trading sessions.
- Banks and dealers: They stream prices and take the other side, or match flow.
- Funds and asset managers: They move size based on macro views, rebalancing, and hedging.
- Corporates: They hedge currency risk from business payments.
- Retail brokers: They route your orders to liquidity providers, or internalize them.
Liquidity means you can enter and exit with low friction. It changes by time of day.
- Major pairs like EUR/USD and USD/JPY usually offer tighter spreads.
- Spreads often widen during rollovers, holidays, and around high impact news.
- Thin liquidity increases slippage. Your stop can fill worse than your price.
Your job is to trade when your setup and liquidity both make sense, then control loss size. If you need a tight risk cap, learn how to place a stop loss in forex.
Common myths beginners should ignore
- Get-rich-quick: Leverage speeds up losses. Treat trading like risk management, not income replacement.
- Easy scalping: Small targets face spread, commissions, and slippage. A tiny edge gets erased fast.
- More indicators equals more accuracy: Most indicators lag price. One clear setup beats five conflicting signals.
- You need to predict news: You need a plan for volatility. Price reaction matters more than the headline.
- Stops are optional: One uncontrolled move can wipe weeks of gains. Define your exit before entry.
- One strategy works in all markets: Volatility and trend conditions change. Your rules must account for it.
Step 1 — Set Your Goals, Time Commitment, and Risk Tolerance
Pick a trading style that matches your schedule
Your schedule decides your style. If you force it, you will miss entries, move stops, or overtrade.
- Swing trading: Hold trades for days to weeks. Check charts 1 to 2 times per day. Fits a job and a fixed routine. Fewer trades, less screen time.
- Day trading: Open and close trades the same day. Needs 1 to 3 focused hours, often around major market sessions. More decisions, more execution pressure.
- Scalping: Many fast trades, short holds. Needs near full attention during your trading window and tight execution. Spreads and errors matter more. Read a scalping forex strategy only if you can protect the time and focus.
Write your available hours. Write your trading window. Pick one style. Commit for at least 30 trading days before you judge results.
Define realistic expectations and learning milestones
Most retail traders lose money. Many brokers publish risk warnings. One common figure is that about 71% of retail CFD accounts lose money. Treat this as your baseline risk signal.
Set process goals first. Profit goals come later.
- Milestone 1: Learn order types, spread, pip value, leverage, margin, and swaps. You must calculate risk before you place a trade.
- Milestone 2: Build one setup with clear entry, stop, and exit rules. No discretion. No extra filters.
- Milestone 3: Execute 50 to 100 demo trades and log each one. Track rule compliance, not P and L.
- Milestone 4: Move to small live size. Keep the same rules. Expect emotions to change your behavior.
Use simple targets for skill. Example, hit 90% rule adherence for 20 trades in a row. If you break rules, you reset the count.
Decide what you can afford to lose and set a max drawdown limit
Only fund your account with money you can lose without changing your life. If a loss forces you to borrow, sell assets, or skip bills, you sized too big.
Set a hard maximum drawdown. This is the point where you stop trading and review.
- Account max drawdown: 10% to 20% is a common beginner ceiling. Lower is safer.
- Action at the limit: Stop trading for at least one week. Audit your journal. Reduce risk before you restart.
Max drawdown protects you from leverage. It also protects you from revenge trading after a losing streak.
Create a simple personal risk policy
You need a written risk policy. One page. No exceptions.
Keep your policy simple. If you cannot follow it, your strategy does not matter.
Step 2 — Learn Forex Market Basics (Beginner Glossary That Actually Matters)
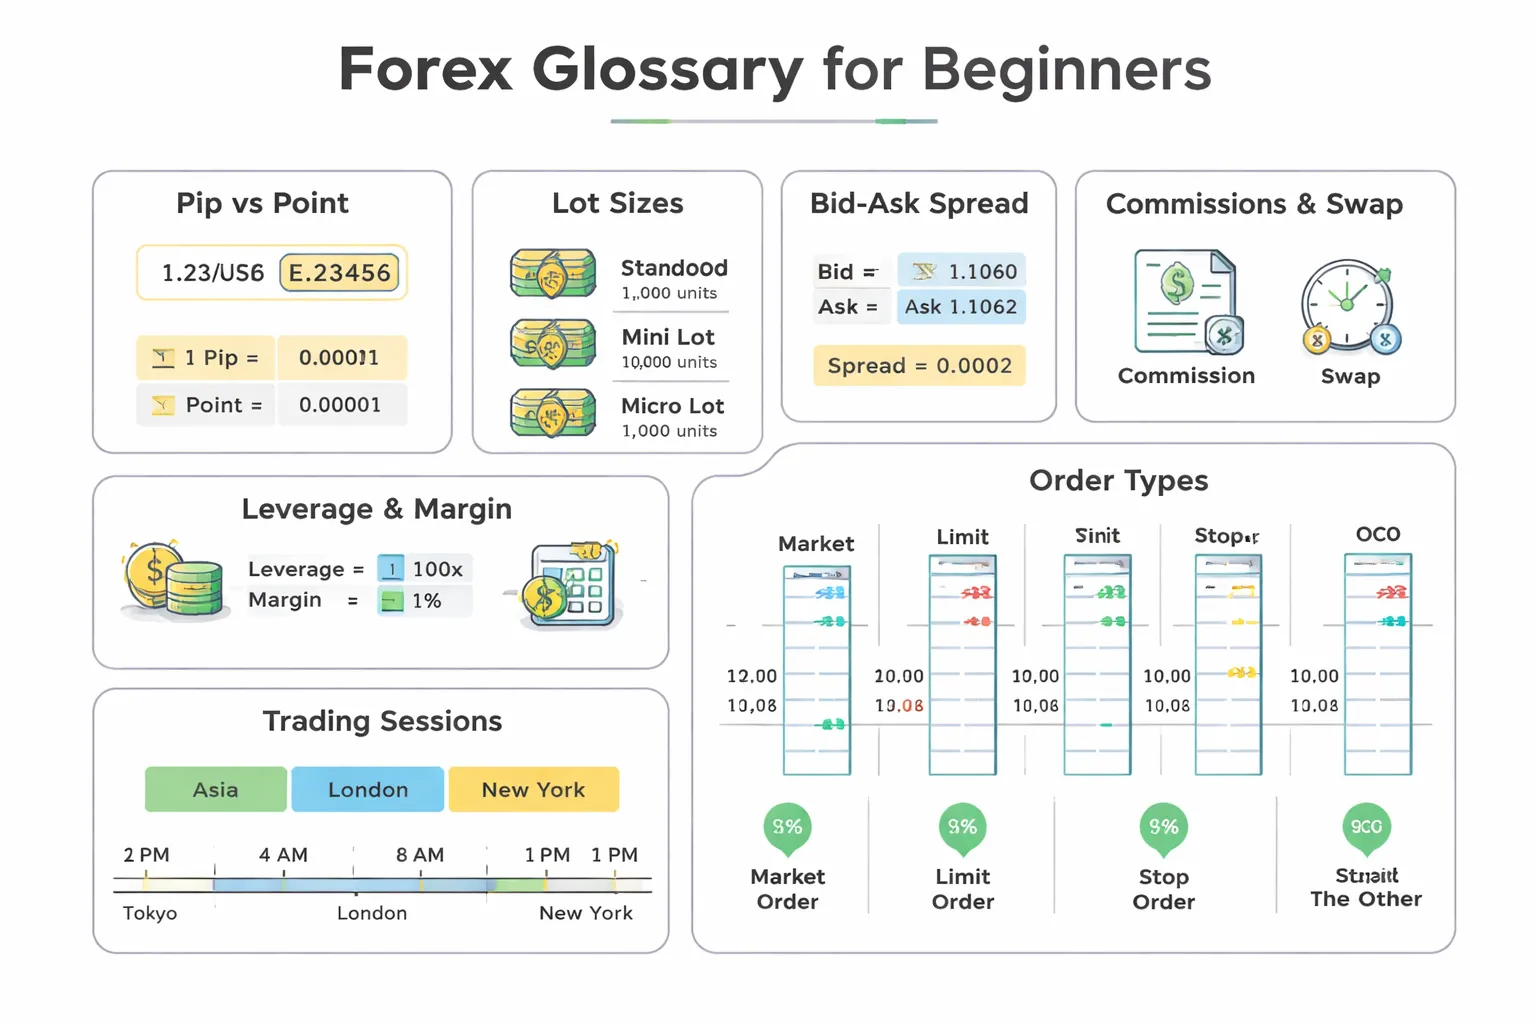
Pips, points, lots, and contract size
You need four sizing terms. They control your profit, loss, and risk.
- Pip: The standard price step in most pairs. For EUR/USD a pip is 0.0001. If EUR/USD moves from 1.1000 to 1.1005, that is 5 pips.
- Point: A smaller unit used by some brokers. Often 1 pip equals 10 points. If EUR/USD moves 1.10000 to 1.10005, that is 5 points, or 0.5 pips. Check your platform quotes.
- Lot: The trade size unit. Common lot types:
- Standard lot: 100,000 units of the base currency.
- Mini lot: 10,000 units.
- Micro lot: 1,000 units.
- Contract size: How much one lot represents. In spot forex it is typically the same as above. Example, 1.00 lot EUR/USD usually equals 100,000 EUR.
Simple pip value example for EUR/USD. If you trade 1 standard lot, a 1 pip move is about $10. If you trade 0.10 lot, a 1 pip move is about $1. If you trade 0.01 lot, a 1 pip move is about $0.10. Your exact pip value changes slightly with price and account currency.
Bid, ask, spread
Every quote has two prices.
- Bid: The price you can sell at.
- Ask: The price you can buy at.
- Spread: Ask minus bid. This is a built-in cost.
Example. EUR/USD shows 1.10000 bid and 1.10008 ask. The spread is 0.00008, or 0.8 pips. If you buy, you start down 0.8 pips. If you sell, you also start down 0.8 pips. Price must move in your favor to cover the spread.
Commissions, swaps, rollover, slippage
- Commission: A separate fee charged by many low spread accounts. Example, $3 per side per standard lot means about $6 round trip for opening and closing.
- Swap, rollover: An overnight financing charge or credit for holding a position past the broker cut-off time. It depends on the pair, your direction, and rates. Swaps can turn a small win into a loss if you hold too long. They can also add cost fast during multi-day holds.
- Slippage: You get filled at a different price than you requested. It happens in fast markets, low liquidity, or around news. Slippage can be negative or positive, but plan for negative. Stops can slip the most during spikes.
Track these costs in your journal. Many beginners underestimate them, then wonder why results differ from backtests.
Leverage and margin in plain English
Leverage lets you control a large position with a smaller deposit. Margin is that deposit. Leverage does not reduce risk. It makes it easier to take too much risk.
- Used margin: The amount locked to keep your position open.
- Free margin: What remains to absorb losses and open trades.
- Equity: Your balance plus unrealized profit or loss.
Simple example. You open 1 standard lot EUR/USD, about $100,000 notional. With 50:1 leverage, margin needed is about $2,000. If your account has $2,500, you have little room for drawdown. A normal swing can trigger a forced close.
Margin call and stop-out: If your equity drops too far relative to used margin, the broker blocks new trades. If it drops further, the broker closes positions to protect the loan. You lose control of the exit. Avoid this by keeping total open risk low and position sizes small.
Trading sessions and volatility patterns
Forex trades 24 hours, but it does not move the same all day. Volatility clusters around the biggest financial centers and their overlaps.
- Asia session: Often slower in EUR/USD and GBP/USD. JPY pairs can move more. Spreads can widen in quieter periods.
- London session: Usually the most active. Many pairs see strong trends and breakouts. Liquidity improves, spreads often tighten.
- New York session: High activity, especially early. US data releases can drive fast moves.
- London and New York overlap: Often the highest liquidity and volatility window. Good for execution, but also more whipsaws around news.
Match your strategy to the session. If you scalp, you need tight spreads and steady liquidity. If you swing trade, you care more about swap and daily range.
Order types you will use
- Market order: Enter now at the best available price. Use it when speed matters more than price. Expect slippage in fast moves.
- Limit order: Buy below current price or sell above current price. Use it to enter at a better price or to take profit. Limits control price but may not fill.
- Stop order: Buy above current price or sell below current price. Use it for breakout entries and for stop loss. Stops can slip during spikes.
- Stop-limit order: A stop triggers a limit. Use it when you want a breakout entry but refuse to pay worse than a set price. Risk, it may not fill, and price can run without you.
- OCO order: One cancels the other. Place two orders, often a breakout buy stop above and a sell stop below, or a take profit and stop loss pair. When one triggers, the other cancels. Use it to reduce manual errors and avoid double entries.
If you want the exact click path for placing each order type, use this guide on how to place a forex trade step by step.
Step 3 — Choose What to Trade (Pairs, Volatility, and News Sensitivity)
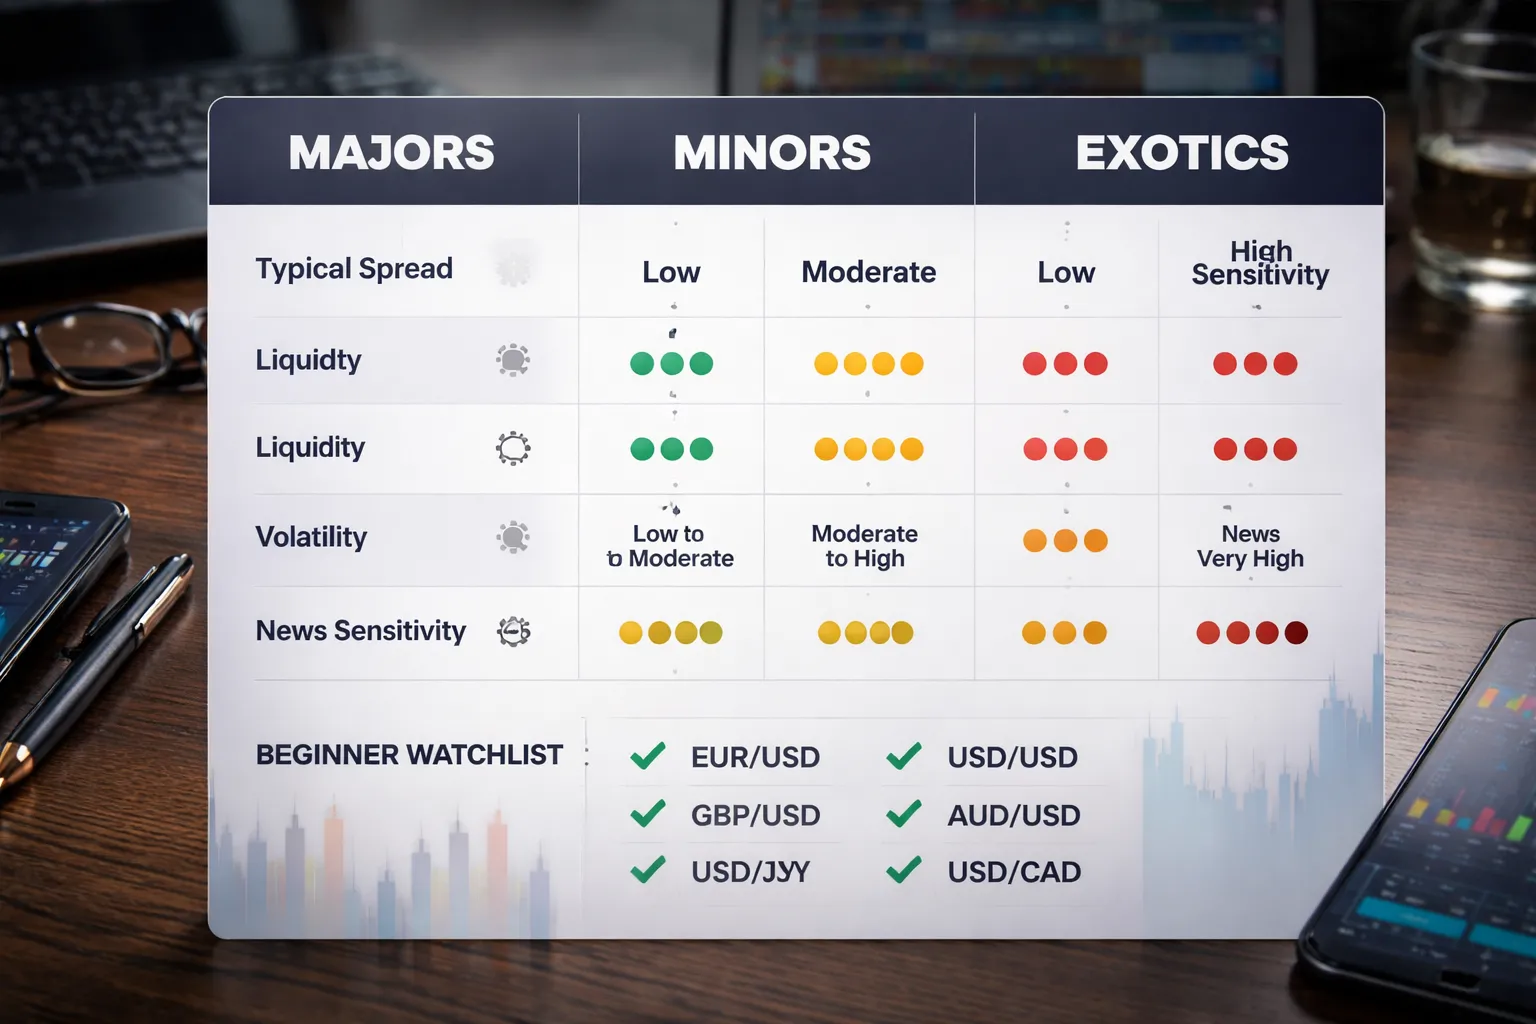
Majors vs minors vs exotics, spreads and risk
Your pair choice controls your costs and your execution quality.
- Majors. EUR/USD, USD/JPY, GBP/USD, USD/CHF, AUD/USD, USD/CAD, NZD/USD. Tight spreads most of the day. Deep liquidity. Cleaner fills. Fewer surprise gaps.
- Minors. Crosses without USD, like EUR/GBP, EUR/JPY, GBP/JPY, AUD/JPY. Wider spreads than majors. Moves can run harder. More chop around local session opens.
- Exotics. One major plus an emerging currency, like USD/TRY, USD/ZAR, USD/MXN. Much wider spreads. Thin liquidity at times. Bigger gaps. Higher swap costs. Higher headline risk.
As a beginner, start with majors. You pay less per trade. You get fewer ugly fills. You can manage risk with smaller stops.
How to shortlist 3 to 5 beginner friendly pairs
Pick a small watchlist and learn its behavior. Use these filters.
- Low spread. Your broker quote should stay tight in normal hours. If the spread often jumps, drop the pair.
- Matches your schedule. Trade pairs that move when you can watch them.
- London, EUR/USD, GBP/USD, EUR/GBP.
- New York overlap, EUR/USD, GBP/USD, USD/CAD.
- Asia, USD/JPY, AUD/USD, NZD/USD.
- Stable volatility. Avoid pairs that spike and reverse fast until you have reps.
- Clear driver. Pick pairs where you understand the main catalyst, like Fed for USD, BoJ for JPY, BoE for GBP, RBA for AUD, BoC plus oil for CAD.
| Beginner watchlist option | Why it works |
|---|---|
| EUR/USD, USD/JPY, GBP/USD | High liquidity, tight spreads, lots of clean setups. |
| EUR/USD, AUD/USD, USD/CAD | Adds a commodity link without going exotic. |
| EUR/USD, EUR/GBP, GBP/USD | Lets you compare EUR and GBP strength side by side. |
Keep it to 3 to 5 pairs. Trade fewer markets, take better trades. You also track risk and risk-reward ratio with less noise.
Understanding correlations, USD, risk on risk off, commodity links
Many pairs move together. Correlation can double your risk without you noticing.
- USD exposure. If you go long EUR/USD and long GBP/USD, you often hold two trades that depend on USD weakness. Treat it like one bigger bet.
- Risk on risk off. In risk off moves, traders often buy USD and JPY and sell higher yield currencies. AUD and NZD often suffer. In risk on moves, AUD and NZD often do better.
- Commodity links. CAD often reacts to oil. AUD often reacts to iron ore and China data. NZD often reacts to dairy and risk sentiment. These are not rules, just common drivers.
- Cross effects. EUR/JPY can move because EUR moves, JPY moves, or both. That can increase speed and whipsaws.
Simple rule. If two charts look similar most days, do not take both trades in the same direction. Pick the cleaner setup and size it correctly.
Build a basic economic calendar routine, high impact releases
News moves price. You need a repeatable routine.
- Once per day. Check the calendar for the next 24 hours. Mark high impact events for your pairs.
- Two time windows. Watch the 30 minutes before and after each release. Spreads can widen. Slippage rises. Stops get hit fast.
- Core releases to respect.
- USD. CPI, PCE, Nonfarm Payrolls, FOMC rate decision and press conference, ISM PMI, GDP.
- EUR. ECB decision and press conference, Eurozone CPI, PMI.
- GBP. BoE decision, UK CPI, UK jobs, GDP.
- JPY. BoJ decision, Tokyo CPI, GDP.
- CAD. BoC decision, CPI, jobs, oil headlines.
- AUD. RBA decision, CPI, jobs, China data.
Rule for beginners. Do not open new trades right before a high impact release on the currencies in your pair. Let the spike happen first. Then trade the structure that forms after.
Avoid common beginner traps, too many pairs
- Overtrading the watchlist. More pairs create more signals. You take low quality setups to stay busy.
- Hidden risk stacking. You open several trades that all depend on the same currency move.
- Ignoring spread conditions. You trade at rollover or during thin hours and your costs jump.
- Chasing the mover. You switch pairs after a big candle. You buy tops and sell bottoms.
Start with 3 to 5 pairs. Track how they behave by session, by news, and by trend days versus range days. Add new pairs only after you can trade your first set with consistent execution.
Step 4 — Pick a Regulated Broker and Trading Platform (Safety First)
Step 4. Pick a Regulated Broker and Trading Platform (Safety First)
Your broker holds your funds and routes your orders. Safety and costs matter more than promos.
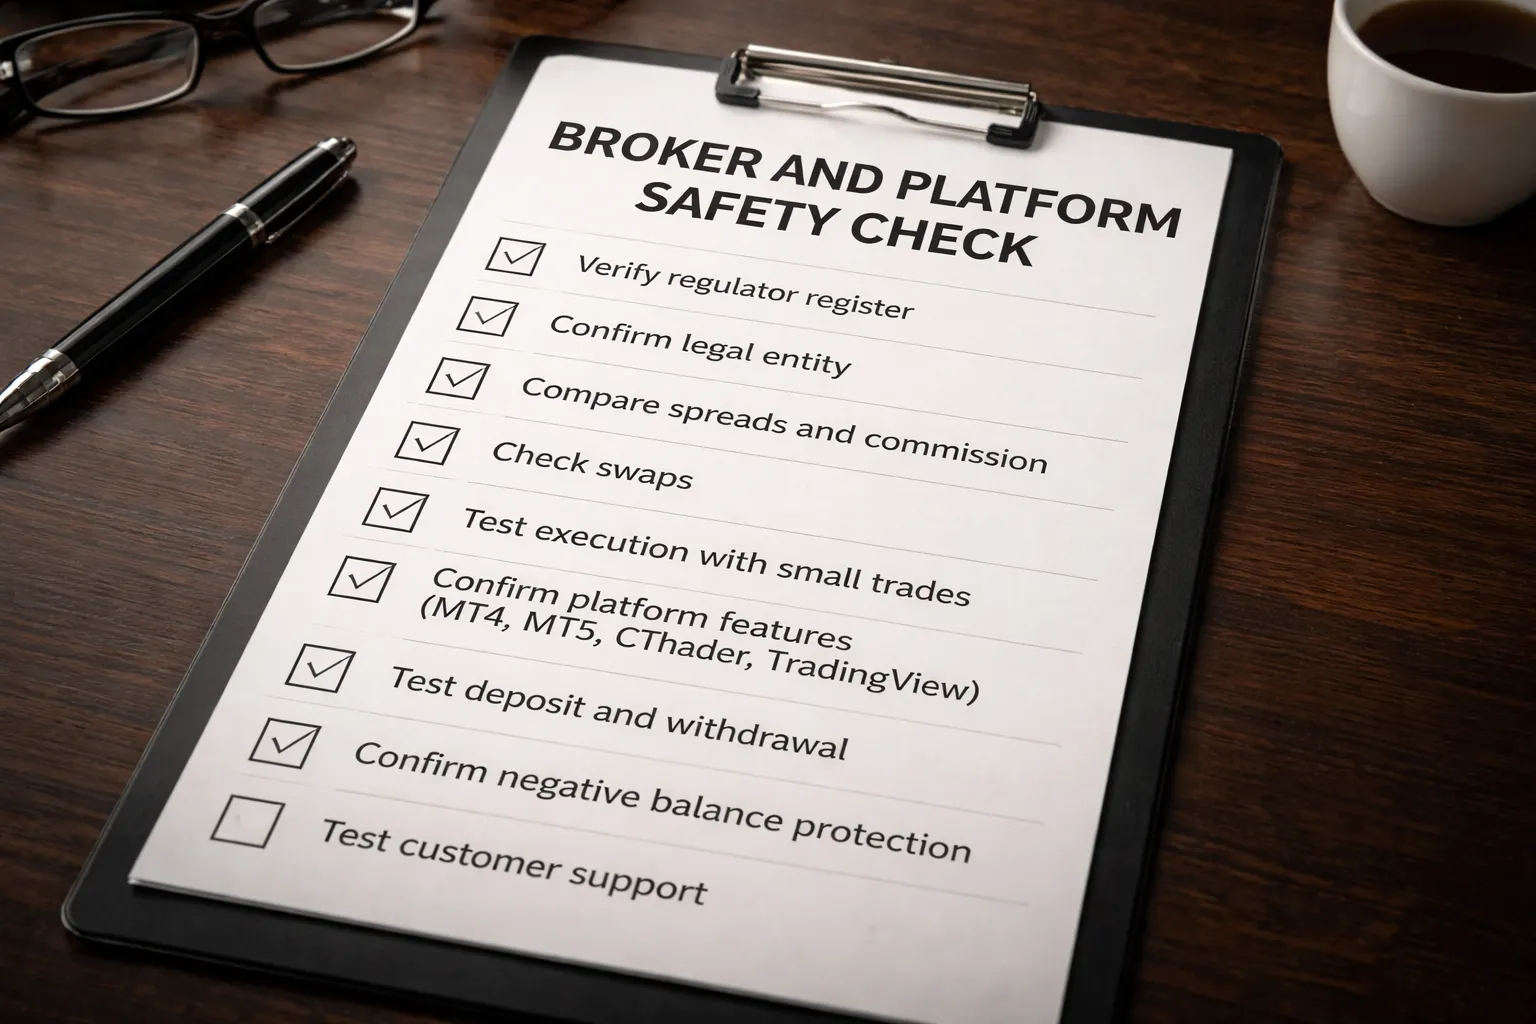
Verify regulation and avoid unlicensed brokers
- Find the license on the regulator site. Do not trust a logo on the broker site. Copy the license number, search it on the official register, match the legal entity name and domain.
- Check the exact entity. Big brands run multiple entities. Your account sits under one. Confirm country, legal name, and address.
- Confirm client money rules. Look for segregation of client funds and investor protection terms in the entity disclosures.
- Avoid red flags. Unverified regulation, pressure to deposit fast, bonus offers tied to withdrawal limits, vague fee pages, and no clear complaints process.
- Search enforcement actions. Use the regulator site and major warning lists. If you see “clone firm” warnings, walk away.
Account types and fee structure
You pay to trade. You either pay through the spread, a commission, swaps, or all three.
- Spread only account. Simple pricing. Higher spread. Often better for small size and low trade frequency.
- Raw spread plus commission. Lower spread. You pay a fixed commission per lot. Often better for active trading and tight stop methods.
- Swaps and financing. Holding past rollover adds a daily debit or credit. Brokers set their own swap rates. Compare them on the pairs you plan to trade.
- Other fees. Check inactivity fees, deposit fees, withdrawal fees, and currency conversion fees. These can beat your trading costs if you trade small.
| Cost item | What it is | What you should do |
|---|---|---|
| Spread | Difference between bid and ask | Compare average spreads, not best case. Check during your trading hours. |
| Commission | Fee per lot on raw accounts | Convert to cost per trade. Add it to spread when you compare brokers. |
| Swap | Overnight financing | Verify long and short swap on your pairs. Check triple swap day policy. |
| Slippage | Fill price differs from requested price | Track it in your journal. It often matters more than a 0.1 pip spread gap. |
Execution model and what it means for you
- Market maker. The broker can take the other side or internalize flow. You often get fixed or wider spreads. You may see fewer rejects in calm markets. You must watch for stop hunting claims and focus on measurable issues like slippage and re-quotes.
- STP or ECN style. The broker routes orders to liquidity providers. You often get variable spreads plus commission. Spreads can widen hard in news or illiquid hours. You can get positive or negative slippage.
- What to test. Place small trades at different times. Log spread, fill speed, re-quotes, and stop order behavior. Test during your real session, not only mid day London.
Platform checklist
- MT4 or MT5. Huge broker support. Strong for order types and automation. MT5 adds more markets and features, but broker implementation varies.
- cTrader. Clean interface, strong depth of market tools on some brokers, solid for execution focused trading.
- TradingView integration. Good charts and alerts. Confirm if you can place trades from TradingView on your broker, or if it is charting only.
- Mobile vs desktop. Use mobile for monitoring and emergency exits. Do analysis and execution on desktop if your method needs precise entries.
- Order controls. You need market, limit, stop, stop loss, take profit, and trailing stop if you use it. Check if you can set SL and TP at entry.
- Data and reporting. Export trade history in CSV. You need this for tracking performance and slippage.
Deposits, withdrawals, protection, and support
- Deposits and withdrawals. Test a small deposit and a small withdrawal before you scale. Track processing time and fees.
- Base currency and conversion. Match your account currency to your funding source when possible. Conversions add hidden cost.
- Negative balance protection. Confirm it in writing for your entity. This matters in gaps and fast markets.
- Support checks. Message support with specific questions on swaps, margin, and execution. Time the response. Keep transcripts.
- Broker stability. Look for years in business, audited financials if available, and clear risk disclosures.
Once you pick a broker and platform, keep your setup simple. Trade your planned pairs. Keep position size small until your fills, costs, and withdrawals prove reliable.
Step 5 — Practice on a Demo Account the Right Way
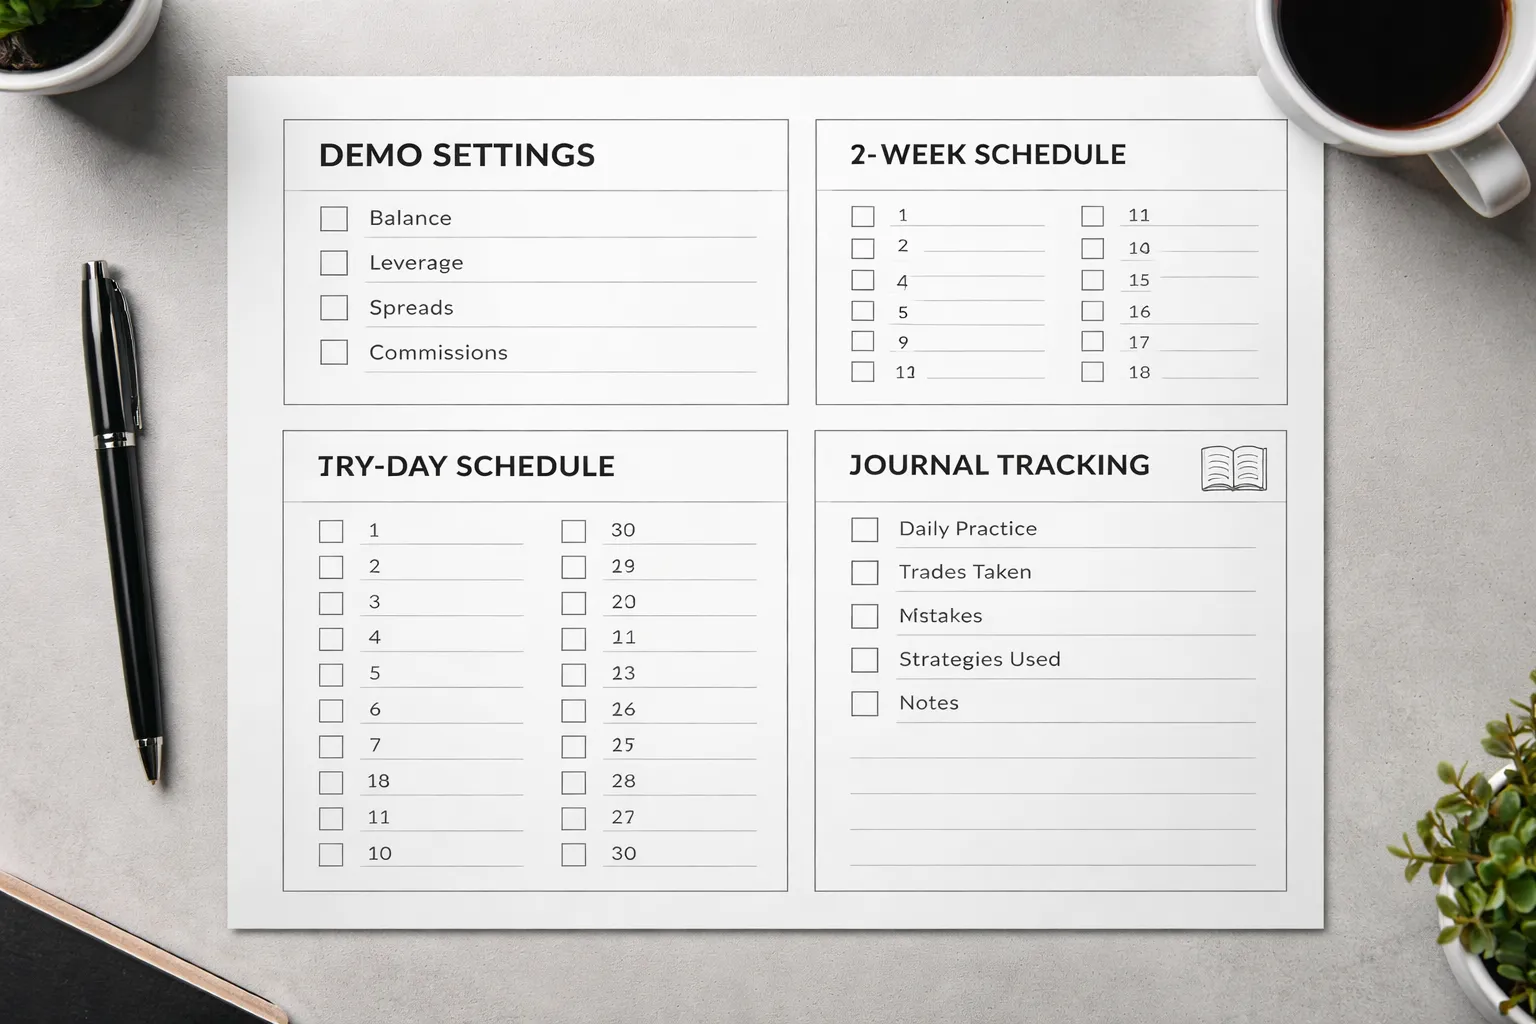
Step 5, Practice on a Demo Account the Right Way
Set demo conditions to match real trading
A demo works only if it copies your live setup. Match the numbers. Match the costs. Match the routine.
- Account balance: Set your demo balance to what you will fund in month one. Do not use a $50,000 demo if you plan to start with $500.
- Leverage: Set the same leverage you will use live. If your broker defaults to high leverage, lower it in the demo settings if possible.
- Position size: Use the exact lot sizing you plan to trade live. Keep risk per trade fixed. Do not “size up” because it is fake money.
- Spreads and commissions: Use the same account type you will use live, standard or raw plus commission. Track average spread during your trading hours.
- Execution: Place orders the same way you will trade live, market, limit, stop. Practice during the same session you will trade live.
- Stops and targets: Put a stop loss and take profit on every trade. Do it at entry, not later.
- Rules only: Trade only your planned pairs and your planned setups. Ignore everything else.
Two week plan, build the routine
Your goal is repetition. You want clean execution, not big wins.
- Day 1: Set up charts. Save templates. Set your default order size. Define one setup you will trade.
- Days 2 to 4: Take only A grade trades. Max 1 to 3 trades per day. Screenshot every entry and exit.
- Days 5 to 7: Add a pre trade checklist. Do not trade if one item fails. Practice placing orders fast and correct.
- Days 8 to 10: Focus on stop placement and target placement. Keep the same risk on every trade.
- Days 11 to 14: Reduce mistakes. No late entries. No moved stops. No revenge trades. If you break a rule, stop for the day.
30 day plan, prove consistency
Your goal is rule adherence under normal market noise. You track process first. Profit comes second.
- Week 1: Trade one setup on one or two pairs. Build a sample size of at least 15 trades.
- Week 2: Keep the same setup. Improve timing and order placement. Cut low quality trades.
- Week 3: Add one variable only, a second session, a second pair, or a second setup. Keep risk constant.
- Week 4: Trade like it is live. Same hours. Same max trades per day. Same stop trading rules after losses.
What to track in your journal
If you do not track it, you cannot fix it. Keep your journal simple and strict.
- Before trade screenshot: Mark your entry, stop, and target.
- After trade screenshot: Show the exit and note if you followed the plan.
- Reason for entry: One sentence. State the setup and the trigger.
- Risk details: Entry, stop distance in pips, position size, planned loss in dollars.
- Outcome: Profit or loss in R, not dollars. Use risk-reward ratio to keep results comparable.
- Execution quality: Slippage, spread at entry, order type used.
- Emotions: One word at entry and one word at exit, calm, rushed, angry, bored.
- Rule adherence: Yes or no. If no, list the broken rule and the cause.
- Next action: One fix you will apply on the next trade.
When to move from demo to live
Move to live only when your process stays stable. Use objective criteria.
- Sample size: At least 30 trades on your main setup.
- Rule adherence: 90% or higher across those trades. No repeated rule breaks.
- Risk control: Same risk per trade on every trade in the last 20 trades.
- Drawdown control: You stop trading when your rules say stop. You do not “win it back” on the same day.
- Execution stability: You can place orders without errors, wrong lot size, missing stop, or fat finger entries for two straight weeks.
- Realistic expectations: Your results come from a repeatable edge, not one lucky run.
When you go live, start small. Keep the same rules. Your first goal is clean execution with real money.
Step 6 — Build a Simple Trading Plan (Your Beginner Rulebook)
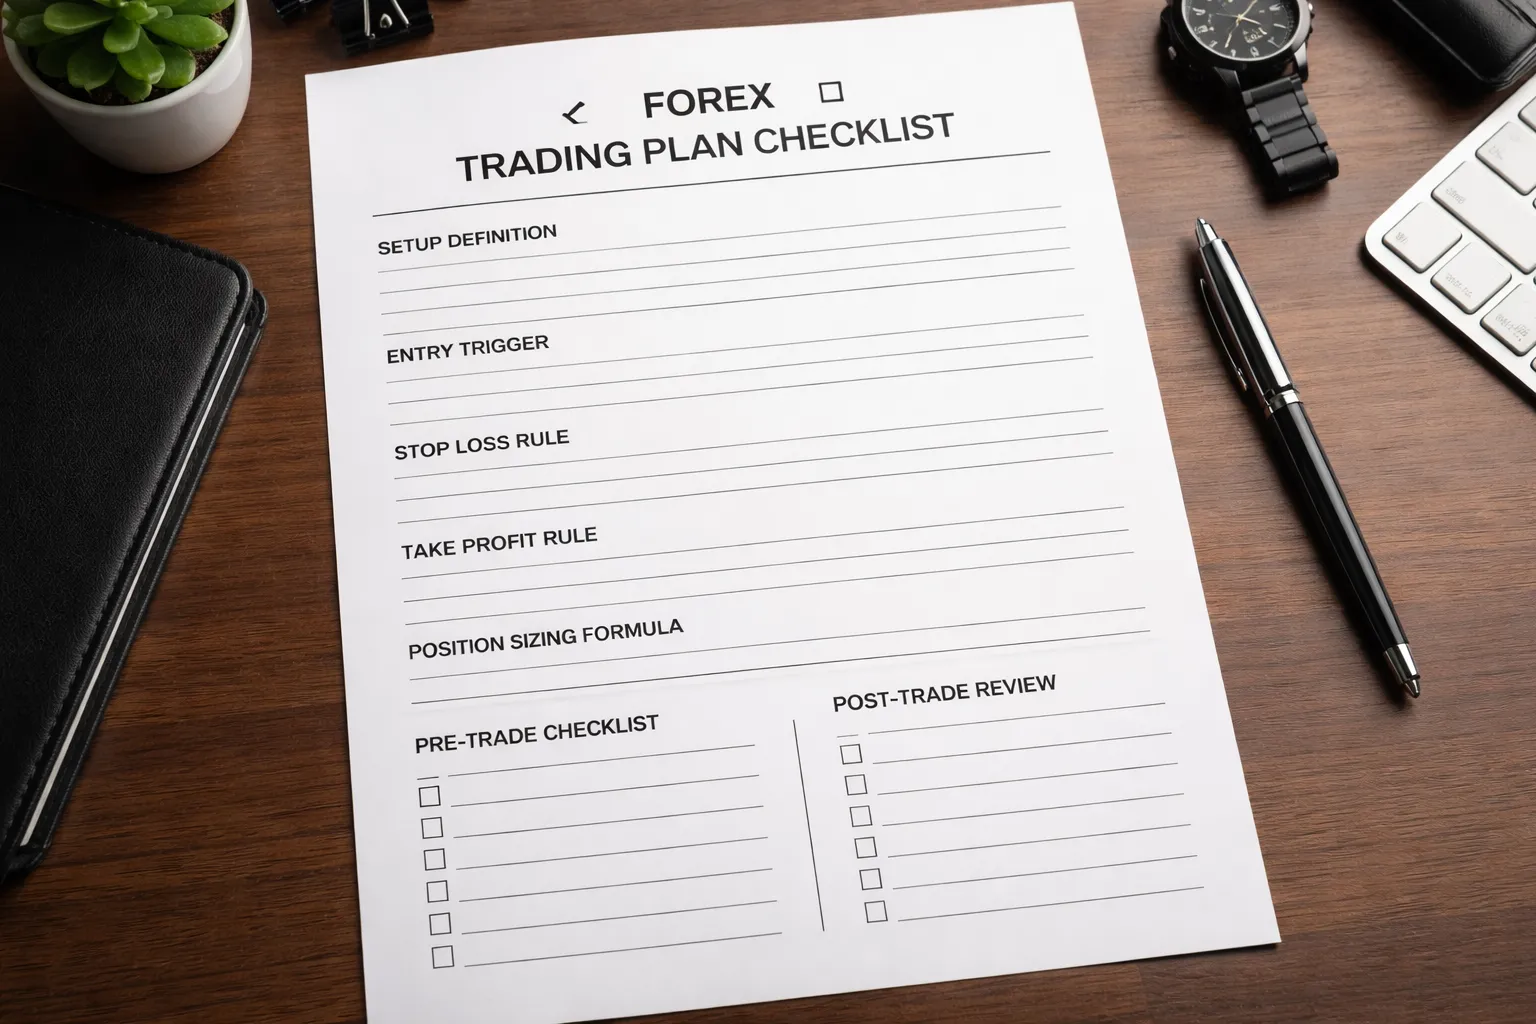
What a Simple Trading Plan Does
Your trading plan is your rulebook. It tells you what to trade, when to enter, where to exit, and how much to risk. Keep it short. One setup. One risk rule. One review process.
Define One Setup Only
Pick one style for your first 30 trades. Do not mix systems.
- Trend-following setup: Trade in the direction of the higher time frame trend. Look for pullbacks to a clear level. Enter when price resumes the trend.
- Range trading setup: Trade the edges of a defined range. Buy near support, sell near resistance. Exit before the middle turns into chop.
Choose one. If you already struggle to draw clean levels, start with the range setup. If you can hold winners and accept smaller win rates, start with trend-following.
Entry Triggers and Confirmation Tools
Use price first. Add one indicator at most. Your goal is a repeatable trigger.
- Market structure: Higher highs and higher lows for an uptrend. Lower highs and lower lows for a downtrend. Sideways for range.
- Key levels: Prior swing high or low, range high or low, daily high or low, round numbers if price reacts to them.
- Entry trigger options:
- Break and retest: Price breaks a level, then retests it and holds. You enter on the retest rejection.
- Rejection candle at level: Pin bar or strong close away from the level. You enter on the next candle break or market entry after the close.
- Simple pullback continuation: After a trend move, price pulls back to a level, then prints a higher low or lower high. You enter on the break of that structure point.
- One optional indicator: 20 EMA or 50 EMA for trend filter only. Rule: only buy above, only sell below. Do not stack indicators.
Exit Rules: Stop Loss and Take Profit
Your exits decide your survival. Set them before you enter.
- Stop loss placement logic:
- Place the stop beyond the level that proves you are wrong.
- For trend-following, stop goes beyond the last swing low for buys, or swing high for sells.
- For range trades, stop goes beyond the range boundary, not inside the range.
- Add a small buffer for spread. Use a fixed buffer in pips that matches the pair, for example 1 to 3 pips on majors, more on volatile pairs.
- Take profit methods:
- Fixed R multiple: Target 1.5R or 2R. If your stop is 20 pips, 2R is 40 pips.
- Next level target: Target the next major support or resistance level. Do not aim through obvious barriers.
- Two-part exit: Take partial at 1R, move stop to breakeven only after price clearly moves away, then trail behind swings.
Write one take profit rule and stick to it for a month. If you want help building targets, use this guide on how to set take profit in forex.
Position Sizing: Lot Size From Stop Distance and Risk
You size the trade from risk, not from how confident you feel.
- Set your risk per trade: 0.25% to 1% of account balance. Beginners should start at 0.25% to 0.5%.
- Calculate risk amount: Account balance x risk %.
- Convert stop distance to money per pip: You need the pip value for the pair and lot size. Most platforms show this in the order ticket.
- Lot size formula: Lot size = risk amount ÷ (stop in pips x pip value per 1.00 lot).
| Item | Example |
|---|---|
| Account balance | $2,000 |
| Risk per trade | 0.5% |
| Risk amount | $10 |
| Stop loss | 25 pips |
| Allowed $ per pip | $10 ÷ 25 = $0.40 per pip |
| Resulting position size | Choose the lot size that gives about $0.40 per pip on your platform |
If the required lot size is below your broker minimum, skip the trade or use a pair with a tighter stop structure. Do not increase risk to make the trade fit.
Pre-Trade Checklist
- Setup: This trade matches my one defined setup.
- Time frame: I know the trend or range on my higher time frame.
- Level: Entry is at a clear level. I can mark it on the chart.
- Trigger: My trigger printed and closed. No early entry.
- Stop: Stop is beyond invalidation. I added spread buffer.
- Target: Take profit rule is set. R multiple or next level is clear.
- R:R check: Minimum planned reward is at least 1.5R if using fixed targets.
- Risk: Lot size matches my risk %. No manual guessing.
- News check: I checked the calendar for high impact events on the pair.
- Execution: Order type is correct. Stop and limit are attached before I confirm.
Post-Trade Review Template
- Pair and session: Pair, date, time, London or New York.
- Setup type: Trend-following or range, and the exact trigger used.
- Entry: Price, order type, screenshot before entry.
- Stop and target: Stop in pips, target method, planned R.
- Position size: Lots, risk %, risk in dollars.
- Result: Win or loss, R gained or lost, notes on slippage or spread.
- Rule adherence: Followed rules, yes or no. If no, list the broken rule.
- Mistake tag: Early entry, late exit, moved stop, oversize, revenge trade, skipped checklist.
- One fix: One action to prevent the same mistake next time.
Track two numbers each week. Rule adherence rate, and average R per trade. Fix process first. Profits come later.
Step 7 — Learn Risk Management Before You Place Your First Live Trade
Risk per trade guidelines and why consistency beats big wins
Your first job is survival. You control that with position size.
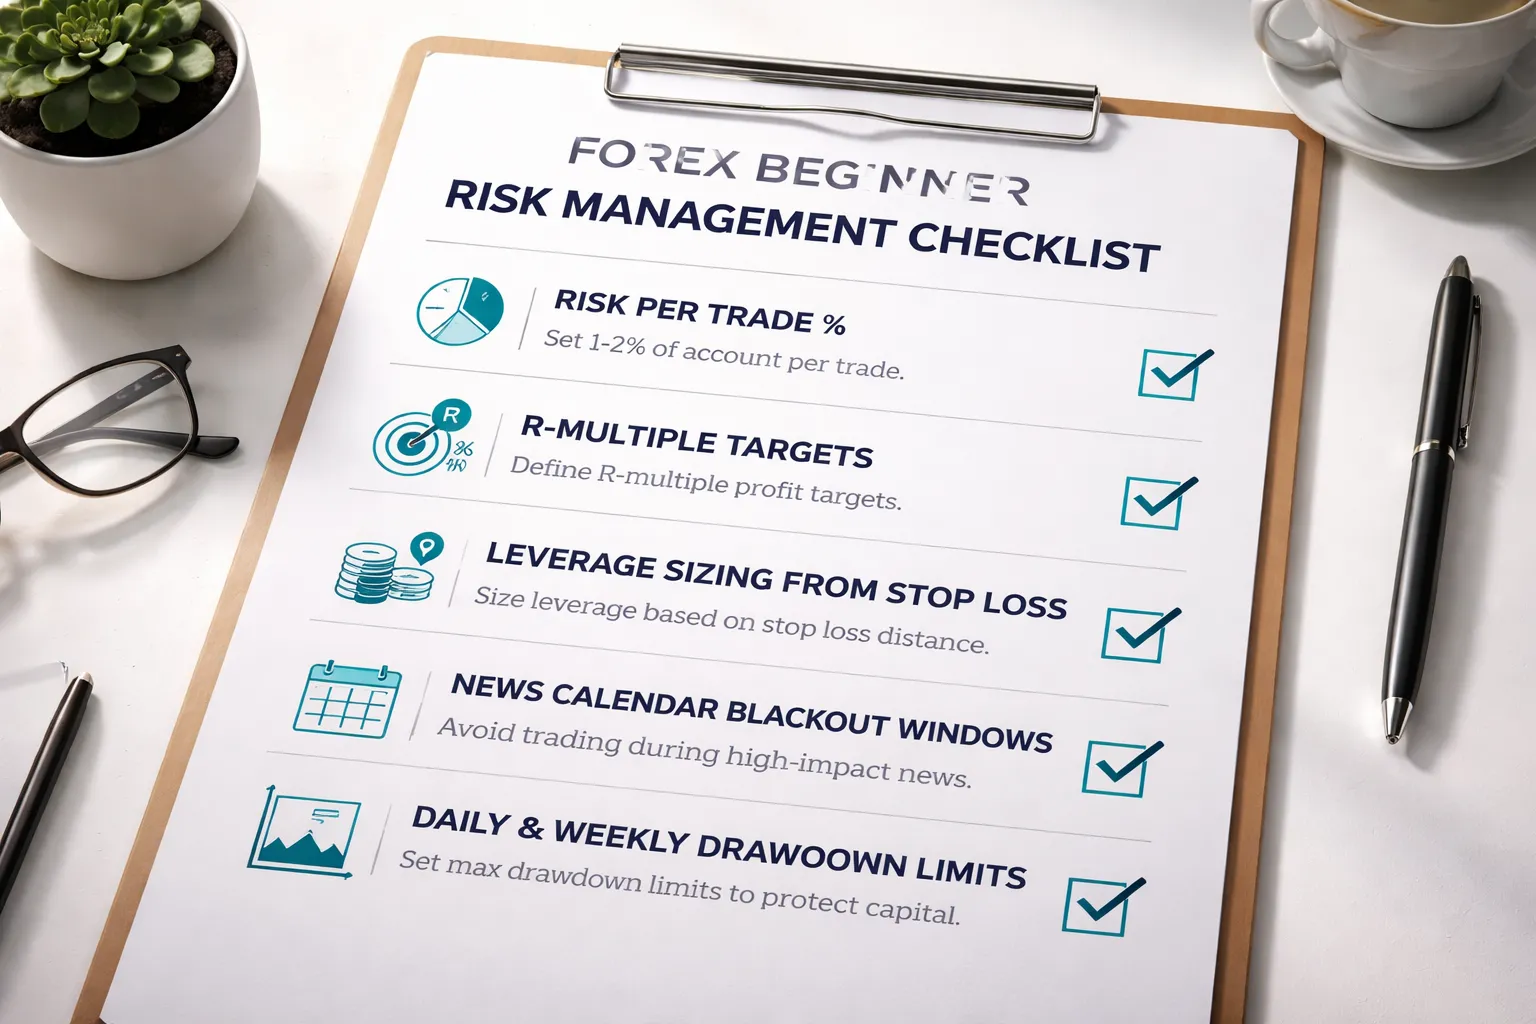
- Risk a fixed percent per trade. Use 0.25% to 1% of your account. Stay at 0.25% to 0.5% while you learn.
- Keep risk constant. Do not increase size after a win. Do not “make it back” after a loss.
- Size from your stop. Decide the stop level first. Then calculate lots so the loss at the stop equals your fixed risk.
- Avoid wide stops to fit big size. If the stop must be wide, trade smaller.
Consistency beats big wins because it keeps your sample clean. Your journal metrics mean nothing if your size changes every trade.
Risk to reward ratio and win rate, how they work together
You do not need a high win rate. You need a positive expectancy.
Use this quick check.
- 1R equals the amount you risk per trade.
- If you target 2R and you win 40% of the time, expectancy is (0.40 x 2) - (0.60 x 1) = +0.20R.
- If you target 1R and you win 60% of the time, expectancy is (0.60 x 1) - (0.40 x 1) = +0.20R.
Pick one model and stick to it for at least 50 trades. Do not change targets every week. If you need a deeper breakdown, read what is risk reward ratio in trading.
Managing leverage responsibly, common beginner leverage mistakes
Leverage is not the problem. Oversizing is.
- Mistake, sizing by margin. You look at “required margin” and think you can afford the trade. Fix it by sizing only from risk and stop distance.
- Mistake, tight stop with big size. You place a small stop to justify more lots. Spread and normal noise take you out. Fix it by placing the stop where the trade idea is invalid, then reduce size.
- Mistake, stacking correlated pairs. You go long EURUSD and short USDCHF and think it is diversified. It is the same USD bet. Fix it by setting a max total risk on correlated positions.
- Mistake, holding large size into low liquidity. You trade big during rollover or thin sessions and pay for slippage. Fix it by lowering size or skipping those hours.
Set a simple rule. Total open risk across all positions stays under 1% to 2% while you learn.
Protecting yourself from news spikes and gaps, calendar rules
News can blow through stops. Spreads can widen. Slippage can hit hard.
- Mark red folder events for both currencies. CPI, jobs, rate decisions, speeches.
- No new trades 15 to 30 minutes before high impact news.
- No new trades 15 to 30 minutes after. Let spreads normalize.
- Reduce risk or exit before scheduled events. Do this if the event can move the pair fast.
- Do not hold large risk over weekends. Gaps happen. Your stop may not fill where you want.
Write the rule into your checklist. If you break it once, you will break it again.
Drawdown control, daily loss limit, weekly stop, and cool off rules
One bad day can turn into a damaged month. Put hard walls in place.
- Daily loss limit. Stop trading after 2R lost in a day, or after two losing trades, whichever hits first.
- Weekly stop. Stop trading for the week after 5R lost, or after three rule breaks.
- Cool off rule. After you hit a stop, take 24 hours off. No charts. No “one more trade”. Review the journal instead.
- Reset only with a plan. Before trading again, write one fix and one rule to prevent the same sequence.
These limits protect your mindset and your data. You need clean reps more than you need action.
Step 8 — Place Your First Trade (A Step-by-Step Walkthrough)
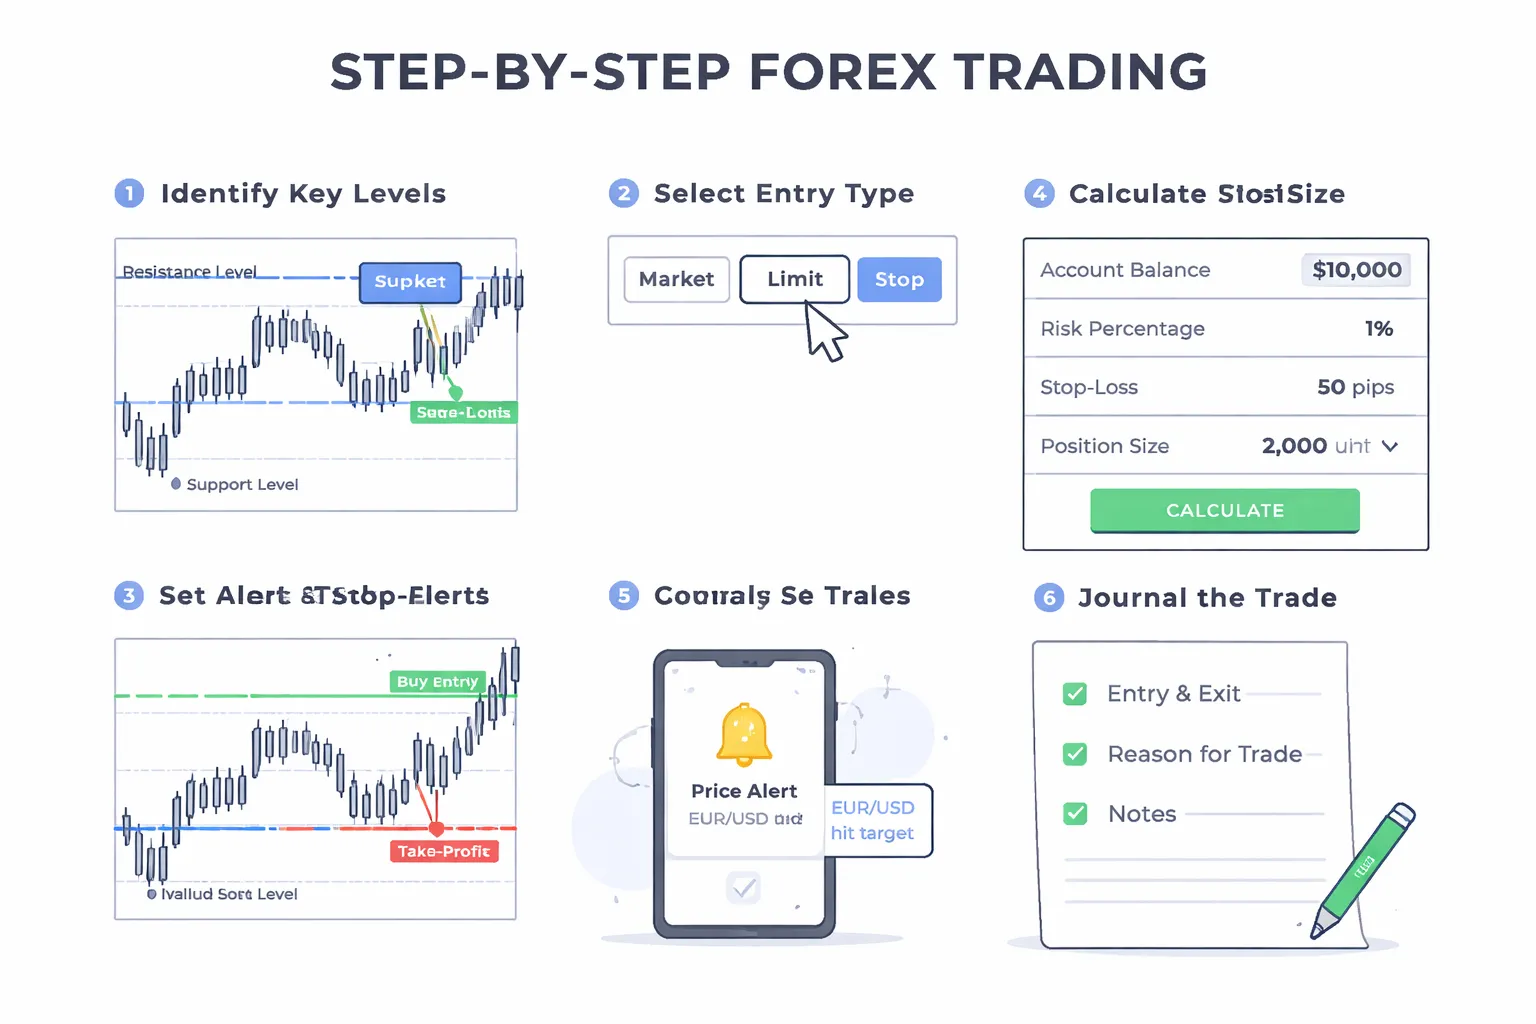
Finding a clean setup on the chart, levels, trend, and context
Start top down. Higher timeframe first, then your entry timeframe.
- Pick one pair. Use a major with tight spreads.
- Mark key levels. Prior swing high and low, clear support and resistance, weekly or daily open, and obvious round numbers.
- Define trend. Higher highs and higher lows means uptrend. Lower highs and lower lows means downtrend. If price chops inside a range, treat it as a range.
- Check context. Avoid entries right into major levels. Avoid low liquidity times. Know if high impact news hits soon.
- Wait for your trigger. Your setup must match your plan. If it does not, you skip.
Choosing buy vs sell and selecting the correct order type
Pick direction from structure and location. Then choose the order that fits your entry rule.
- Buy when your plan calls for a long and price sits at support in an uptrend, or breaks and holds above a level.
- Sell when your plan calls for a short and price sits at resistance in a downtrend, or breaks and holds below a level.
- Market order. Use when your entry triggers now and spread is normal.
- Buy limit or sell limit. Use for pullback entries at a level.
- Buy stop or sell stop. Use for breakout continuation after price clears a level.
Set an expiration time for pending orders. If price does not reach your level within your session, cancel it.
Setting stop-loss and take-profit with a clear invalidation point
Your stop goes where your idea becomes false. Not where it feels comfortable.
- Place the stop beyond structure. Beyond the swing low for a buy, beyond the swing high for a sell, with a small buffer for spread.
- Make the stop a chart decision. Do not set it by a fixed pip number.
- Set take profit at a logical target. Next major level, range boundary, or prior swing point.
- Check R before you place the trade. If your plan needs 2R and the chart offers 1R, you pass.
If you need a deeper guide, read how to set stop loss and take profit.
Calculating position size and checking margin requirement
Size the trade from risk. Keep it fixed per trade.
- Step 1. Set risk per trade in dollars. Example, $1,000 account at 1% risk means $10.
- Step 2. Measure stop size in pips from entry to stop.
- Step 3. Calculate size. Lot size = risk dollars divided by stop pips divided by pip value.
- Step 4. Check margin.
- Step 5. Place the trade only if free margin stays safe after entry.
Keep a minimum free margin buffer. If margin gets tight, you sized too big.
Monitoring the trade without micromanaging, alerts, plan-based decisions
Manage by rules. Do not manage by feelings.
- Set alerts. One at entry zone, one at stop area, one at target area. Let the platform watch price.
- Check on candle close. Use your trading timeframe. No constant watching.
- Do not move the stop wider. If the stop is wrong, you planned wrong. Take the loss and review.
- Only adjust per plan. Examples, move stop to break even after 1R, scale out at a level, trail behind structure. Use one method, not all.
- Follow your daily limits. If you hit your stop trading rule, you stop.
Closing the trade and documenting results in your journal
Close the trade at your stop, your target, or your rule-based exit. Do not negotiate with the chart.
- Record the outcome in R. Example, -1R, +2R, +0.5R.
- Screenshot before and after. Mark entry, stop, target, and exit.
- Log execution quality. Did you follow the plan, yes or no.
- Write one lesson. One fix, one rule, or one checkpoint for next time.
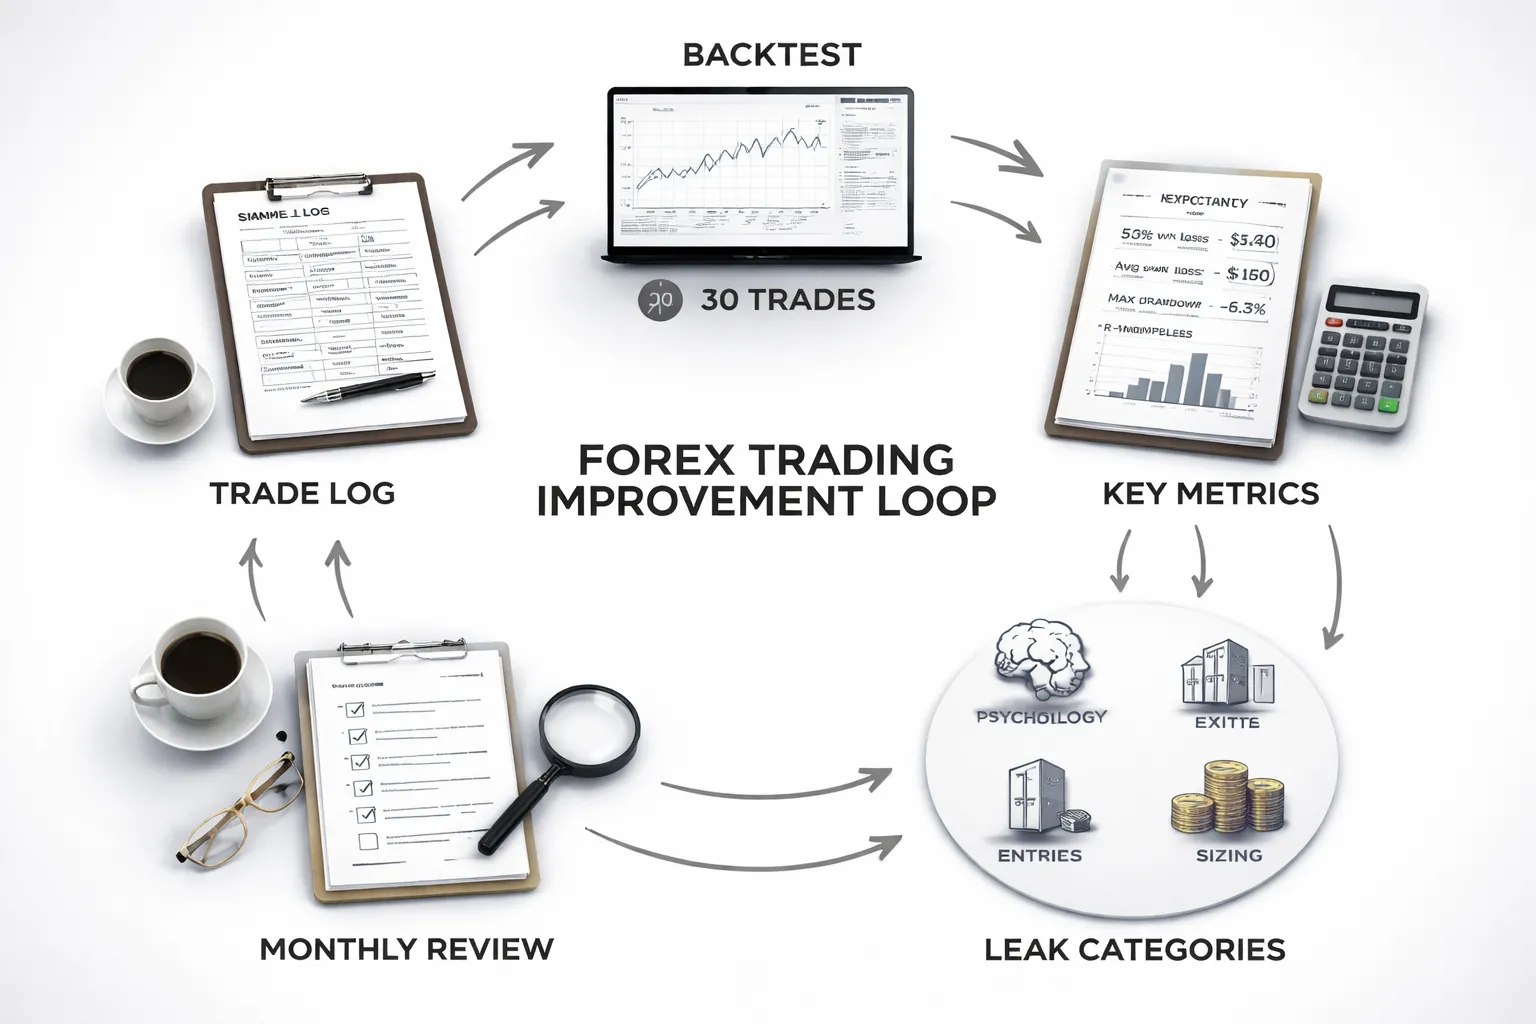
Step 9 — Improve with Journaling, Backtesting, and Performance Metrics
Journal fast, journal clean
Your journal is a decision log. Keep it tight. Track what you can control and what you need to fix.
- Setup tag: name your pattern or rule set.
- Pair and session: EURUSD London, GBPJPY New York.
- Timeframe used for entry: keep it consistent.
- Entry, stop, target, exit: price levels and timestamps.
- Risk in R: planned R, then realized R.
- Position size: lots or units, and why it matched your rules.
- Reason for entry: 1 to 2 bullets, rule-based.
- Reason for exit: stop, target, time, or rule-based exit.
- Execution grade: A, B, C. A means full plan followed.
- One mistake: one line.
- One fix: one line. One new checkpoint.
Skip forecasts, news opinions, long stories, and feelings that do not link to a rule. Save screenshots. You want proof, not memory.
Beginner backtesting, manual vs tools
Backtesting tells you if your rules work before you pay for the lesson live.
- Manual replay: best for learning. Scroll chart bar by bar. Mark signals. Record trades in R. Take screenshots.
- Platform tools: faster once your rules are strict. Use MT4 or MT5 simulators, TradingView Bar Replay, or broker replay tools. Avoid any test that lets you see future candles.
Start with one setup on one pair. Test the same way you trade. Same session. Same timeframes. Same stop rules.
Sample size basics:
- Minimum: 30 trades to spot obvious issues.
- Better: 100 trades to judge consistency.
- Split results by market type: trend days vs range days.
If you do not have enough trades, your conclusions will swing with luck. Keep testing until the numbers stabilize.
Track metrics that drive decisions
Use R-multiples as your base unit. It keeps results comparable across pairs and account sizes.
Keep a simple dashboard. One line per month. One line per setup.
Find your biggest leaks
Most losing systems are not broken. Execution is broken. Sort your losses by cause.
- Psychology leak: revenge trades, moving stops, skipping signals after a loss.
- Entry leak: late entries, poor location, chasing candles. Add a filter like structure or a moving average rule. If you need one, use a clean guide from moving averages.
- Exit leak: taking profit early, holding losers, no rule-based exit. Fix your stop and target rules first.
- Sizing leak: raising risk after wins, cutting risk after losses, inconsistent position sizing.
Mark every trade with one leak tag. You will see the pattern fast.
Run a monthly review loop, change one thing
Review once per month. Keep the process the same each time.
- Step 1: export your trades. Sort by setup and by grade.
- Step 2: compute metrics for A-trades only, then for all trades. The gap shows your discipline cost.
- Step 3: list the top 3 mistake tags by frequency and by total R lost.
- Step 4: pick one change. One rule tweak or one checklist item. No more.
- Step 5: run it for the next month. Then compare before and after.
If you change three variables at once, you will not know what worked. One change. One month. Repeat.
Beginner Strategies (Low-Complexity Approaches to Start With)
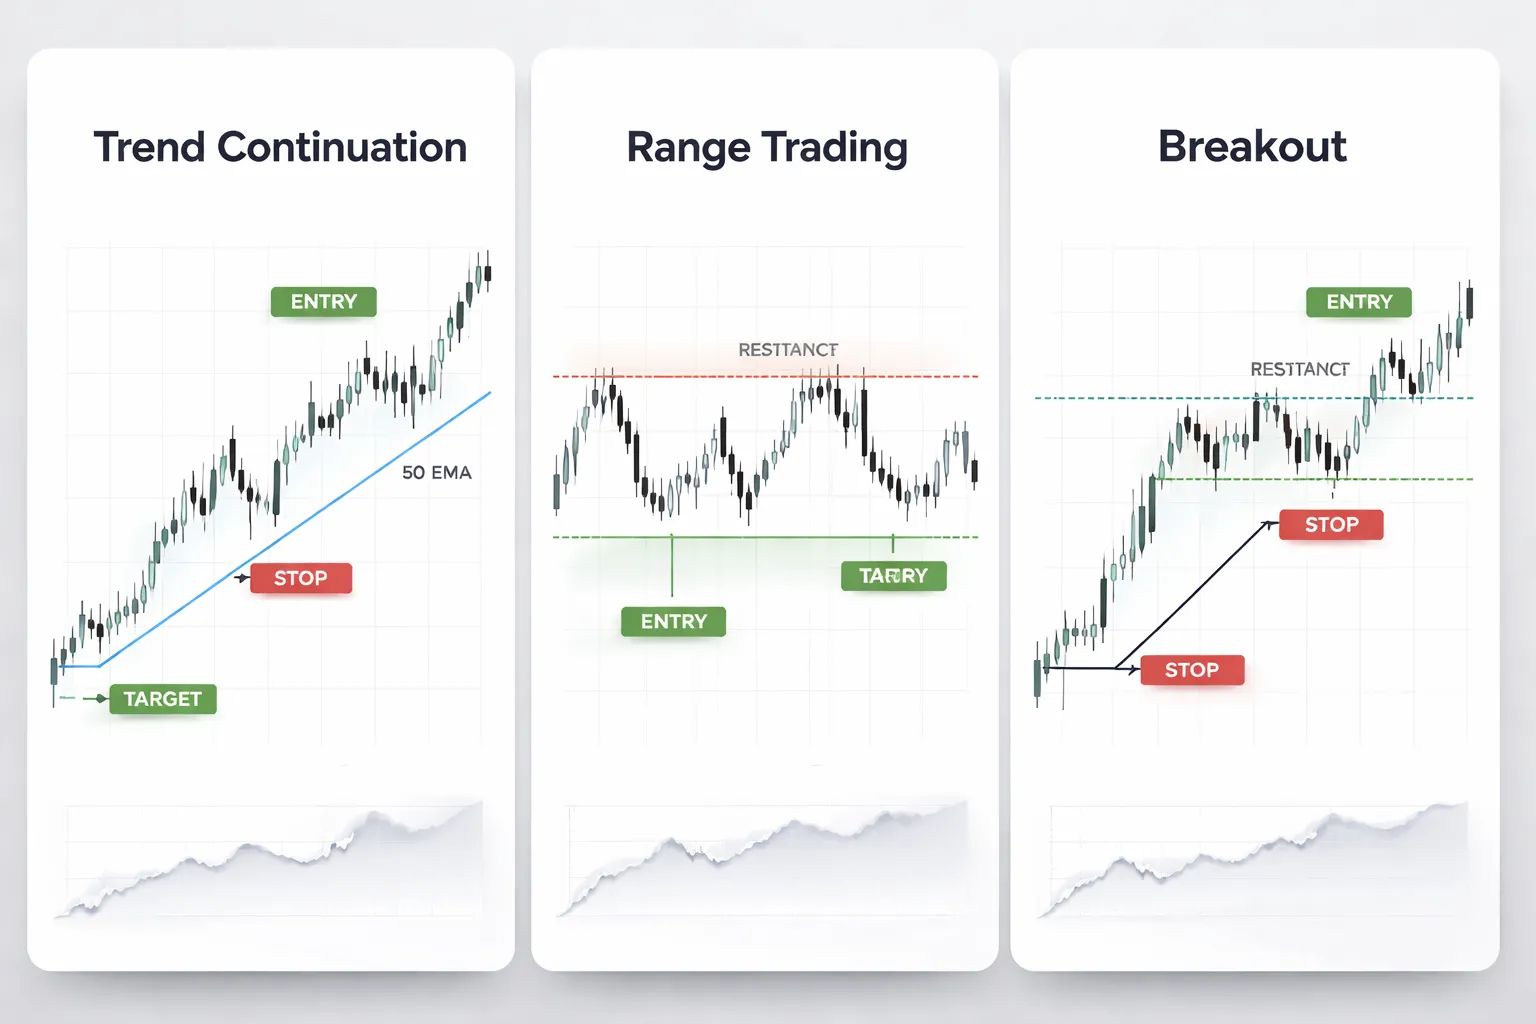
1) Simple Trend Continuation, Structure Plus a Moving Average Filter
This is a low-complexity way to trade with the dominant flow. You use price structure for entries. You use a moving average as a filter, not a signal.
- Market type: trending pairs, clean higher highs and higher lows, or lower highs and lower lows.
- Timeframes: pick one, then stick to it. Many beginners use H1 to H4 to reduce noise.
- Filter: 50 EMA or 200 EMA. Trade long when price stays above the EMA. Trade short when price stays below the EMA.
- Setup: wait for a pullback into a prior swing area. Then wait for structure to resume, like a break of a minor swing in the trend direction.
- Entry trigger: enter on the break and close beyond the minor swing, or on a retest that holds.
- Invalidation: your stop goes beyond the pullback low for longs, or beyond the pullback high for shorts.
- Exit: first target at the prior swing high or low. Then decide, take full profit, or scale and trail behind new swing points.
Rules you can test fast: only take A-trades where the trend structure and the EMA filter agree. Track the win rate and average R. If your average R stays below 0.3R after 30 trades, your exits need work, not your entries.
2) Support and Resistance Range Trades With Clear Invalidation
Range trading is simple when you define the box and respect invalidation. You do not trade the middle.
- Market type: sideways price, repeated touches, no clean trend.
- Draw levels: mark the most obvious highs and lows that caused sharp reactions. Keep it to two lines, range high and range low.
- Entry: buy near range low after a rejection. Sell near range high after a rejection.
- Confirmation: use a clear rejection candle close back inside the range, or a failed push that leaves a wick outside and closes inside.
- Invalidation: stop goes outside the range, past the level that should hold. Place it where your idea is wrong, not where it feels cheap.
- Targets: first target near the middle if the range is tight. Main target near the opposite side of the range.
Most beginner losses come from two errors, entering too early and using stops inside the noise. Learn stop placement once and standardize it. Use this guide for details on how to place a stop loss.
3) Breakout Basics, How to Avoid False Breakouts
Breakouts fail because traders buy the first touch. You need rules that force proof.
- Define the level: use a clear range high or low with at least two clean touches. Ignore messy lines.
- Precondition: price compresses toward the level, smaller swings, less overlap, fewer deep pullbacks. Skip wide chop.
- Confirmation rule 1, close: require a candle close beyond the level on your trading timeframe. No close, no trade.
- Confirmation rule 2, retest: wait for price to retest the broken level and hold. Enter only after the retest rejects back in the breakout direction.
- Confirmation rule 3, time: if the breakout does not move at least 1R in your favor within a set number of candles, exit or cut risk. Stalls often snap back.
- Invalidation: stop goes back inside the range, beyond the breakout level plus a small buffer based on recent swing size.
- Target: measure the range height and project it from the breakout, or target the next major structure level.
Track false breakout rate as a metric. Log every breakout as one of three outcomes, clean continuation, retest then continuation, or failure back into the range. If failures exceed 50%, tighten your confirmation. Do not widen stops to fix bad entries.
4) Why Copying Strategies Blindly Fails, and How to Adapt Responsibly
Most strategy copying fails for reasons you can measure. The rules do not match your broker costs, your timeframe, your execution, or your risk control.
- Hidden cost mismatch: a strategy that works on low spreads can fail on higher spreads. Log spread at entry and compare losers vs winners.
- Timeframe mismatch: a scalping setup breaks when you trade it on higher timeframes, and the opposite. Keep the original timeframe.
- Sample size problem: a 10-trade win streak proves nothing. Demand at least 50 trades per setup before you judge it.
- Risk mismatch: copying entries without copying position sizing changes outcomes. Standardize risk in R and keep it constant.
- Rule drift: you add filters, remove stops, or move targets. Then you blame the strategy. Freeze the rules for a test block.
Adapt with one change at a time. Pick one variable, like a stricter breakout close rule, or a different stop buffer. Run it for a month. Compare metrics, win rate, average R, max drawdown in R, and mistake tags. Keep what improves expectancy. Delete what does not.
Common Beginner Mistakes and How to Avoid Them
Overleveraging and Moving Stop Losses
Overleverage turns small mistakes into account damage. A wide spread, a small spike, or one bad entry can wipe your week.
- What it looks like: you size positions by feel, you increase lots after losses, you risk more because the setup “looks strong.”
- What to do instead: cap risk per trade. Use a fixed percent or fixed dollars. Keep it small. Size your position from stop distance, not from how confident you feel.
- Stop loss rule: you can tighten a stop when price moves in your favor and structure supports it. You do not widen a stop. If your stop level is wrong, exit and re-enter with a new plan.
- Account rule: set a daily loss limit and a weekly loss limit. When you hit it, you stop trading.
Revenge Trading
Revenge trading starts after a loss. Your goal shifts from execution to payback. Your risk jumps. Your selectivity drops.
- Trigger: a sudden loss, a stop-out that feels unfair, or missing a winner.
- Cost: you take lower quality trades, you oversize, you skip your checklist.
- Fix: build a reset routine. Step away for 10 to 20 minutes. Mark the trade as “valid loss” or “mistake.” If it is a mistake, stop for the day. If it is valid, you may continue, but only at normal size.
- Hard rule: no immediate re-entry in the same direction without a new setup. New setup means new structure and a new invalidation level.
FOMO Entries and Screen Staring
FOMO makes you chase candles. Screen staring makes you micro-manage noise. Both push you into late entries and early exits.
- What it looks like: you enter after a big move, you buy highs and sell lows, you close winners early because every tick feels like a threat.
- What to do instead: define your entry trigger before price gets there. Use limit orders when your plan allows it. If you need confirmation, require a close, not a spike.
- Time rule: set chart check times. For example, check every 15 minutes on a 15 minute plan, or once per hour on an hourly plan. Do not watch every tick.
- Execution tool: use alerts for key prices. Let the alert pull you in, not boredom.
Ignoring Spreads, Swaps, and Illiquid Hours
Costs matter more than beginners expect. Spread and slippage can erase your edge. Swaps can turn a “good trade” into a slow leak.
- Spread check: log the typical spread for your pair during your trading window. If spread spikes, skip the trade or reduce size.
- Illiquid hours: avoid thin periods where spreads widen and moves get erratic. If you trade off-hours, widen your filters and lower your expectations.
- Swap check: before holding overnight, record the swap rate and the planned hold time. If the swap cost is meaningful versus your target, adjust your plan.
- News rule: if you do not trade news, do not “just hold through it.” Close or reduce risk before high impact events.
Strategy Hopping and Changing Rules Mid Trade
Strategy hopping keeps you in constant reset. You never collect enough data to know what works.
- What it looks like: you change indicators weekly, you add filters after losses, you remove stops after a few wins.
- What to do instead: set a minimum test block. Trade one strategy for a fixed number of trades, or a fixed number of weeks. Track R per trade, win rate, average win in R, average loss in R, and max drawdown in R.
- Mid-trade rule: you do not change entry, stop, or target because you feel uneasy. You only execute pre-written management rules.
- Planning rule: define your minimum acceptable reward before you enter. Use a clear risk-reward ratio standard and reject trades that do not meet it.
Relying on Signals Without Understanding the Logic
Signals can hide bad risk, bad timing, and bad market conditions. If you do not understand the logic, you cannot judge quality.
- Problem: you follow entries but you do not know the invalidation level, the market condition, or the expected hold time.
- Fix: write a one page rule set for any signal you use. Include market type, entry trigger, stop placement, target logic, and when to skip.
- Verification: backtest the logic on at least 50 to 100 samples. If you cannot test it, you cannot trust it with size.
- Control: you stay the decision maker. A signal can suggest. Your plan decides.
Pros, Cons, and Costs of Forex Trading
Benefits
- High liquidity. Major pairs trade fast. You can usually enter and exit without long waits.
- Accessibility. You can start with small position sizes. Many brokers offer micro or nano sizing through CFDs or spot accounts.
- Trade both directions. You can buy to profit from strength or sell to profit from weakness. Shorting is built into most forex platforms.
Downsides
- Leverage risk. Leverage magnifies errors. A small move against you can wipe out a large share of your account. Use strict position sizing and stops.
- Noise and false signals. Forex reacts to news, flows, and short term liquidity grabs. Many moves fade fast. You need clear rules and filters.
- Psychological pressure. Fast P and L swings push you to overtrade, revenge trade, or move stops. Your plan must limit decisions under stress.
Typical costs breakdown
Your real cost is the total friction per trade. Track it in pips and in dollars.
| Cost | What it is | When you pay | What to check |
|---|---|---|---|
| Spread | The gap between bid and ask | On entry, and effectively on exit | Average spread during your trading hours, spread widening at news and rollover |
| Commission | Fixed fee per lot or per side on some accounts | Each trade | Total round turn commission, how it scales with lot size |
| Swap, rollover | Overnight financing or credit | When you hold past the broker cutoff time | Long and short swap rates per pair, triple swap day, rules for weekends and holidays |
| Slippage | Fill price differs from your order price | More common in fast markets | Execution model, average slippage stats if published, behavior around news |
Estimate your all in cost before you size up. If your average target is 10 pips and your all in cost is 2 pips, you start each trade down 20%. This is why your risk-reward ratio must fit your win rate and your costs.
Tax and reporting considerations
- Instrument type. Spot forex, CFDs, and futures can get different tax treatment in the same country.
- Trader classification. Some places tax you as an investor, others as a business if you trade frequently.
- What counts as taxable. Realized gains, realized losses, swap interest, and rebates can all matter.
- Withholding and broker location. Offshore vs local brokers can change reporting forms and deadlines.
- Record keeping. Save statements, trade exports, and deposit and withdrawal history. Track fees separately from P and L.
- What to check in your country. Tax rate on trading income, loss offset rules, holding period rules, and required forms for foreign accounts.
Safety, Legality, and Scams (E-E-A-T Checklist)
How to spot broker and “guru” red flags
- No clear regulation. You cannot find a license number, regulator name, or legal entity on the broker site. Walk away.
- Offshore address for “tax free” trading. Offshore is not automatically a scam, but it raises recovery risk and dispute limits.
- Hard withdrawal friction. Extra “verification” only when you request a withdrawal, changing rules mid stream, or forced bonus terms.
- Guaranteed returns. Any promise of fixed monthly gains or “risk-free” forex signals is a scam signal.
- Pressure tactics. “Deposit today,” constant calls, or threats that you will miss a “window.”
- Copy trading without audited history. No third-party tracking, no long track record, no clear max drawdown data.
- Fake proof. Screenshots, edited MT4 statements, or P and L without timestamps and broker name.
- Opaque costs. No live spread data, unclear commissions, or hidden “admin” and “platform” fees.
- Unreal bonuses. Large deposit bonuses tied to high volume requirements that block withdrawals.
- Guru upsells. Free group leads to paid course, then paid signals, then paid “funding,” then “managed account.”
Do quick checks before you fund. Match the broker name, legal entity, and license number on the regulator site. Verify the domain age. Search the firm name plus “withdrawal problem,” “complaint,” and “regulator warning.”
Risk disclosures and why most beginners lose at first
Forex and CFDs use leverage. Leverage magnifies small price moves into large profit or loss. A normal intraday move can wipe out an undercapitalized account.
Many brokers publish a standard risk warning. You will often see figures like “71% of retail accounts lose money.” Treat that as a baseline. Most beginners lose because they:
- Use too much leverage for their account size.
- Trade without a stop, or move the stop farther away.
- Overtrade after wins or losses. See signs of overtrading.
- Ignore costs. Spread, commission, slippage, and overnight financing add up.
- Trade news spikes with wide spreads and fast gaps.
- Risk too much per trade and hit a drawdown they cannot recover from.
Read the disclosure for margin rules. Know how your broker handles stop orders during fast markets. Learn what triggers a margin call and forced liquidation. Write those numbers down before you trade.
Secure account practices: 2FA, withdrawal testing, device security
- Turn on 2FA. Use an authenticator app. Avoid SMS if you can.
- Use a unique password. Store it in a password manager.
- Lock your email. Your email controls password resets. Add 2FA there too.
- Whitelist withdrawals if available. Restrict withdrawals to your own bank account or approved addresses.
- Do a small withdrawal test. Fund the account, place no trades, then withdraw a small amount. Confirm timing, fees, and process.
- Keep your device clean. Update your OS and browser. Use antivirus. Do not install random indicators or cracked software.
- Separate trading from daily browsing. Use a dedicated browser profile, or a dedicated device if you can.
- Avoid public Wi-Fi. Use your mobile hotspot, or a trusted network.
If a broker makes withdrawals slow, unclear, or selective, stop adding funds. Save all receipts, chat logs, and ticket numbers.
When to consider professional advice (and what advisors can and can’t do)
Consider a professional when the decision affects taxes, legal reporting, or large sums. Examples include cross-border accounts, business structures, or funded trading programs with complex contracts.
- Tax professional. Helps with reporting forms, loss treatment, and record keeping standards. They cannot change your tax law, they can help you comply.
- Financial advisor. Helps you set risk limits, position sizing rules, and portfolio exposure. They cannot guarantee trading results.
- Attorney. Helps with contracts, disputes, and recovery steps if fraud occurs. They cannot promise you will recover funds.
Verify credentials. Confirm their scope in writing. Ask how they charge. Hourly fees reduce conflicts. Avoid anyone who asks for account login access or custody of your funds.
Frequently Asked Questions
How much money do you need to start forex trading?
Start with enough to trade your smallest position size and still follow your risk cap. Many beginners use $100 to $1,000. Smaller accounts face wider percentage swings from spreads, swaps, and minimum lot sizing. Never fund with money you need for bills.
How much can you make trading forex?
Your results depend on your edge, risk per trade, costs, and leverage. No fixed income exists. Track performance in R, not dollars. Focus on staying consistent and keeping drawdowns small. Many retail traders lose money due to leverage and poor risk control.
What leverage should a beginner use?
Use the lowest leverage your broker allows. Leverage does not change risk unless you increase position size, but it makes it easier to oversize. Keep risk per trade small, often 0.25% to 1% of your account, and size positions from your stop loss.
What currency pair should you trade first?
Start with one major pair with tight spreads and high liquidity, often EUR/USD or USD/JPY. Trade one pair until you know its session behavior, average range, and news sensitivity. Fewer markets make your stats cleaner and your process easier to repeat.
Is forex trading gambling?
It becomes gambling when you trade without rules, sizing, or a tested method. It becomes trading when you define entry, stop, target, risk per trade, and when you stop for the day. Your journal decides which one you are doing.
What is the safest order type for beginners?
Use simple orders you understand and can execute consistently. Many beginners start with market entries and a hard stop loss. Learn the differences before adding complexity. Read our forex order types guide to avoid mistakes with stops and limits.
Where should you place your stop loss?
Place it at the price level that proves your trade idea wrong. Do not place it where it only “feels” safe. Set the stop first, then size the trade so your account risk stays within your limit. Avoid widening stops after entry.
How long does it take to learn forex trading?
Expect months to learn basics and longer to build consistency. Track at least 50 to 200 trades in one setup before judging results. Focus on process metrics, execution quality, and drawdown control. Fast learning comes from strict journaling and review.
Should you trade forex during news events?
Beginners should avoid major releases. Spreads can widen and slippage can jump, which breaks stop loss assumptions. If you trade news later, define rules for no-trade windows, max spread, and reduced size. Use an economic calendar every week.
How do you choose a forex broker?
Check regulation, execution quality, typical spreads, swap rates, and withdrawal speed. Test support with real questions. Avoid brokers that push bonuses or pressure you to deposit more. Read the client agreement. Never share account login details with any third party.
Conclusion
Conclusion
Forex trading rewards process, not impulse. Your edge comes from risk control, execution discipline, and clean data. Keep your goals small and your rules strict.
- Trade small. Start with the minimum size your broker allows. Increase only after at least 50 to 100 logged trades that follow your rules.
- Protect capital. Set a hard max loss per trade and a daily stop. Stop when you hit either limit.
- Control costs. Track spread, slippage, and swap. Skip trades when spreads widen, liquidity drops, or news risk spikes.
- Review weekly. Measure win rate, average win, average loss, and expectancy. Cut what fails. Keep what works.
Final tip. Write your rules on one page and treat them like a contract. Use this forex trading plan template, then execute the same way for the next 30 days. No tweaks mid-cycle. Only change after review.
-
Stop Loss vs Take Profit: Differences, Examples & Best Practices
5 months ago -
Forex Trading Psychology Tips: How to Stay Disciplined and Consistent
5 months ago -
Forex Order Types Explained: Market vs Limit vs Stop Orders
5 months ago -
How to Set Stop Loss and Take Profit (Step-by-Step)
5 months ago -
Risk Management in Forex for Beginners (Rules That Keep You in the Game)
5 months ago
-
-
- Risk per trade guidelines and why consistency beats big wins
- Risk to reward ratio and win rate, how they work together
- Managing leverage responsibly, common beginner leverage mistakes
- Protecting yourself from news spikes and gaps, calendar rules
- Drawdown control, daily loss limit, weekly stop, and cool off rules
-
- Finding a clean setup on the chart, levels, trend, and context
- Choosing buy vs sell and selecting the correct order type
- Setting stop-loss and take-profit with a clear invalidation point
- Calculating position size and checking margin requirement
- Monitoring the trade without micromanaging, alerts, plan-based decisions
- Closing the trade and documenting results in your journal
-
- How much money do you need to start forex trading?
- How much can you make trading forex?
- What leverage should a beginner use?
- What currency pair should you trade first?
- Is forex trading gambling?
- What is the safest order type for beginners?
- Where should you place your stop loss?
- How long does it take to learn forex trading?
- Should you trade forex during news events?
- How do you choose a forex broker?
-
-
- Risk per trade guidelines and why consistency beats big wins
- Risk to reward ratio and win rate, how they work together
- Managing leverage responsibly, common beginner leverage mistakes
- Protecting yourself from news spikes and gaps, calendar rules
- Drawdown control, daily loss limit, weekly stop, and cool off rules
-
- Finding a clean setup on the chart, levels, trend, and context
- Choosing buy vs sell and selecting the correct order type
- Setting stop-loss and take-profit with a clear invalidation point
- Calculating position size and checking margin requirement
- Monitoring the trade without micromanaging, alerts, plan-based decisions
- Closing the trade and documenting results in your journal
-
- How much money do you need to start forex trading?
- How much can you make trading forex?
- What leverage should a beginner use?
- What currency pair should you trade first?
- Is forex trading gambling?
- What is the safest order type for beginners?
- Where should you place your stop loss?
- How long does it take to learn forex trading?
- Should you trade forex during news events?
- How do you choose a forex broker?
-
How to Place a Forex Trade Step by Step (Your First Trade Explained)
3 months ago -
Forex Trading vs Crypto Trading: Which Market Is Better for Beginners?
3 months ago -
Forex Lot Size Calculator: How to Use It to Size Trades Correctly
5 months ago -
How to Calculate Position Size in Forex (Position Sizing Formula + Examples)
5 months ago -
Forex Leverage Explained: How It Works, Pros, Cons & Examples
5 months ago
-
Forex Trading Platforms Comparison: MetaTrader vs cTrader vs TradingView
5 months ago -
Is Forex Trading Legal in the United States? Rules, Regulators & What to Know
5 months ago -
Stop Loss vs Take Profit: Differences, Examples & Best Practices
5 months ago -
Forex Market Hours & Trading Sessions Explained (Best Times to Trade)
5 months ago -
Best Forex Trading Journal Tools (Top Picks Compared)
5 months ago