Risk Management in Forex for Beginners (Rules That Keep You in the Game)

Most beginner forex accounts fail because losses get too big, too fast. Many brokers report that around 70% or more of retail CFD accounts lose money. Leverage speeds up the damage.
Risk management is the set of rules you use to control loss size on every trade. It keeps one mistake from wiping out weeks of progress. It also keeps you trading long enough to improve.
In this guide, you will learn the core rules that protect your account. You will learn how to set a fixed risk per trade, size positions, place stop losses, and control leverage. You will also learn how to use a simple risk-reward ratio so wins can cover losses. Each rule is practical. Each rule is easy to apply before you click buy or sell.
Key Takeaways
Key Takeaways
- In het kort: Risk a fixed amount per trade, most beginners use 0.5% to 2% of account equity.
- In het kort: Size every position from your stop loss distance, not from a gut feel.
- In het kort: Place your stop loss before you enter, and keep it at a price level that matches your setup.
- In het kort: Control leverage, high leverage magnifies small mistakes into large losses.
- In het kort: Use a simple risk to reward rule, aim for at least 1:2 so winners can cover losers.
- In het kort: Avoid trading through high impact news if you cannot manage fast spreads and slippage.
- In het kort: Track risk, outcomes, and rule breaks, your journal shows what to fix.
Protect your downside first. If you keep losses small, you stay in the game long enough to build skill.
Pick one risk number and stick to it. If you risk 1% per trade, it takes 10 straight losses to draw down about 10%. If you risk 5% per trade, the same 10 losses cut your account by about 40%.
Let the stop loss set your position size. Decide the stop in pips, then calculate lot size so the money at risk matches your rule. If the stop must be wide, trade smaller. If the required size becomes too small to matter, skip the trade.
Keep your risk to reward positive. With a 1:2 target, you can be wrong more often and still survive. Example, a 40% win rate with 1:2 can still grow an account if you keep execution clean.
Use the right order type. A stop loss is a stop order, a take profit is a limit order. If you mix them up, you break your plan. Read this guide on forex order types.
What risk management means in forex (and why beginners blow up)
Risk vs. uncertainty, what you control and what you can’t
Risk management means you control the size of your losses before you enter.
You cannot control price movement. You cannot control spreads widening. You cannot control slippage in fast markets.
You can control three things.
- Position size, how many lots you trade.
- Stop loss distance, where you exit if you are wrong.
- Total exposure, how much you risk across open trades and correlated pairs.
If you set size and stop first, the market can only hurt you by a known amount. If you skip that step, every trade has unlimited downside.
The ruin problem, why a few big losses erase months of gains
Blowing up rarely comes from many small losses. It comes from a few oversized losses.
Losses compound faster than gains because your base shrinks.
| Account drawdown | Gain needed to break even |
|---|---|
| 10% | 11.1% |
| 20% | 25% |
| 30% | 42.9% |
| 50% | 100% |
| 70% | 233.3% |
If you risk too much per trade, a normal losing streak can push you into a drawdown you cannot recover from.
Example: risk 10% per trade. Lose 5 trades. You are down about 41%. You now need about 70% just to get back. Most beginners never dig out of that hole.
Common beginner traps that cause account blowups
- Overtrading. You take low quality setups to feel active. More trades means more fees, more mistakes, and more exposure.
- Revenge trading. You increase size after a loss to get it back. You trade your emotions, not your plan.
- No stop loss. You tell yourself you will exit manually. Then price runs, you freeze, and a small loss turns into a large one.
- Martingale averaging down. You add to a losing trade because it is “cheaper.” Your average entry improves, but your risk spikes. One trend move can wipe out your account.
These mistakes share one feature. They increase risk after you lose. That is the fastest path to ruin.
The core promise of risk management
Risk management does not make you right. It keeps you liquid.
Your goal as a beginner is survival. You need enough time in the market to build skill, track results, and refine execution.
When you cap risk per trade, you can take hundreds of trades without one mistake ending your account. That gives you the only edge that matters early on, staying in the game long enough to learn and improve.
Know the types of risk you face in forex trading
Market risk: volatility, trends, and range breaks
Price moves for reasons you cannot control. Data releases, central bank decisions, and risk events can push a pair fast. Volatility expands and your normal stop size may become too tight.
Trends can run further than you expect. If you fade a trend with high leverage, a normal pullback can become a large loss.
Ranges break. A pair can respect support and resistance for days, then move through it in minutes. Many beginners place stops at obvious levels. That clusters exits and can speed up the move.
Volatility changes by session. London and New York often move more than Asia. Your position size and stop distance must match current conditions, not yesterday’s chart.
Leverage and margin risk: margin calls, liquidation, and how brokers calculate margin
Leverage is the main reason accounts blow up. It turns a small move into a large percentage gain or loss. Your broker does not care about your analysis. It cares about margin.
Margin is a deposit. You post it to open and keep a position. Brokers set:
- Initial margin, what you need to open the trade.
- Maintenance margin, what you need to keep it open.
- Margin level, your equity divided by used margin, shown as a percent on many platforms.
Core calculation. Used margin depends on position size, price, and leverage. A common model looks like this:
Used margin = (Notional value) / (Leverage)
Notional value = Units x Price. For USD-quoted pairs, price is the current rate. For other pairs, your platform converts into your account currency.
What triggers forced action. When losses reduce equity, your margin level drops. Brokers then apply:
- Margin call, a warning or restriction when margin level hits a threshold.
- Stop-out or liquidation, the broker closes positions to protect itself when margin level falls further.
Thresholds vary by broker. Some liquidate at 50% margin level. Some at 100%. You need to know the exact numbers in your account terms.
Liquidity and execution risk: slippage, spread widening, and partial fills
You can plan risk and still get worse fills. That is execution risk. It rises during news, session opens, and thin hours.
- Slippage. Your order fills at a different price than requested. It can be negative or positive. Stops often slip when price moves fast.
- Spread widening. The bid-ask spread expands. Your entry costs more and your stop is easier to hit. This often happens around major releases and at rollover.
- Partial fills. Your order fills in pieces at different prices, more common with large size or less liquid pairs. Your average entry can end up worse than expected.
Execution risk makes tight stops and high leverage a bad mix. It also makes trading during high-impact news harder to control.
Gap and weekend risk: when stops may not fill at your price
Gaps happen when the market reopens at a different price. Weekends create the most common gap risk because spot FX is closed while news still happens.
If price jumps over your stop, your stop order fills at the next available price. You take the larger loss. This is normal market behavior. Your stop price is a trigger, not a guarantee.
Gaps also occur around major news in fast markets. You see this most in pairs tied to the event country and in cross pairs with lower liquidity.
Counterparty and broker risk: regulation, segregation of funds, and platform outages
You trade through a broker. That adds operational and counterparty risk.
- Regulation. A regulated broker must meet capital and conduct rules. Rules differ by jurisdiction. You need to know which entity holds your account.
- Segregation of funds. Some regulators require client money to sit in separate accounts from broker operating funds. Segregation reduces risk if the firm fails. It does not remove it.
- Execution model. Some brokers internalize flow. Some route to external liquidity. This affects spreads, slippage, and conflict of interest.
- Platform outages. Servers go down. Feeds freeze. Your internet fails. If you cannot manage a trade, your risk can expand fast.
Keep risk small enough that a technical failure does not become an account event.
Strategy risk: when a method stops working or was never statistically valid
Many beginner strategies fail because they never had an edge. Others fail because market conditions change.
- Overfitting. You build rules that match past noise. Performance collapses live.
- Regime change. Volatility, correlations, and trend strength shift. A method built for ranges can fail in trends. A method built for trends can fail in chop.
- Execution gap. Your backtest uses perfect fills. Live trading includes spreads, slippage, and missed trades.
- Sample size risk. Ten trades prove nothing. A good month proves nothing. You need enough trades to judge expectancy.
Track your results by setup type, session, pair, and volatility. If you trade ranges, use clear levels and defined invalidation, and keep your stop logic consistent. If you need a framework, see this range trading strategy guide.
Set non-negotiable account-level rules (your safety rails)
Choosing a maximum risk per trade
Set one fixed risk number per trade. Keep it small. This rule protects you from a bad streak and from your own impulse.
- Conservative range: 0.25% to 1.00% of your account per trade.
- New traders: start at 0.25% to 0.50%. Increase only after you log at least 50 to 100 trades on the same setup.
- If your win rate is unknown: stay at 0.25% to 0.50%. Your data is not stable yet.
Decide using your worst case streak, not your best month. If you risk 1% per trade, 10 losses equals about a 10% drawdown, before spread and slippage. If that drawdown would make you change your system, your risk is too high.
| Risk per trade | 10 consecutive losses (approx.) | 20 consecutive losses (approx.) |
|---|---|---|
| 0.25% | 2.5% | 5% |
| 0.50% | 5% | 10% |
| 1.00% | 10% | 20% |
Use a fixed percentage risk. Your stop distance can vary. Your position size must adjust to keep the same account risk.
Daily and weekly drawdown limits
Set a hard stop for the day and the week. You stop trading when you hit it. You do not negotiate with yourself.
- Daily max loss: 1% to 2% of your account, or 2 to 4 losing trades at your normal risk.
- Weekly max loss: 3% to 6% of your account, or 6 to 12 losing trades at your normal risk.
- After hitting the limit: close the platform. No revenge trades. No “one more” setup.
Reset rules need structure. After a daily stop, you review execution, spreads, and slippage, then trade next session only if your plan still fits market conditions. After a weekly stop, reduce risk by half for the next 10 trades, or pause until you can explain the drawdown in your journal.
Maximum open risk
Open risk is the total you can lose if every stop hits. Cap it. This prevents stacked trades from turning into one oversized bet.
- Simple cap: keep total open risk at 1% to 2% of your account.
- If you take multiple entries: split risk. Example, three positions at 0.33% each, not three positions at 1%.
- If you trail stops: recalculate open risk using the current stop level, not the original stop.
Do not count “I will close it early” as risk control. Only the stop level counts.
Correlation rules
Correlation creates hidden exposure. You can take different pairs and still make the same bet on one currency.
- Limit same-currency exposure: avoid stacking positions that all depend on USD strength or weakness.
- One idea, one risk unit: if two trades express the same bias, treat them as one trade and split your risk.
- Examples of hidden overlap: long EURUSD and long GBPUSD both short USD. Short USDJPY and long XAUUSD both short USD in different form.
Write a rule you can follow. Example, you allow one USD-short position at full size. Any second USD-short position must use half risk or gets rejected.
Define a maximum leverage cap
Your broker may offer high leverage. You do not need to use it. Set your own cap and treat it as a hard rule.
- Practical cap for beginners: keep effective leverage at 1x to 5x. Avoid going above 10x.
- Use effective leverage: total position notional divided by account equity.
- Reason: leverage amplifies slippage, spread costs, and gap risk. It also forces margin calls during normal volatility.
If you want a simple framework, build your trade plan around a fixed risk percent and a clear stop. Then choose position size from that. This keeps leverage as an outcome, not a target. For position planning with clean numbers, see this risk-reward ratio guide.
Position sizing for beginners (the skill that prevents oversized losses)
Position sizing for beginners (the skill that prevents oversized losses)
Position sizing turns your risk limit into a trade size. You set the stop first. You pick a fixed risk percent. The math then tells you how many units to trade.
The position sizing equation
Use this core formula.
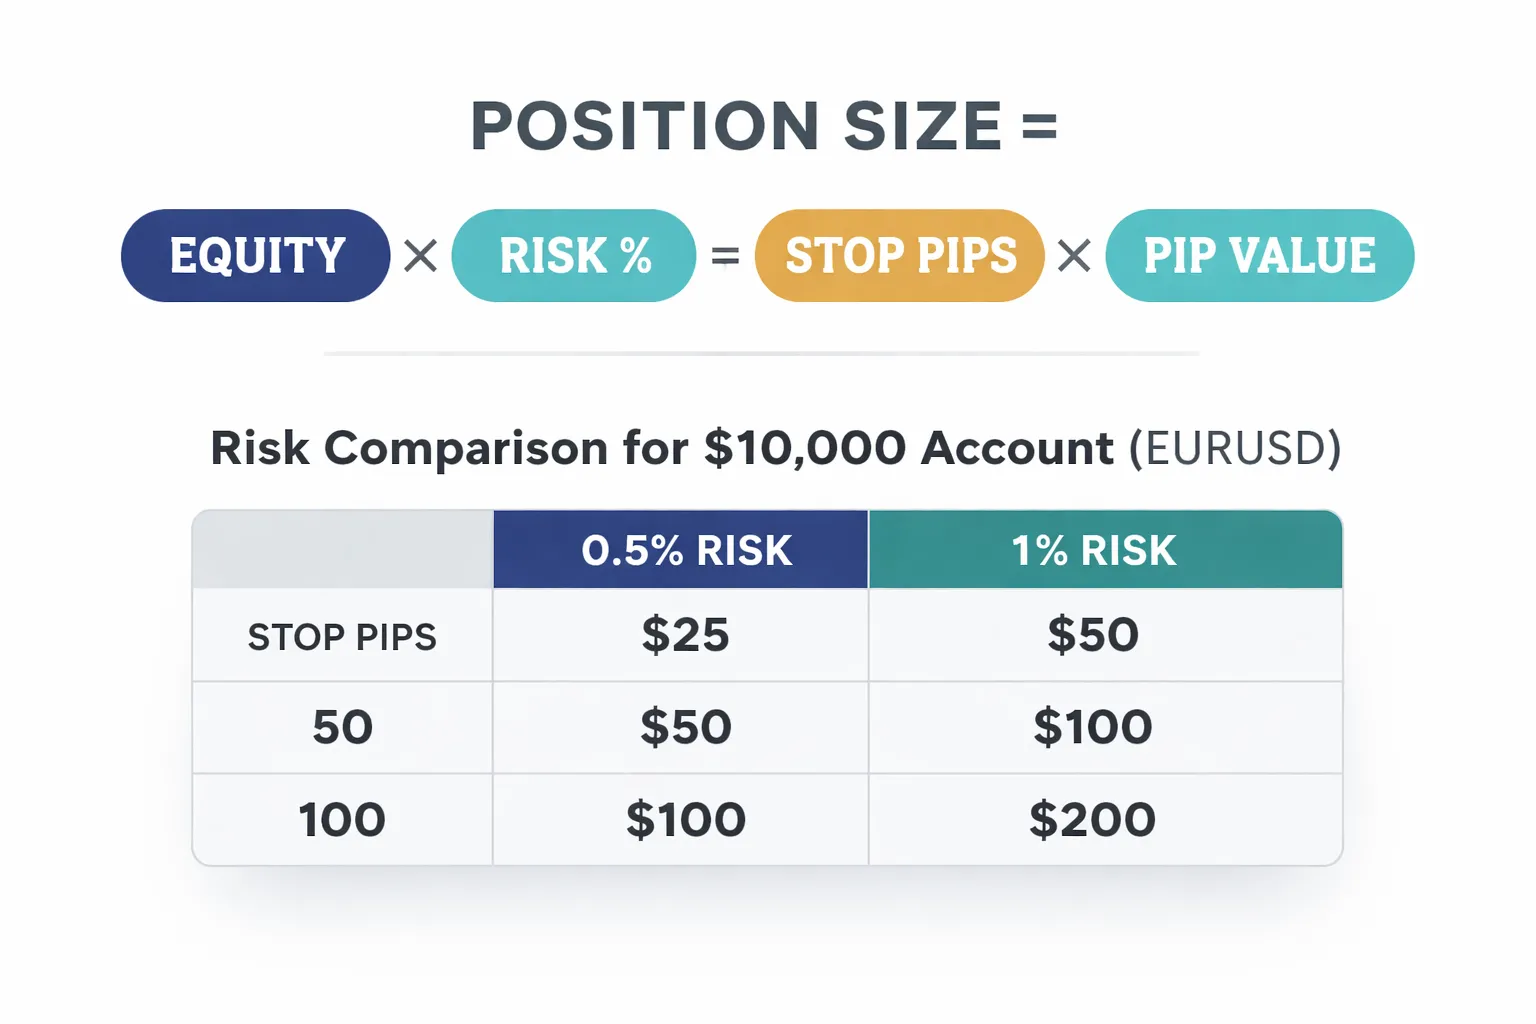
Position size (in lots) = (Account equity × Risk %) ÷ (Stop distance in pips × Pip value per 1 lot)
Or in dollars first.
Risk amount ($) = Account equity × Risk %
Allowed loss ($) = Stop pips × Pip value × Lots
Rearrange to solve for lots.
Pips, pip value, and lot sizes
You need three pieces to size correctly.
- Stop distance (pips). The number of pips between entry and stop.
- Pip value. How much money you gain or lose per pip for a given lot size.
- Lot size. The number of units you trade.
Standard lot sizes in spot FX.
- Standard lot: 100,000 units of the base currency.
- Mini lot: 10,000 units.
- Micro lot: 1,000 units.
Common pip value shortcuts when your account currency is USD and the quote currency is USD, like EURUSD and GBPUSD.
- 1 standard lot: about $10 per pip.
- 1 mini lot: about $1 per pip.
- 1 micro lot: about $0.10 per pip.
These are approximations. They vary slightly with price on some pairs. Use your platform or a calculator for exact numbers.
JPY pairs and non-USD accounts, what changes and what doesn’t
Two things stay the same.
- You still set risk % the same way.
- You still measure stop distance from entry to stop.
Two things change.
- Pip size on JPY pairs. Most pairs use 0.0001 per pip. JPY pairs use 0.01 per pip. Your platform still shows pips, but the decimal format differs.
- Pip value in your account currency. If your account is not in USD, or the quote currency is not your account currency, pip value needs a conversion at the current rate.
Practical rule.
- If your account currency matches the pair’s quote currency, pip value stays simple.
- If it does not match, pip value becomes a converted number. Let a calculator handle it, but verify the inputs.
Using an online position size calculator safely
Calculators help, but only if you feed them correct inputs.
- Account currency and equity. Use current equity, not starting balance.
- Risk % or risk amount. Pick one and keep it consistent.
- Pair and current price. Price affects pip value when conversion is needed.
- Stop loss in pips. Use the true distance from entry to stop. Do not guess.
- Lot type. Confirm whether the output is in standard lots, units, or contracts.
After you get a lot size, sanity check the result. Multiply stop pips × pip value × lots. The number should equal your risk amount.
Worked examples, 0.5% vs 1% risk with different stops
Assume a $10,000 USD account trading EURUSD. Use pip value of $10 per pip per 1 standard lot.
| Equity | Risk % | Risk $ | Stop (pips) | Lot size | $ per pip |
|---|---|---|---|---|---|
| $10,000 | 0.5% | $50 | 20 | 0.25 lots | $2.50 |
| $10,000 | 1.0% | $100 | 20 | 0.50 lots | $5.00 |
| $10,000 | 0.5% | $50 | 50 | 0.10 lots | $1.00 |
| $10,000 | 1.0% | $100 | 50 | 0.20 lots | $2.00 |
| $10,000 | 0.5% | $50 | 100 | 0.05 lots | $0.50 |
| $10,000 | 1.0% | $100 | 100 | 0.10 lots | $1.00 |
What this shows.
- Doubling risk percent doubles position size.
- Wider stops force smaller size.
- Your stop controls trade survival. Your size controls account survival.
Build this into your routine. Define the setup, place the stop, calculate size, then execute. This is part of a complete plan, see the day trading forex strategy for beginners for a simple process you can follow.
Stop-loss and take-profit rules that make sense (not myths)
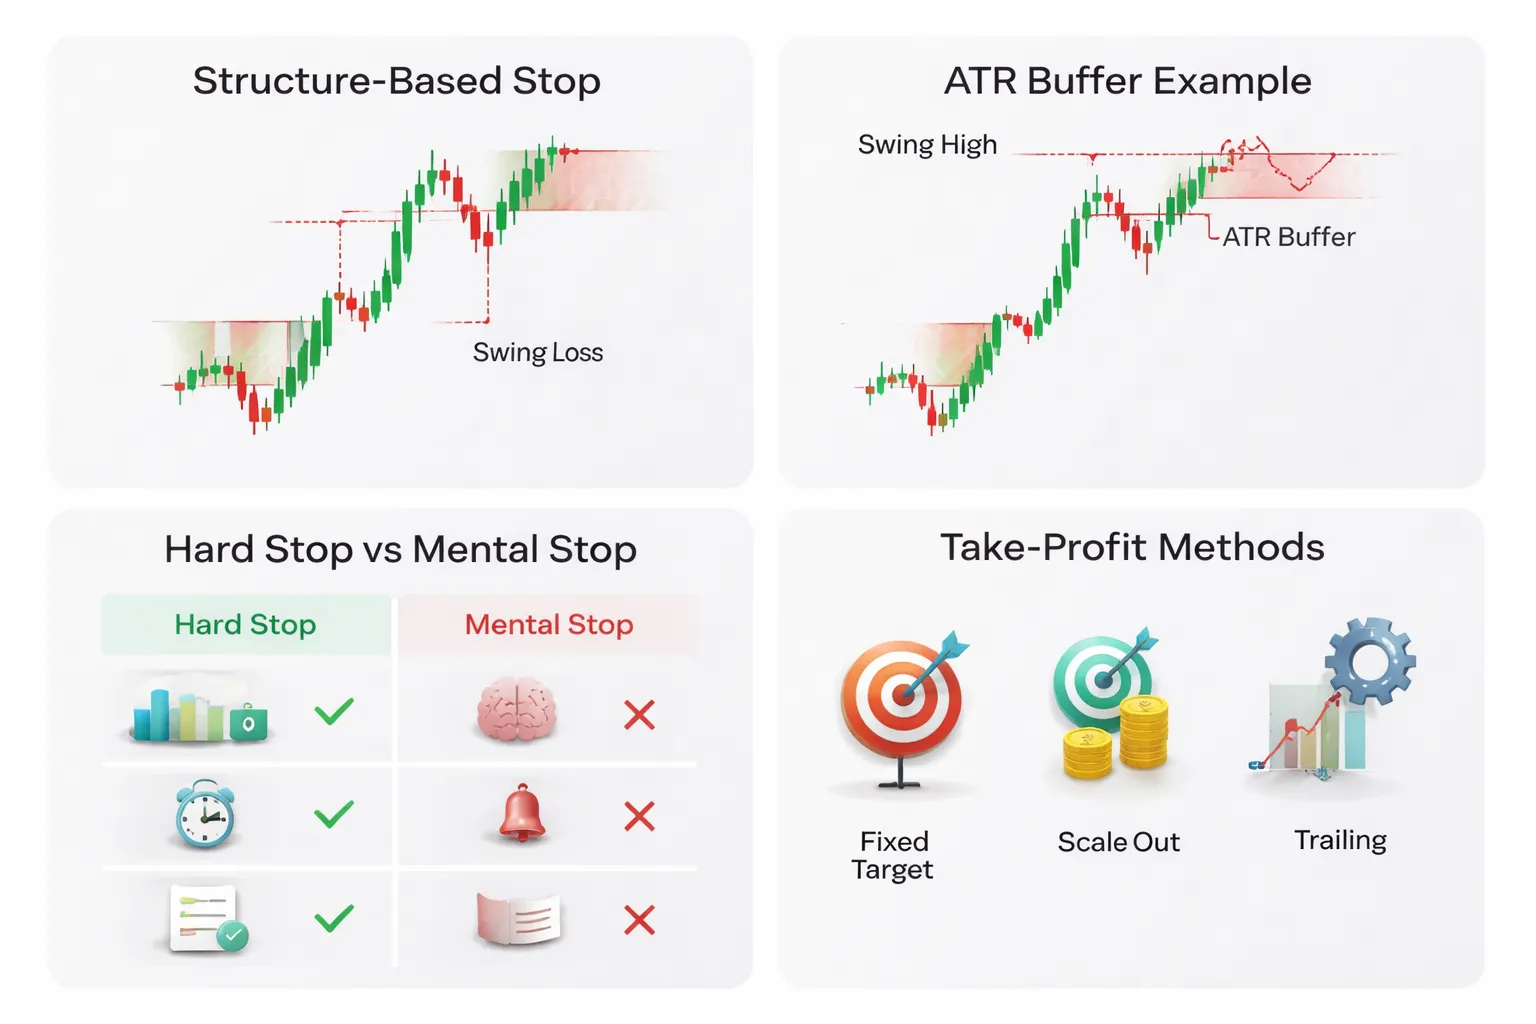
Place your stop where your trade is wrong
Your stop-loss is not a pain threshold. It is a thesis invalidation point.
Define one clear reason you enter. Then define the price level that proves that reason failed. Put the stop there.
- Breakout trade: Stop goes back inside the range, past the level that should now hold.
- Pullback trade: Stop goes beyond the swing low or swing high that defines the trend leg.
- Range trade: Stop goes beyond support or resistance, past the level that must reject price.
Do not place stops at round numbers by habit. Do not place them at a fixed pip count. Place them where structure changes. If you cannot explain the level in one sentence, the stop is random.
Volatility-based stops with ATR, so you avoid random stop-outs
Structure gives you the level. Volatility tells you the buffer.
ATR measures typical movement. Use it to avoid getting clipped by normal noise.
- Step 1, mark the structure invalidation level.
- Step 2, check ATR on your trading timeframe.
- Step 3, add a buffer like 0.5x to 1.5x ATR beyond the structure level, based on how tight the structure is and how volatile the session is.
Rules you can follow.
- If your stop sits inside the pair’s normal wiggle, you will take many small losses from noise.
- If you widen the stop, you must reduce position size to keep risk constant.
- ATR does not predict direction. It just helps you size the distance.
Hard stop vs mental stop, beginners should default to hard stops
A hard stop is a stop order on the platform. A mental stop is a promise.
Use hard stops.
- Price can move fast. You will not react fast enough.
- News spikes can gap or slip. A mental stop becomes a bigger loss.
- Stress makes you hesitate. Hesitation turns a planned loss into damage.
Use a mental stop only if you already execute with discipline, you watch price continuously, and you accept that slippage can exceed your planned risk. Most beginners fail this test.
Take-profit options, pick the one you can execute
Take-profit is not about being right. It is about getting paid when the trade works.
- Fixed target: Set TP at a defined level, like prior swing high or low, range boundary, or a measured move. You get consistency. You avoid giving back gains.
- Scale out: Take partial profit at the first logical level, then let the rest run to a second level. You reduce pressure. You also reduce upside on big winners.
- Trail: Move the stop behind structure as price makes new swings, or use an ATR trail. You aim to catch trends. You must accept more giveback.
| Method | Best for | Main risk |
|---|---|---|
| Fixed target | Ranges, mean reversion, clear levels | Exits too early in strong trends |
| Scale out | Mixed conditions, newer traders | Smaller average win if you cut too much too soon |
| Trailing stop | Trends, breakouts that run | Gives back profit during pullbacks |
Match your take-profit to market structure. If you trade into the next major level, expect reactions. If you want deeper detail on setting targets, use the risk-reward ratio guide.
Moving a stop, when it is justified and when it is fear
One rule covers most mistakes.
Never move your stop farther away. If your thesis is invalidated, exit. If you move the stop, you break the plan and you change the risk.
Moves that make sense.
- Price makes a new swing in your favor, you trail the stop behind that new structure.
- You scale out, then you move the stop to reduce remaining risk based on the updated plan.
- You planned a time stop, price fails to move as expected within your window, you exit or tighten by rule.
Moves driven by fear.
- You move the stop because price is close to it.
- You move the stop because you want to avoid being wrong.
- You remove the stop because you expect a bounce.
Write your stop and take-profit rules before you enter. Execute them the same way every trade. That is how you stay in the game.
Risk-to-reward, win rate, and expectancy (how profitability really works)
Risk-to-reward alone does not make you profitable
A high risk-to-reward ratio looks good on paper. It fails in live trading when your win rate drops too low.
If you target 1:3 but you win 15% of the time, you still lose money. If you target 1:1 but you win 60% of the time, you can make money.
Profitability comes from the mix of your win rate and your average win versus your average loss. You need all three numbers.
Expectancy, the only formula you need
Expectancy tells you what you earn or lose per trade on average.
Expectancy = (Win rate × Average win) − (Loss rate × Average loss)
- Win rate, percentage of trades that hit your take profit.
- Loss rate, 1 minus your win rate.
- Average win, average gain of winning trades in R or in pips.
- Average loss, average loss of losing trades in R or in pips.
Use R to keep it clean. If you risk 1R per trade, then a full stop loss equals −1R. A take profit at 2R equals +2R.
Example with 1:2 risk-to-reward.
- Risk: 1R. Reward: 2R.
- Win rate: 40%. Loss rate: 60%.
- Expectancy = (0.40 × 2R) − (0.60 × 1R) = 0.20R per trade.
This is why you can be wrong more than you are right and still grow the account.
Break-even win rates for common risk-to-reward setups
Break-even means expectancy equals zero, before spread and slippage. Real break-even needs a little more.
| Risk-to-reward | Break-even win rate |
|---|---|
| 1:1 | 50% |
| 1:2 | 33.3% |
| 1:3 | 25% |
As you push for bigger targets, your required win rate drops. Your actual win rate often drops too. That tradeoff decides your edge.
What to optimize first as a beginner
Start by cutting big losses. Do not start by chasing bigger wins.
- Keep every loss near your planned stop. No exceptions.
- Avoid widening stops to avoid a loss. That turns a small loss into a large one.
- Track your average loss. If it is bigger than 1R, you have a discipline problem, not a strategy problem.
- After you control losses, work on better entries and cleaner exits. Then test larger targets.
If you want one upgrade that helps both win rate and average win, trade clearer structures and levels. Learn a few forex chart patterns and stick to the ones you can execute the same way every time.
Leverage management (how to use it without getting wiped out)
Effective leverage vs broker leverage, the key distinction
Broker leverage is the maximum your broker allows, like 30:1, 50:1, or 500:1. It is a limit, not a target.
Effective leverage is what you actually use on a trade. It depends on your position size and your account equity.
Effective leverage formula: position notional value divided by account equity.
Example. You have a $2,000 account. You open a $20,000 position. Your effective leverage is 10:1.
Most beginners blow up from high effective leverage, not because the broker offered a high number.
Margin level, free margin, and why trades get liquidated
Your platform tracks margin in real time. Learn three terms and watch them every session.
- Used margin: the amount locked to keep your open positions.
- Equity: balance plus floating profit or loss.
- Free margin: equity minus used margin. This is your buffer.
Margin level formula: equity divided by used margin, then multiply by 100.
When price moves against you, your equity drops. Your free margin shrinks. Your margin level falls.
Brokers enforce two lines.
- Margin call level: you get a warning, or you lose the ability to open new trades.
- Stop out level: the broker closes positions to reduce used margin.
This is how traders get wiped out. They use too much size, then a normal pullback drains free margin, then stop out closes positions at the worst time.
A stop loss helps, but only if your position size makes the stop affordable. Use a real stop and size the trade to it. If you need help with the mechanics, read how to place a stop loss.
Leverage guidelines for beginners, practical caps by strategy style
Start with a cap on effective leverage. Treat it like a hard rule.
- Swing trading: 1:1 to 3:1 effective leverage.
- Day trading: 2:1 to 5:1 effective leverage.
- Scalping: 1:1 to 3:1 effective leverage. Keep it low because costs and slippage hit harder.
Then set a second cap using a simple stress test. Estimate a normal adverse move for your setup and timeframe, then make sure you can survive it without margin pressure.
- Build for at least a 1 percent to 2 percent equity drawdown on a single trade without any margin warning.
- Build for a larger move around news and session opens, or do not hold size through those windows.
High leverage does not improve your edge. It only increases the speed of outcomes.
How spread and slippage impact leveraged positions more than you think
Leverage magnifies trading costs because costs hit your equity directly.
Spread is the gap between bid and ask. You pay it when you enter, and again when you exit through the market.
Slippage is the difference between your expected fill and your actual fill. It increases during low liquidity, fast markets, and news.
Small costs become large when your effective leverage is high.
| Account equity | Effective leverage | All-in cost (spread plus slippage) | Equity hit |
|---|---|---|---|
| $2,000 | 2:1 | 0.05% of position | $2 |
| $2,000 | 10:1 | 0.05% of position | $10 |
| $2,000 | 25:1 | 0.05% of position | $25 |
At 25:1, a tiny execution cost becomes a meaningful chunk of your risk. It also pushes your margin level down faster.
Rules that reduce the damage.
- Trade the most liquid pairs when you are new.
- Avoid market orders in thin conditions. Use limit orders when your setup allows it.
- Reduce size before scheduled news. If you insist on trading news, assume worse fills.
- Track average spread and average slippage in your journal, then include them in your real risk per trade.
Trade planning and execution discipline (turn rules into behavior)
Pre-trade checklist: setup quality, stop location, size, and invalidation
Discipline starts before you click. You need a checklist you follow every time.
- Setup quality: Write your setup name. List the exact entry trigger. If you cannot define it in one sentence, skip the trade.
- Stop location: Place the stop at the price that proves your idea wrong, not at a dollar amount. The stop must sit beyond a clear structure level. If you rely on chart patterns, keep your rules consistent and use the same pattern definitions each time. See chart pattern rules.
- Invalidation: Define what cancels the trade before entry. Examples, candle closes beyond your level, level breaks on higher time frame, spread widens above your limit, news hits in the next X minutes.
- Position size: Calculate size from your stop distance and your fixed risk per trade. Use this formula. Position size = account risk in dollars ÷ stop distance in pips ÷ pip value per unit.
- True risk: Add spread and likely slippage to the stop distance. If your stop is 20 pips and your all-in cost averages 2 pips, size the trade as if the stop is 22 pips.
- Order plan: Decide the order type now. Decide the stop and target now. If you need to move them to feel better, you do not take the trade.
| Checklist item | Minimum standard | Hard stop rule |
|---|---|---|
| Spread | At or below your journal average | Skip if spread is above your limit |
| Stop distance | Beyond structure, includes costs | No trade if stop sits inside noise |
| Risk per trade | Fixed percent or fixed dollars | No resizing after entry |
| Entry trigger | Written and repeatable | No trigger, no trade |
One-trade-at-a-time mindset: prevent “portfolio” chaos as a beginner
Beginners blow up from stacked exposure. You think you run several small trades. You often run one big trade spread across pairs.
- Limit open risk: Cap total open risk at a small number. Example, 1R to 2R total across all trades.
- Limit correlation: Treat highly correlated pairs as the same trade. Long EURUSD and long GBPUSD can move together. Size them like one position.
- One idea at a time: If the trades share the same driver, keep only one. Choose the cleanest chart and the tightest spread.
- No hedging to avoid exits: Opposite positions often double costs and hide the real loss. Close the losing idea. Log it. Move on.
- Kill switch: Stop trading for the session if you hit your daily loss limit or your max number of trades.
Order types explained: market, limit, stop, and OCO for risk control
Your order type is a risk tool. Use the one that matches your plan.
- Market order: You enter now at the best available price. You accept slippage. Use it only when speed matters more than price and conditions stay liquid.
- Limit order: You enter at your price or better. You control entry price. You risk missing the trade. Use it for pullbacks and level entries.
- Stop order: You enter only if price breaks a level. You confirm momentum. You risk worse fills in fast moves. Use it for breakouts and continuation triggers.
- Stop loss order: Your exit if you are wrong. Place it when you place the entry. Never add a stop “later.”
- Take profit limit: Your planned exit at a target. It reduces decision pressure. It also keeps you from holding and hoping.
- OCO: One cancels the other. Use it to bracket a trade. You can place entry plus stop and target as one package where your platform allows it.
| Order type | What you control | Main risk |
|---|---|---|
| Market | Speed | Slippage and spread spikes |
| Limit | Entry price | No fill, partial fill |
| Stop (entry) | Entry condition | Worse fill in breakouts |
| OCO bracket | Exit structure | Wrong placement locks in a bad plan |
Creating if/then rules: what you do after a loss, after a win, and after a near-miss
You do not rise to your goals. You fall to your rules. Write rules that trigger actions.
- If you take a loss, then: stop trading for 10 minutes, log the trade, screenshot entry and exit, mark whether you followed the checklist. Take the next trade only if you meet every checklist item.
- If you hit two losses in a row, then: cut size by 50 percent for the next trade or stop for the day. Do not “win it back.”
- If you take a win, then: do not increase size on the next trade. Keep size fixed for the session. Log whether the win came from process or from luck, based on your rules.
- If you miss a trade by a few pips, then: do not chase with a market order. Cancel the idea or wait for the next planned trigger. Log the miss as a near-miss, not as a loss that needs recovery.
- If price hits your stop and then reverses, then: do nothing. No re-entry unless a fresh setup triggers. Log the re-entry rule and enforce a minimum cooldown.
- If spreads widen above your limit, then: you cancel pending orders and you do not place new ones until spreads normalize.
| Event | If | Then |
|---|---|---|
| Loss | Stop hit | Cooldown, journal, next trade only with full checklist |
| Win | Target hit | No size increase, journal, keep session risk cap |
| Near-miss | Missed fill or early exit | No chase entry, wait for new trigger, log it |
Managing risk during news, high volatility, and low-liquidity sessions
Which events move FX most
You face the highest spike risk around scheduled macro releases and central bank decisions.
- Inflation data (CPI). Moves rate expectations fast. Big impact on USD pairs and risk currencies.
- Jobs data (NFP). Often creates the sharpest one minute swings in USD pairs. Slippage risk increases.
- Rate decisions and guidance. Central bank statement, rate vote, and press conference. The press conference can reverse the first move.
- Unexpected headlines. Geopolitics, interventions, bank stress, surprise policy comments. These can hit during thin liquidity and gap price.
Rule for beginners. Treat CPI, NFP, and rate decisions as special conditions. Do not trade them by default. Trade only if you use a news plan with defined risk and broker behavior tested.
How spreads widen and what that does to stops
Spreads often widen before and after releases. Liquidity providers pull quotes. Your platform may show normal candles but a wider bid ask gap.
- Your stop triggers on bid or ask, not on the chart mid price.
- A wider spread can hit your stop without a real directional move.
- Market orders can fill worse than expected. Your loss can exceed your planned amount.
- Limit orders can miss fills. You get no trade, then you chase. That creates bad entries.
Practical check. Log the typical spread for your pair during normal conditions, then compare it during major releases. If spread expands beyond your session limit, you cancel pending orders and you do not place new ones until spreads normalize.
Three safe choices during high volatility
Pick one. Do not mix them mid trade.
- Reduce size. Keep your stop distance the same. Lower lot size so your dollar risk stays inside your per trade cap.
- Widen the stop, then recalculate size. Increase stop distance to survive noise, then cut position size so your dollar risk stays fixed. Use the same risk percent, never more.
- Skip the trade. Stand down for the release window. This is the highest expectancy decision for most beginners.
If you need help setting stops that match your plan, use this stop loss guide.
Session-based volatility and beginner rules
Volatility changes by session. Your rules should change with it.
- Asia session. Often lower volatility on many major pairs. Breakouts fail more. Spread can look fine but follow through can be weak.
- London session. Higher liquidity and cleaner moves. Many pairs set the day’s direction. Good for planned entries with defined stops.
- New York session. Strong moves, especially with US data. More reversals after the first impulse.
- London and New York overlap. Usually the highest liquidity and fastest movement. Your stop gets tested more often. Your fills can be better than in thin hours, but speed increases mistakes.
Beginner guidance. Trade one main window only. Use the same pairs, the same time block, the same risk cap. Avoid the first minutes after a major open if you see spread expansion or rapid whipsaws.
Weekend and holiday rules
Gaps and thin markets break risk models. Your stop does not protect you from a gap through your level.
- Do not hold new positions into the weekend unless your strategy requires it and your size assumes a worst case gap.
- Reduce exposure before market close. Close or cut positions when liquidity fades late Friday.
- Avoid major holidays. Liquidity drops, spreads widen, and price can jump on small orders.
- Watch early closes. Brokers and banks reduce hours. Your normal spread stats stop being valid.
- Cancel pending orders before the weekend if you cannot monitor fills and spread behavior.
Simple rule. If you cannot explain how you will handle a gap, you do not hold the trade.
Psychological risk management (the part most beginners underestimate)
Cognitive biases you must control
Your brain will try to “fix” randomness. That is where most beginner risk starts.
- Overconfidence. A winning streak makes you increase size, loosen rules, or skip checks. Fix it with a hard cap. Set a maximum risk per trade and a maximum leverage level, then never raise them after a win. Only change them after a planned review window, like 20 to 50 trades.
- Loss aversion. You hate realizing a loss, so you move stops, refuse to exit, or “hold to get back to breakeven.” Fix it with one rule. Your stop goes in when you enter, and it never moves further away. You can tighten it, or exit early if your plan allows it.
- Recency bias. You overweight the last few outcomes. After losses you trade scared, after wins you trade loose. Fix it with fixed position sizing. Risk the same fraction each trade. Do not scale up or down based on mood or recent P&L.
- FOMO. You chase a move because you feel late. You enter far from your stop, so your position size jumps, or your stop gets wider. Fix it with an entry checklist. If price already moved and your stop distance breaks your risk limit, you skip the trade. No exceptions.
Revenge trading and tilt, install circuit breakers
Revenge trading starts after a loss that feels unfair. Tilt shows up as speed, urgency, and rule bending.
- Know your triggers. Common ones are slippage, a stop-out by a few pips, missing an entry, or giving back profits.
- Use a two-strike rule. After two rule breaks, you stop trading for the day. Do not “make it back.”
- Set a daily loss limit. Example, stop for the day at 2R or 3R down, where R equals your planned risk per trade. When you hit it, you are done.
- Add a time lock. After any stop-out, wait 10 to 20 minutes before the next trade. No charts during the break.
- Remove the buttons. If you tilt on market orders, disable one-click trading. If you tilt on scalps, trade higher timeframes. If you tilt at night, trade only during set hours. If you want a faster style, read scalping forex strategy for beginners and copy the risk rules, not the pace.
Process goals beat money goals
Money goals push you into forced trades. Process goals keep your risk stable.
- Track rule-following. Score each trade as “A” or “Not A.” An A trade follows your plan on entry, size, stop, and exit management.
- Measure execution errors. Log slippage, late entries, missed exits, and stop moves. These are controllable losses.
- Set targets you control. Examples, 95% of trades placed with correct size, 100% of trades with stop entered at entry, zero moved stops, zero trades outside your hours.
| What you track | Why it matters | Simple metric |
|---|---|---|
| Plan compliance | Controls risk and keeps your edge measurable | A-trade rate, % |
| Risk consistency | Prevents emotional sizing | Average R per trade, variance |
| Rule breaks | Shows psychological leaks | Count per week |
| Overtrading | Creates low-quality exposure | Trades per day vs plan |
Build tolerance for normal drawdowns
Even a solid strategy loses often. You must size risk so normal losses do not trigger panic.
Use your win rate and your risk-reward to estimate what “bad luck” looks like. Long losing streaks happen by chance.
| Win rate | Chance of at least 8 losses in a row over 200 trades | What it means for you |
|---|---|---|
| 50% | About 54% | Expect an 8-loss streak to occur often. Size risk so you can sit through it. |
| 40% | About 82% | An 8-loss streak is likely. Do not treat it as proof your system “stopped working.” |
| 30% | About 96% | Long losing streaks are near certain. Small risk per trade is not optional. |
Example in R units. If you risk 1R per trade, eight losses cost 8R. If you risk 2% per trade, that is about a 16% drawdown. Many beginners crack well before that and then change the plan mid-sample.
- Pick a risk level that survives your expected streak. Many beginners stay near 0.25% to 1% risk per trade to avoid emotion-driven errors.
- Define a review threshold. Example, pause and review after 10R drawdown or after 30 trades, not after three losses.
- Separate variance from mistakes. Variance is losses that followed your rules. Mistakes are stop moves, oversizing, and chasing. Only one of these needs discipline, not strategy changes.
A simple beginner risk management plan (template you can copy)
Starter ruleset you can follow today
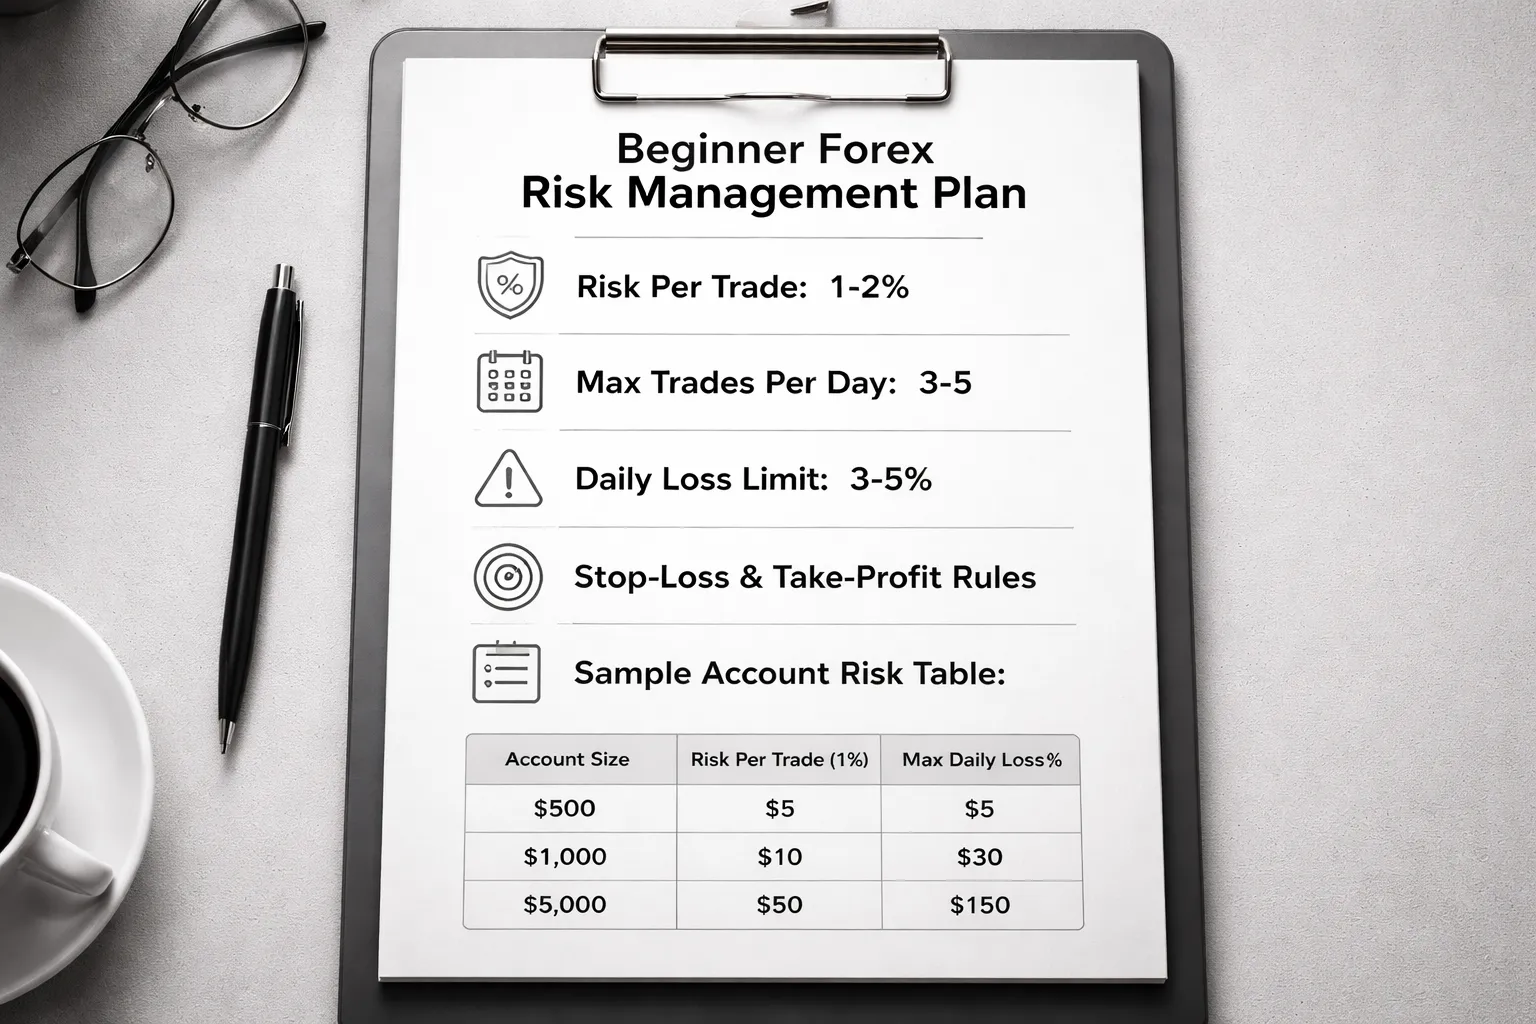
- Risk per trade: 0.5% of your account. If you feel stress, drop to 0.25%. Do not go above 1% as a beginner.
- Max trades per day: 2. If you take 2 trades, you stop. You avoid revenge trading and random setups.
- Max daily loss: 1.5R or 2R. If you hit it, you stop for the day. No exceptions.
Template: I risk 0.5% per trade. I take max 2 trades per day. I stop trading for the day at -2R or after 2 losing trades, whichever comes first.
Stop-loss, take-profit, and trade management framework
- Stop-loss placement: Put your stop where your setup is invalid. Do not place it at a “nice” round number. Use structure.
- Take-profit plan: Set a target before entry. Aim for at least 1.5R. Many beginner systems survive on 1.5R to 2.5R targets with solid win rates.
- Move to break-even rule: Only after price reaches +1R. If you move earlier, you cut winners and keep losers.
- Partial profits rule: Optional. If you use it, keep it simple. Example, take 50% off at +1.5R, trail the rest behind the last swing.
- Hard rule: You do not widen your stop. You can tighten it based on new structure, but you never give a losing trade more room.
Position size formula: Position size = (Account balance x Risk %) / Stop size in pips. Convert to lots using your broker’s pip value.
Example plans for $500, $1,000, and $5,000 accounts
- Realistic expectation: your goal is rule execution, not income. With small accounts, your edge shows in R, not dollars.
- Target for the first 50 to 100 trades: avoid large drawdowns. Stay inside your daily loss limit. Keep risk flat.
- If your account feels too small: do not increase risk. Reduce trade frequency and only take your best setups.
How to adjust after 50 to 100 trades using data
- Track these fields: pair, session, setup name, stop pips, planned R, result in R, rule break yes or no, screenshot.
- Separate your samples: “rules followed” trades vs “mistake” trades. Do not mix them.
- Calculate: win rate, average win in R, average loss in R, expectancy. Expectancy = (Win% x Avg Win) - (Loss% x Avg Loss).
- Change one variable at a time: risk, target, stop method, or entry filter. Never change more than one per test.
- Adjust risk only after consistency: if you have 50 to 100 trades with no sizing errors and stable results, you can move from 0.5% to 0.75%. If your drawdown exceeds 10R, cut risk in half until you recover discipline.
- Cut what causes mistakes: if most rule breaks happen after trade 2, lower your max trades per day to 1. If most mistakes happen on correlated pairs, limit exposure. Use a forex correlation pairs list to avoid stacking the same bet.
Copy and fill: Risk per trade: __%. Max trades/day: __. Daily loss limit: __R. Weekly review: every __ trades. Pause trigger: -__R. Setup list: __. Management rules: BE at +__R, partial at +__R, target at __R.
How to track and improve your risk over time (journaling + metrics)
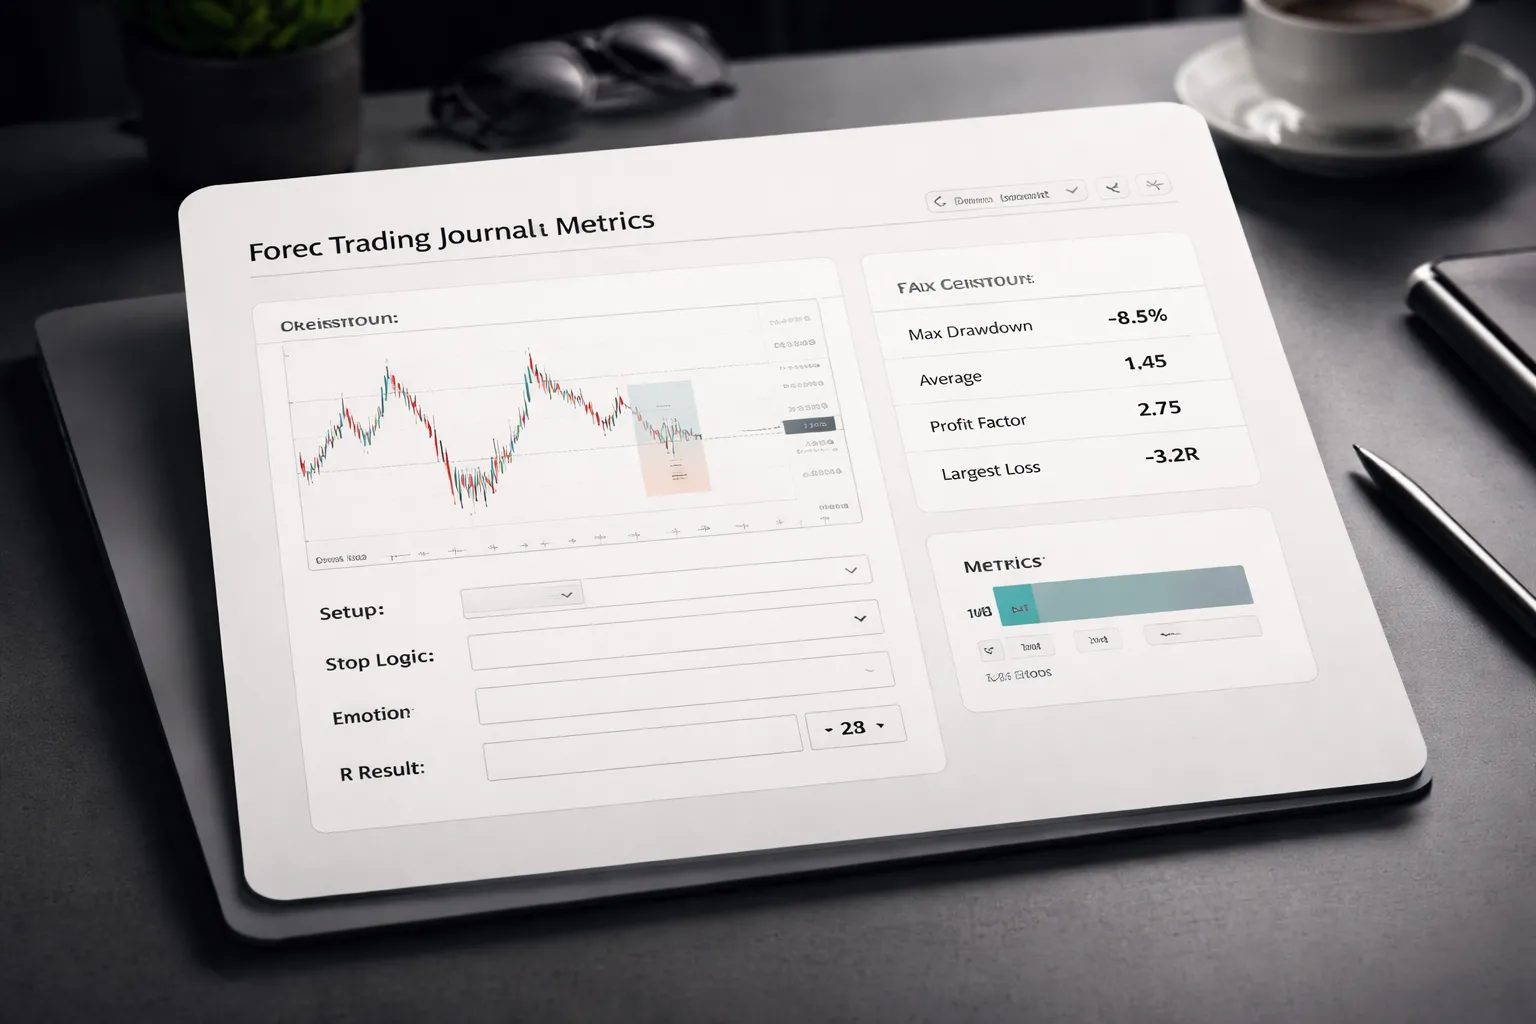
What to record in a journal
Your journal should let you answer one thing fast, did you follow your rules. Keep it simple. Record the same fields every time.
- Screenshot, entry moment, and exit moment. Mark entry, stop, target, and key level.
- Date and session, London, New York, overlap, or Asia.
- Pair and correlation note, list any other open trades on related pairs.
- Setup name, choose from your setup list only. No “other” bucket.
- Reason for entry, 1 to 2 lines. State what you saw, not what you hoped.
- Stop logic, why the stop sits there. “Under swing low” or “above structure,” not “20 pips.”
- Position size, risk in dollars and in R. Confirm risk per trade matches your plan.
- Planned management, BE at +__R, partial at +__R, target at __R. Write it before you click buy or sell.
- Execution quality, spread, slippage, late entry, missed level.
- Emotions and state, tired, rushed, angry, bored. One word is enough.
- Rule breaks, yes or no. If yes, tag the rule you broke.
- Result in R, not pips. R makes trades comparable across pairs and timeframes.
Key metrics to track (and why they matter)
Track metrics that protect you first. Then track metrics that improve your edge.
- Max drawdown, biggest peak-to-trough drop in R. This tells you if your risk settings fit your psychology.
- Average R per trade, total R divided by number of trades. This is your core performance number.
- Profit factor, gross wins divided by gross losses. Above 1.0 means you have an edge or you got lucky. Track it over batches, not days.
- Largest loss, worst single trade in R. If it is below your planned loss, you broke a rule or you had a gap and no protection.
Review in fixed batches. Use the same sample size each time.
| Metric | How to calculate | Action if it is bad |
|---|---|---|
| Max drawdown (R) | Highest equity in R minus lowest after it | Lower risk per trade, cut max trades/day, add a pause trigger |
| Average R | Total R, divided by trades | Remove weak setups, tighten entry rules, reduce overtrading |
| Profit factor | Sum of winning R, divided by sum of losing R | Stop taking low quality trades, review stop placement, review exits |
| Largest loss (R) | Minimum single-trade R | Add hard rules for stop placement and “no move stop wider” |
Keep a separate line for execution errors. Your strategy and your execution are different problems.
For stop and target mechanics, keep your rules consistent with your plan and your stop loss vs take profit structure.
Finding rule-breaking patterns
Your fastest improvement comes from removing preventable losses. Most of those come from rule breaks, not from a bad market day.
- Tag every mistake, late entry, no stop, moved stop wider, revenge trade, doubled size, traded news, traded correlated pairs.
- Count mistakes by type, over the last __ trades. One table. One ranking.
- Link mistakes to conditions, time of day, pair, volatility, win or loss before the trade, number of trades already taken.
- Write a single fix per top mistake, a rule you can follow. Example, “After 2 trades, stop for the day,” or “No second trade on correlated pairs.”
- Measure the fix, track the mistake rate next batch. If it does not drop, the rule is too weak or you ignore it.
Do not change five things at once. Change one rule. Test it for one review block. Keep it or delete it.
Backtesting vs forward testing
Backtesting tells you if a setup had a chance. Forward testing tells you if you can trade it.
- Backtesting can tell you, basic win rate, typical R multiples, worst streaks, and whether your stop logic makes sense on past charts.
- Backtesting cannot tell you, your real fills, your real spreads, your hesitation, and your ability to follow management rules in live conditions.
- Forward testing can tell you, if you execute clean, if your rules fit your schedule, and which pairs trigger your mistakes.
- Forward testing cannot tell you, long-term expectancy fast. Small samples lie.
Use this workflow.
- Backtest one setup for 50 to 100 examples. Write the rules in plain language.
- Forward test for __ trades with fixed risk per trade: __%.
- Review every __ trades. Change one variable only.
- Do not increase size until you show rule compliance for two review blocks in a row.
Copy and fill: Risk per trade: __%. Max trades/day: __. Daily loss limit: __R. Weekly review: every __ trades. Pause trigger: -__R. Setup list: __. Management rules: BE at +__R, partial at +__R, target at __R.
Common forex risk management mistakes beginners make (and fixes)
Using arbitrary stop sizes and inconsistent position sizing
Many beginners pick a stop size based on comfort, not structure. Then they use the same lot size anyway. This breaks your risk cap.
Fix it. Set your stop based on your setup rule. Then calculate position size from that stop so you risk the same amount every time.
- Mistake: “I always use a 20 pip stop.”
- Fix: Stop goes where your trade idea is invalid. Size changes to keep risk fixed.
- Mistake: Bigger stop and same lot size.
- Fix: Bigger stop means smaller size. No exceptions.
- Mistake: You change risk per trade after a loss.
- Fix: Lock risk per trade for a review block. Change one variable only at review time.
If you do not size from your stop, you do not control risk. Use a position size calculator or a simple spreadsheet. Place the stop correctly first. If you need help with mechanics, use this guide on how to place a stop loss.
Adding to losing positions without a plan (and how to avoid martingale traps)
Averaging down feels like “improving your entry.” Most of the time, you just increase exposure while your premise weakens.
- Mistake: You add because price moved against you, not because your setup rules triggered a new entry.
- Fix: No adds unless your plan defines the add level, the new stop, and the final total risk.
- Mistake: You double size to “get back to even.”
- Fix: Ban martingale. Your max risk stays capped per trade and per day. If you hit your pause trigger, you stop.
Use a hard rule. If you add, the combined position must still respect your max risk. If you cannot calculate total risk in seconds, you do not add.
Risking more after wins: why it often leads to giving profits back
After a win, many traders increase size fast. They confuse confidence with edge. Volatility then resets them.
- Mistake: You increase risk after one or two wins.
- Fix: Increase size only after you show rule compliance for two review blocks in a row.
- Mistake: You “press” on marginal setups because you feel ahead.
- Fix: Your setup list is your gatekeeper. No setup, no trade.
- Mistake: You let a winning day turn into a red day.
- Fix: Use a daily loss limit and a pause trigger. Stop trading when you hit them, even if you feel sharp.
Profits do not change probabilities. Your process does. Keep risk stable. Let the sample size do the work.
Ignoring correlations: stacking USD exposure unknowingly
Beginners think multiple pairs means diversification. In FX, many pairs move together because they share the same currency.
If you take EURUSD, GBPUSD, and AUDUSD at the same time, you often stack the same USD risk. One USD move can hit all positions.
- Mistake: You treat each trade as independent.
- Fix: Track currency exposure. Count total risk per currency, not just per trade.
- Mistake: You open two USD pairs that express the same idea.
- Fix: Pick one best setup. If you must take two, cut size so combined exposure stays within your cap.
- Mistake: You ignore “risk-on” correlation, like AUDUSD and NZDUSD moving together.
- Fix: Group pairs into buckets. Limit one trade per bucket at a time.
Simple rule. If two trades likely win and lose together, treat them as one position for risk limits.
Trading too many pairs: simplifying to reduce decision fatigue
More pairs create more signals, more tabs, and more impulsive trades. Decision fatigue leads to rule breaks.
- Mistake: You scan 20 to 40 pairs and take anything that looks close.
- Fix: Trade a short list. Start with 3 to 6 pairs you can review fast.
- Mistake: You switch pairs after each loss.
- Fix: Keep the same pairs for a full review block. Then adjust.
- Mistake: You trade different behaviors with one set of rules.
- Fix: Match pairs to your setup. Remove the rest.
Less choice increases consistency. Consistency makes your stats usable.
Frequently Asked Questions
What is forex risk management?
Forex risk management is how you limit loss before you enter a trade. You set a stop loss, size the position, and cap leverage. Your goal is survival. You stay in the game long enough for your edge to play out.
How much should you risk per trade as a beginner?
Start with 0.25% to 1% of your account per trade. Use the same risk on every setup. Keep it small until you log at least 50 trades with stable execution. Increase only after your drawdowns stay controlled.
What is the simplest position sizing rule?
Pick a fixed percent risk. Measure your stop in pips. Then set lot size so a stop out equals that percent. If the stop needs to be wider, your position must be smaller. If you cannot size down, skip the trade.
Do you always need a stop loss?
Yes. No stop means one fast move can erase weeks of gains. Place the stop at a price level that proves your trade wrong, not at a money amount. Set it before entry and do not widen it.
Where should you place your stop loss and take profit?
Place the stop beyond the level that invalidates your setup. Place take profit where your plan says the edge ends. Keep both levels set before entry. Use a repeatable process, see set stop loss and take profit.
What risk to reward ratio should you use?
Do not force a fixed number. Use trades where your target makes sense on the chart and pays for your expected win rate. Many beginners start near 1:1 to 1:2. Track results and adjust from data.
How much leverage should you use?
Use the least leverage that lets you place your planned stop and still risk your fixed percent. High leverage does not increase edge. It increases error cost. If you feel pressure, your leverage is too high.
How do you avoid blowing up during news and volatility?
Reduce size or do not trade high impact releases. Widening stops without cutting size breaks your risk rule. Expect spreads to jump and stops to slip. If your plan cannot handle that, stay flat.
How many forex pairs should you trade as a beginner?
Trade 3 to 6 pairs. Learn their spread, volatility, and best sessions. Use one rule set per setup. Keep the same list for a full review block. More pairs means more variance and weaker stats.
How do you manage drawdowns?
Set a max daily and weekly loss limit. Stop when you hit it. Reduce risk after a losing streak, for example cut risk in half for the next 10 trades. Your goal is to prevent tilt and protect capital.
What is the biggest risk management mistake beginners make?
They change rules after each loss. That kills consistency and makes results meaningless. Keep risk fixed. Keep pairs limited. Review in blocks, not in emotions. Change one variable at a time and log the impact.
Conclusion
Risk management keeps you trading long enough to learn. Most beginners lose because leverage magnifies small mistakes. Many CFD brokers report that about 71% of retail accounts lose money. You cannot control the market. You can control your risk.
- Risk a small, fixed percent per trade, often 0.5% to 1%.
- Place the stop first, then size the position to match your risk.
- Cap leverage. If your stop needs to be wider, trade smaller, not bigger.
- Set a weekly loss limit. Stop trading when you hit it.
- Review results in blocks. Change one rule at a time and log it.
Final tip. Write your rules on one page. Follow them for the next 50 trades with no changes. Track risk, R multiple, win rate, and max drawdown. If you want to tighten exits and targets without guessing, use this guide on how to set take profit in forex.
-
How to Start Forex Trading Step by Step (Beginner Roadmap)
1 month ago -
Forex Order Types Explained: Market vs Limit vs Stop Orders
1 month ago -
Stop Loss vs Take Profit: Differences, Examples & Best Practices
1 month ago -
How to Set Stop Loss and Take Profit (Step-by-Step)
1 month ago -
How to Place a Forex Trade Step by Step (Your First Trade Explained)
1 month ago
-
- Market risk: volatility, trends, and range breaks
- Leverage and margin risk: margin calls, liquidation, and how brokers calculate margin
- Liquidity and execution risk: slippage, spread widening, and partial fills
- Gap and weekend risk: when stops may not fill at your price
- Counterparty and broker risk: regulation, segregation of funds, and platform outages
- Strategy risk: when a method stops working or was never statistically valid
-
- Using arbitrary stop sizes and inconsistent position sizing
- Adding to losing positions without a plan (and how to avoid martingale traps)
- Risking more after wins: why it often leads to giving profits back
- Ignoring correlations: stacking USD exposure unknowingly
- Trading too many pairs: simplifying to reduce decision fatigue
-
- What is forex risk management?
- How much should you risk per trade as a beginner?
- What is the simplest position sizing rule?
- Do you always need a stop loss?
- Where should you place your stop loss and take profit?
- What risk to reward ratio should you use?
- How much leverage should you use?
- How do you avoid blowing up during news and volatility?
- How many forex pairs should you trade as a beginner?
- How do you manage drawdowns?
- What is the biggest risk management mistake beginners make?
-
-
Forex Lot Size Calculator: How to Use It to Size Trades Correctly
1 month ago -
How to Calculate Position Size in Forex (Position Sizing Formula + Examples)
1 month ago -
Forex Leverage Explained: How It Works, Pros, Cons & Examples
1 month ago -
Margin vs Leverage in Forex: What’s the Difference?
1 month ago -
What Is Forex Trading? A Beginner’s Guide to How It Works
1 month ago
-
Forex Leverage Explained: How It Works, Pros, Cons & Examples
1 month ago -
Forex Market Hours & Trading Sessions Explained (Best Times to Trade)
1 month ago -
Is Forex Trading Legal in the United States? Rules, Regulators & What to Know
1 month ago -
What Is a Lot Size in Forex? Lot Types + Quick Examples
1 month ago -
Forex Trading Platforms Comparison: MetaTrader vs cTrader vs TradingView
1 month ago