How to Set Take Profit in Forex (Targets, Levels & Examples)

Take profit decides when you get paid. It also decides how often your wins cover your losses.
A take-profit (TP) order is an exit set in advance. Your broker closes the trade when price hits your target. You lock in gains without watching every tick.
This guide shows you how to set take-profit targets using clear rules, not guesses. You will learn how to pick TP levels from structure, swing highs and lows, and key support and resistance. You will learn how to size targets with risk to reward, ATR, and pip values. You will see worked examples for long and short trades, plus common mistakes that cut profit or increase missed exits.
For the other side of the trade, see how to place a stop loss in forex.
Key Takeaways
- In het kort: Set take profit from structure. Use swing highs and lows, plus clean support and resistance.
- In het kort: Pick targets before you enter. Your TP must fit your entry and stop loss, not the other way around.
- In het kort: Use risk to reward to size the move. If your stop is 30 pips and you want 2R, your TP sits 60 pips from entry.
- In het kort: Use ATR to avoid targets that sit inside normal noise. If price can swing 40 pips in a typical period, a 10 pip TP will often get hit randomly and cap upside.
- In het kort: Adjust for spread and execution. Place your TP where you can get filled, not where a line looks perfect.
- In het kort: Plan partial exits if you trade trends. Take some profit at the first level, then hold the rest for the next level with rules.
- In het kort: Do not move TP out of hope. Do not cut it early out of fear. Follow your levels and your management rules.
- In het kort: Track results. Log R gained per trade, win rate, and average excursion. Use the data to refine TP distance and scaling.
Strong take-profit planning starts with levels. Then you size the target with risk to reward and volatility. Keep it rule-based, and tie it to your risk plan, see risk management in forex.
What a Take-Profit Order Is (and What It Isn’t)
Definition and purpose in forex trading
A take-profit order, TP, is an instruction you place with your broker to close your trade when price reaches your target level.
It locks in gains if price hits that level. It also removes the need to watch every tick.
You set TP from your plan, not from hope. You tie it to a level on the chart, then check if the reward justifies your risk.
TP is not a prediction tool. It will not make price reach your target. It will only execute if price trades at your TP level.
Take-profit vs closing manually, control, discipline, execution
Manual exits give you control, but they also add discretion. Discretion often turns into early exits, late exits, or missed exits.
A TP order enforces your rules. It protects you from hesitation, overconfidence, and screen fatigue.
- Control: Manual closing lets you react to new information. TP locks the exit level in advance.
- Discipline: TP reduces impulse decisions, especially after fast moves.
- Execution: TP can fill when you are away. Manual closing cannot.
TP does not guarantee a perfect fill. In fast markets you can get slippage, gaps, or partial fills, depending on your broker and liquidity.
Take-profit vs stop-loss, complementary roles in a trade plan
Stop-loss defines where your idea fails. Take-profit defines where you get paid if your idea works.
You need both to make results measurable. Stop-loss sets R, your risk per trade. Take-profit sets the planned multiple of R.
- Stop-loss: Caps downside. Keeps one trade from wrecking your account.
- Take-profit: Standardizes upside. Converts a move into booked profit.
Do not treat TP as a safety net. Your stop-loss is the safety net. Your TP is a cash-out rule.
Common TP types
Different brokers label TP orders differently. The logic stays the same. You predefine the exit price and let the platform handle execution.
- Limit take-profit: Your position closes with a limit order at your TP price. You target price or better, but you can miss the fill in a fast move.
- Market-if-touched, MIT: When price touches your TP level, the platform sends a market order to close. You get a fill, but price can slip.
- OCO or bracket: You place TP and stop-loss together. One cancels the other when it fills. This keeps risk and exit logic linked, if your broker supports it.
If you need a refresher on how these orders work on-platform, read forex order types.
Why Setting a Take Profit Matters
Reducing emotional decision-making and overtrading
A take profit gives your trade a clear finish line. You decide the exit before price starts moving fast.
This cuts two common mistakes. You grab small profits too early, or you hold too long and turn a winner into a loser.
A fixed TP also reduces overtrading. When you plan one trade with one target, you stop chasing every small candle. You wait for your setup and you let the order do the work.
If you still mix up limit, stop, and market triggers, review forex order types.
Improving expectancy, linking targets to win rate and average win
Your take profit sets your average win. Your stop-loss sets your average loss. Together, they shape expectancy.
Use this simple model.
Expectancy (per trade) = (Win rate × Avg win) − (Loss rate × Avg loss)
- If your TP is too close, your win rate may rise, but your average win drops.
- If your TP is too far, your average win may rise, but your win rate often drops.
- You need a combination that stays positive after spread, commission, and slippage.
| Scenario | Win rate | Avg win | Avg loss | Expectancy |
|---|---|---|---|---|
| Small TP | 60% | 0.5R | 1.0R | -0.10R |
| Balanced TP | 45% | 1.5R | 1.0R | +0.125R |
| Far TP | 30% | 3.0R | 1.0R | +0.20R |
R means your risk per trade. If your stop is 20 pips, then 1R equals 20 pips. A 1.5R target equals 30 pips.
Preventing round-trip trades when profits evaporate
Forex can move fast, then reverse fast. If you do not set a take profit, you rely on real-time judgment to exit.
That fails most often when volatility spikes, spreads widen, or you step away from the screen.
A TP locks a planned payout. It stops the round-trip trade, where you watch unrealized profit return to break-even or flip to a loss.
- You reduce time spent managing exits.
- You standardize results, which makes your stats easier to trust.
- You avoid late exits caused by hesitation.
Aligning exits with your timeframe, scalp vs day trade vs swing
Your TP must fit your holding time. If you scalp, you need reachable targets and fast execution. If you swing trade, you need room for price to breathe.
- Scalping: Smaller TPs, higher sensitivity to spread and slippage, faster hit rate matters. You often target nearby liquidity, recent highs and lows, or a fixed R.
- Day trading: Mid-range TPs that match the session move. You often anchor targets to intraday support and resistance and average true range.
- Swing trading: Larger TPs based on structure, weekly levels, and trend legs. You accept lower win rates if your average win stays large versus your risk.
Match your TP distance to what price can realistically cover in your trade window. If you do not, you force exits that fight the market.
Pre-TP Checklist: Define the Trade Before Choosing the Target

Confirm the trade thesis and the invalidation point
Your take profit must fit the reason you entered.
- State your thesis in one line. Example, break and retest, range rotation, trend continuation, mean reversion.
- Mark the level that proves you wrong. If price trades there, the setup failed, not just your target.
- Use structure, not hope. Put invalidation beyond the swing high or low, beyond the range boundary, or beyond the pattern failure point.
- Do not pick TP before you know the “wrong” price. If you cannot define invalidation, skip the trade.
Place stop-loss first: hard stop vs mental stop
Set your stop-loss before you choose any target. Your stop defines the trade’s cost and keeps TP realistic.
- Hard stop. A stop order placed at your broker. Use it when you cannot monitor the trade, during news risk, or when volatility can spike.
- Mental stop. An exit rule you execute manually. Only use it if you can watch price and you follow rules with no exceptions.
- Size the trade off the stop distance. If your stop must be 35 pips and your risk per trade is fixed, your position size adjusts. Not the stop.
- Link TP to your stop. If your setup cannot reasonably reach at least 1R in your holding window, the trade has weak expectancy. Learn the math in risk-reward ratio.
Select the timeframe and holding period assumptions
Your timeframe sets how far price can travel and how long you can wait.
- Entry timeframe. The chart you use to trigger the trade. It should match how tight your stop is.
- Management timeframe. The chart you use to manage exits. A lower chart creates more noise and more early exits.
- Planned hold time. Intraday, multi-session, or multi-day. Write it down. Your TP must fit that window.
- Check distance vs typical movement. Use ATR or recent session ranges. If your TP needs 2x the pair’s normal move for that period, it is a low-probability target.
Check upcoming catalysts: economic calendar and session liquidity
News and liquidity change volatility. That changes both stop safety and TP reach.
- Scan the economic calendar first. Prioritize high-impact releases for currencies in your pair, plus central bank events.
- Decide how you handle the event. Hold through with a hard stop, reduce size, tighten exposure, or exit before the release.
- Match TP logic to the session. London and New York often deliver cleaner range expansion. Asia often ranges more, with smaller targets.
- Watch liquidity pockets. Session opens, overlaps, and fixings can move price fast. Spreads can widen in off-hours. That can tag stops and miss TPs by a few pips.
How to Set Take Profit in Forex: Step-by-Step Process
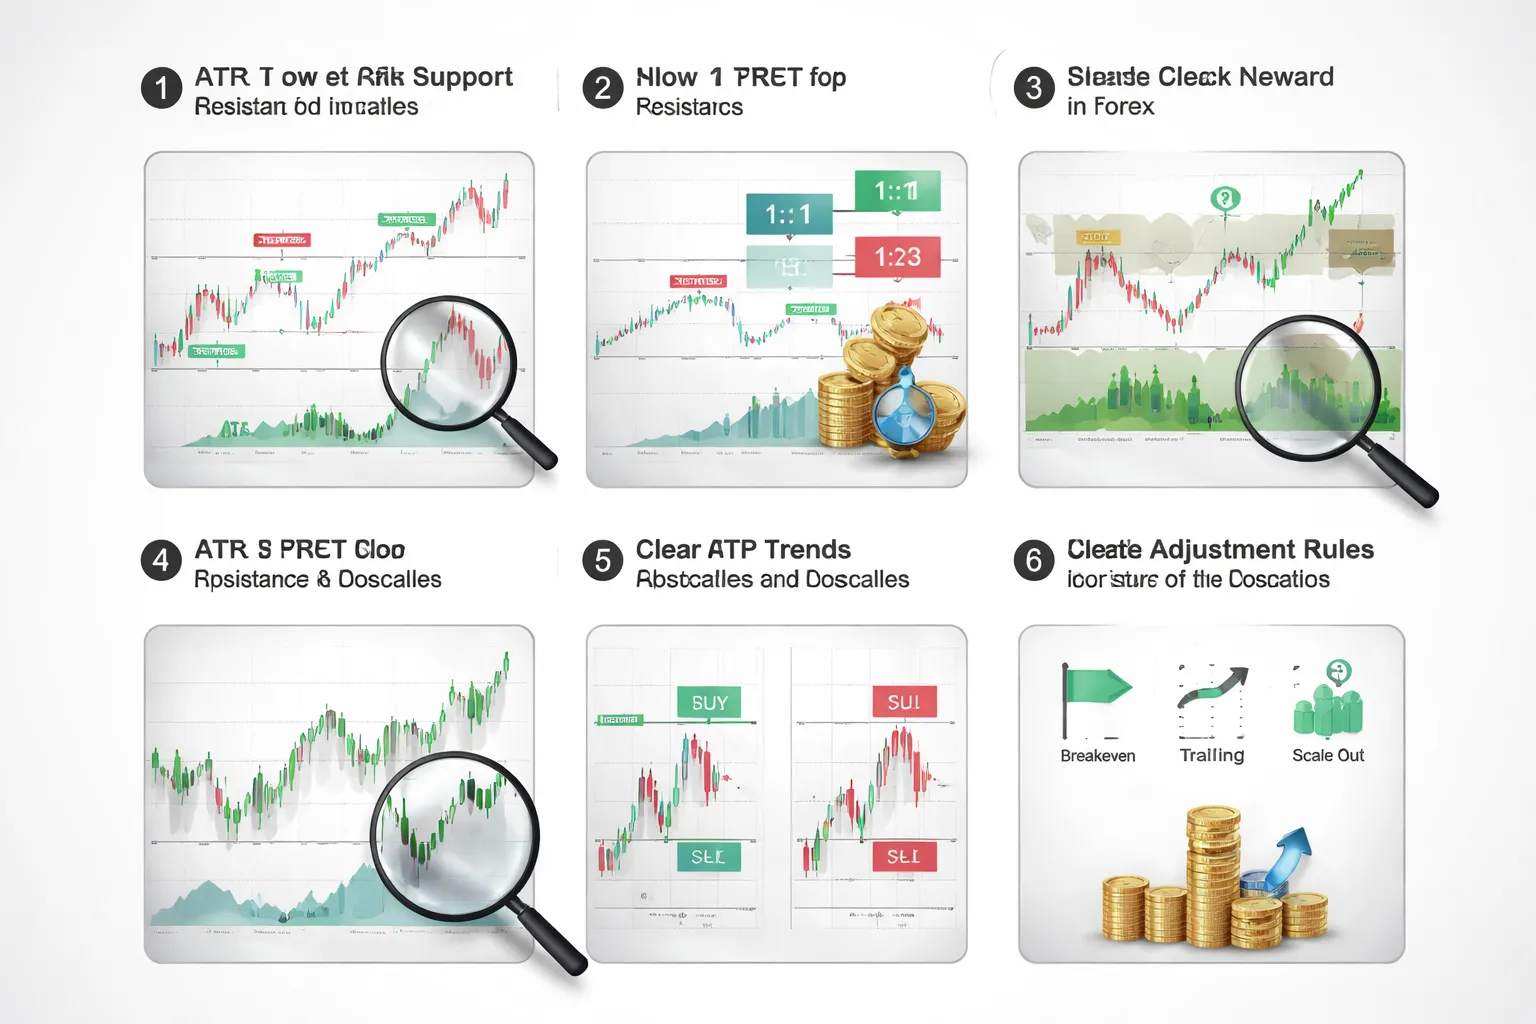
Step 1: Mark the nearest structure levels
Start with price structure. Your best first take profit sits where other traders already act.
- Support and resistance: Mark the closest obvious zones around your entry.
- Swing highs and swing lows: Use the most recent clean turning points, not minor noise.
- Round numbers: 1.2000, 1.2050, 150.00. These often attract orders and create stalls.
- Liquidity pools: Equal highs, equal lows, and recent stop clusters often get swept, then price reacts.
For a long trade, map the nearest resistance and the last swing high. For a short trade, map the nearest support and the last swing low. These are your first realistic TP candidates.
Step 2: Estimate volatility with ATR to avoid unrealistic targets
Structure gives you the location. ATR tells you if price can reach it in your timeframe.
- Set ATR to 14 periods on your trading timeframe.
- Use ATR as a distance guide, not as a signal.
- If your TP sits far beyond what price typically moves in your holding window, it will miss too often.
Example: If EURUSD ATR(14) on M15 is 8 pips and your TP is 30 pips away, you need close to 4x ATR. That target fits a longer hold, not a quick trade.
Step 3: Choose a risk–reward baseline based on your strategy stats
Pick a baseline R multiple before you fine-tune the exact price.
- 1:1 fits high win-rate, short-hold approaches.
- 1:2 fits many intraday breakout and pullback systems.
- 1:3 needs strong edge, patience, and fewer trades.
Use your own data. Your win rate must support your R multiple.
If you do not have stats yet, start at 1:1.5 or 1:2, then review 50 to 100 trades and adjust.
Step 4: Validate target quality
Do a final check before you place the order.
- Room to target: Price should have clean space between entry and TP. If it must grind through multiple levels, lower the TP.
- Obstacles: Mark nearby structure, session highs and lows, VWAP bands if you use them, and recent consolidation blocks.
- Market regime: Range markets pay smaller targets. Trend markets allow extension targets and partial holds.
- Spread and execution: Tight sessions support tighter TPs. Wider spreads need more distance.
Set TP before the level, not on it. Front-run by a small buffer so you get filled when price taps the zone.
Step 5: Place the TP order correctly on your platform
Put the TP in the correct direction and at the correct price precision.
- For a buy, your take profit must sit above entry.
- For a sell, your take profit must sit below entry.
- Check digits for your pair. Many majors quote 5 decimals, JPY pairs often quote 3.
- Confirm you set the TP on the position, not as a separate pending order, unless your platform requires it.
- Check your platform uses bid or ask for TP triggers. It matters on tight targets.
If your platform supports it, set TP and SL in the ticket before you click buy or sell. This reduces mistakes.
Step 6: Decide rules for adjustment before entry
Do not improvise after you are in the trade. Write simple rules you can repeat.
- Move to breakeven: Only after price clears a level and holds, or after a defined R milestone like +1R.
- Trail: Trail behind swing lows and highs, or a fixed ATR fraction. Avoid tight trails in choppy ranges.
- Scale out: Take partial profit at TP1, then hold the rest for TP2 at the next structure level.
- Time stop: Exit if price does not move within a set number of candles or before a scheduled high-impact release.
Keep the rules consistent with your trading style. If you scalp, use tighter time rules and smaller ATR-based targets. For a tighter execution framework, see our scalping forex strategy for beginners.
Best Take-Profit Methods (Targets You Can Reuse Across Strategies)
Support and Resistance Targeting (Previous Highs, Lows, Supply and Demand)
Use market structure first. It gives you repeatable targets and clear invalidation.
- Previous swing high or low: In an up move, set TP at the last swing high. In a down move, set TP at the last swing low.
- Fresh supply or demand zone: Target the first untouched zone ahead of price. Old zones get weaker after multiple hits.
- Break and retest levels: If price breaks a key level and holds, target the next structure level on the higher timeframe.
- Session highs and lows: Asia range high and low, London high and low, previous day high and low. These act as magnets.
Execution rule: Place TP a few pips before the level, not on it. Many exits cluster on exact highs and lows, so price often stalls before the line.
Risk Reward Targets (TP as a Multiple of Your Stop)
This method stays consistent across pairs and timeframes. You set TP based on your stop distance.
- Define your stop first: Your stop must sit beyond structure, not at an arbitrary pip count.
- Pick a fixed multiple: Common choices are 1R, 1.5R, 2R, 3R, where 1R equals your stop size.
- Use partials if needed: Take some profit at 1R, move stop to breakeven only if your plan allows it, then aim the rest at 2R or the next structure.
If you want a simple framework, set TP at 2R by default, then adjust only when a major structure level blocks the path. For a deeper breakdown, see our risk-reward ratio in trading guide.
ATR Based Targets (Volatility Bands for Realistic Exits)
ATR targets adapt to volatility. They prevent you from placing TPs that price rarely reaches.
- Measure ATR: Use ATR(14) on your trading timeframe.
- Set TP as a fraction or multiple: Common settings are 0.5x ATR, 1.0x ATR, 1.5x ATR from entry.
- Match it to your holding time: Scalp targets often sit near 0.3x to 0.8x ATR. Intraday swings often use 1x to 2x ATR.
Rule: Do not use ATR alone. Combine it with structure. If 1x ATR lands inside a strong supply zone, treat that as your ceiling.
Trend Following Exits (Trailing Stop vs Fixed TP)
Strong trends punish fixed targets. They reward exits that stay with the move.
- Fixed TP: Use it when the trend runs into clear higher timeframe resistance or when you trade time based sessions.
- Trailing stop: Use it when the trend shows clean higher highs and higher lows, or lower highs and lower lows.
Practical trailing options you can reuse:
- Structure trail: In a long, trail below the last higher low. In a short, trail above the last lower high.
- ATR trail: Trail at 1x to 2x ATR behind price. Wider trails reduce stop-outs but give back more open profit.
- Moving average trail: Exit on a close beyond a key MA, or trail beyond it with a buffer.
Rule: Pick one trailing method. Do not mix three trails in one trade. You will exit early and blame the market.
Range Trading Exits (Opposite Side of the Range)
Ranges create clear, repeatable targets.
- Define the range: Mark the range high and low on a higher timeframe, then refine on your entry timeframe.
- Buy near support, target resistance: Set TP just before the range high.
- Sell near resistance, target support: Set TP just before the range low.
- Use mid range targets: If the range is wide or choppy, take partial profit at the midpoint and hold the rest for the far side.
Rule: Do not aim for breakouts with a range TP plan. If you expect a breakout, switch to a trend plan with a trail.
Indicator Based Exits (Moving Averages, Channels, Volatility Envelopes)
Indicators can standardize exits. They can also lag. Use them as rules, not predictions.
| Tool | TP method | Pros | Cons |
|---|---|---|---|
| Moving averages | Take profit at a key MA on mean reversion trades, or trail behind the MA in trends. | Simple rules. Works well in smooth trends. | Whipsaws in ranges. Late exits in fast reversals. |
| Price channels | Target the opposite channel line, or take partials at the midline. | Clear targets. Fits range and trend pullbacks. | Channel choice changes results. Breakouts can invalidate the channel fast. |
| Volatility envelopes | Exit when price hits the outer band, or scale out across bands. | Adapts to volatility. Good for mean reversion. | Bands expand in trends, you can exit too late or never get a touch. |
Rule: Backtest your indicator exit on your exact timeframe and pair. Indicators behave differently across volatility regimes.
Order Flow and Liquidity Ideas (Pools, Round Numbers, Caution)
Liquidity targets work because many orders sit in obvious places.
- Equal highs and equal lows: These often hold stop clusters. Target just before the sweep zone if you want fills.
- Trendline stops: Clean trendlines attract breakout traders and stops. Sweeps often occur before reversals.
- Round numbers: 1.1000, 1.0900, 150.00. These attract profit taking and pending orders.
- Previous day high and low: Common draw targets for intraday flow.
Caution rule: Liquidity targets can cause sharp spikes and fast reversals. If you place TP exactly at the obvious level, you risk missing the fill. If you hold through the sweep, you risk giving back profit. Solve this with partial exits and a tight rule for the remainder.
How to Choose Take-Profit Levels on the Chart (Practical Rules)

Identify “clean air” before you pick a target
Your best take-profit sits where price can travel with few obstacles.
- Map the nearest barriers first. Mark the closest swing highs and lows, supply and demand zones, and prior session high and low.
- Measure the open space. If you see multiple minor pivots between your entry and your TP, expect stalls and partial reversals.
- Prefer the next clear level. One obvious level with empty space behind it often pays better than a closer target blocked by clutter.
- Avoid targets inside congestion. Ranges and chop absorb orders. Price tags many levels and then snaps back.
Use round numbers and psychological levels with intent
Round numbers pull orders. They also trigger fast profit taking.
- Major handles. Levels like 1.1000, 1.2500, 150.00 often act as magnets.
- Half and quarter levels. 1.1050, 1.1075 can matter on active pairs and lower timeframes.
- Do not treat them as standalone signals. Use them as target zones, then confirm with structure and volatility.
- Plan for the spike. Price often overshoots a round number, then reverses. Scale out into it.
Handle multiple resistance layers with two placements
When price faces stacked levels, you need a clear rule. Pick one of these and stick to it.
- Conservative TP. Place TP before the first major barrier. You trade for a higher hit rate and smaller givebacks.
- Aggressive TP. Place TP near the next barrier after a likely break. You trade for larger wins and lower hit rate.
- Split the order. Take partial profit at the first level, leave the rest for the next level. Move your stop based on your plan, not emotion.
Account for spread and execution, avoid “exact level” take profits
If your TP sits on the obvious line, you compete with the crowd.
- Front-run the level. For a long, set TP a few pips before resistance. For a short, set TP a few pips before support.
- Use the right quote side. Longs close on bid, shorts close on ask. Your platform may display one side by default.
- Widen the buffer when spread widens. News, rollovers, and low liquidity sessions need larger offsets.
| Market condition | TP placement rule |
|---|---|
| Tight spread, liquid session | TP 10% to 25% of spread before the level |
| Normal spread | TP 0.25x to 0.75x spread before the level |
| Wide spread or fast market | TP 1x to 2x spread before the level, or scale out earlier |
Use confluence, structure plus volatility plus trend filters
One line on the chart is weak. A stacked reason is stronger.
- Structure. Target the next swing high or low, range boundary, or prior day high or low.
- Volatility. Match target distance to current movement. In quiet markets, closer targets fill more often. In active markets, extend targets to the next zone.
- Trend filter. In an uptrend, aim for highs and liquidity above. In a downtrend, aim for lows and liquidity below. Avoid placing a far TP straight into the dominant pullback area.
- Moving average alignment. If price holds above key MAs in an uptrend, you can justify a wider TP. If price chops through them, tighten targets. Use a simple MA filter, see moving averages in Forex.
- Confluence rule. Only set an aggressive TP when at least two factors agree, structure and trend, or structure and volatility.
Keep your process consistent. Mark levels, find clean air, pick conservative or aggressive, then offset for spread. Use partial exits when the target sits at a liquidity magnet.
Take Profit Examples (Realistic Walkthroughs)
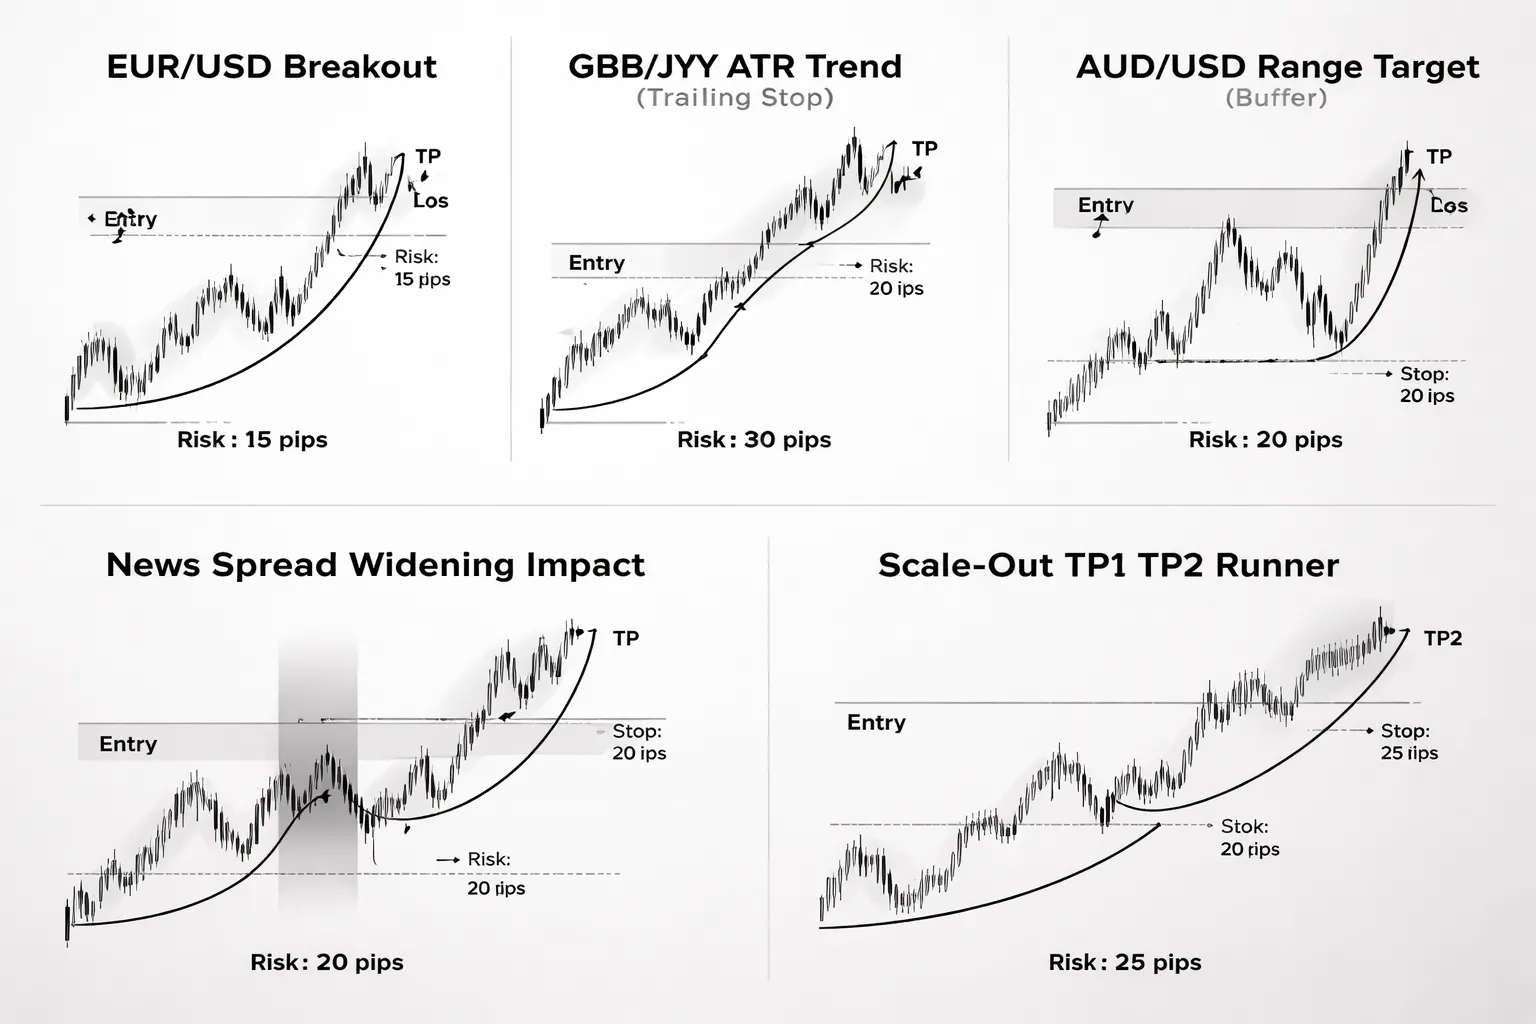
Example 1: EUR/USD breakout, structure TP, 1:2 R:R
Setup: You buy a clean break above a range high on EUR/USD.
- Entry: Breakout close above 1.0850, then a small pullback holds above 1.0850.
- Stop loss: Below the broken level and the pullback low at 1.0830, risk is 20 pips.
- Baseline TP for 1:2: 40 pips from entry. If entry is 1.0855, TP sits at 1.0895.
- Structure check: Next prior swing high sits at 1.0890. That is a liquidity magnet.
- Placement: You place TP a few pips before it, at 1.0888, then add spread buffer if needed.
Result logic: You aimed for 1:2, but you respected the nearest obvious sell zone. You took the conservative fill instead of hoping it tags the exact high.
Example 2: GBP/JPY trend trade, ATR target with a trailing component
Setup: You trade with the trend on GBP/JPY after a pullback into support.
- Entry: 186.20 after price respects a higher low.
- ATR(14): 120 pips (1.20).
- Stop loss: 1 x ATR below entry at 185.00, risk is 120 pips.
- TP1: 1 x ATR up at 187.40. You take partial profit there.
- TP2 idea: 2 x ATR up at 188.60, but you do not hard set it if the trend runs.
- Trailing rule: After TP1 fills, you trail the stop 1 x ATR behind price, recalculated each day or each new swing low.
Result logic: ATR gives you a target that matches current volatility. The trail keeps you in the move if momentum expands.
Example 3: AUD/USD range trade, target near prior swing with a buffer
Setup: AUD/USD sits in a clear box. You fade the range edges.
- Range: Support at 0.6550, resistance at 0.6610.
- Entry: Buy at 0.6555 after a rejection wick at support.
- Stop loss: Below support at 0.6535, risk is 20 pips.
- Target: Prior swing high and range top at 0.6610.
- Buffer: You set TP at 0.6606 to front-run the level by 4 pips, then adjust for spread if your broker quotes wide.
Result logic: Range tops and bottoms attract limit orders. You get paid before the crowd. You avoid the common miss where price tags the level and reverses without filling you.
Example 4: News scenario, widening spreads, why small TPs can fail
Setup: You trade during a high impact release. Spreads widen, price gaps, fills slip.
- Normal conditions: EUR/USD spread 0.8 pips. You scalp for 6 pips.
- News conditions: Spread widens to 4.0 pips. Slippage adds 1 to 3 pips.
- What breaks: A 6 pip TP can turn into 2 pips net, or it never fills because the bid or ask does not print at your level.
- Fix: You either skip the trade, or you increase target distance so the spread has less impact, or you switch to a wider structure based TP with a smaller position size.
- Rule: If spread is more than 20 to 30% of your TP distance, the target is too tight for that moment.
Result logic: Tight TPs assume stable execution. News destroys that assumption. You need more room or no trade.
Example 5: Scaling out, TP1 at 1R, TP2 at resistance, runner with trailing stop
Setup: You take a directional trade into a known resistance level and expect a reaction.
- Entry: 1.2500.
- Stop loss: 1.2460, risk is 40 pips. That is 1R.
- TP1: +1R at 1.2540. You close 40 to 60% of the position.
- TP2: Resistance at 1.2580. You place TP a few pips before it, at 1.2576, and close another 30 to 50%.
- Runner: You leave the rest open. After TP1, you move stop to breakeven or reduce risk. Then you trail under swing lows or use a simple MA filter.
Result logic: TP1 pays you fast. TP2 pays you at structure. The runner captures trend extension. This keeps your risk-reward ratio strong without forcing one perfect exit.
Advanced Targeting: Multiple Take Profits, Partial Closes, and Trade Management
When to Use TP1, TP2, TP3 vs a Single Fixed Target
Use multiple take profits when price can travel in stages and you can map clear structure levels. Use a single fixed target when the setup has one obvious payoff zone and low follow-through risk.
- Use TP1, TP2, TP3 when: the trend is strong, the pair has room to run, and you can mark clean swing highs and lows. You want to get paid early, then hold a smaller size for extension.
- Use a single TP when: you trade mean reversion, range bounces, news spikes, or tight sessions where price often snaps back. You want one decision, one exit.
- Use two targets when: you see one nearby barrier and one higher timeframe level beyond it. TP1 handles the first barrier, TP2 targets the higher timeframe level.
- Use three targets when: you trade trend continuation. TP1 sits before the first obstacle, TP2 sits at the next major structure, TP3 is a runner with a trailing stop.
Partial Close Mechanics, Position Sizing, and Platform Constraints
Partial closes only work if your broker and platform support reducing position size in increments. Your plan must match the minimum trade size and step size.
- Start with a clean split: 50% at TP1, 30% at TP2, 20% runner. Adjust if your platform forces rounded sizes.
- Respect lot steps: many brokers use 0.01 lots minimum and 0.01 steps. If you enter 0.03 lots, you cannot close 50% exactly. You close 0.01 or 0.02.
- Use multiple orders if needed: instead of one 0.30 lot trade, open three orders, 0.15, 0.09, 0.06. Each order gets its own TP. This avoids partial-close limits.
- Keep risk fixed at entry: size the total position so the initial stop-loss equals your planned risk, for example 1R. Do not increase total size because you plan to scale out.
- Know your execution: partial closes can slip in fast markets. Place targets at realistic liquidity zones, not exact highs.
| Entry method | Best for | Common issue |
|---|---|---|
| One position, partial closes | Simple management, one entry price | Lot step limits, partial fill risk |
| Multiple positions, fixed TPs | Clean TP1, TP2, runner logic | More orders, more management |
Moving Stop-Loss to Breakeven, Benefits and Pitfalls
Breakeven protects your account. It also cuts winners if you move it too early.
- Best time to move to breakeven: after TP1 hits, or after price closes beyond a key level and holds. You want proof, not a spike.
- Use a buffer: breakeven plus spread plus a few pips reduces stop-outs. Exact breakeven often gets tagged by normal noise.
- Match breakeven to market structure: if the last swing low sits below your entry, moving to entry may put your stop inside the pullback zone.
- Do not force breakeven in ranges: ranges retest. You will get stopped and watch price move to your target without you.
Rule you can test. Move to breakeven after price reaches at least 1R and closes in your favor, or after TP1 fills. If your backtest shows worse results, delay the move.
Trailing Stops, ATR Trail and Swing Trail
Trailing stops outperform fixed TP when the market trends and extends beyond your planned levels. They underperform in choppy price action.
- ATR trail: set stop at a multiple of ATR below price for buys, above price for sells. Example: 2 x ATR(14). This adapts to volatility. It keeps you in during expansion and cuts you during contraction.
- Swing trail: move stop under the last higher low in an uptrend, or above the last lower high in a downtrend. This follows structure. It fits clean trending markets.
- When ATR trail wins: volatile trends, breakouts, news driven continuation. Fixed TP often caps gains too early.
- When swing trail wins: steady directional moves with clear pullbacks. You avoid getting stopped by random ATR spikes.
- When both fail: tight ranges and overlapping candles. Use fixed TP near the range edge instead.
If you struggle to mark swing points, tighten your chart process and use consistent rules. You can improve this skill with trendlines and basic structure mapping.
Time-Based Exits, Close if Price Does Not Move in X Candles
Time stops protect you from dead trades that tie up margin and attention. They also reduce drawdown from slow failures.
- Set the clock based on your timeframe: on M15, use 12 to 24 candles. On H1, use 6 to 12 candles. On H4, use 3 to 6 candles.
- Define what “does not move” means: price fails to reach 0.5R, or fails to close beyond the trigger level, within X candles.
- Exit rules: close full position, or cut the runner and keep the core. Do not widen the stop to “give it room”.
- Best use case: breakout trades and momentum entries. If momentum does not show fast, your edge fades.
Common Mistakes When Setting Take Profit (and How to Fix Them)
Setting arbitrary pip targets unrelated to volatility or structure
If you pick “30 pips” or “50 pips” because it sounds clean, your TP stops matching the market. Some days 30 pips is noise. Other days it is a stretch.
- Fix: Anchor your TP to structure first, then validate it with volatility.
- Use: nearest swing high or low, supply or demand zone, prior day high or low, or a clean support or resistance level. Then check ATR or recent candle ranges so your target is reachable inside your typical holding time.
- Rule: if your TP sits inside the pair’s average daily movement already used up, reduce expectations or skip the trade.
Choosing a TP that sits before the real level, or exactly on it, without buffer logic
Price often reacts at obvious levels. If your TP sits right on the level, you compete with everyone. If it sits too far before the level, you cut winners for no reason.
- Fix: pick one buffer method and keep it consistent.
- Option A: set TP slightly before the level to improve fill odds when you expect a sharp reaction.
- Option B: set TP beyond the level when you expect a break and continuation, then manage with a trailing stop or partials.
- Practical buffer: a fraction of ATR, or a fixed number of ticks that matches the pair’s spread and typical noise.
If you struggle to map levels cleanly, review support and resistance and standardize what counts as a valid level.
Ignoring market regime, trending vs ranging behavior
Ranges reward mean reversion. Trends reward holding. One TP style does not fit both.
- Fix for ranges: target the opposite side of the range, or the midline if the range is tight. Take profits faster. Avoid “home run” targets.
- Fix for trends: use multiple targets or a runner. Place the first TP at the next structure level, then trail the rest behind swings or a moving average.
- Quick filter: if recent swings overlap and breakouts fail, treat it as a range. If swings expand and pullbacks stay shallow, treat it as a trend.
Over-optimizing R:R and lowering win rate unintentionally
Chasing a perfect 3R or 5R target often forces your TP into low-probability space. Your win rate drops. Your equity curve gets rough.
- Fix: let the chart pick the target, then accept the R:R it gives you.
- Process: set stop based on invalidation, set TP at the next meaningful level, then check if the trade still meets your minimum edge.
- Minimum standard: define a floor, such as 1.5R. If structure only offers 0.8R, pass or change the setup.
- Track: log R multiple and win rate by setup. Optimize the setup, not the single trade.
Constantly moving the TP farther away (greed) or closer (fear)
Moving TP breaks your plan. You either turn good trades into missed exits, or you clip winners before the move finishes.
- Fix: write a TP adjustment rule before you enter.
- Only move TP farther when the market prints new structure in your favor and volatility expands, and you also tighten risk on the position.
- Only move TP closer when your exit condition triggers, such as momentum fading within your time rule, or price failing to close beyond the trigger level.
- Best practice: use partials. Take a first TP at a logical level, leave a runner with a trailing stop. This reduces emotional edits.
Not factoring transaction costs, spread, commission, and slippage
Costs hit every trade. They matter most when you target small moves or trade during volatile sessions.
- Fix: build costs into both your stop distance and your TP.
- Spread: if spread widens, your effective entry and exit shift. Tight targets stop working.
- Commission: subtract it from your expected R. A “1R” plan can turn into 0.85R after costs.
- Slippage: assume worse fills around news, illiquid hours, and fast breakouts. Use limit orders for TP when possible, and avoid targets that require perfect fills.
- Rule: if estimated total costs exceed 10% to 15% of your planned profit, skip the trade or widen the target with a better setup.
Pros and Cons of Using Take-Profit Orders in Forex
Key Advantages of Take-Profit Orders
- Automation. You do not need to watch the chart to exit. Your broker can close the trade when price hits your level.
- Discipline. You lock in a plan before emotions show up. You reduce the odds of turning a winner into a loser.
- Consistent execution. You can standardize exits across many trades. That makes your results easier to track, review, and improve.
- Cleaner risk control with SL. A fixed TP pairs well with a fixed stop-loss. You know your planned R before you enter.
Key Disadvantages of Take-Profit Orders
- Capped upside. A fixed TP limits your best trades. Strong trends can run far past your target.
- Premature exits in trends. Price often tags common levels, then continues. You can exit right before the main move.
- TP placement errors cost money. If you set targets at obvious levels with no buffer, spread and quick spikes can fill you, then price reverses.
- False sense of precision. Markets do not respect exact numbers. A tight TP can depend on perfect fills, which you rarely get in fast conditions.
Fixed Take-Profit vs Trailing, Use the Right Tool
- Use a fixed TP when: you trade ranges, you trade mean reversion, you target a specific level (prior high, support or resistance, measured move), or you have a small window where the setup works.
- Use a trailing approach when: you trade breakouts, you trade trends, volatility expands, or your edge comes from rare large winners.
- Practical hybrid: take partial profit at a fixed level, then trail the rest. This reduces regret and keeps exposure to the bigger move.
- Validation step: backtest both exit styles on your pair and timeframe. Do not guess. Use how to backtest a Forex strategy to confirm what improves expectancy.
Risk Considerations You Must Plan For
- Gaps. Weekends and major news can gap price. Your TP may fill worse than expected, or it may skip entirely and fill at the next available price.
- Volatility spikes. Fast moves can hit your TP and reverse in seconds. If you rely on a single tight level, you can exit during noise instead of structure.
- Partial fills (broker-specific). Some brokers can fill your TP in pieces, especially in thin liquidity or larger sizes. That changes your average exit price and your real R.
- Order type matters. A TP usually acts like a limit exit. You may avoid negative slippage, but you can miss the fill if price touches briefly and liquidity is thin.
- Platform rules vary. Some brokers treat TP as an attached order on their server, others require the platform to stay connected, especially with certain account types. Confirm how your broker handles it.
Risk Management Foundations That Make Your TP Work
Linking TP to position size
Your TP only matters if your loss stays fixed when you are wrong. That comes from matching your stop distance and your lot size.
Set risk first. Use a fixed percent or fixed dollar amount per trade. Then size your position from your stop loss distance. Your TP becomes the profit side of the same plan.
- Step 1: Choose account risk per trade, for example 0.5% to 2%.
- Step 2: Place the stop where your trade idea fails, not where it feels comfortable. Measure the distance in pips.
- Step 3: Calculate lot size so the stop equals your planned risk.
- Step 4: Set TP from your method, then check the implied R:R. If it is too low, skip the trade or change the setup.
If you change your stop after entry but keep the same lot size, you change your risk. If you scale out without a plan, you change your average R. Keep exits and sizing tied together.
For a clean foundation, align your stop and TP logic. Use the same structure for both, see stop loss vs take profit.
Minimum viable R:R and expectancy
R is your risk per trade. If your stop is 50 pips, then 1R equals 50 pips. A 2R TP equals 100 pips.
R:R alone does not make you profitable. Expectancy does.
Expectancy (in R) = Win rate × Avg win (R) − Loss rate × Avg loss (R)
| Win rate | Avg win | Avg loss | Expectancy |
|---|---|---|---|
| 40% | 2.0R | 1.0R | 0.40×2.0 − 0.60×1.0 = 0.20R |
| 55% | 1.2R | 1.0R | 0.55×1.2 − 0.45×1.0 = 0.21R |
| 30% | 3.0R | 1.0R | 0.30×3.0 − 0.70×1.0 = 0.20R |
Use this to set a minimum viable TP. If your method wins 35% of the time, you need larger winners. If it wins 60%, you can use tighter targets. Measure your numbers, then pick TP rules that keep expectancy positive after spread and slippage.
Backtesting TP rules
Backtest your TP as a rule, not as a guess you change trade by trade.
- Win rate: How often TP hits before SL.
- Average win (R): Your mean R on winners, after costs.
- Average loss (R): Your mean R on losers, including full stops and partial exits.
- Expectancy (R): Your edge per trade.
- Profit factor: Gross profit divided by gross loss. Useful, but do not treat it as the goal.
- Max drawdown: Peak to trough equity decline. This tells you if your TP is too ambitious for your win rate.
- Longest losing streak: Sets realistic expectations for your TP and helps you size risk.
Test fixed R targets first, like 1R, 1.5R, 2R. Then test structure-based exits, like prior swing high, daily range, or next supply zone. Keep the entry and stop rules unchanged, or you will mix effects and learn nothing.
Journaling exits
Backtests give you a baseline. Journals tell you how your TP performs in live conditions.
- Planned TP: Price, pips, and R.
- Actual exit: Price, pips, and R. Include partials.
- Reason for exit: TP hit, manual exit, time exit, news, spread spike, platform issue.
- MAE and MFE: Max adverse and max favorable excursion in pips and R. This shows if your TP sits too close or too far.
- Screenshot at entry and exit: Same zoom level. Mark TP and SL.
After 30 to 50 trades, sort by setup type and session. Compare planned R to realized R. If you often exit early at 0.8R when the plan says 2R, your TP rule may be fine, but your execution is not. If MFE rarely reaches 2R, your TP rule is too far for that setup.
Platform Notes: How Take Profit Orders Are Placed on Popular Forex Platforms
MT4 and MT5: Set TP at Entry, Then Modify
You can place a take profit when you open the trade, or add it after entry.
- At entry: In the Order window, set Volume, Stop Loss, and Take Profit. Then place a Market order or a Pending order.
- After entry: Right-click the open position or pending order, choose Modify or Delete Order, then type your TP price and confirm.
- Use price, not pips: MT4 and MT5 require an exact TP price level. Convert your plan from pips and R into a price before you click.
- Check trade direction: For a buy, TP must sit above entry. For a sell, TP must sit below entry.
- Lock the right order: If you scale in, modify the correct ticket. Do not change a different position by mistake.
cTrader and TradingView Brokers: Brackets and OCO Behavior
Many brokers on cTrader and TradingView support bracket orders. You place SL and TP together around your entry. The platform then links them.
- Bracket order: You set entry, SL, and TP in one ticket. The platform places the exit orders as soon as your entry fills.
- OCO logic: SL and TP act as one-cancels-the-other. If TP fills, the SL cancels. If SL fills, the TP cancels.
- Partial exits: If you take partial profit, your remaining TP and SL may not resize the way you expect. Verify remaining position size and attached orders after the fill.
- Reduce-only rules: Some brokers enforce reduce-only behavior on exits. This helps prevent an exit order from flipping you into a new position.
- Server-side vs platform-side: Some platforms show the bracket, but the broker holds the orders. Others simulate until filled. Treat every TP as a broker-side order only after you confirm it appears in the trade list.
Mobile Trading Apps: Avoid Entry Errors and Price Precision Mistakes
Most TP mistakes happen on mobile. Small screens hide key fields.
- Use exact price: Mobile tickets often default to a rounded price. Check the last digit. JPY pairs and metals use different decimals.
- Confirm buy or sell: Mobile buttons sit close together. One wrong tap flips your direction, and your TP ends up on the wrong side.
- Do not rush the ticket: Set lot size first, then SL, then TP. Many apps reset fields when you change volume.
- Check the distance: If the broker rejects your TP, you may sit inside the minimum distance or freeze level. The app may show a generic error.
- Recheck after submission: Open the position details and confirm TP exists, correct price, correct size, and correct symbol.
Broker Differences That Change TP Execution
Your platform matters less than your broker rules. These three settings cause most TP issues.
- Minimum distance: The broker requires TP to sit at least X points away from current price. Fast markets can make a valid TP invalid in seconds.
- Freeze level: The broker blocks modifications near market price. When price gets close to your TP, you may not be able to move it.
- Requotes and execution model: Some brokers requote market orders. Others use market execution with slippage. A TP fill can slip on gaps or news.
| Issue | What you see | What to do |
|---|---|---|
| Min distance violation | TP rejected or auto-adjusted | Move TP further away, or place the trade first, then set TP once spread normalizes |
| Freeze level | You cannot modify TP near price | Plan your TP before entry, avoid late edits in fast conditions |
| Requotes or slippage | Entry differs, TP ends up mis-sized in pips | Recalculate TP from the actual fill price, then modify the order |
If you want the full framework for pairing exits, see stop loss vs take profit for execution rules and examples.
FAQ
What is a take profit order in forex?
A take profit (TP) is an order that closes your trade when price hits your chosen level. It locks in profit without you watching the chart. Your broker executes it as a market order once the TP price triggers.
How do you choose a take profit level?
Set TP at a level the market may reach. Use recent swing highs or lows, support or resistance, ATR-based distance, or a fixed risk to reward ratio. Align TP with your stop loss and the current spread.
How do you calculate take profit in pips?
Find your entry price. Choose your target price. Subtract entry from target, then convert the difference to pips for that pair. Example, EURUSD entry 1.1000 and TP 1.1050 equals 50 pips.
What risk to reward should you use for take profit?
Start with 1:1 to 1:2 if you trade short-term. Use 1:2 to 1:3 if you trade swings. Do not force high reward ratios on low volatility pairs. Your win rate must support the ratio.
Should you set take profit before you enter?
Yes. You avoid freeze levels and late edits in fast markets. You also reduce impulsive exits. Place TP with your entry and stop loss as one plan. Update only if price structure changes.
Can take profit fail to execute?
Yes. Fast moves can cause slippage, gaps, or requotes on some execution models. Your TP may fill worse than the set price. Use liquid sessions, avoid news spikes, and size trades for realistic fills.
Is it better to use one TP or multiple targets?
Use one TP for simple systems. Use multiple targets if you scale out and trail the rest. Example, take 50% at 1R, move stop to breakeven, then target 2R. Keep rules fixed.
Should you move take profit while in the trade?
Move TP only for a rule-based reason. Examples, new resistance forms, volatility drops, or you switch to a trailing exit. Do not move TP farther away to avoid taking profit. That breaks expectancy.
How does spread affect take profit?
Spread reduces your net profit and changes where price must trade to hit TP. On buys, the bid must reach your TP. On sells, the ask must reach your TP. Wider spread makes tight targets harder to hit.
What is the best way to set TP for beginners?
Use fixed risk to reward first. Pick a stop that matches structure, then set TP at 1.5R or 2R. Track results for at least 50 trades. Review your rules in your forex risk management process.
Conclusion
Your take profit does one job, it turns a good trade into booked profit. Set it with a rule, not a feeling.
- Start with structure. Put your stop where the trade idea breaks, then measure your risk in pips.
- Set a fixed target first. Use 1.5R or 2R until you have enough data to adjust.
- Respect levels. Place TP before major support or resistance, not on it.
- Match TP to volatility. If the pair moves 40 pips on average, a 15 pip target will depend on perfect timing.
- Account for spread. On buys the bid must hit TP. On sells the ask must hit TP. Tight targets fail more when spread widens.
Final tip, write one TP rule, follow it for 50 trades, then change only one variable at a time. If you need cleaner targets, tighten your level work with this trendline guide.
-
How to Start Forex Trading Step by Step (Beginner Roadmap)
1 month ago -
Forex Order Types Explained: Market vs Limit vs Stop Orders
1 month ago -
Stop Loss vs Take Profit: Differences, Examples & Best Practices
1 month ago -
How to Set Stop Loss and Take Profit (Step-by-Step)
1 month ago -
How to Place a Forex Trade Step by Step (Your First Trade Explained)
1 month ago
-
-
- Step 1: Mark the nearest structure levels
- Step 2: Estimate volatility with ATR to avoid unrealistic targets
- Step 3: Choose a risk–reward baseline based on your strategy stats
- Step 4: Validate target quality
- Step 5: Place the TP order correctly on your platform
- Step 6: Decide rules for adjustment before entry
-
- Support and Resistance Targeting (Previous Highs, Lows, Supply and Demand)
- Risk Reward Targets (TP as a Multiple of Your Stop)
- ATR Based Targets (Volatility Bands for Realistic Exits)
- Trend Following Exits (Trailing Stop vs Fixed TP)
- Range Trading Exits (Opposite Side of the Range)
- Indicator Based Exits (Moving Averages, Channels, Volatility Envelopes)
- Order Flow and Liquidity Ideas (Pools, Round Numbers, Caution)
-
- Example 1: EUR/USD breakout, structure TP, 1:2 R:R
- Example 2: GBP/JPY trend trade, ATR target with a trailing component
- Example 3: AUD/USD range trade, target near prior swing with a buffer
- Example 4: News scenario, widening spreads, why small TPs can fail
- Example 5: Scaling out, TP1 at 1R, TP2 at resistance, runner with trailing stop
-
- Setting arbitrary pip targets unrelated to volatility or structure
- Choosing a TP that sits before the real level, or exactly on it, without buffer logic
- Ignoring market regime, trending vs ranging behavior
- Over-optimizing R:R and lowering win rate unintentionally
- Constantly moving the TP farther away (greed) or closer (fear)
- Not factoring transaction costs, spread, commission, and slippage
-
- What is a take profit order in forex?
- How do you choose a take profit level?
- How do you calculate take profit in pips?
- What risk to reward should you use for take profit?
- Should you set take profit before you enter?
- Can take profit fail to execute?
- Is it better to use one TP or multiple targets?
- Should you move take profit while in the trade?
- How does spread affect take profit?
- What is the best way to set TP for beginners?
-
-
-
- Step 1: Mark the nearest structure levels
- Step 2: Estimate volatility with ATR to avoid unrealistic targets
- Step 3: Choose a risk–reward baseline based on your strategy stats
- Step 4: Validate target quality
- Step 5: Place the TP order correctly on your platform
- Step 6: Decide rules for adjustment before entry
-
- Support and Resistance Targeting (Previous Highs, Lows, Supply and Demand)
- Risk Reward Targets (TP as a Multiple of Your Stop)
- ATR Based Targets (Volatility Bands for Realistic Exits)
- Trend Following Exits (Trailing Stop vs Fixed TP)
- Range Trading Exits (Opposite Side of the Range)
- Indicator Based Exits (Moving Averages, Channels, Volatility Envelopes)
- Order Flow and Liquidity Ideas (Pools, Round Numbers, Caution)
-
- Example 1: EUR/USD breakout, structure TP, 1:2 R:R
- Example 2: GBP/JPY trend trade, ATR target with a trailing component
- Example 3: AUD/USD range trade, target near prior swing with a buffer
- Example 4: News scenario, widening spreads, why small TPs can fail
- Example 5: Scaling out, TP1 at 1R, TP2 at resistance, runner with trailing stop
-
- Setting arbitrary pip targets unrelated to volatility or structure
- Choosing a TP that sits before the real level, or exactly on it, without buffer logic
- Ignoring market regime, trending vs ranging behavior
- Over-optimizing R:R and lowering win rate unintentionally
- Constantly moving the TP farther away (greed) or closer (fear)
- Not factoring transaction costs, spread, commission, and slippage
-
- What is a take profit order in forex?
- How do you choose a take profit level?
- How do you calculate take profit in pips?
- What risk to reward should you use for take profit?
- Should you set take profit before you enter?
- Can take profit fail to execute?
- Is it better to use one TP or multiple targets?
- Should you move take profit while in the trade?
- How does spread affect take profit?
- What is the best way to set TP for beginners?
-
-
Forex Lot Size Calculator: How to Use It to Size Trades Correctly
1 month ago -
How to Calculate Position Size in Forex (Position Sizing Formula + Examples)
1 month ago -
Forex Leverage Explained: How It Works, Pros, Cons & Examples
1 month ago -
Margin vs Leverage in Forex: What’s the Difference?
1 month ago -
What Is Forex Trading? A Beginner’s Guide to How It Works
1 month ago
-
Forex Leverage Explained: How It Works, Pros, Cons & Examples
1 month ago -
Forex Market Hours & Trading Sessions Explained (Best Times to Trade)
1 month ago -
Is Forex Trading Legal in the United States? Rules, Regulators & What to Know
1 month ago -
Forex Trading Platforms Comparison: MetaTrader vs cTrader vs TradingView
1 month ago -
How to Calculate Position Size in Forex (Position Sizing Formula + Examples)
1 month ago