Day Trading Forex Strategy for Beginners (A Practical Starter System)
Day trading forex means opening and closing currency trades in the same day. You aim to capture small price moves, while you control risk with strict rules. This guide gives you a starter system you can follow from day one.
You will learn:
- What to trade: beginner-friendly currency pairs and the sessions that move them.
- When to trade: a simple daily routine, plus the few market conditions to avoid.
- How to enter: one clear setup with exact triggers and a repeatable checklist.
- How to exit: stop loss and take profit placement, plus position sizing.
- How to stay consistent: basic tracking and rules that cut overtrading.
You will also use a simple risk-reward ratio rule to keep each trade measured.
Key Takeaways
Key Takeaways
- In het kort: Trade one clean setup, at set hours, with fixed risk, and a written checklist.
- In het kort: Use a hard stop loss on every trade, placed before you enter.
- In het kort: Keep risk per trade small and consistent, then size your position to match the stop distance.
- In het kort: Use a simple risk-reward rule, do not take trades that fail it.
- In het kort: Avoid low-liquidity periods and high-impact news windows, they raise spread and slippage.
- In het kort: Track every trade, then cut the setups and times that lose you money.
You need a repeatable process more than a “smart” idea. Pick one pair. Pick fixed trading hours. Use the same entry trigger each time.
Define risk first. Set your stop loss at the invalidation point, not at a money amount. Then calculate position size so the loss stays the same across trades. Use one rule for risk-reward and follow it every time.
Control your trade count. A daily max trades rule reduces revenge trading. A no-trade rule around major releases reduces spread spikes and random fills.
Keep a log. Record pair, session, setup, stop size in pips, risk, result, and a screenshot. Review weekly. If you want to validate this starter system fast, use a basic forex strategy backtest before you scale up.
What “Day Trading Forex” Really Is (and What It Isn’t)
How Day Trading Differs From Scalping and Swing Trading
Day trading forex means you open and close trades within the same trading day. You do not hold positions overnight. Your goal is to capture intraday moves and cut exposure to overnight gaps and swap costs.
- Scalping targets small moves, often 2 to 10 pips. You may take many trades per session. Costs matter more because spreads and slippage eat a larger share of each win.
- Day trading targets medium intraday moves, often 10 to 60 pips depending on pair and volatility. You usually take fewer trades and hold longer than a scalper.
- Swing trading holds for days to weeks. It targets larger moves and uses wider stops. It accepts overnight risk and swaps. If you want that style, use a separate plan built for it, see our swing trading forex strategy for beginners.
How Pricing, Spreads, and Swaps Affect Intraday Trades
Forex trades quote two prices. Bid is where you sell. Ask is where you buy. The difference is the spread. You start every trade down by the spread.
- Spreads are a fixed hurdle. If EUR/USD shows 0.8 pips spread and you target 8 pips, spread is about 10% of the target before slippage and commissions.
- Spreads expand when liquidity drops. This often happens around rollover, late US session, and major news. Wider spreads can trigger stops and worsen entries.
- Slippage is real. Fast moves can fill you worse than your price. This hits stop orders the most during spikes.
- Swaps matter if you hold past rollover. Day trading avoids swaps by closing before the broker’s daily rollover time. If you hold through it, you pay or earn swap. Triple swap can apply midweek, depending on broker rules.
| Item | What it is | What it does to a day trade |
|---|---|---|
| Bid/Ask | Sell price and buy price | Defines your true entry and exit prices |
| Spread | Ask minus bid | Immediate cost, bigger impact on small targets |
| Commission | Fee on some accounts | Adds to break-even distance |
| Slippage | Fill differs from requested price | Raises losses and cuts wins during volatility |
| Swap | Overnight financing | Usually avoided if you close before rollover |
Why Beginners Lose Money: Randomness, Leverage, and Lack of Process
Intraday charts contain noise. Price can whip around with no clean follow-through. If you treat every move as a signal, you will overtrade and feed spreads.
- Randomness creates clusters of losses. A decent setup can fail three or five times in a row. If you change rules mid-streak, you destroy your edge.
- Leverage magnifies small mistakes. A tight stop with oversized position sizing turns normal variance into big drawdowns.
- No process makes results impossible to repeat. If you cannot define the setup, entry trigger, stop, target, and no-trade times, you cannot measure anything.
- Cost blindness kills small edges. If your average win is close to your average loss, spreads and slippage can flip the math against you.
Realistic Expectations: Time to Proficiency and the Typical Learning Curve
Day trading is a skill. You build it with reps and review. Most beginners need months of consistent practice before they trade cleanly under pressure.
- Weeks 1 to 4: You learn platform execution, position sizing, and how spreads behave across sessions. You should trade small or use a demo while you build routine.
- Months 2 to 4: You narrow to one or two setups and one session. You start tracking stats like win rate, average win, average loss, and max losing streak.
- Months 4 to 6: You focus on consistency. You reduce rule breaks. You learn when not to trade. You size up only after stable execution.
Expect uneven results early. Measure progress by rule adherence and risk control first, then profit. If you stay disciplined and keep your risk small, you give your edge time to show up.
Forex Market Basics You Must Know Before Using Any Strategy

Pips, lots, and pip value
You need three numbers to control risk, pips, lot size, and pip value.
- Pip: The standard price step. On most pairs, 1 pip = 0.0001. On JPY pairs, 1 pip = 0.01.
- Lot: Position size. 1 standard lot = 100,000 units, 1 mini lot = 10,000, 1 micro lot = 1,000.
- Pip value: How much money you make or lose per pip at your lot size.
Simple example on EUR/USD with USD account:
- Price: 1.1000 to 1.1010 = +10 pips.
- Trade size: 0.10 lots (10,000 units).
- Pip value at 0.10 lots is about $1 per pip.
- Result: 10 pips = about $10.
Use this to set risk first. If your stop is 15 pips and you risk $30, you need about $2 per pip, which is about 0.20 lots on EUR/USD.
| EUR/USD lot size | Approx pip value | 10 pip move |
|---|---|---|
| 0.01 (micro) | $0.10 per pip | $1 |
| 0.10 (mini) | $1.00 per pip | $10 |
| 1.00 (standard) | $10.00 per pip | $100 |
Bid/ask spread, slippage, and execution quality
You pay the spread when you enter and exit. Spread is the gap between bid and ask.
- If EUR/USD shows 1.1000 bid and 1.1002 ask, the spread is 2 pips.
- If you buy, you enter at ask. If you sell, you enter at bid.
- Your trade starts negative by about the spread.
Slippage is a different cost. It happens when your fill price differs from your order price. Fast moves and thin liquidity increase it.
- Positive slippage helps you, negative slippage hurts you.
- Market orders slip more than limit orders.
- Stops can slip during spikes. Your loss can exceed your planned stop distance.
Execution quality decides if a small edge survives. If your average target is 8 pips and your average total cost is 2 pips spread plus 1 pip slippage, you give up 37.5% of the move. That changes your break-even point and your win rate.
Know what each order type does before you trade live. Use this guide to market, limit, and stop orders.
Leverage and margin
Leverage lets you control a large position with a small deposit. Margin is the deposit your broker locks while the trade stays open.
- At 30:1 leverage, you can control $30,000 with about $1,000 margin.
- At 100:1 leverage, you can control $100,000 with about $1,000 margin.
Leverage does not change pip movement. It changes how big your position is relative to your account. That is why it amplifies both gains and losses.
Example with a $1,000 account:
- You open 0.10 lots on EUR/USD. Notional size is about $10,000.
- A 20 pip loss is about $20. That is a 2% account loss.
- You open 0.50 lots. Notional size is about $50,000.
- A 20 pip loss is about $100. That is a 10% account loss.
High leverage makes it easy to oversize. Oversizing causes margin calls, forced liquidation, and strategy failure even when your entry logic is fine.
Sessions and liquidity
Liquidity drives spreads, slippage, and follow-through. You want consistent liquidity for day trading.
- London session: Often the highest volume. Many trends start here.
- New York session: High volume, especially the overlap with London.
- Tokyo session: Can be slower for many pairs, often tighter ranges outside major news.
- London and New York overlap: Often the most movement and the best fills.
Most retail day trading setups work best when spreads stay tight and price moves enough to pay your costs. In practice, that usually means London open through the New York morning. Expect worse execution during rollover and around major news releases.
Choosing the Best Pairs and Time Windows for Beginners
Start With Beginner Friendly Pairs
Your pair choice sets your spread cost, your fill quality, and your stress level. As a beginner, stick to major pairs. Skip exotics.
- Best starting group, majors: EUR/USD, GBP/USD, USD/JPY, AUD/USD, USD/CHF, USD/CAD.
- Why majors work: tighter spreads, deeper liquidity, cleaner intraday structure, more reliable execution.
- Minors, use later: EUR/GBP, EUR/JPY, GBP/JPY. They can move well, but spreads can widen faster.
- Exotics, avoid: USD/TRY, USD/ZAR, USD/MXN. Spreads are wide, moves can gap, stops can slip.
If you want one pair to learn first, pick EUR/USD. It often has the best combination of tight spread and stable behavior during London and early New York.
Pick One Session and Trade It Every Day
Consistency beats variety. Choose one daily window. Trade it for weeks. Build pattern recognition in the same conditions.
- London session: strong liquidity, frequent trends and breakouts, good for EUR/USD and GBP/USD.
- New York morning: good movement, especially when US data hits, best when spreads stay tight.
- London and New York overlap: often the best fills and the most follow through, also the most noise if you chase.
Begin with a 2 to 3 hour block. Example, first part of London, or the overlap. Avoid rollover. Avoid the minutes around major news until you have rules for it.
Use an ATR Filter to Avoid Dead or Chaotic Markets
You need enough movement to cover spread and slippage. You also need control. ATR helps you filter both extremes.
Use ATR(14) on the 15 minute chart as a quick volatility check.
- Too dead: ATR(14) is very low for your pair, candles stay small, price chops inside a tight band. Skip it.
- Too hot: ATR spikes far above its normal level, candles expand fast, stops need to be wide. Reduce size or skip it.
- Tradeable: ATR is near its recent average and price forms clean swings and breaks.
Compare ATR to its last 5 to 20 session range. You do not need a perfect number. You need a repeatable filter.
A Simple Watchlist Ruleset to Cut Noise
More pairs create more signals and more bad trades. Limit your inputs. Make your process boring.
- Rule 1: Trade one session only.
- Rule 2: Track three pairs max. Start with EUR/USD plus one of GBP/USD or USD/JPY.
- Rule 3: Only trade when spread stays tight for that pair, relative to its usual spread in your session.
- Rule 4: Apply the ATR(14) 15 minute filter. Skip the lowest volatility pair and any pair with an ATR spike.
- Rule 5: Pick one A setup per day. If it does not appear, you do nothing.
- Rule 6: Use the same chart view each day. If you need a refresher, review candlestick chart basics and keep your markings simple.
This ruleset keeps your focus tight. It also makes your results easier to review, because you trade the same pairs in the same hours under similar volatility.
Your Practical Starter System: A Simple Day Trading Forex Strategy
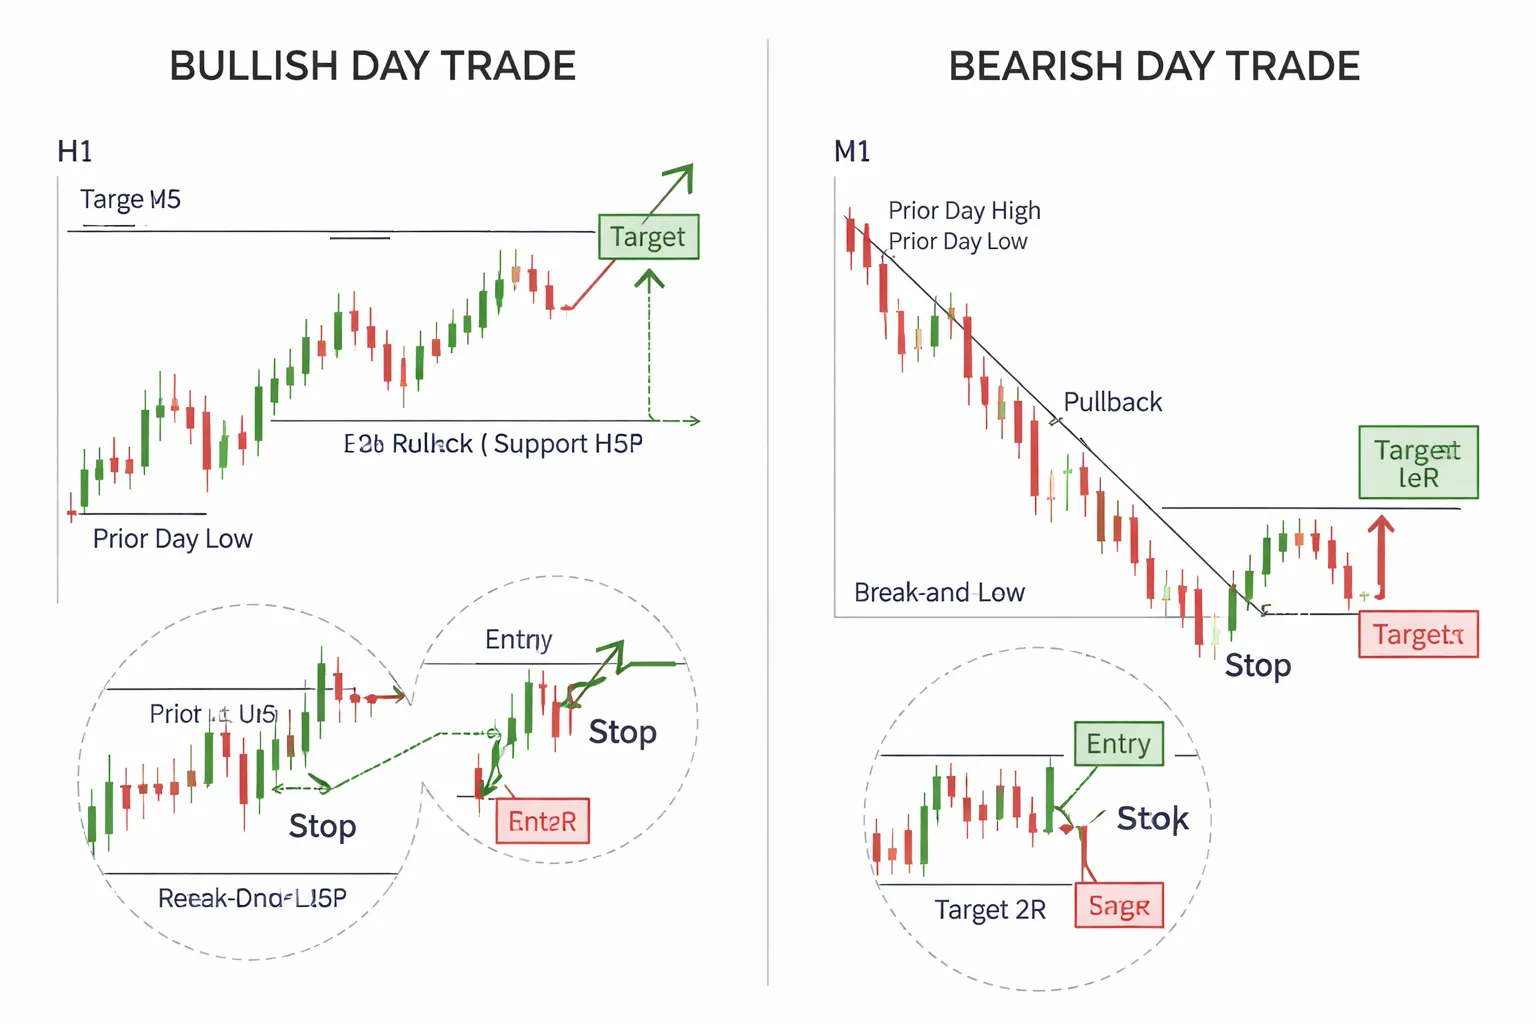
Core Concept, Trend First, Pullback Second
You trade one pattern. You trade it the same way every day.
Find the intraday trend. Wait for a pullback into a clear level. Take the next push with structure.
This keeps your decisions binary. Trend or no trend. Pullback or no pullback. Trigger or no trigger.
Chart Setup, Clean and Repeatable
Use a simple template. Do not add tools to fix poor discipline.
- Timeframes: H1 for bias, M5 or M15 for entries.
- Indicators: none required. Optional, one EMA 20 to help you see trend and pullback depth.
- Session focus: trade your chosen 2 to 3 hour window only.
- Price markings: horizontal lines only. No zones unless your lines become meaningless.
Step 1, Identify Directional Bias With Higher Timeframe Structure
Do this before you look for entries.
- Bullish bias: H1 makes higher highs and higher lows. Price holds above the last broken swing high.
- Bearish bias: H1 makes lower highs and lower lows. Price holds below the last broken swing low.
- No trade bias: H1 chops inside a tight range, or swings overlap with no clear breaks.
Your goal is alignment. You want your entry timeframe to follow the H1 structure, not argue with it.
Step 2, Mark Key Levels
Mark levels once, then wait. You need only the levels that other traders also see.
- Prior day high and prior day low: natural liquidity targets and reaction points.
- Current session high and low: your intraday range boundary.
- Two most recent H1 swing points: last swing high and last swing low that define trend structure.
- One clear intraday swing on M15: the most recent impulse leg that your pullback will retrace into.
Do not draw more than you can use. If you cannot explain why a level matters, delete it.
Step 3, Entry Trigger Options for Beginners
You enter only after a pullback reaches structure. No pullback, no trade.
- Option A, Break and retest: price breaks above a minor intraday swing high in an uptrend, then retests that level and holds. You buy on the hold. In a downtrend, price breaks below a minor swing low, retests, then holds below. You sell on the hold.
- Option B, Rejection candle at level: price pulls into your marked level, prints a clear rejection candle on M5 or M15, then the next candle confirms with follow-through. You enter on the confirmation close or a small retrace.
Define rejection simply. Long wick into the level. Close back away from the level. Follow-through next candle.
Step 4, Stop-Loss Placement Rules Based on Structure
Your stop goes where your trade idea breaks. Not where your pain threshold sits.
- For break and retest: place the stop beyond the retest swing. In a long, below the retest low. In a short, above the retest high.
- For rejection candle: place the stop beyond the rejection wick extreme. Add a small buffer only if spread requires it.
- Hard rule: if the stop must be too large to make sense, you skip the trade.
If you need a deeper stop framework, use this stop loss guide for forex beginners.
Step 5, Take-Profit Methods
Pick one method and use it for 20 trades. Then review.
- Method 1, Fixed R: take profit at 2R. If your stop is 10 pips, your target is 20 pips. Simple. Easy to track.
- Method 2, Next level targeting: target the next obvious level, prior day high or low, session high or low, or the next H1 swing point.
- Method 3, Partial exits: take 50 percent off at 1R, move stop to breakeven, then target the next level with the rest.
Do not mix methods inside the same week. Consistency gives you usable data.
Step 6, Trade Management Rules
Most beginners lose money from management errors, not entry errors.
- Move to breakeven only after structure forms: in a long, you want a higher low after entry. In a short, you want a lower high after entry.
- Do not move to breakeven on the first green candle: you will get stopped by normal pullbacks.
- If price stalls at a major level: consider taking partials. If you do not take partials, accept the full plan and do not interfere.
- If volatility spikes against you fast: do not widen your stop. You take the loss and review the setup quality.
Trade Examples Outline, Bullish Walkthrough
- H1 bias: higher highs and higher lows. Price broke above the last H1 swing high and holds above it.
- Levels marked: prior day high, session low, last H1 swing low.
- Pullback: M15 pulls back into a prior intraday swing level, near session VWAP if you use it, or near the EMA 20 if you keep it. You still require a horizontal level.
- Trigger: break and retest of a minor M5 swing high, or a rejection candle off the pullback level with follow-through.
- Stop: below the retest low, or below the rejection wick.
- Target: 2R, or prior day high, whichever is closer. If price reaches 1R and forms a higher low, you can move to breakeven.
Trade Examples Outline, Bearish Walkthrough
- H1 bias: lower highs and lower lows. Price broke below the last H1 swing low and holds below it.
- Levels marked: prior day low, session high, last H1 swing high.
- Pullback: M15 retraces into a prior intraday swing level that now acts as resistance.
- Trigger: break and retest of a minor M5 swing low, or a rejection candle from resistance with follow-through.
- Stop: above the retest high, or above the rejection wick.
- Target: 2R, or prior day low, whichever is closer. If price reaches 1R and forms a lower high, you can move to breakeven.
Rules-Based Risk Management (The Non-Negotiables)
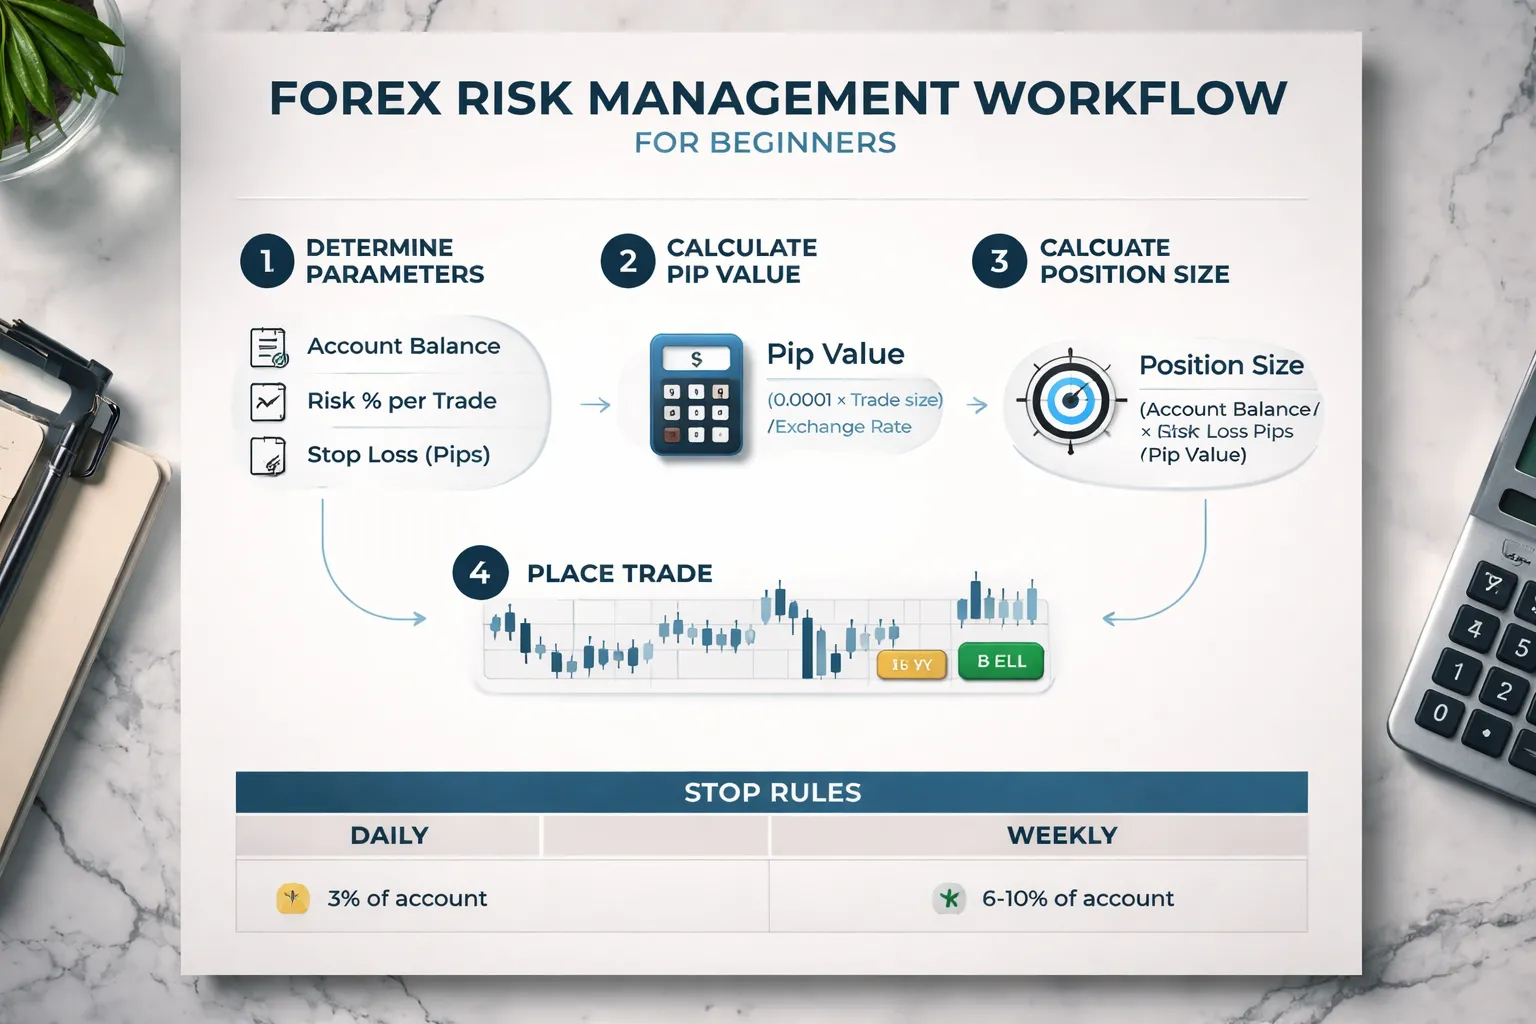
Position Sizing Formula (Risk Per Trade to Lot Size)
Your edge means nothing if your size is random. You size every trade from your stop loss, not from your confidence.
Core formula
- Risk amount ($) = Account balance x Risk %
- Lot size = Risk amount ($) / (Stop size in pips x Pip value per 1.00 lot)
Fast calculator workflow
- Step 1, set your risk %, example 0.50%.
- Step 2, measure your stop in pips from entry to stop.
- Step 3, get pip value for your pair for 1.00 lot.
- Step 4, compute lot size, then round down.
- Step 5, place the trade only if the stop and size match your rules.
Example
- Account = $5,000
- Risk % = 0.50%, risk amount = $25
- Stop = 12 pips
- If pip value at 1.00 lot = $10 per pip, risk per 1.00 lot = 12 x 10 = $120
- Lot size = 25 / 120 = 0.20 lots
Beginner Risk Parameters (Hard Limits)
You need tight limits while you learn execution and control.
- Risk per trade, 0.25% to 0.75%. Start at 0.50%.
- Max trades per day, 2 to 4. More trades means more mistakes.
- Max daily drawdown, 1.5% to 2.0%. Stop when hit.
- Max open risk at one time, 1.0%. Do not stack correlated trades.
How to Avoid “Death by a Thousand Cuts” in Chop
Chop bleeds you through small, repeated losses. You prevent it with filters and a stop rule.
- Trade only in your session window, pick one, London or New York. Skip the dead hours.
- Require clean structure, one clear swing break, one pullback, one trigger. No structure, no trade.
- Skip tight ranges, if the last 60 to 90 minutes stay inside a narrow box and your stops sit inside it, stand down.
- One failed setup rule, if you take one A+ setup and it fails fast, reduce size on the next trade or stop for the session.
- Two losses rule, two losses in a row means you stop trading that day.
Why Risk-to-Reward Is Not Enough (Expectancy and Distribution)
R matters, but expectancy pays you. You can lose money with 2R targets if your win rate is too low or your losses cluster.
Expectancy formula
- Expectancy (in R) = (Win rate x Avg win in R) - (Loss rate x Avg loss in R)
Quick examples
- Win rate 35%, average win 2R, average loss 1R. Expectancy = (0.35 x 2) - (0.65 x 1) = 0.05R. Small edge, high variance.
- Win rate 45%, average win 1.6R, average loss 1R. Expectancy = (0.45 x 1.6) - (0.55 x 1) = 0.17R. Better, smoother.
Distribution basics you must respect
- Losses cluster. You will hit streaks even with a good strategy.
- Most of your profit may come from a few trades. Protect your capital so you stay present for them.
- Track results by setup type and session. Kill what drags expectancy below zero.
If you want to verify expectancy with real samples, use a simple journal and run a proper test process. See how to backtest a forex strategy.
Account Protection Rules (When You Stop Trading)
These rules keep one bad day from turning into a bad month.
- Daily stop, stop for the day at -2R or at your max daily drawdown, whichever hits first.
- Weekly stop, stop for the week at -6R or -5%, whichever hits first.
- Execution stop, stop immediately after one rule break, missed stop, revenge trade, moving a stop wider, doubling size.
- Market stop, stop if spreads widen, fills slip, or news creates abnormal spikes during your setup window.
- Recovery rule, after a stop-out day, next day risk drops by 50% until you log two green days or three rule-perfect sessions.
| Rule | Default for beginners |
|---|---|
| Risk per trade | 0.50% |
| Max trades per day | 3 |
| Max daily drawdown | 2.0% |
| Daily stop in R | -2R |
| Weekly stop | -6R or -5% |
A Daily Routine That Makes the Strategy Repeatable
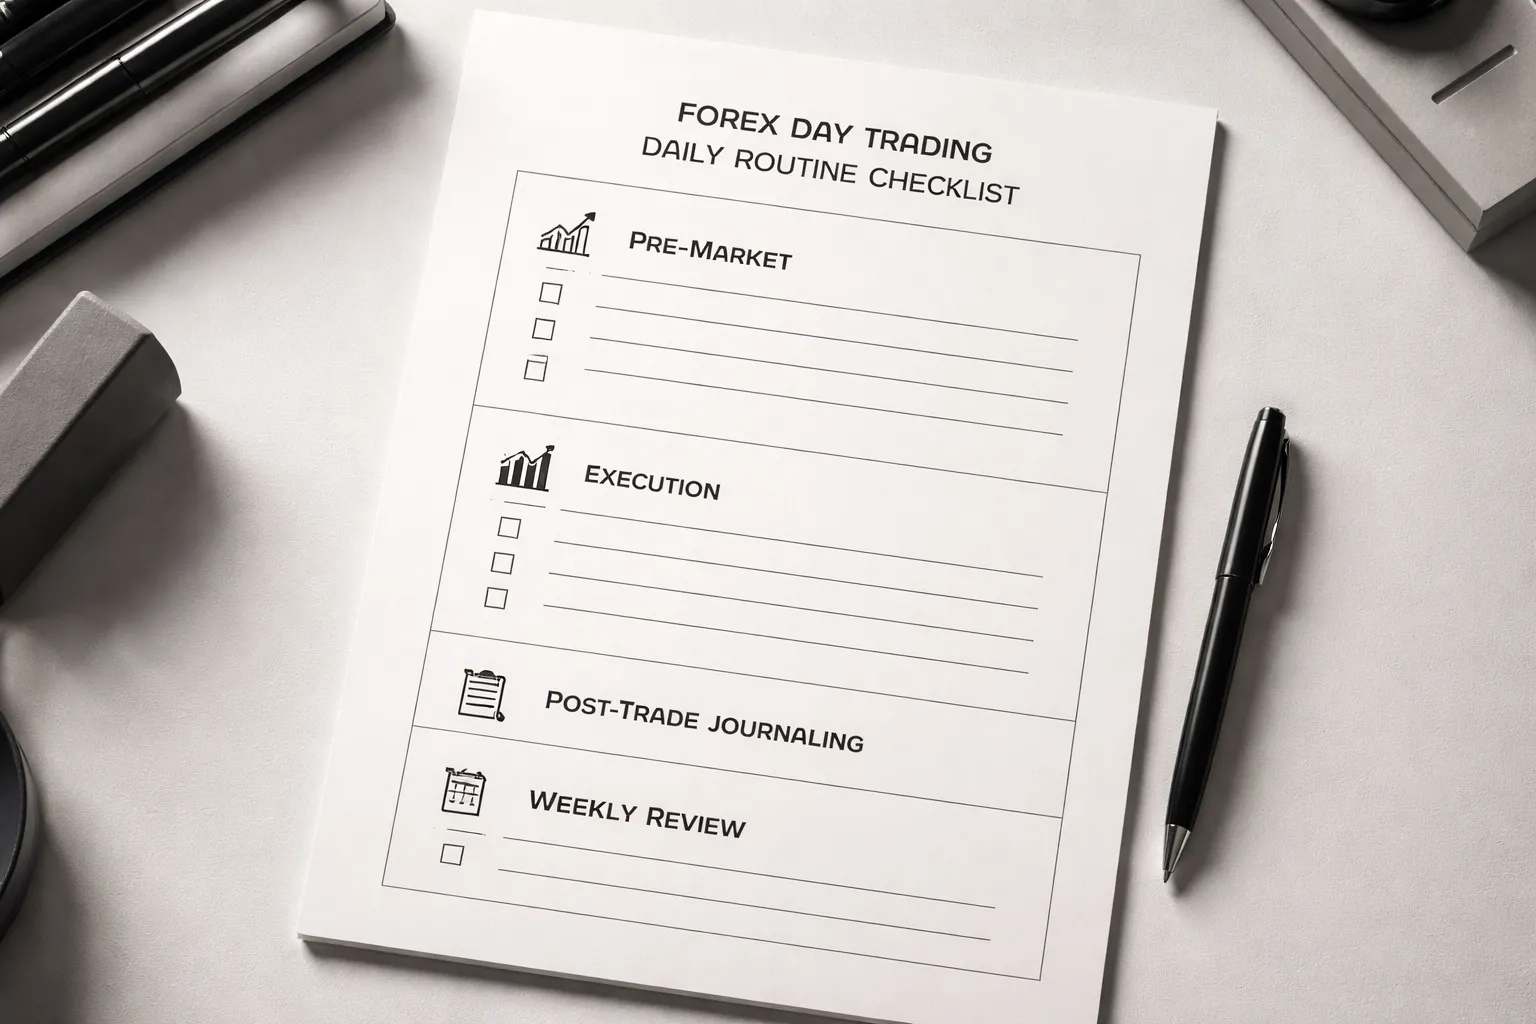
Pre-market checklist (10 to 15 minutes)
- News scan. Check the calendar for high-impact events on your pair. Mark the times. If a red event hits within 30 minutes of your setup window, you stand down.
- Levels. Mark yesterday high, yesterday low, Asia range high and low, and the nearest clean swing high and swing low on your chart. Keep it to 5 to 8 lines. Delete the rest.
- Bias. Define one directional plan for the session. Write one sentence. Example, “Only longs above Asia high, only shorts below Asia low.” If price sits inside the range, you have no bias.
- Volatility conditions. Check spread and the last 30 to 60 minutes of candles.
- Stand down if spread is 2x your normal.
- Stand down if candles show whipsaw, long wicks both sides, and no follow-through.
- Stand down if price already ran hard in one direction before your window, and your stop would need to double to fit.
- Risk settings. Confirm today risk per trade, max trades, and max daily drawdown. If you had a stop-out day, apply the 50% risk rule before you open a chart.
Execution checklist (every trade)
- Trade window. You trade only inside your planned hours. Outside that window, you do nothing.
- Setup match. The trade must match your written plan and your marked level. No level, no trade.
- Entry confirmation. You need a clear trigger at the level. Use one trigger type and keep it the same.
- Break and close beyond the level, then a retest that holds.
- Rejection at the level with a clean candle close back in your direction.
- Stop and target. Place the stop where the setup fails, not where it feels small. Set the target before you enter. Use a fixed minimum R. If you do not understand R, read risk-reward ratio.
- Position size. Size the trade from stop distance and your risk per trade. No rounding up.
- No-trade conditions.
- You missed the move. Price already left the level without you.
- Your stop needs to be wider than your plan allows.
- You feel rushed, angry, or you want to win back a loss.
- You already hit max trades, max drawdown, or daily stop in R.
- News is due within 30 minutes.
- Price chops inside the range and keeps crossing your level.
- One change rule. You can adjust stop or target once, based on structure. After that, hands off. No repeated edits.
Post-trade journaling (5 minutes per trade)
- Screenshot 1. Chart at entry with your level, stop, and target visible.
- Screenshot 2. Chart at exit with the same markings.
- Log the facts.
- Pair, session, date.
- Setup tag, example, “Asia range break” or “retest hold.”
- Entry, stop, target, result in R.
- Time in trade.
- Rule adherence. Mark each item as Yes or No, trade window, level present, trigger, sizing, news filter, daily limits.
- Emotions. Write two words before entry and two words after exit. Example, “calm, focused” then “tight, annoyed.” Keep it short.
- Lesson. One line only. Example, “Entered late, stop had to be too wide.”
Weekly review (45 to 60 minutes)
- Export the week. List every trade with result in R and whether it followed rules.
- Tag setups. Use 3 to 6 tags total. Keep them stable. Example, “breakout,” “retest,” “rejection,” “range chop,” “news day.”
- Separate A trades from everything else.
- A trade equals rules followed and clean market conditions.
- B trade equals rules mostly followed but conditions or execution slipped.
- C trade equals rule break. You do not study C trades for edge, you study them for discipline fixes.
- Build your personal playbook. Save 10 to 20 best A-trade screenshots. Add 3 notes to each, the level type, the trigger, and the common mistake to avoid. This becomes your reference before each session.
- One improvement. Pick one fix for next week. Example, “No trades within 45 minutes of red news.” Track it daily.
Common Beginner Mistakes (and How to Fix Them Fast)
Overtrading and Revenge Trading, Practical Guardrails
Overtrading comes from boredom and FOMO. Revenge trading comes from pain. Both break your risk math.
- Set a daily loss limit: stop for the day at 2R down, or after 2 consecutive losses. No exceptions.
- Set a daily trade limit: 3 to 5 trades max. If you hit the limit, you stop. This forces selectivity.
- Use a cooldown rule: after any loss, wait 10 minutes. After a full stop out, wait 30 minutes.
- Only trade A setups: if your checklist is not a full yes, you pass. You do not “make it work.”
- Time box your session: trade one window, then you are done. Example, London open plus 90 minutes.
Fast fix. Put these rules at the top of your journal. Track breaks as a separate stat, like a losing trade.
Changing Rules Mid-Trade, How to Pre-Commit to Exits
Most beginners lose by editing the plan after the entry. You move the stop. You delay the exit. You turn a small loss into a large one.
- Write your exit before you enter: stop price, take profit price, and invalidation level. No trade without all three.
- Place bracket orders: stop and target go in immediately. You remove “decision time.”
- Use one stop rule only: stop stays where it is, or you tighten it. You never widen it.
- Define one management trigger: example, “Move stop to break even only after +1R and a close beyond the level.”
- Limit mid-trade actions: one partial take profit, one stop move. That is it.
If you keep changing exits, your backtest means nothing. Your stats become noise. Lock the rules and let the sample size work.
Trading During Major News Without a Plan, What to Do Instead
News spikes break levels and spreads. Slippage increases. Your stop can fill worse than planned. Beginners treat this like normal price action and pay for it.
- Mark red news times before the session: you do it once, then follow the rule.
- Default rule: no new trades 30 minutes before to 15 minutes after high impact news on your pair.
- If you insist on trading news: trade only a defined “news system” with reduced size, wider planned stop, and a hard time stop.
- Better alternative: wait for the first post-news range, then trade the break and retest with normal rules.
- Log outcomes: track news trades as a separate category. If it is negative EV, cut it.
Most beginners do better by skipping the spike and trading the cleanup move.
Ignoring Costs, Spread Widening, Rollover Timing, and Thin Liquidity
Costs decide whether a small edge survives. Beginners ignore them and wonder why live results lag the backtest.
- Spread widening: spreads often widen at session roll, around news, and during low liquidity. Avoid those windows.
- Rollover timing: swap and spread distortions often hit around the daily rollover. Do not open new day trades near rollover.
- Thin liquidity: late US session and pre-Asia can chop and slip. Trade your highest liquidity window.
- Pair selection: start with major pairs that usually carry tighter spreads. Avoid exotic pairs as a beginner.
- Measure your real costs: record average spread paid and slippage on entries and exits. If your target is small, costs can erase it.
| Cost Problem | What You See | Fast Fix |
|---|---|---|
| Spread widening | Stops hit “for no reason” | Trade liquid sessions only, avoid red news windows |
| Slippage | Fill worse than your stop or limit | Use limit entries when possible, reduce size near volatility |
| Rollover effects | Sudden spread spike, swap charges | No new trades near rollover, close short-term trades earlier |
Strategy Hopping, How Many Trades You Need Before Judging a System
System hopping resets your learning curve. You never collect enough data to know if you have an edge.
- Pick one system for one market: one pair, one session, one setup type. Narrow beats broad.
- Minimum sample size: take at least 50 trades before you judge results. 100 trades is better if your system trades less often.
- Track three numbers: win rate, average R per trade, and max drawdown in R. Ignore money totals early.
- Change one variable at a time: if results fail, adjust one rule and re-sample. Do not rewrite the system.
- Use a written plan: put the rules in a single page, then execute. Use this forex trading plan template format.
Fast fix. Commit to 4 weeks on one setup. No new indicators. No new timeframes. You either prove it works, or prove it does not.
Tools, Platforms, and Broker Criteria for Day Trading Forex
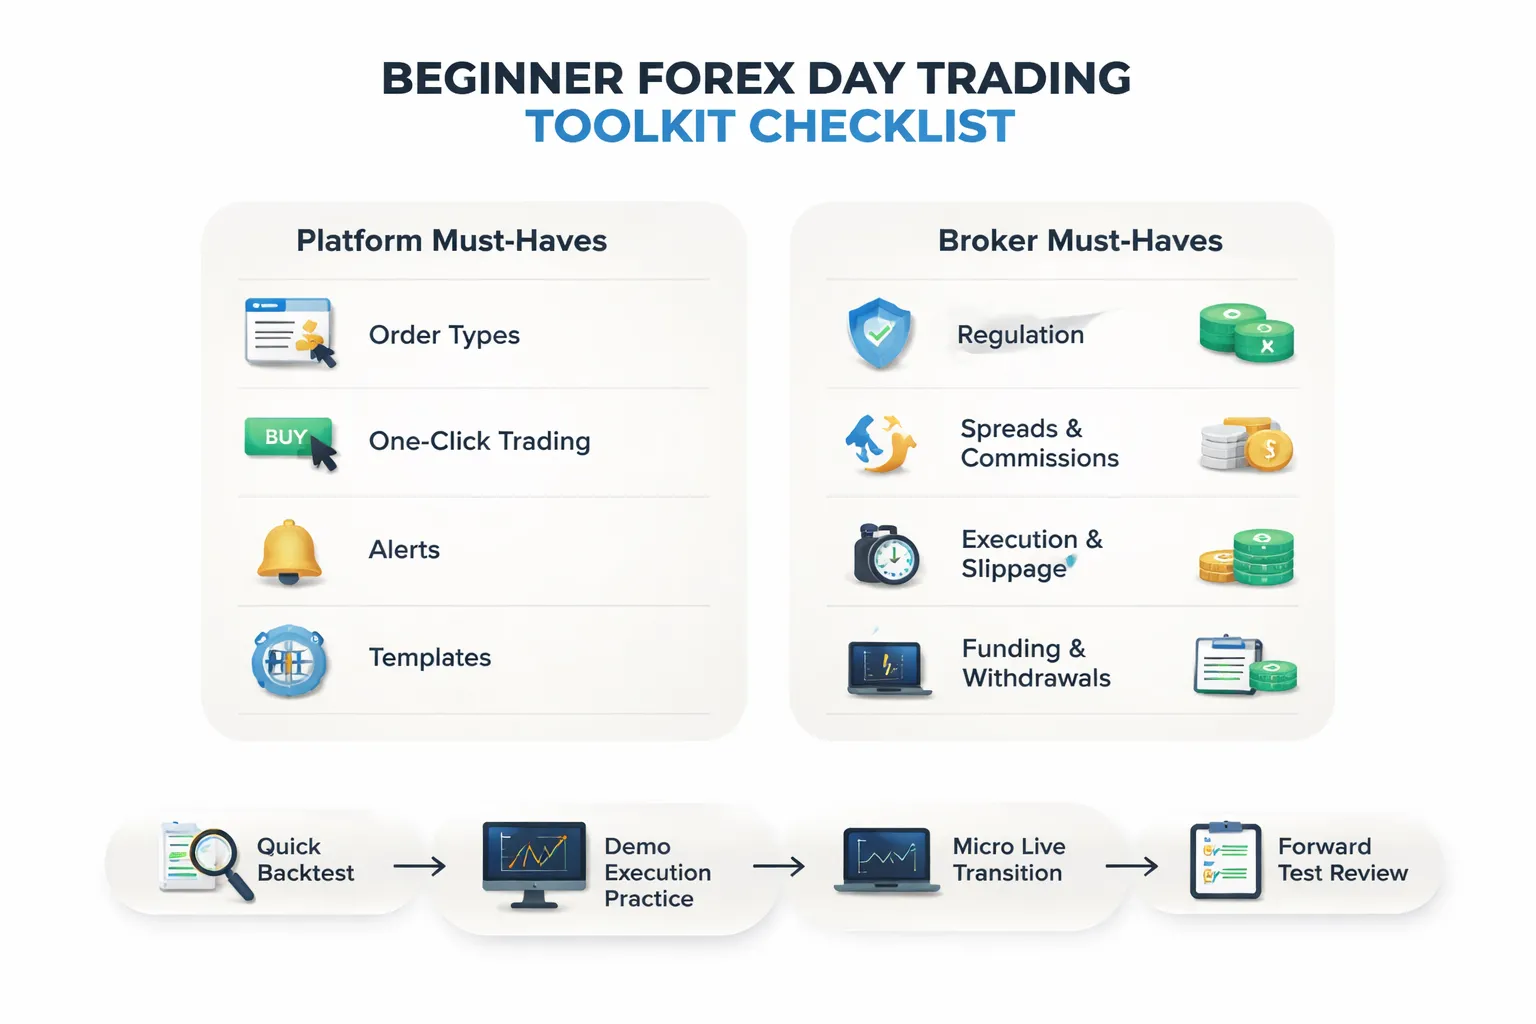
Platform essentials: order types, one-click trading, alerts, and templates
Your platform must let you execute fast and record clean data. If it adds friction, you will skip trades or break rules.
- Order types: Market, limit, stop, and stop-limit. Add OCO if your platform supports it. You need bracket orders, entry plus stop-loss plus take-profit, as one action.
- One-click trading: Use it only if you also lock position size. Set default risk per trade in lots or units. Turn on trade confirmations if you keep misclicking.
- Order modification: You must edit stops and targets quickly. You must see stop distance in pips and in account currency.
- Alerts: Price alerts, session alerts, and economic calendar alerts. Use alerts to reduce chart time. Do not use alerts for new indicators.
- Templates and layouts: Save one chart template per setup. Save one order preset per market. Remove extra panels and indicators.
- Time and sales, depth of market: Optional for beginners. Do not add it unless you can prove it improves execution.
- Data export: You need CSV export for trades. You need timestamps, instrument, size, entry, exit, and fees.
Broker checklist: regulation, spreads, execution, and funding
Your broker is part of your edge. High costs and bad fills kill a day trading system.
- Regulation: Choose a regulated broker in your jurisdiction. Verify the license number on the regulator site. Skip offshore brokers that promise high leverage.
- Costs: Compare average spread during your trading hours, not the minimum spread shown in ads. Add commission and swap. Track total cost per round trip.
- Account type: For active day trading, a raw spread plus commission account often prices cleaner than a wide spread account. You still must verify the all-in cost.
- Execution quality: Look for stable fills during liquid hours. Track slippage on entries and exits. If your stops slip often in normal conditions, change broker.
- Order handling: Confirm the broker supports stop-loss and take-profit attached to every order. Confirm minimum stop distance rules.
- Platform stability: Uptime matters more than features. You need no freezes during major sessions.
- Funding and withdrawals: Use methods you can repeat. Check deposit and withdrawal fees, processing time, and limits. Test one small withdrawal early.
- Risk controls: You want negative balance protection if offered in your region. You want margin closeout rules stated clearly.
| Check | What you do | What you record |
|---|---|---|
| All-in cost | Trade 10 small round trips in your session | Average spread, commission, total per trade |
| Slippage | Use stops and limits on the same setup | Pips slipped on entry and exit |
| Platform reliability | Run it for 2 weeks without switching | Disconnects, freezes, rejected orders |
| Funding | Deposit small, then withdraw small | Time to process, total fees |
Demo vs live: how to transition without changing behavior
Use demo to learn execution, not to chase profit. Then go live with the same rules and smaller size.
- Demo goal: Perfect order flow. Entry, stop, target, and exit rules. Journal every trade.
- Make demo realistic: Use the same leverage limits you will use live. Use the same trading hours. Limit yourself to your exact setup list.
- Do not optimize on demo: If you keep changing rules, you train inconsistency.
- Go live in steps: Start with the smallest position size your broker allows. Keep the same stop distance logic. Keep the same daily loss limit.
- Keep behavior identical: Same checklist, same number of trades per day, same no-trade rules around news if your plan avoids it.
- Expect different fills: Live adds slippage and emotions. Do not change the system because of one bad fill. Track 20 to 30 trades before you judge execution.
If you need a clean target rule, use this guide on how to set take profit and keep it fixed for your 4 week test.
Backtesting vs forward testing: what beginners should do first
Backtesting helps you screen ideas. Forward testing proves you can execute them.
- Start with quick backtesting: Use 50 to 100 historical trades on one pair and one session. Log win rate, average R, max drawdown in R, and average trade duration. Ignore money totals.
- Do not overfit: Use simple rules you can execute in real time. Avoid dozens of filters.
- Then forward test: Trade the same setup for 4 weeks on demo or micro size. Track the same metrics. Add notes on mistakes, late entries, and skipped trades.
- Compare results: If backtest and forward test differ, your execution or market conditions changed. Fix execution first. Only then adjust one rule and re-test.
- Minimum sample mindset: Judge the setup after a block of trades, not after one day.
Adapting the Starter System to Different Market Conditions
Trending Days vs Ranging Days, Use a Simple Regime Filter
Your starter system will behave differently in trend and chop. Add one filter. Keep it objective. Check it before the session.
- Trend day filter (trade with the trend): Price sits on one side of the 50 EMA on your execution timeframe, and the 50 EMA slopes in one direction. Skip counter-trend setups.
- Range day filter (trade less, take quicker exits): Price crosses the 50 EMA back and forth, and the 50 EMA stays flat. Treat breakouts with suspicion. Take fewer trades.
Log the regime each day. Tag each trade as Trend or Range. After 20 to 30 trades, check which regime produces your best expectancy. Then decide if you will trade both regimes or only your best one.
When to Reduce Size or Skip, Low Volatility and Pre-Holiday Sessions
Low volatility changes the math. Price does not travel far enough to pay for spreads and normal stop sizes.
- Skip rule, low range: If the last 14 candles on your execution timeframe show small bodies and small wicks, and price struggles to move, skip. You want clean pushes, not drift.
- Reduce size rule, thin sessions: If it is a pre-holiday session or you see long quiet stretches with sudden spikes, trade half size or do not trade. Liquidity can vanish fast.
- Spread rule: If spread expands beyond your normal level for that pair and time, skip. Spread expansion is a hidden stop loss.
Make this measurable in your journal. Track average spread at entry. Track your average favorable move after entry. If the average move drops, your system did not break, the session quality did.
Handling High Volatility, Wider Stops, Fewer Trades, Stricter Filters
High volatility helps range, but it punishes sloppy entries. Your job is to control risk, not to chase movement.
- Wider stop, same account risk: If candles expand, widen your stop to a structure level that makes sense. Cut position size so your dollar risk stays fixed.
- Fewer trades: Limit attempts. Take your A setup only. Stop after 1 to 2 losses. High volatility can cluster losses.
- Stricter entry filter: Require a clean break and close beyond your trigger level, then a pullback or retest before entry. Skip first spikes.
Use one volatility measure in your log. Record the session range in pips or your ATR value at the time of entry. Compare results in high volatility blocks versus normal blocks. Adjust one rule at a time.
Correlated Pairs and USD Exposure, Avoiding Accidental Over-Risking
Correlation turns two trades into one bigger trade. You must track exposure, especially to USD.
- One USD direction rule: If you are long EURUSD and long GBPUSD, you are short USD twice. Treat that as one idea with doubled risk. Do not take both at full size.
- Max exposure rule: Set a cap, such as 1R total on all positions tied to the same currency, or 0.5R each if you take two correlated trades.
- Conflict rule: If signals conflict across highly correlated pairs, skip the second trade. Mixed signals often mean chop.
| Positions You Take | What You Really Hold | Simple Fix |
|---|---|---|
| Long EURUSD + Long GBPUSD | Short USD, 2 units of risk | Take one trade, or split size across both |
| Short USDJPY + Short USDCAD | Short USD in one, long USD in the other, mixed | Skip the second if it weakens your bias |
| Long AUDUSD + Long NZDUSD | Short USD plus correlated risk | Reduce size, or pick the cleaner setup |
If you need a clean process for building rules and position sizing, follow your checklist from your beginner forex trading roadmap and keep every change testable.
Pros, Cons, and Who This Beginner Day Trading System Fits Best
Advantages: clarity, limited screen time, structured decisions
- Clear rules. You trade one setup, in one session window, with the same checklist. You reduce “maybe” trades.
- Limited screen time. You plan your levels before the active window, then you watch only the candles that matter for entry and management.
- Structured decision-making. You define bias first, then you qualify the setup, then you size the trade, then you execute. You do not improvise mid-trade.
- Simple risk control. Fixed risk per trade, one stop, one target or a defined exit rule. You cap damage fast.
- Clean reviews. Fewer variables means faster feedback. You can tag each trade as “followed rules” or “broke rules” in minutes.
Trade-offs: fewer signals, more waiting, and missed moves
- Fewer trades. If your rules filter hard, you may see zero to two valid trades in a day. Some weeks feel slow.
- Patience cost. You will watch price move without you. You need to accept skipped trades as part of the system.
- Chop days happen. Tight ranges and fake breaks can hit stops. Your edge comes from position sizing and repeatable execution, not from being right every day.
- Session dependence. If you trade a specific window, you cannot force it outside that window and expect the same behavior.
- Opportunity cost. One setup means you ignore other valid styles. That is fine early, but you must commit to the process.
Who this beginner system fits best, and who struggles
- Fits you if you like routines. You can follow a checklist, log trades, and repeat the same steps daily.
- Fits you if you want fewer decisions. You prefer one market read, one trigger, and one risk rule.
- Fits you if you have limited time. You can focus on one high-liquidity session and avoid all-day screen watching.
- You struggle if you chase action. You will overtrade during slow periods. Compensation: set a daily max trades rule, and walk away after it.
- You struggle if you hate stops. You will widen stops or remove them. Compensation: use fixed risk per trade and hard stops only.
- You struggle if you need constant validation. You will change rules after a small losing streak. Compensation: lock rules for a set sample size, then review.
- You struggle if you trade from signals. You will follow indicators without context. Compensation: keep price action and levels primary, then use one indicator as a filter. If you use candlestick triggers, keep them limited to a small set from these key candlestick patterns.
A realistic progression plan: one setup to a small playbook
| Phase | Focus | Rules | Minimum sample | Goal |
|---|---|---|---|---|
| 1. One setup | One pair, one session, one trigger | Fixed stop method, fixed risk, one exit plan | 30 to 50 trades | Prove you can execute without rule breaks |
| 2. Tighten filters | Remove low-quality trades | Add one filter only, time window, volatility floor, or level quality | 30 trades after the change | Improve average trade, keep frequency acceptable |
| 3. Add a second setup | Same risk model, new market condition | One additional pattern, pullback or breakout, not both at once | 30 trades per setup | Trade two conditions without confusion |
| 4. Small playbook | 2 to 3 setups max | Shared sizing rules, shared no-trade rules | 100+ total trades | Consistency across weeks, not single days |
Keep your playbook small. Add tools only when your logs show a repeatable problem. Change one variable at a time, then retest.
FAQ
What is a realistic daily goal for a beginner?
Target process, not money. Aim for 1 to 3 high-quality setups, not a profit target. Judge your day by rule-following, clean execution, and zero revenge trades. If your edge is real, results follow over 50 to 100 trades.
How much money do you need to start day trading forex?
Start with enough to risk small. Use 0.25% to 1% risk per trade. If your broker requires high margin, lower your position size. A small account can still build skill. Do not increase size until your log proves consistency.
What leverage should you use as a beginner?
Use the lowest leverage that lets you place your planned position size. Leverage does not create edge, it magnifies errors. Cap your risk per trade. If you feel pressure from swings, your size is too big.
Which currency pairs should beginners trade?
Pick one or two liquid pairs with tight spreads, like EURUSD or GBPUSD. Stick to the same pair for at least 30 trades per setup. You need repetition to learn behavior, spread costs, and how your rules perform.
What timeframes work best for a starter day trading system?
Use one execution timeframe and one higher timeframe for context. Many beginners do well with 15-minute entries and 1-hour context. Avoid jumping timeframes mid-trade. It creates late entries, early exits, and inconsistent logs.
How many trades should you take per day?
Set a hard cap. Start with 1 to 3 trades. Quality beats volume. A cap blocks overtrading and forces selectivity. If you keep trading after your best window, you usually give back gains. Read this: how to avoid overtrading.
Where should you place your stop loss?
Put the stop where your setup fails, not where it feels comfortable. Use a technical level, then size the trade so the dollar risk stays fixed. If you keep getting stopped by noise, your stop is too tight or your entry is late.
What risk to reward ratio should you use?
Use a ratio that fits your setup stats. Many beginner systems start with 1:1 to 1:2. Do not force 1:3 if your win rate collapses. Track win rate and average win and loss over at least 50 trades.
Should you trade news releases?
No, not at the start. Spreads widen and fills slip. Your backtest will not match live conditions. Create a no-trade window around high-impact releases. Trade normal conditions first. Add news trading only after you prove an edge.
Can you use indicators in this system?
Yes, but keep them simple. Use indicators to filter or time entries, not to predict. One or two tools max. If an indicator does not improve your log after 30 trades, remove it. Price and risk rules matter more.
How long until you know if the strategy works?
Log at least 50 trades per setup. One week is noise. One great day proves nothing. Track expectancy, drawdown, and rule errors. Change one variable at a time, then retest. If you keep changing rules, you stay stuck.
What is the biggest beginner mistake?
Mixing setups and breaking rules. You cannot measure performance if each trade follows different logic. Run one setup at a time. Use fixed risk. Keep a small playbook. Your goal is repeatable execution, not constant tweaking.
Conclusion
Conclusion
You do not need more indicators. You need a system you can repeat.
Run one setup. Trade one session. Use fixed risk. Log every trade. Review your stats each week.
Keep your rules tight. Keep your execution tighter. If the numbers do not improve, change one variable, then retest.
- Pick one pair. Focus on clean spreads and stable movement.
- Pick one time block. Same hours, same market conditions.
- Risk small and fixed. Use a hard stop. No averaging down.
- Track only what matters. Win rate, average win, average loss, expectancy, drawdown, rule errors.
- Protect your edge. Stop trading after your daily loss limit. Quit after your max trades.
Final tip, do not optimize the strategy first. Optimize your discipline first. If you want a simple trend filter you can standardize, use moving averages, then keep everything else the same until you have enough trades to judge results.
-
Stop Loss vs Take Profit: Differences, Examples & Best Practices
5 months ago -
Forex Trading Psychology Tips: How to Stay Disciplined and Consistent
5 months ago -
Forex Order Types Explained: Market vs Limit vs Stop Orders
5 months ago -
How to Set Stop Loss and Take Profit (Step-by-Step)
5 months ago -
How to Start Forex Trading Step by Step (Beginner Roadmap)
5 months ago
-
- Core Concept, Trend First, Pullback Second
- Chart Setup, Clean and Repeatable
- Step 1, Identify Directional Bias With Higher Timeframe Structure
- Step 2, Mark Key Levels
- Step 3, Entry Trigger Options for Beginners
- Step 4, Stop-Loss Placement Rules Based on Structure
- Step 5, Take-Profit Methods
- Step 6, Trade Management Rules
- Trade Examples Outline, Bullish Walkthrough
- Trade Examples Outline, Bearish Walkthrough
-
- What is a realistic daily goal for a beginner?
- How much money do you need to start day trading forex?
- What leverage should you use as a beginner?
- Which currency pairs should beginners trade?
- What timeframes work best for a starter day trading system?
- How many trades should you take per day?
- Where should you place your stop loss?
- What risk to reward ratio should you use?
- Should you trade news releases?
- Can you use indicators in this system?
- How long until you know if the strategy works?
- What is the biggest beginner mistake?
-
How to Place a Forex Trade Step by Step (Your First Trade Explained)
3 months ago -
Forex Trading vs Crypto Trading: Which Market Is Better for Beginners?
3 months ago -
Forex Lot Size Calculator: How to Use It to Size Trades Correctly
5 months ago -
How to Calculate Position Size in Forex (Position Sizing Formula + Examples)
5 months ago -
Forex Leverage Explained: How It Works, Pros, Cons & Examples
5 months ago
-
Forex Trading Platforms Comparison: MetaTrader vs cTrader vs TradingView
5 months ago -
Is Forex Trading Legal in the United States? Rules, Regulators & What to Know
5 months ago -
Stop Loss vs Take Profit: Differences, Examples & Best Practices
5 months ago -
Forex Market Hours & Trading Sessions Explained (Best Times to Trade)
5 months ago -
Best Forex Trading Journal Tools (Top Picks Compared)
5 months ago