Scalping Forex Strategy for Beginners (Rules, Entries & Risk)

Forex scalping is a fast trading style. You take many short trades to capture small moves, often on 1 to 15 minute charts. Most scalps target about 5 to 20 pips, so spread and execution speed matter.
This guide gives you a beginner scalping plan with clear rules. You will learn what pairs and sessions to trade, what a valid setup looks like, where to enter and exit, and where to place your stop loss and take profit. You will also learn how to size positions so one bad trade does not wipe out a day of work. Risk control comes first, because small targets leave little room for mistakes.
If you need a refresher, read our risk-reward ratio guide.
Key Takeaways
- In het kort: Trade liquid pairs and the busiest sessions; low spreads matter more than big moves.
- In het kort: Use one clear setup and one trigger; skip trades that look “almost right”.
- In het kort: Enter with precision; your edge comes from execution, not prediction.
- In het kort: Place the stop loss where the setup is invalid, not where it “feels safe”.
- In het kort: Keep targets small and realistic; spreads and slippage must fit inside your plan.
- In het kort: Size positions from the stop distance; cap risk per trade so one loss does not ruin your day.
Key takeaways
- Scalping works best on high-liquidity pairs during high-volume hours. You need tight spreads and fast fills.
- You need fixed rules for setup, entry, stop, and take profit. You cannot improvise on a 1 minute to 5 minute chart.
- Your stop loss defines the trade. Place it beyond the structure that supports your entry, and accept the loss if price breaks it.
- Your take profit must account for costs. Spread, commission, and slippage can turn a good idea into a bad trade.
- Position size comes from risk, not confidence. Use the same risk per trade and adjust lot size to the stop distance.
- Limit your daily damage. Set a max loss for the day, stop trading when you hit it.
- Use the right order type for your entry. Review market vs limit vs stop orders before you go live.
What a Scalping Forex Strategy Is (and What It Isn’t)
How Scalping Works in Practice
A scalping forex strategy targets small moves. You take many trades. You aim for small profits per trade and accept small losses fast.
You work with tight stops. Your trade either works quickly or you exit. You do not “give it room.” You cut it.
Most scalps use:
- High liquidity pairs, spread stays lower and fills improve.
- Clear entry triggers, one setup, one rule set.
- Fixed risk per trade, lot size changes with stop size.
- Fast management, move to break even only if your rules say so, otherwise keep it simple.
Scalping is execution heavy. Your edge can be small, but your discipline must be strong. Costs hit every trade, so they matter more here than in longer styles.
Typical Timeframes for Beginners, M1 vs M5
Beginners often start on M1 because it “looks active.” It also forces fast decisions and creates more noise.
M5 is often easier because:
- Less noise, fewer random spikes per candle.
- More time to decide, you can place orders without rushing.
- Cleaner structure, levels hold more often than on M1.
- Fewer trades, you avoid overtrading and reduce cost drag.
If you want to learn scalping without blowing up your process, start on M5. Trade one pair. Trade one session. Track results.
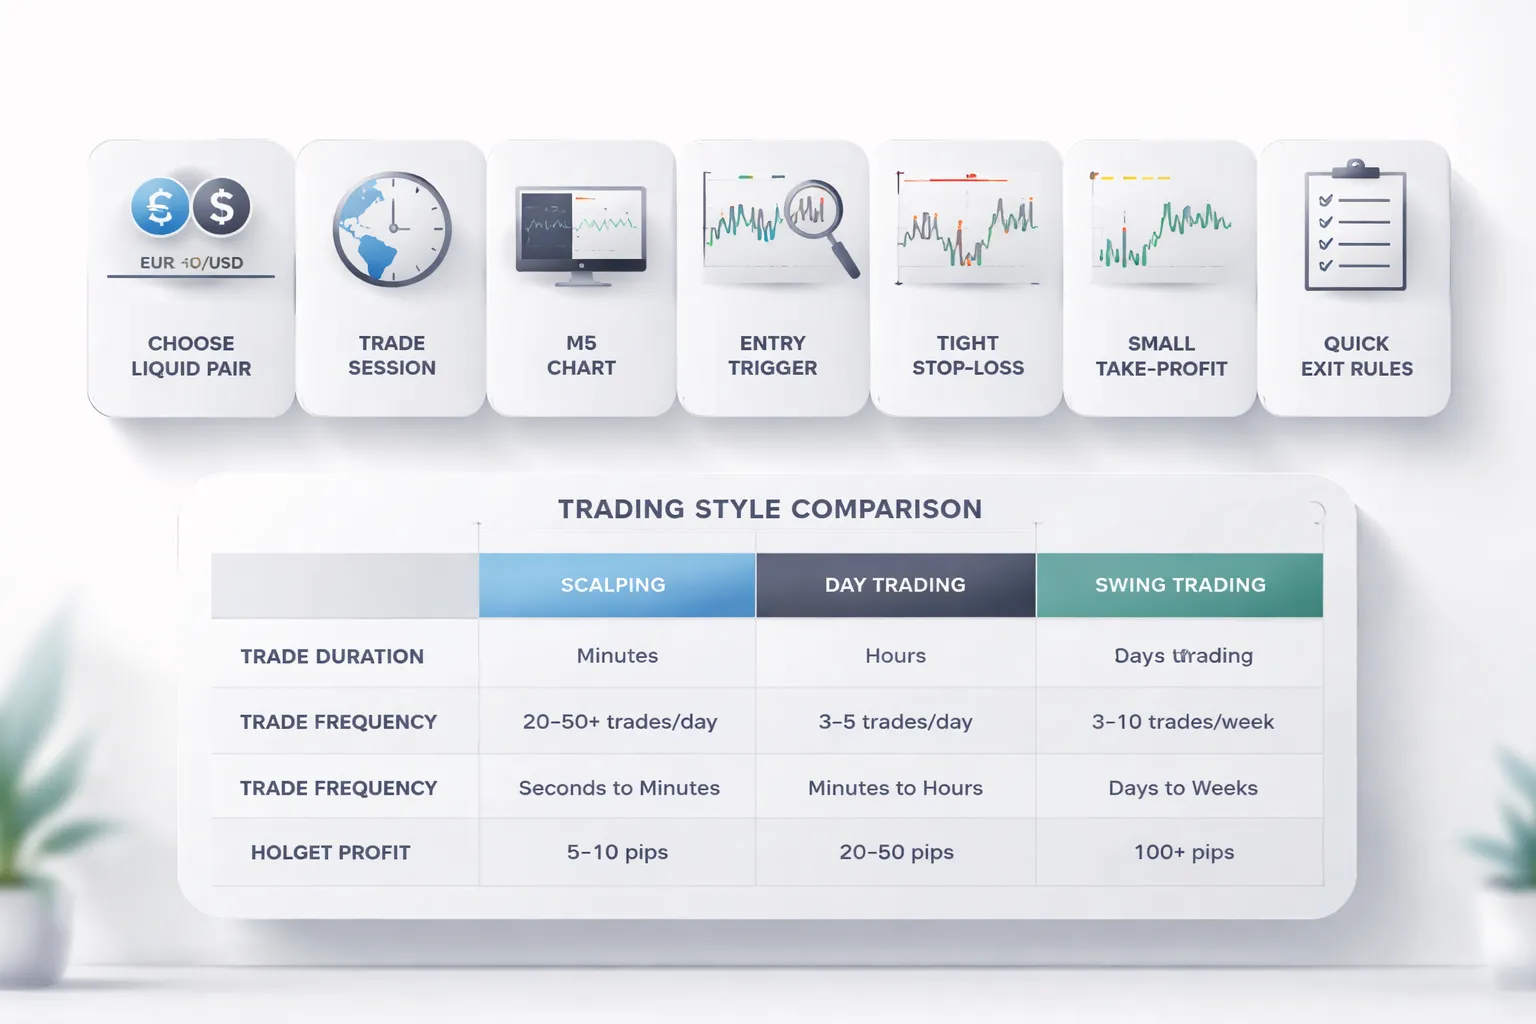
Scalping vs Day Trading vs Swing Trading
| Style | Typical hold time | Trades per day | Decision load | Main pressure |
|---|---|---|---|---|
| Scalping | Seconds to minutes | Many | High | Execution, spreads, slippage |
| Day trading | Minutes to hours | Low to moderate | Medium | Patience, managing intraday swings |
| Swing trading | Days to weeks | Few | Low | Holding through pullbacks, swap, news gaps |
Scalping gives you more “at bats,” but it also gives you more chances to make mistakes. It demands focus. If you cannot follow rules under speed, you will pay for it.
Common Misconceptions That Blow Up Scalpers
- “No stop-loss needed.” A scalper without a stop turns one bad move into a large loss. Tight stops define the strategy. If you cannot place a stop, you are not scalping, you are gambling.
- “More trades equals more profit.” More trades equals more spread, more commission, and more slippage. It also increases fatigue. You profit from quality setups and repeatable execution, not from constant clicking.
Scalping is not a shortcut. It is a rule set built around speed, tight risk, and quick exits. If you want cleaner exits, study how to set take profit levels and keep your targets realistic for your timeframe.
Who Scalping Is Suitable For (Beginner Fit Check)
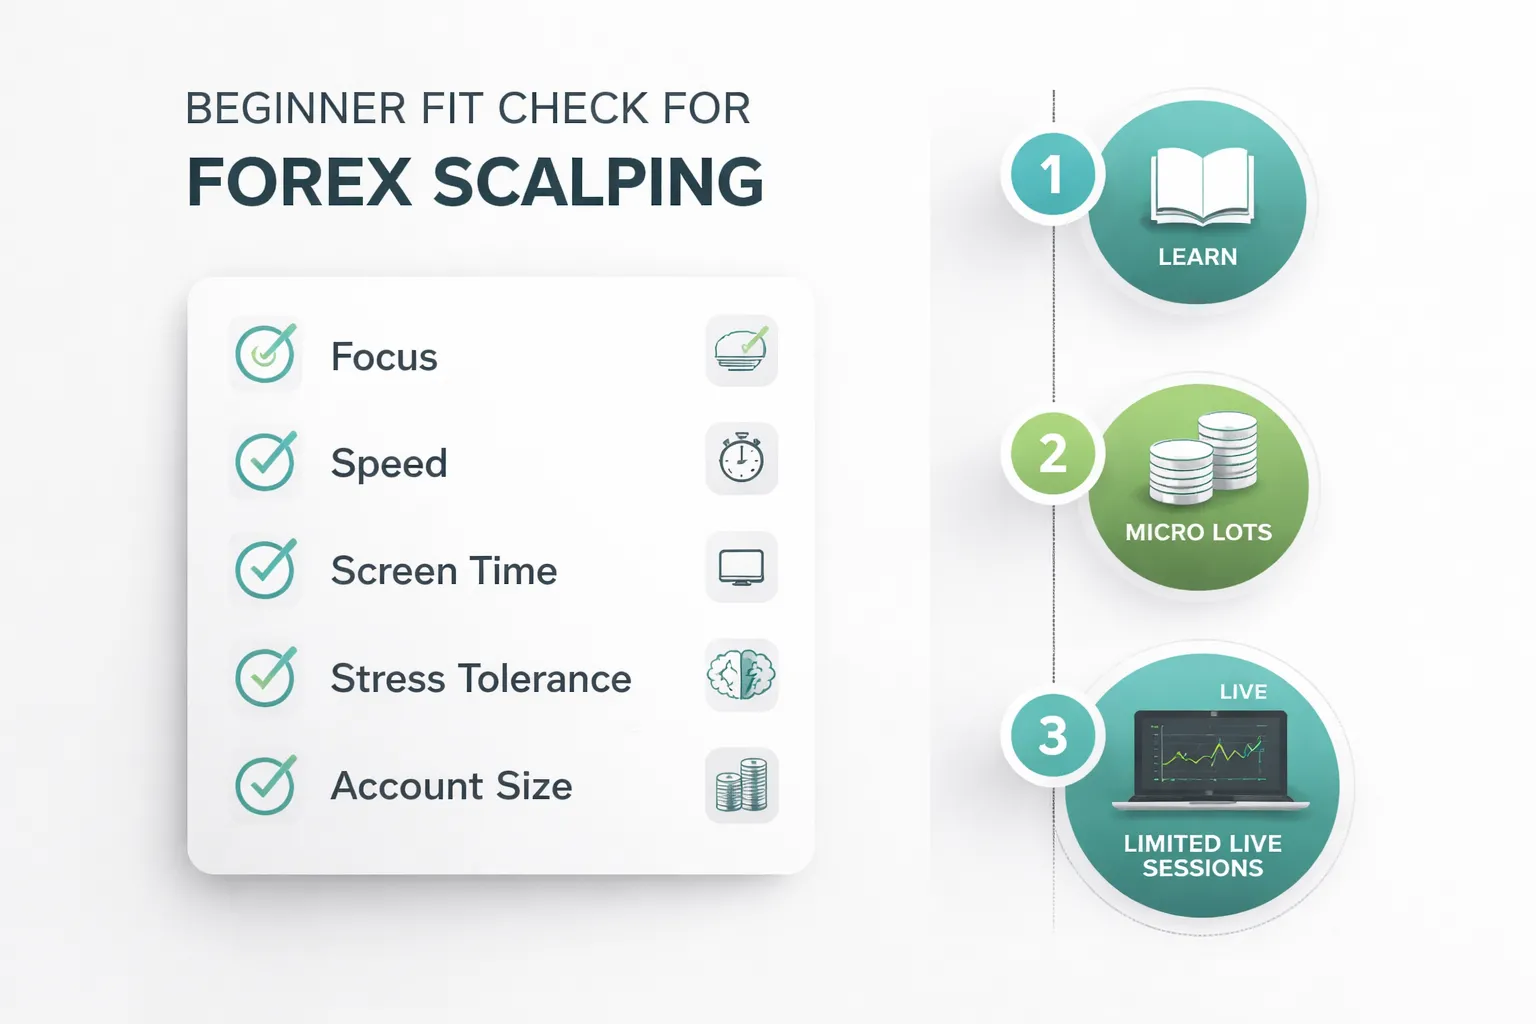
Personality and schedule requirements
Scalping fits you if you can follow rules under time pressure. You need fast decision making and strict execution. You also need comfort with small wins and frequent exits.
- Focus: You must watch price closely. You must avoid distractions.
- Speed: You must place orders fast and manage trades without hesitation.
- Screen time: You need fixed sessions. Most scalp setups appear during high liquidity, often London and New York overlaps.
- Routine: You need the same pairs, the same hours, and the same playbook.
Capital considerations
Tiny accounts struggle because costs scale against you. Spread, commission, and slippage can equal a large share of each target. Your position size also hits limits fast when you use tight stops.
- Costs matter more: If you aim for 5 to 10 pips, paying 1 to 2 pips in total costs is heavy.
- Sizing limits: Tight stops force larger position size to make the trade worth it, but margin and risk caps block that.
- Risk control: If your broker only offers larger minimum lot sizes, you cannot fine tune risk per trade.
| Scalp target | Total trade costs (spread + commission + slippage) | Cost share of target |
|---|---|---|
| 5 pips | 1 pip | 20% |
| 5 pips | 2 pips | 40% |
| 10 pips | 1 pip | 10% |
| 10 pips | 2 pips | 20% |
Keep cost share low. Many scalpers filter pairs by spread first. EUR/USD and USD/JPY often stay cheaper than crosses, but you must check your broker at your trading hours.
If you should avoid scalping
Scalping punishes weak discipline. It also punishes emotional trading. Avoid it if you match these points.
- You tilt fast: You chase after a loss. You widen stops. You double size.
- You trade to feel busy: You take marginal setups to avoid waiting.
- You break rules under pressure: You move your take profit. You cancel your stop. You add to losers.
- You hate screen time: You cannot sit through a full session without drifting.
- You struggle with stress: Your heart rate and urgency drive decisions.
Overtrading is the main beginner failure. More trades increase spread paid, commission paid, and decision fatigue. Your edge disappears fast.
A safer learning path
Use a staged rollout. You learn execution first, then risk control, then speed.
- Step 1, demo: Trade one pair. Trade one session per day. Log every trade with entry, stop, target, and reason.
- Step 2, micro lots: Go live with the smallest size. Risk stays fixed per trade. Treat costs as part of your system.
- Step 3, limited live sessions: Trade 30 to 60 minutes only. Set a max trades cap. Stop after a daily loss limit.
Do not add indicators to fix bad execution. Keep your entry trigger simple and repeatable. If you need help reading clean entries, review candlestick patterns and test one trigger at a time.
Market Basics You Must Understand Before You Scalper Trade
Spread, commission, and swap, which costs actually matter for scalpers
Your scalping edge is small. Costs can erase it fast. Track these three costs on every trade.
- Spread: The gap between bid and ask. You pay it every time you enter and exit. For most scalpers, spread is the main cost. If your average win is 4 to 8 pips, a 1.2 pip spread is a large tax.
- Commission: Charged on many raw spread accounts. Treat it as extra spread. Convert commission to pips so you can compare accounts. If a broker charges $7 per round turn per 1.0 lot on EURUSD, that is about 0.7 pips.
- Swap: Overnight financing. Most scalpers close trades fast, so swap usually does not matter. It matters if you hold through rollover or if you “scalp” during slow sessions and end up stuck in a trade.
| Cost | When you pay it | Why it matters for scalping |
|---|---|---|
| Spread | Every entry and exit | Directly reduces win rate and average win |
| Commission | Every round trip on many ECN style accounts | Needs conversion to pips to judge true cost |
| Swap | At rollover if you hold | Usually minor, can hurt when trades turn into holds |
Log your average spread during your trading hour, not the broker’s “from 0.0” marketing number. Spreads widen at news, rollover, and thin sessions. Your system must survive those conditions or you must avoid them.
Pips, points, and pip value, quick sizing math beginners must know
You need fast math. It keeps your risk fixed and your execution clean.
- Pip: The standard price unit. Most pairs move in 0.0001, that is 1 pip. JPY pairs move in 0.01, that is 1 pip.
- Point: The smaller quote step. On most platforms, 1 pip equals 10 points because price shows five decimals on non JPY pairs and three decimals on JPY pairs.
- Pip value: The money you win or lose per pip for your position size.
Use this sizing rule:
Lot size = Risk in account currency / (Stop in pips × Pip value per 1.0 lot)
Quick reference for many USD quote pairs like EURUSD, GBPUSD, AUDUSD:
- 1.0 lot: about $10 per pip
- 0.10 lot: about $1 per pip
- 0.01 lot: about $0.10 per pip
Example: You risk $20 with a 5 pip stop on EURUSD. At $10 per pip for 1.0 lot, your size is 20 / (5 × 10) = 0.40 lots.
Do this before you trade. If you guess size, your results will swing and you will misread your strategy performance.
Liquidity and slippage, why fills can make or break a scalping system
Scalping depends on getting filled close to your price. Liquidity controls that.
- High liquidity: Tighter spreads, faster fills, less slippage. You get this most on major pairs and during active sessions.
- Low liquidity: Wider spreads, slow fills, more slippage. Your stop and target become less reliable.
Slippage hits you in two places.
- Entries: You click buy, you get filled worse. Your effective stop distance shrinks and your cost rises.
- Stops: Price jumps through your stop. You lose more than planned. This is common during news spikes.
Measure it. Track “requested price” versus “filled price” in your journal. If your average slippage is 0.3 pips and your average target is 4 pips, you just gave away a meaningful part of your edge.
Control it with simple rules.
- Trade the most liquid pairs first, like EURUSD, USDJPY, GBPUSD.
- Trade during active hours. Avoid late session dead zones.
- Skip major red news if your strategy cannot handle spread and speed changes.
- Use limit orders for planned pullbacks when possible, accept that you may miss some trades.
Volatility vs noise, how to tell a tradable move from random chop
You need movement to pay for costs. You also need structure so your stop and target make sense.
Volatility helps when it shows direction and follow through. Noise hurts when price flips both ways and prints small ranges.
- Tradable move: Price pushes, pulls back, then continues. Swings are clean. Candles close near their highs in up moves or near their lows in down moves.
- Random chop: Overlapping candles, frequent wicks on both sides, many reversals inside a tight range. Breakouts fail fast.
Use a simple screen before you take any setup.
- Range check: If the last 10 to 20 candles cover fewer pips than your target plus costs, skip it. You need enough room.
- Clarity check: If you cannot mark a clear swing high and swing low without guessing, skip it.
- Retest check: Favor moves that pull back and hold a level. Avoid first breakouts in dead ranges.
If you want a clean framework for trading pullbacks without chasing, use this pullback trading strategy guide as your structure reference.
Best Forex Pairs and Trading Sessions for Beginner Scalpers
Top Beginner-Friendly Pairs
Start with major pairs. They trade the most volume. They usually have the tightest spreads and the cleanest fills.
- EUR/USD, often the lowest spread major. Steady liquidity across London and New York. Cleaner structure on lower timeframes.
- GBP/USD, more movement than EUR/USD. Higher cost and faster swings, but still liquid. Use smaller size until you can handle the pace.
- USD/JPY, tight spreads at active hours. Often smooth trends. Watch for quick spikes around US data and Japan related headlines.
Majors dominate because your edge in scalping comes from execution. Tight spreads, fast fills, and consistent order flow matter more than “big moves.”
Choose by Trading Costs, Not Hype
Scalping fails when costs eat your target. Your true cost per trade is spread plus commission plus slippage.
Use this quick filter before you pick a pair for scalping.
- Check your broker’s average spread for that pair, not the minimum.
- Add commission for your position size.
- Assume some slippage on stop orders and fast markets.
- If your all in cost is more than 20 to 30 percent of your target, do not scalp that pair.
Track your real costs. Log spread at entry, commission paid, and how often you get slipped. Adjust your targets and stop placement from that data.
Best Times to Scalp
You want volume. You want fast but orderly movement. That usually means London and the New York overlap.
- London session, strong liquidity and clean continuation moves, especially in EUR/USD and GBP/USD.
- London and New York overlap, the day’s peak volume. Best for quick follow through after a retest.
- New York morning, still liquid, but watch for sharp reversals after major US releases.
Stand aside in these conditions.
- First and last minutes around high impact news for the pair you trade. Spreads widen and slippage jumps.
- Late New York and rollover. Liquidity drops and spreads can expand.
- Quiet hours where price chops inside a tight range. Your entries get churned and costs stack up.
If you scalp retests, you still need levels that hold. Build those levels from clear zones. Use this support and resistance guide to mark them fast and consistently.
Pairs and Periods to Avoid as a Beginner
Avoid anything that makes execution unpredictable.
- Exotics, wide spreads, poor fills, and uneven liquidity. Your stop gets hit by spread expansion, not by a real move.
- Thin cross pairs during off hours, even if the chart looks clean. The spread can double without warning.
- Illiquid times, late New York, pre London, holidays, and the minutes around rollover.
Keep your focus tight. One to two pairs. One session. Same rules. That is how you control costs and build consistency.
Tools and Chart Setup for a Beginner Scalping Workflow
Recommended Platform Features
Your edge in scalping comes from execution. Your platform must reduce clicks and reduce delay.
- One-click trading. You place and close orders without extra confirmation windows. You cut slippage risk when price moves fast.
- Hotkeys. You map keys for buy, sell, close, close partial, and cancel all. You avoid missed fills when you need to exit.
- Time and sales, if available. You watch the tape for sudden bursts of prints. You use it as a warning for momentum spikes and news-driven flow.
- Depth of market, if available. You treat it as context, not a signal. You look for thin liquidity that can widen spread and slip stops.
- Spread display in pips. You keep it visible at all times. You do not scalp blind on costs.
Chart Template, Keep It Clean
Scalping punishes clutter. Extra tools add lag and create conflict. Use a simple template and keep it the same every day.
- Candles only. If you still struggle with candle structure, review forex candlestick basics.
- Key levels. Mark prior day high and low, current day open, and the most recent session high and low. These levels attract stops and liquidity.
- One moving average, optional. Use a single MA as a filter, not as an entry trigger. If it adds confusion, remove it.
- Session separator. You split Asia, London, and New York. You see where range forms and where expansion starts.
- News marker. You tag high-impact releases on the chart. You avoid entries into scheduled volatility.
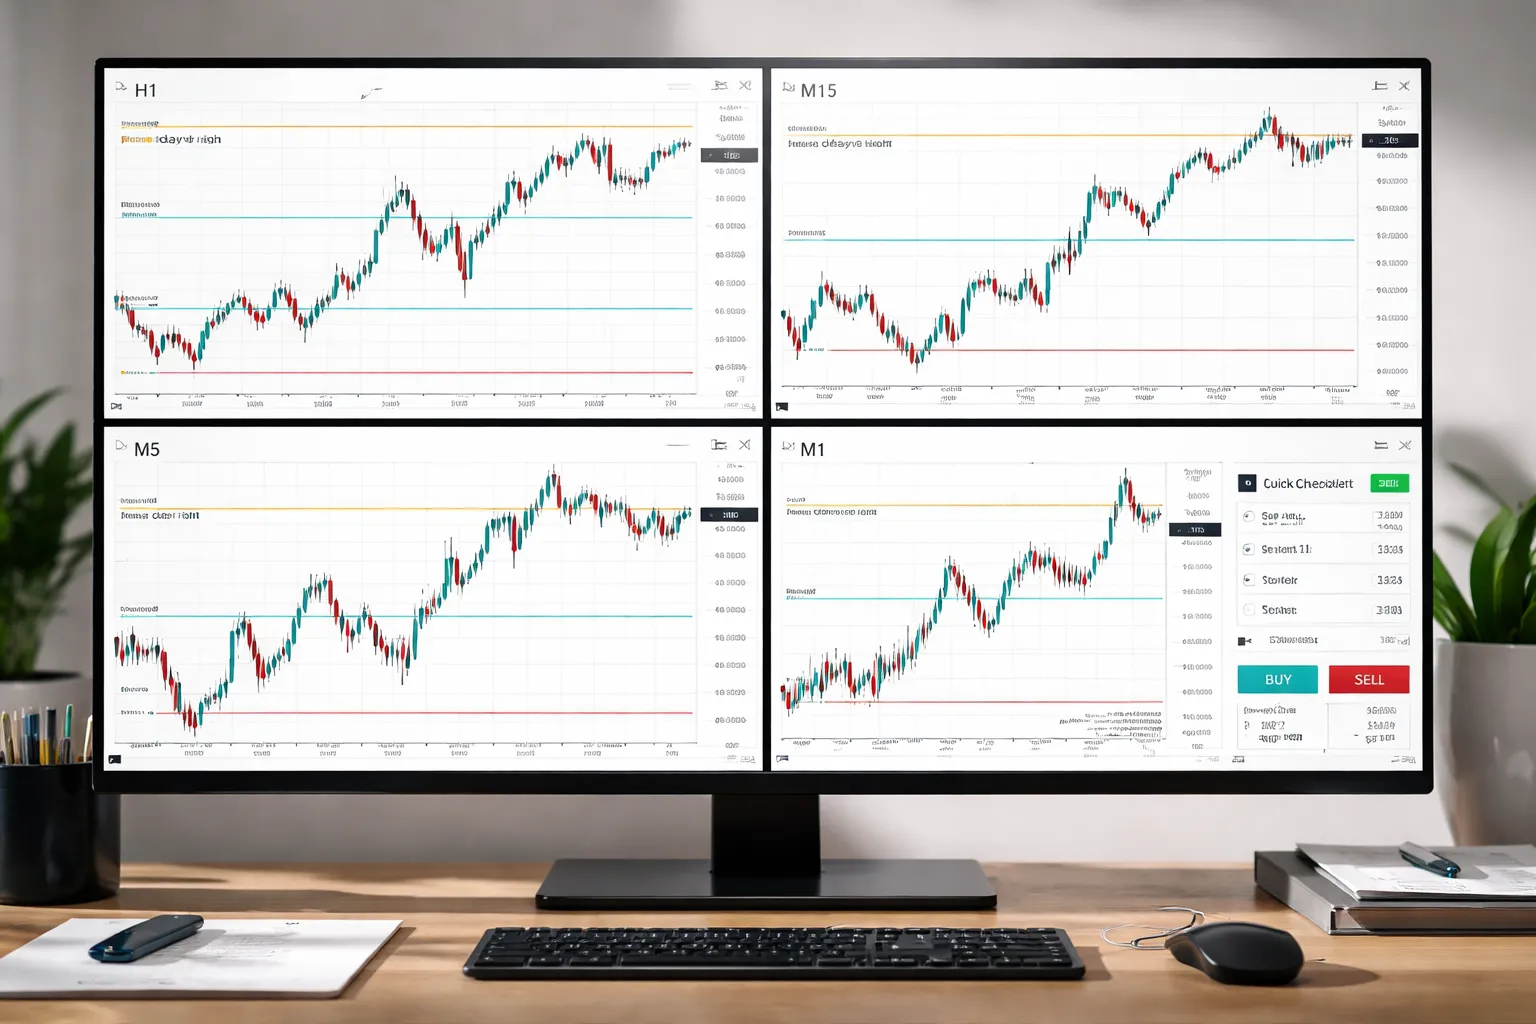
Timeframe Stack for Bias and Execution
You need two jobs. Direction and entry. Separate them.
- H1 for structure. You identify trend, range, and the nearest swing points. You define the area where price can run stops.
- M15 for working bias. You mark the current swing, pullback zones, and clean breakout levels. You decide what you will trade and what you will ignore.
- M5 for setup. You wait for the pullback to finish or the range to compress. You see if price holds above or below a key level.
- M1 for execution. You enter on the trigger candle and manage the first seconds of the trade. You keep stops and targets based on structure, not on noise.
Do not build bias from M1. You will overtrade. Use M1 to execute a plan made on higher frames.
Execution Checklist, Before You Place the First Trade
- Set your session. You trade one block of time. You skip rollover and thin hours.
- Mark levels. Prior day high and low, day open, session high and low, and the closest swing high and low on M15 or H1.
- Check spread. You record the typical spread for your pair during your session. You stop trading if it expands beyond your limit.
- Load alerts. You set alerts at your levels, not at random prices. You let the market come to you.
- Set order defaults. You pre-fill lot size, SL type, and TP type. You avoid errors under speed.
- Confirm execution settings. You set max deviation or slippage controls if your platform supports it. You avoid surprise fills.
- Prepare the exit. You know where you will cut the trade if the level fails. You do not improvise mid-candle.
| Workflow Item | Beginner Default | Why It Matters |
|---|---|---|
| Pairs | 1 to 2 major pairs | Lower spread, better liquidity, fewer spread spikes |
| Charts | H1, M15, M5, M1 | Bias stays stable, entries stay precise |
| Indicators | None to one filter | Less lag, fewer conflicting signals |
| Levels | PDH, PDL, day open, session highs and lows | Common liquidity targets for scalps |
| Execution | One-click, hotkeys, visible spread | Faster entries and exits, fewer mistakes |
Core Rules of a Scalping Forex Strategy for Beginners
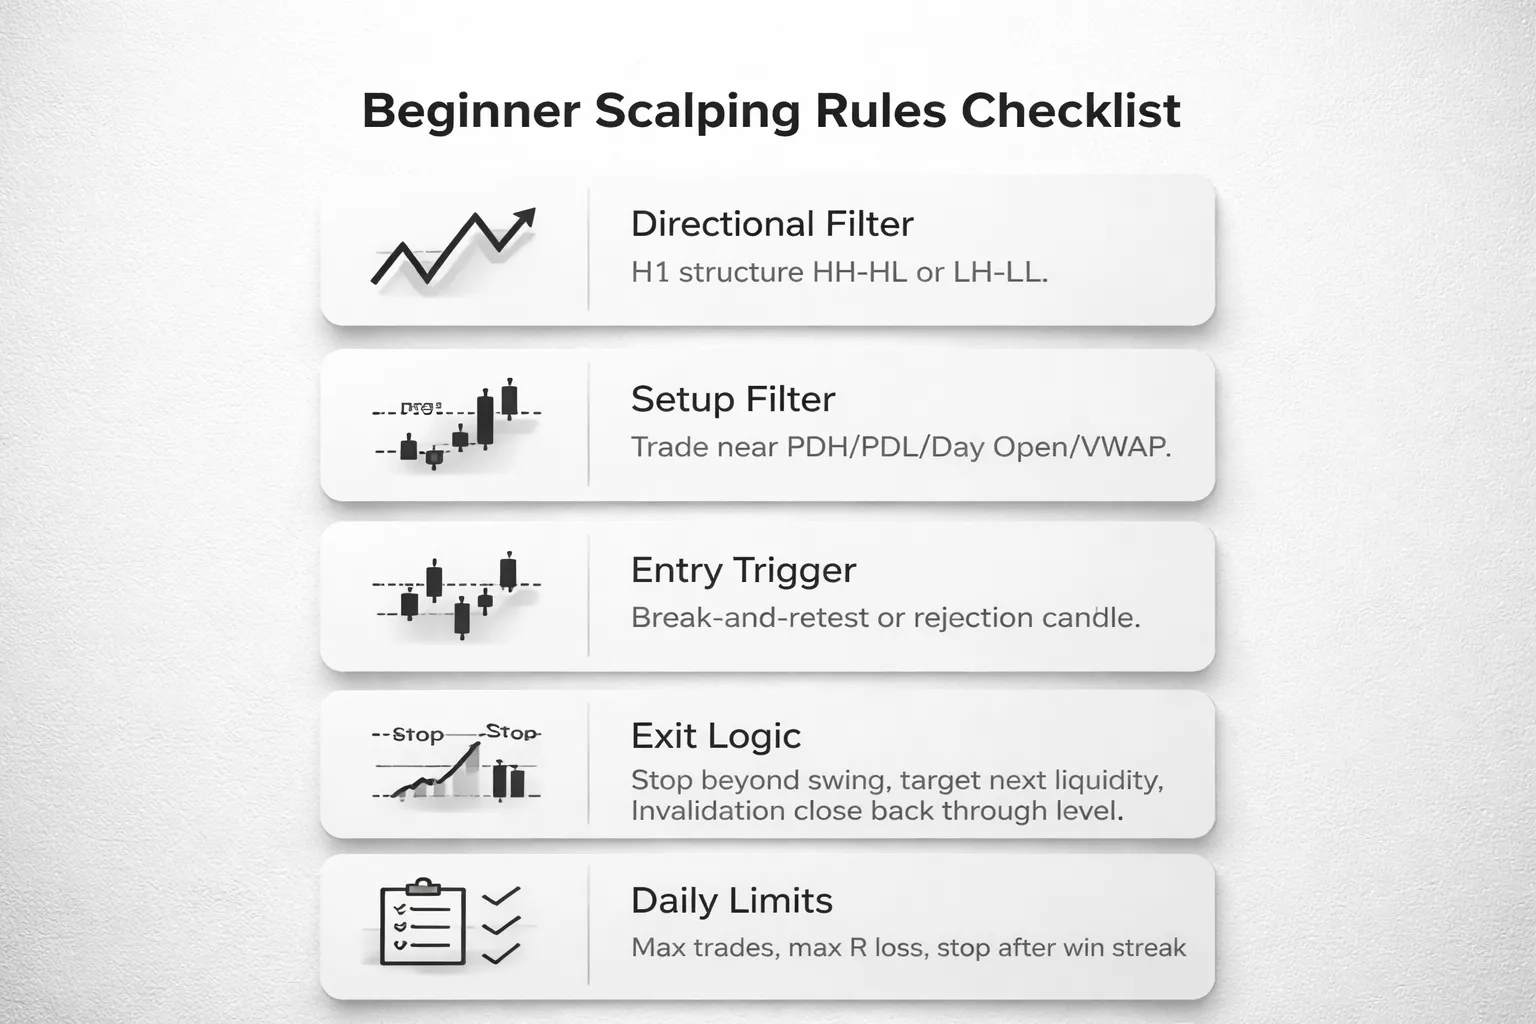
Directional filter, trade with the session trend
Your first job is direction. You need one clear bias before you look for entries.
- Pick one active session window. London or New York. Do not scalp during rollover or the quiet hours.
- Use H1 for bias, execute on M1 to M5. Do not switch timeframes once you commit.
- Define trend with structure. Uptrend equals higher highs and higher lows on H1. Downtrend equals lower highs and lower lows on H1.
- Only take trades in the trend direction. If H1 is up, you only buy. If H1 is down, you only sell.
- Stand aside in chop. If H1 prints overlapping swings and no clean HH-HL or LH-LL sequence, you do not trade.
Setup filter, trade at levels, not in the middle
Scalps work best when you trade close to a level that pulls orders. Mid-range entries bleed from spread and noise.
- Mark your levels before the session. Previous day high (PDH), previous day low (PDL), day open, and current session high and low.
- Add one optional dynamic level. Use VWAP or a single moving average, not both.
- Only trade within a small distance of a level. If price sits in the middle of the range, you wait.
- Know the “why” of the level. PDH and PDL often act as liquidity targets. Day open often acts as an intraday pivot.
- Skip levels inside high-impact news spikes. News can invalidate clean reactions. Do not scalp through it.
Entry trigger, the candle must confirm
You do not enter because price touched a level. You enter because price reacted in a way you can define.
- Trigger A, break and retest. Price breaks a level, closes beyond it on M1 to M5, then retests the level and holds. You enter on the retest hold, in the direction of the break.
- Trigger B, rejection. Price sweeps a level, then closes back on the other side with a clear rejection candle. You enter on the close or on a small pullback, in the rejection direction.
- One entry per level touch. If you miss it, you miss it. Do not chase.
- Spread check before you click. If spread is wider than normal for your pair, you skip the trade.
Exit logic, predefined stop, target, and invalidation
Your exit rules must exist before you enter. Scalping fails fast when you improvise.
- Invalidation point: If price closes back through the level you used for the setup, the trade idea is invalid. You exit or you accept the full stop. No widening.
- Take-profit logic: Target the next obvious liquidity point, session high or low, day open, PDH or PDL, or the next clean intraday swing.
- Minimum reward rule: Do not take trades with less than 1R potential after spread. If your stop is 5 pips, you need at least 5 pips of clean space to target.
- Time stop: If price does not move in your favor within a few candles after entry, exit near breakeven. Dead trades often turn into losses.
- Risk per trade: Keep it small and fixed. Most beginners stay between 0.25 percent and 1 percent per trade. For deeper rules, use this risk management guide.
Daily limits, hard caps to prevent spirals
You need a daily rule set that forces you to stop.
- Max trades: 3 to 6 trades per session. If you hit the cap, you stop.
- Max daily loss: 2R or 3R. Example, if you risk 0.5 percent per trade, a 3R daily stop equals 1.5 percent. When you hit it, you stop for the day.
- Loss streak stop: Stop after 2 consecutive losses. Reset the next day.
- Winning streak stop: Stop after 2 to 3 clean wins. Protect the day. Do not give profits back to fatigue and overconfidence.
- One-session rule: Trade one session window only. No revenge trades later.
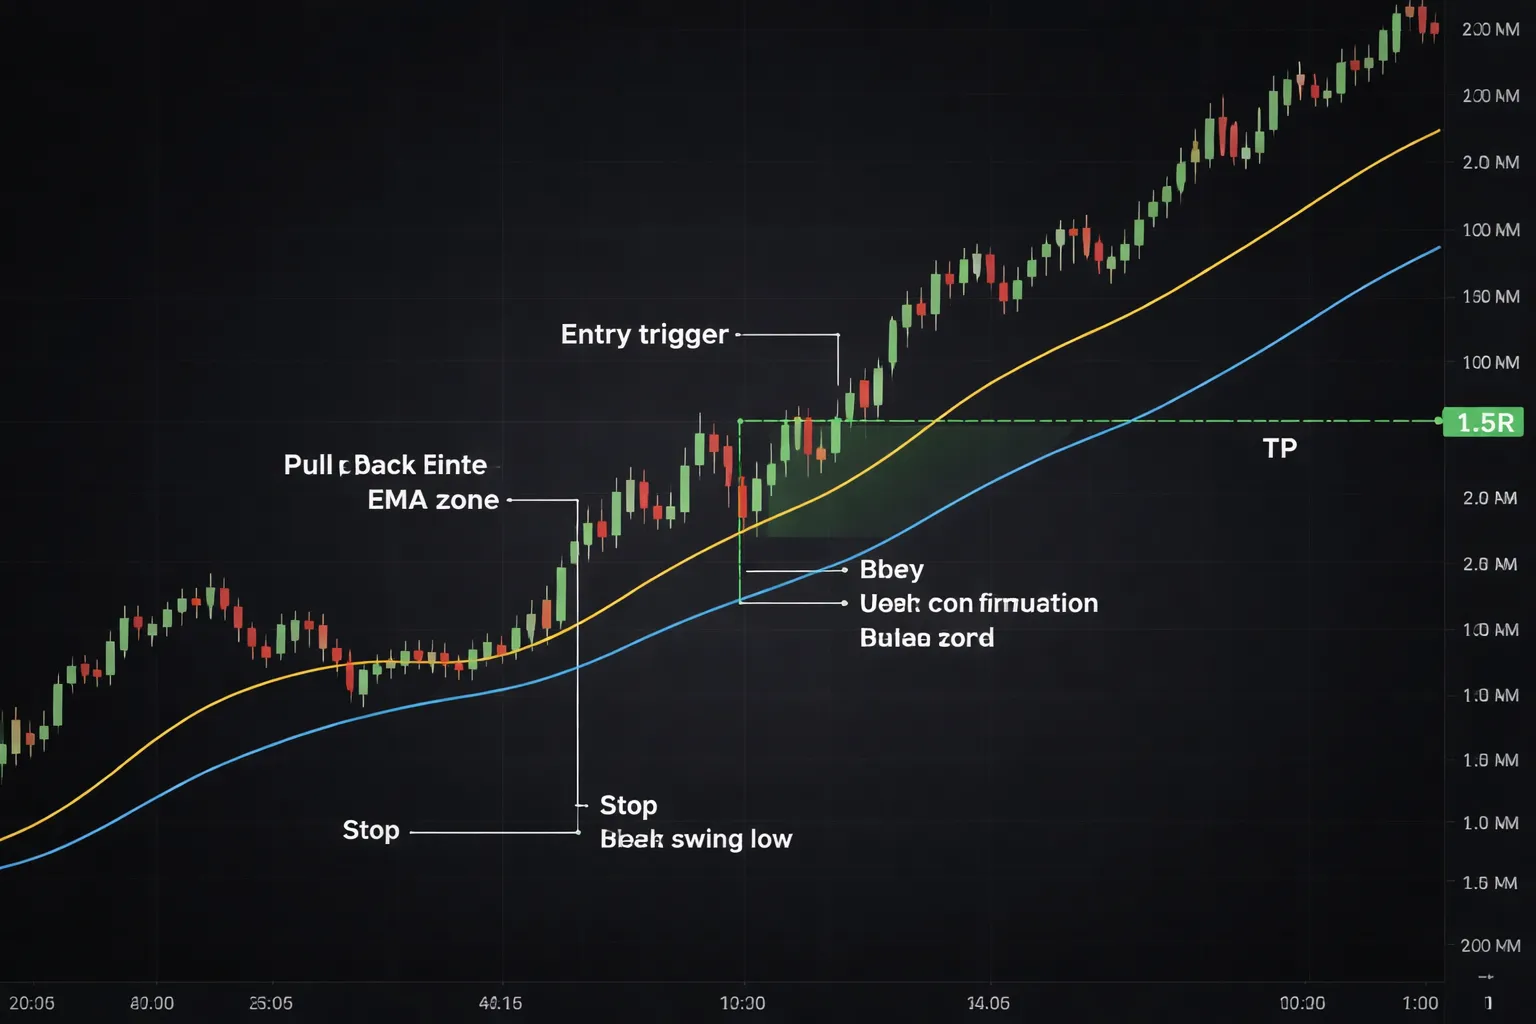
Beginner-Friendly Scalping Strategy #1: Trend-Pullback with EMAs
Indicator settings and market condition
Chart: Use the 1-minute or 5-minute chart for entries. Use the 15-minute chart to confirm direction.
Indicators: Add two EMAs, 20 EMA and 50 EMA, applied to close.
- Trend filter: Trade only in the direction of the 15-minute bias.
- Trend definition: 20 EMA above 50 EMA for longs. 20 EMA below 50 EMA for shorts.
- Clean market: Price respects the EMAs, pulls back, then continues. Avoid chop where price crosses both EMAs often.
- Best sessions: London and New York overlap, or the first 2 to 3 hours of London or New York.
- Pairs: Focus on low spread majors. EURUSD and USDJPY are common starting points.
Step-by-step entry: pullback, confirmation candle, trigger
- Step 1, set direction: Check 15-minute. Only trade with the 20 and 50 EMA trend.
- Step 2, wait for pullback: On 1-minute or 5-minute, let price pull back toward the EMA zone. Ideally into the space between the 20 and 50 EMA.
- Step 3, get a rejection candle: You want a candle that shows the pullback failed. For longs, a bullish close back above the 20 EMA. For shorts, a bearish close back below the 20 EMA.
- Step 4, trigger the entry: Enter on a break of the confirmation candle.
- Long trigger: Buy 0.5 to 1 pip above the confirmation candle high.
- Short trigger: Sell 0.5 to 1 pip below the confirmation candle low.
- Skip rule: If the confirmation candle is huge, skip it. Your stop will bloat and your R will collapse.
Stop-loss placement options
Pick one stop method. Use it every trade. Keep it consistent so you can measure edge.
- Option A, swing point stop: Place the stop 1 to 2 pips beyond the pullback swing low for longs, or swing high for shorts. This fits structure.
- Option B, fixed buffer stop: Place the stop a fixed distance beyond the 50 EMA or beyond the pullback extreme, such as 6 to 12 pips on majors. This fits faster execution.
Rule: If your required stop exceeds your maximum allowed stop for the day, skip the trade. Do not “make it fit” by widening risk.
Take-profit methods
- Method 1, fixed R multiple: Take profit at 1R to 2R. For beginners, start with 1.5R. It reduces decision errors.
- Method 2, nearby liquidity: Target the prior session high or low, the last swing high or low, or an obvious equal high or equal low. These often act as magnet levels.
- Method 3, partials: Take 50 percent off at 1R. Move stop to breakeven only after price has clearly moved away, such as after a strong continuation candle. Let the rest target 2R or a liquidity level.
Exit rule: If price closes back through both EMAs and stays there, exit. The trend condition failed.
Example trade walkthrough: what you should see before clicking buy or sell
Scenario, long scalp:
- 15-minute chart shows 20 EMA above 50 EMA. Both slope up.
- Price makes higher highs and higher lows. No repeated EMA crossovers.
- On the 5-minute chart, price pulls back into the 20 to 50 EMA zone.
- The pullback prints smaller candles and slows. Spread stays stable.
- A bullish rejection candle closes back above the 20 EMA.
- You place a buy stop 1 pip above that candle’s high.
- Your stop goes 1 to 2 pips below the pullback swing low.
- Your target goes to 1.5R, or to the prior swing high if it sits close and gives at least 1R.
- If price stalls and then closes below both EMAs, you exit. You do not wait for hope.
If you want to validate this setup fast, run a small sample backtest before you scale risk. Use the same session window, the same pairs, and the same stop method. See how to backtest a forex strategy.
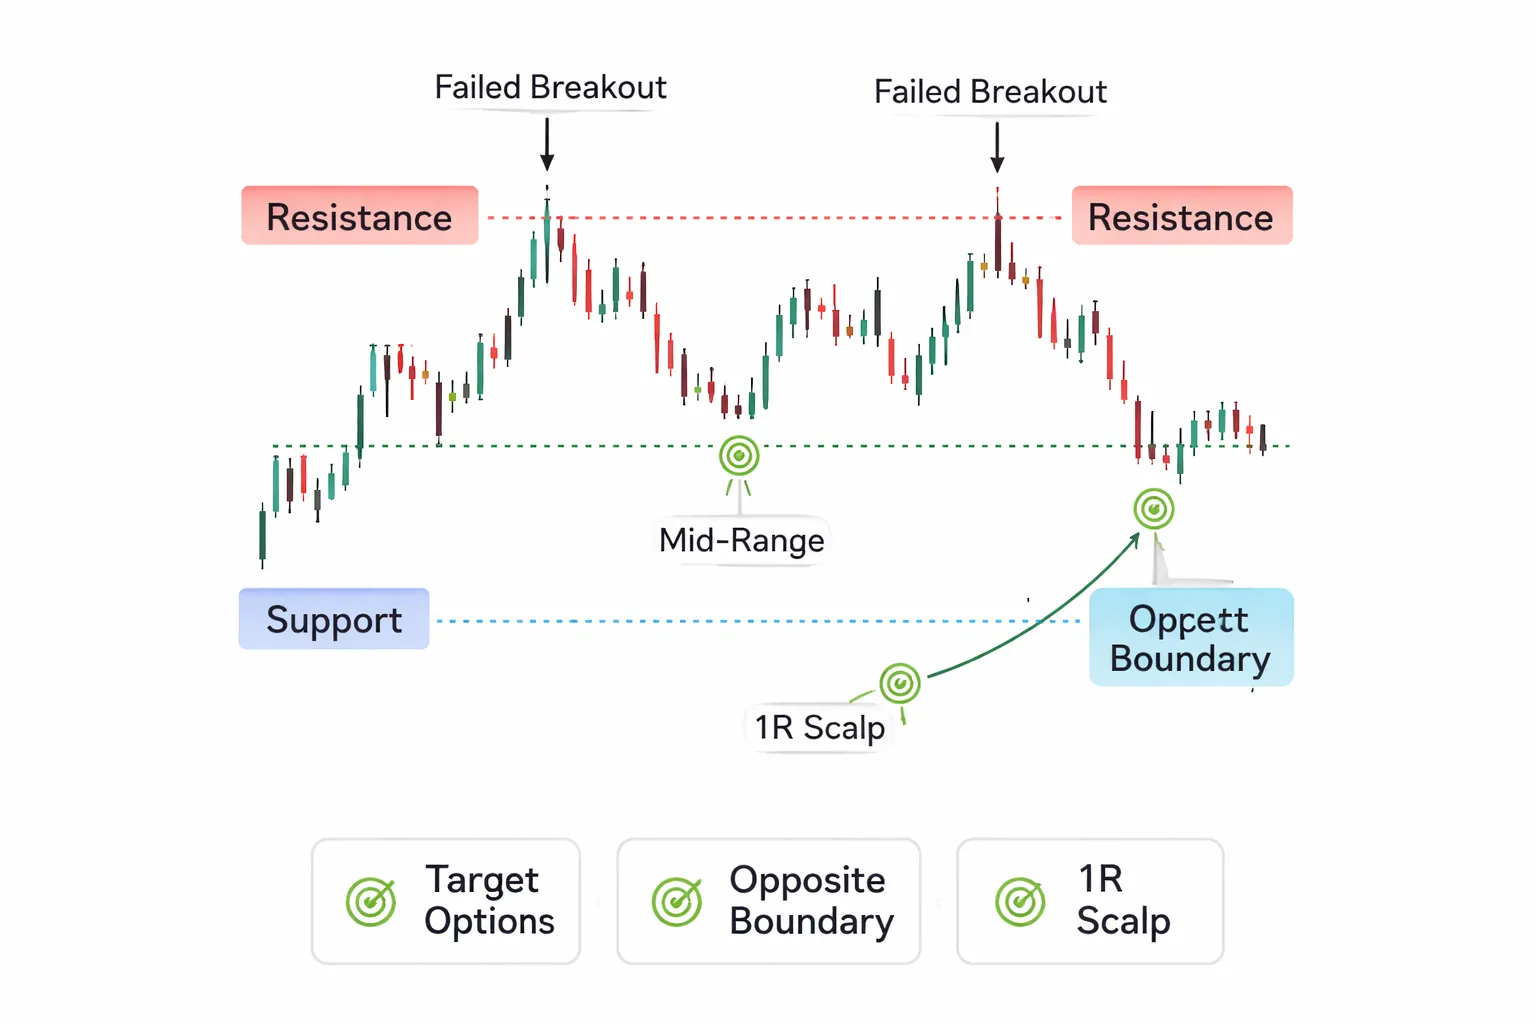
Beginner-Friendly Scalping Strategy #2: Range Scalping at Support/Resistance
Beginner-Friendly Scalping Strategy #2: Range Scalping at Support/Resistance
Range scalping works when price moves between two clear levels and keeps snapping back. You take quick trades at the edges. You avoid the middle unless you trade a strict mean-reversion tag.
How to Identify a Valid Range
You need clean boundaries, clear failures, and controlled volatility. If you do not have those, you do not have a range.
- Boundaries: Mark a support and resistance zone that price respects. You want at least 3 touches total across both sides, with bodies closing back inside the zone.
- Failed breaks: Look for at least one false breakout. Price pokes above resistance or below support, then closes back inside the range within 1 to 3 candles on your trading timeframe.
- Compression: Ranges that tighten often give cleaner bounces. You see smaller candles, overlapping bodies, and fewer wide spikes. Your best scalps come after the market stops trending and starts rotating.
Entry Trigger Options
Do not place limit orders blindly at the line. You want proof that the level held. Use one trigger and keep it consistent.
- Rejection wick: At resistance, price spikes above the zone and rejects, then the candle closes back below resistance. You enter short on the next candle break of the rejection candle low. At support, invert it.
- Micro double-top or double-bottom: Price tests the boundary twice and fails. You enter on the break of the small neckline inside the range. This filters some noise when the first touch was random.
- Mean reversion tag: Price stretches to the boundary with a fast push, then prints a stall candle. You enter back toward the mean after the stall candle closes. You must keep the target small, because the edge can break on the next impulse.
Risk Control in Ranges
Chop punishes tight stops. The spread and small spikes can hit you before the move starts.
- Place stops beyond the zone, not on the line: If support is a 5 to 10 pip area, your stop goes beyond it. A stop inside the zone turns normal noise into a loss.
- Reduce size instead of tightening stops: Keep your stop logical, then lower position size to keep risk fixed. This keeps you alive during messy rotations.
- One attempt per side: If you take a support long and get stopped, do not instantly re-enter at the same level. Wait for a fresh failed break or a new structure. Revenge trading is common in ranges.
- Exit on acceptance outside the range: If price closes outside the boundary and the next candle holds outside, you are no longer trading a range. You exit. You reassess. If you need a refresher on execution details, see how to place a forex trade step by step.
Profit Targets
Pick one target method per setup. Do not mix targets mid-trade.
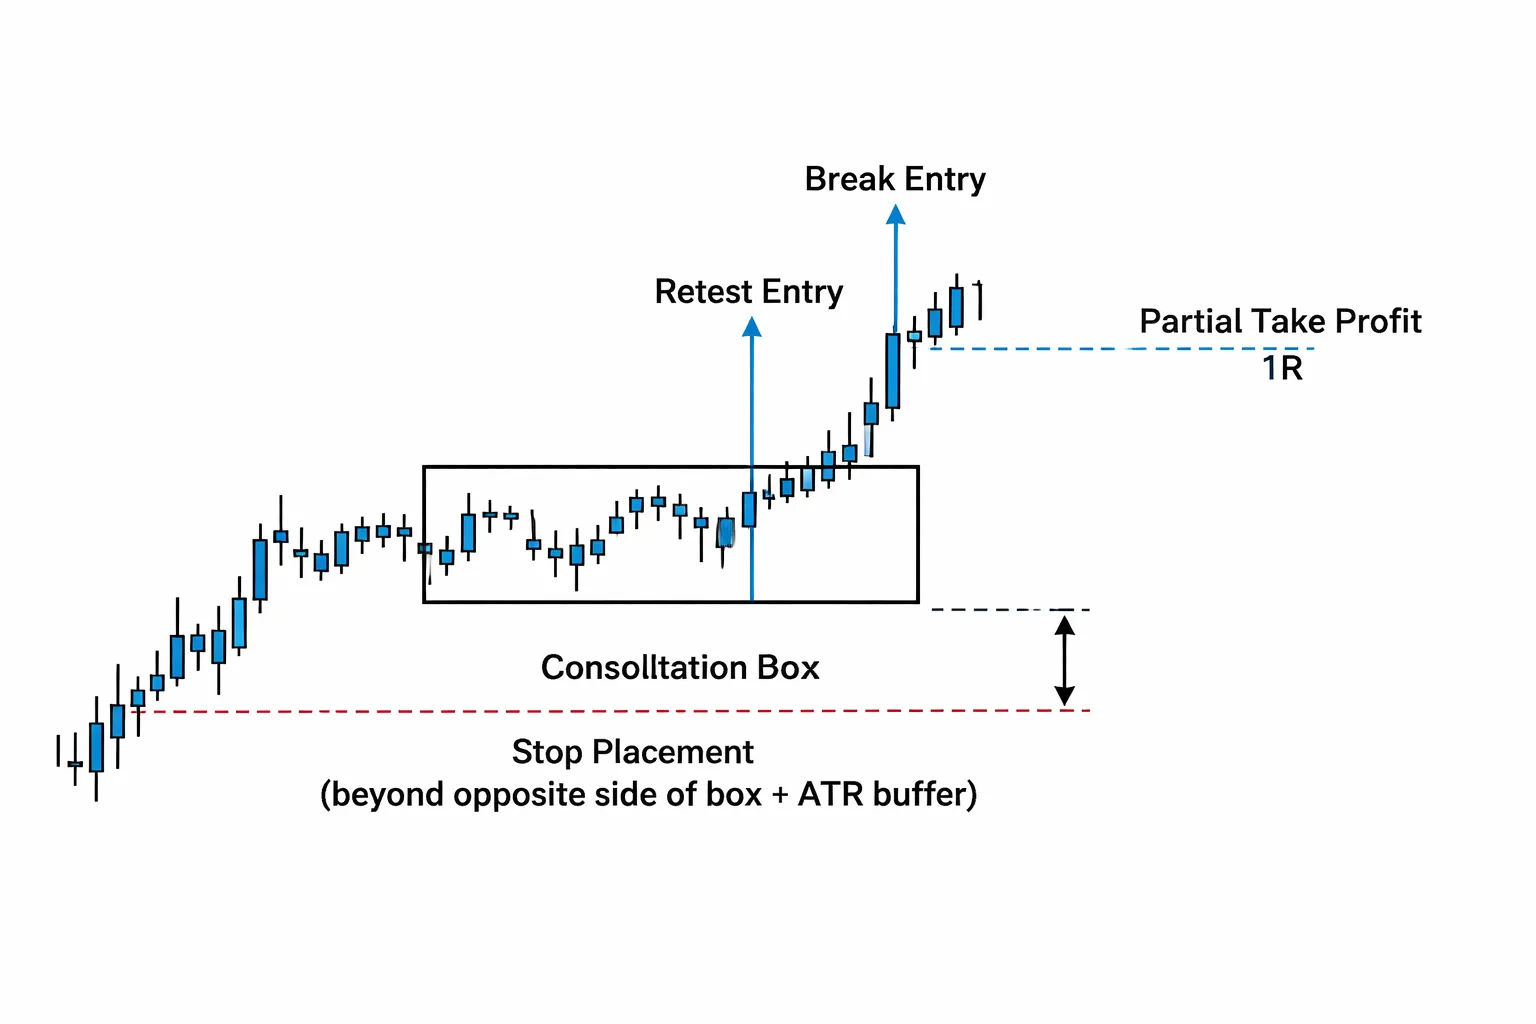
Beginner-Friendly Scalping Strategy #3: Breakout Scalping with a Volatility Filter
Beginner-Friendly Scalping Strategy #3: Breakout Scalping with a Volatility Filter
This setup targets the moment price leaves a tight range. Your edge comes from timing. You trade breakouts when volatility expands, not when price drifts.
Avoiding false breakouts with a volatility filter
- Define the box first. Mark the last 10 to 30 candles of clear consolidation on your scalp timeframe. Use the highest high and lowest low as the range.
- ATR expansion filter. Only take the breakout if the current candle range is at least 1.2x to 1.5x the 14-period ATR of your timeframe, or if the last 3 candles show rising ATR. Skip flat ATR.
- Volume proxy filter. In spot FX you do not have true exchange volume. Use tick volume if your platform shows it. Require a clear spike versus the last 20 bars, for example 1.5x average. No spike, no trade.
- Session timing filter. Focus on London open, London and New York overlap, and the first 60 to 90 minutes of New York. Avoid late US afternoon and the hour before major news.
- Close outside the box. Do not trade on a wick. Require a candle close beyond the range boundary.
Two entry styles, immediate break vs retest entry
-
Immediate break entry
- Trigger. Buy when a candle closes above the box high. Sell when a candle closes below the box low.
- Pros. You catch fast moves. You avoid missing the breakout.
- Cons. You face more slippage and spread impact. You enter closer to exhaustion spikes.
- Best use. Strong session volatility and a clean, tight box.
-
Retest entry
- Trigger. Wait for the breakout close, then enter on a pullback to the broken level. Buy near prior resistance turned support, sell near prior support turned resistance.
- Pros. Tighter stop. Better R multiple. Less chasing.
- Cons. You will miss some trades. Retests can fail and slip back into the box.
- Best use. Moderate volatility, or when the first break candle is large.
Beginner stop placement, beyond structure, not inside the box
- Place stops outside the range. If you buy a breakout, your stop goes below the box low. If you sell a breakdown, your stop goes above the box high.
- Add a buffer. Use 0.1x to 0.3x ATR(14) beyond the level. This reduces stop-outs from normal noise.
- Avoid stops inside the box. The range attracts price. Inside stops get hunted during retests.
- Risk rule. Risk a fixed amount per trade. Keep it small, like 0.25% to 0.5% while you learn execution. Use position sizing to match your stop distance.
- For a deeper stop and target framework, see stop loss and take profit best practices.
Managing trades during spikes
- Take partials fast. When price moves 1R in your favor, consider taking 30% to 70% off. This pays you for correct direction and reduces stress.
- Do not tighten early. Keep the original stop until you get confirmation, like a second close outside the box, or a successful retest hold.
- Trail only after confirmation. After the retest holds, move your stop to the broken level plus a small buffer, or behind the last swing on the entry timeframe.
- Exit rules for failure. If price closes back inside the box after your entry, exit. Do not argue with the range.
- Avoid holding through scheduled red news. If news hits in minutes, cut size, take profit, or skip the trade.
| Component | Beginner rule |
|---|---|
| Market condition | Tight, clean consolidation before an active session |
| Filter | Close outside box plus ATR expansion or tick volume spike |
| Entry | Break close entry or retest entry, pick one and stick to it |
| Stop | Beyond the opposite side of the box plus 0.1x to 0.3x ATR buffer |
| Management | Partial at 1R, tighten only after a second close out or retest hold |
| Invalidation | Close back inside the box |
Entries, Orders, and Execution Tactics (The Part Most Guides Miss)
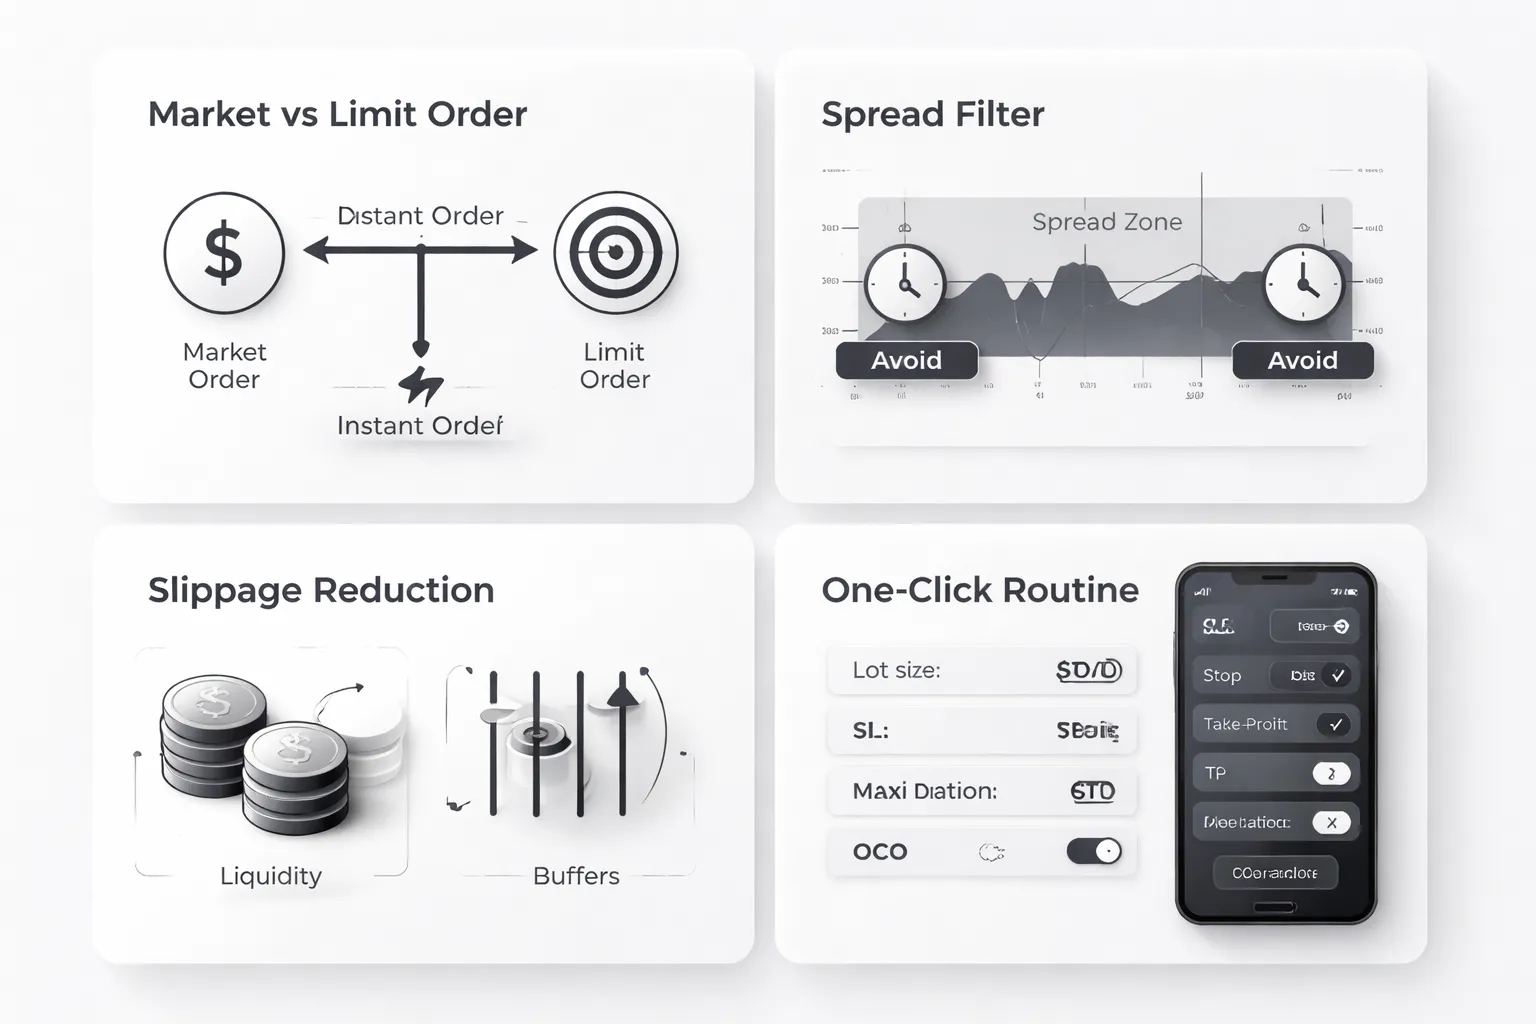
Market vs Limit Orders for Scalping, Speed vs Price Control
Your entry method decides your order type. Do not mix them trade to trade.
- Market orders give speed. You get filled fast, but you accept slippage and spread. Use them when the breakout candle closes outside the box and you want in now.
- Limit orders give price control. You set the price, but you may miss the trade. Use them for retest entries at the box edge.
Match the tool to the setup.
- Break close entry, use market with a max deviation cap.
- Retest entry, use limit at the level, or a limit with a small buffer.
Keep your target and stop realistic. If your typical spread is 0.8 pips and your stop is 3 pips, spread costs 27 percent of your stop before slippage.
Handling Spread Widening, When You Should Not Trade
Spread widening kills scalps. It turns clean 1R trades into scratches or losses.
- Avoid the first 1 to 3 minutes after a major session opens. Liquidity reshuffles and spreads jump.
- Avoid the last 1 to 3 minutes before a session close. Liquidity thins and quotes gap.
- Skip trades 1 to 2 minutes before high impact news and 2 to 5 minutes after. Your box levels still matter, but execution does not.
Set a hard rule. If spread exceeds your normal spread by 2x, you do not enter. If it happens while in a trade, you do not add. You manage the position only.
Reducing Slippage, Avoid Thin Liquidity and Use Price Buffers
Slippage comes from thin liquidity and fast moves. You control both with filters and buffers.
- Trade the most liquid pairs in your broker account. EURUSD, USDJPY, GBPUSD usually fill cleaner than minors and exotics.
- Avoid dead hours. If your chart prints small candles and your tick volume drops, you get worse fills.
- Do not chase. If price runs far beyond your break close level, you skip. Late entries pay the worst slippage.
Use buffers that match your stop logic.
- For market breakout entries, use a max deviation limit in points or pips. If the platform cannot cap it, do not trade that moment.
- For limit retests, place the limit a few tenths of your spread inside the level. Example, if spread is 1 pip, place the limit 0.2 to 0.5 pips inside the box edge. This reduces missed fills from a single wick.
- For stops, keep the buffer consistent with your plan, beyond the opposite side of the box plus 0.1x to 0.3x ATR.
If you need a clean process for setting protective orders, use this stop loss and take profit guide and then keep the same template for every scalp.
One Click Execution Routine, Your Pre Trade Checklist
Most beginners lose on execution, not on the idea. Build a routine you can run in 10 seconds.
- Preset lot size based on your fixed risk per trade. Do not change it mid session.
- Preset stop distance as a template, then adjust to the box size plus ATR buffer.
- Preset take profit to your base R multiple, plus your partial at 1R rule.
- Set max deviation for market orders. If deviation hits, you accept no fill.
- Use OCO when possible. One cancels the other for breakout and retest orders. This prevents double fills in fast markets.
- Confirm spread before you click. If it is above your rule, you stand down.
- Log the fill in pips versus your intended price. Track average slippage per pair and per session.
Execution rules keep your stats stable. Your strategy needs stable stats to survive.
Risk Management for Forex Scalping (Non-Negotiable for Beginners)
Risk per Trade Guidelines (Keep It Small)
Scalping fails from one thing, oversized risk.
Use fixed risk per trade, as a percent of equity. Stay in this range:
- 0.25%: Best default for beginners, protects you during bad fills and streaks.
- 0.50%: Acceptable if your spreads, slippage, and stops stay stable.
- 1.00%: High for scalping, one rough session can damage your month.
Smaller is safer because scalping has more trades, more spreads paid, and more slippage events. Your edge can vanish for a few hours. Your risk size decides if you survive that window.
Position Sizing Formula (Lots From Stop Size)
Size your position from the stop, not from confidence.
Use this formula:
- Risk amount ($) = Account equity x Risk %
- Position size (lots) = Risk amount ($) / (Stop (pips) x Pip value per 1 lot ($/pip))
Quick example:
- Equity $5,000
- Risk 0.50% = $25
- Stop 5 pips
- Pip value for 1.00 lot is about $10 per pip on most USD-quoted majors
- Lots = 25 / (5 x 10) = 0.50 lots
Do not guess pip value. It changes by pair, quote currency, and account currency. Use your platform calculator and record the number.
Lock the stop first, then set size. If the stop must be wider than your plan, size down. If the required size drops below your broker minimum, skip the trade.
Daily Stop Rules (Protect Your Capital and Your Head)
You need hard limits. Scalping creates fast feedback. That includes tilt.
- Max daily loss: 2% is a solid cap for beginners. Many do better at 1% to 1.5%.
- Max consecutive losses: Stop after 3 losses in a row.
- Cool-off period: Take 30 to 60 minutes off. No charts. No revenge trades.
Use a session-based rule too. If you hit your daily loss early, you are done. You do not “make it back” by trading faster.
Track your loss source. Was it spread expansion, slippage, missed entry, or bad read. Fix the process before you trade again.
Reward-to-Risk Reality in Scalping (What to Target)
Scalping often runs lower reward-to-risk. That is fine if your win rate supports it.
Beginner targets:
- R:R 1:1: Clean baseline. Easier math. Less fragile to costs.
- R:R 0.7:1 to 0.9:1: Common in scalping. Needs higher win rate and tight execution.
- Avoid R:R below 0.5:1: Costs and slippage will eat you.
Use this as a reality check:
Start near 1:1. It gives you room for spread, commission, and imperfect fills. If you want a tighter target later, use a rules-based take profit plan and test it. Use a structured take profit approach so your exits stay consistent.
Preventing Margin Issues (Leverage Can Kill Scalpers)
Scalpers blow up from margin, not from one stop.
Keep these rules:
- Do not size by available margin: size by stop and risk only.
- Keep free margin high: low free margin makes spreads, swaps, and small moves trigger margin calls.
- Avoid stacking trades: multiple positions raise used margin and correlation risk.
- Cap leverage used: even if your broker offers 1:200, you do not need it. Use the minimum that fits your planned risk.
Oversizing creates forced exits. Forced exits happen at the worst price. Your edge does not matter if the broker closes you out.
Make margin a checklist item before each session. Equity, used margin, free margin, and maximum position size based on your stop. If any number looks tight, you cut size or you do not trade.
A Complete Scalping Trade Plan Template (Copy/Paste Framework)
Pre-Market Routine (5 Minutes)
- 00:00 to 01:30, news check: Open your economic calendar. Mark all high impact releases for your pair. If a release hits within 15 minutes, you do not open new trades. If a release hits within 30 minutes, you cut size or widen the stop only if your plan allows it.
- 01:30 to 03:00, session bias: Pick one session to trade, London or New York. Write one bias for the next 60 to 120 minutes, bullish, bearish, or range. If you cannot state it in one line, you do not have a bias.
- 03:00 to 05:00, key levels: Mark yesterday high, yesterday low, Asia high, Asia low, and current day open. Add the nearest obvious swing high and swing low. Keep it to 6 to 8 lines max. Too many levels kills speed.
Scalping Trade Checklist (Entry Rules)
- Pair and conditions: You trade one pair. Spread is under your max spread rule. If spread expands, you stand down.
- Time window: You trade only your planned session window. You do not trade the dead hours.
- News filter: No trade inside your blackout window. You do not “hold through” scheduled spikes.
- Market state: You label it, trend or range. You only use the setup that fits that state.
- Level present: Price is at a pre-marked level or a clean intraday swing level. You do not take entries in the middle.
- Trigger: Your trigger candle prints and closes. You enter only after the close. You do not front-run.
- Stop location: Stop sits beyond the level that invalidates the idea. Stop does not sit inside noise.
- Position size: You size from stop distance and fixed risk per trade. You do not round up. You check margin before you click.
- Order type: You know the exact order you will use, market or limit, and the exact stop and take profit points. Use the correct order type for the entry, see market vs limit vs stop orders.
- R to target: Target gives acceptable R after spread and expected slip. If it does not, you skip the trade.
- One trade, one plan: You set stop and target at entry. You do not “manage” without rules.
- Date:
- Pair:
- Session: London or New York
- Market state: Trend or Range
- Bias (1 line):
- Key level used:
- Setup type: Breakout, Pullback, Reversal, Range fade
- Trigger rule:
- Entry price:
- Stop price:
- Stop size (pips):
- Take profit price:
- Planned R:
- Risk per trade ($ or %):
- Position size (lots):
- Max spread allowed:
- News within 30 minutes: Yes or No
- Margin check: Equity, Used margin, Free margin, Max size by stop
- Execution plan: Market or Limit, one sentence why
Post-Trade Process (2 Minutes)
- Screenshot: Save two images, entry chart and exit chart. Same timeframe each time.
- Tag setup type: Tag the trade with one label only. Example, London pullback, NY range fade, breakout retest.
- Log execution quality: Write three lines max.
- Planned vs filled: Entry slip in pips. Exit slip in pips.
- Rule adherence: Followed plan, yes or no. If no, name the rule broken.
- Management: Any changes to stop or target, and the reason, rule-based or impulse.
Weekly Review (Metrics That Matter)
- Expectancy: Track by setup tag. Expectancy = (Win% × Avg win) − (Loss% × Avg loss). Use R, not dollars, so size changes do not lie to you.
- Average slip: Average entry slippage and exit slippage in pips, by session and by order type. If slip jumps, you adjust times, pairs, or order choice.
- Rule breaks: Count them. List the top three. Add a fix for each. Example, “traded into news, add 30 minute alarm”.
- Spread vs target: Average spread paid. Compare it to your average target in pips. If spread eats the target, you change pair, hours, or stop trading that setup.
- Stop size drift: Average stop in pips by setup. If it expands, your entries got late or your levels got sloppy.
- Time to outcome: Average minutes in trade. If it rises, you are not scalping anymore. You are sitting through noise.
Common Beginner Mistakes in Forex Scalping (and How to Fix Them)
Overtrading and Revenge Trading
Scalping fails fast when you trade every wiggle. It fails faster when you try to win back a loss.
- Set hard session boundaries. Define your trading window in advance. Example: London open to London mid session. Stop when the window ends, even if you feel “in sync.”
- Use a trade cap. Set a max number of trades per session. Start with 5 to 10. If you hit the cap, you are done.
- Use a loss cap. Set a max daily loss in R or percent. Example: stop at -2R or -1%. No exceptions.
- Block immediate re-entry. After a losing trade, wait for a full new setup. Add a minimum cooldown like 10 to 15 minutes.
- Track “trades per hour.” If it rises while your win rate drops, you are forcing entries.
Moving Stops and Targets
Beginners move stops because they hate being wrong. They move targets because they want to be right. Both destroy expectancy.
- Define invalidation before entry. Your stop sits at the price level that proves your setup wrong. Place it there and accept it.
- Use one stop rule. Either you never move the stop, or you only trail after price reaches a fixed milestone. Example: move to break even only after +1R.
- Use one target rule. Take profit at a predefined level, or scale at fixed points. Do not change targets mid trade.
- Write the plan on the ticket. Entry, stop, target, and the condition that cancels the trade. If you cannot state it in one line, skip the trade.
- Audit “stop edits.” Log how often you changed a stop. If it happens more than once per session, you have a process problem.
If your stop placement feels random, fix that first. Use this stop loss guide and standardize your invalidation level by setup.
Ignoring Costs
Scalping runs on small targets. Costs can wipe them out.
Your break-even move in pips equals spread plus round-trip commission in pips.
| Item | How to measure | What to do |
|---|---|---|
| Spread | Average spread during your trading hours | Trade pairs and hours with tighter spreads |
| Commission | Convert round-trip commission to pips for your position size | Include it in break-even math |
| Slippage | Average entry and exit slippage in pips | Reduce market orders in thin moments, avoid volatile releases |
- Use a cost ceiling. Keep total cost under 20% of your average target. Example: if your target is 5 pips, keep total cost under 1 pip.
- Do the quick math before you trade. If spread plus commission equals 1.5 pips and your target is 4 pips, you risk paying almost 38% of the move in costs.
- Track net pips, not gross pips. Gross looks good, net pays the bills.
Trading During News
News turns a clean scalp into random fills. Spreads widen. Slippage jumps. Stops become meaningless.
- Know the events that matter. Focus on central bank rate decisions, CPI inflation, jobs data like NFP, GDP, and major speeches from central bank heads.
- Set a no-trade window. Stop trading 10 minutes before the release.
- Wait for the first spike to finish. Resume only after spreads normalize and price forms a new structure. Use a minimum of 15 minutes after high impact releases. Use 30 minutes for rate decisions and press conferences.
- Measure it. Log spread and slippage during releases. If your average cost doubles, you block that period permanently.
Indicator Overload
Too many indicators create late entries and stop size drift. You start “confirming” instead of executing.
- Keep one filter and one trigger. Filter tells you when you can trade. Trigger tells you where you enter.
- Example setup. Filter: price above a single moving average on your higher timeframe. Trigger: break and retest of a level on your execution timeframe.
- Delete the rest. If an indicator does not change your decision in a measurable way, it adds noise.
- Validate with stats. Compare results with and without the extra indicator over 50 trades. If expectancy does not improve, remove it.
Pros, Cons, and Realistic Expectations
Advantages
- Frequent practice. You see more setups per week. You build pattern recognition faster because you repeat the same rules often.
- Defined risk. Scalping works best with tight, pre-set stops. You know your loss before you click. You can cap daily risk with a hard stop after a set number of losses.
- Rapid feedback loops. Trades resolve fast. You can review execution, spread impact, and rule breaks on the same day. You can run simple stats over 50 to 100 trades and adjust one variable at a time.
Disadvantages
- Mental fatigue. Decision volume stays high. After 60 to 120 minutes, your discipline drops. Your worst trades often come late in the session.
- Transaction costs. Spread and commissions hit every trade. On small targets, costs can erase edge. If your average win is 6 pips and total cost is 1.5 pips, you give up 25 percent of your gross profit on winners.
- Execution sensitivity. Slippage, slow fills, and missed entries matter. A 0.5 pip slip can turn a good trade into a break-even trade. A 1 pip slip can turn it into a loser if your stop is tight.
Pros, cons, and realistic expectations
You do not need big pip moves to make scalping work. You need clean execution and stable costs. You need rules you can follow when you feel pressure.
Track three numbers from day one. Win rate. Average win. Average loss. Then track total cost per trade. Spread plus commission plus average slippage. Your edge must beat your costs by a clear margin.
What results to expect early on
- Learning curve. Expect rule breaks first, then slow improvement. Most beginners lose from late entries, early exits, and moving stops. Fix behavior before you change the strategy.
- Sample size. Do not judge your system on 10 trades. Use at least 50 trades for a first read. Use 200 trades before you treat results as stable.
- Variance. Losing streaks happen even with a solid edge. Plan for 6 to 12 losses in a row depending on your win rate. If that breaks your risk limits, your size is too big.
| Metric | Minimum to track | Why it matters |
|---|---|---|
| Total trades | 50 | Reduces noise from short-term randomness |
| Average total cost per trade | Every trade | Costs can wipe out small targets |
| Expectancy | After 50 trades | Shows if your rules produce positive outcome per trade |
| Max losing streak | After 100 trades | Sets position sizing and daily stop limits |
If you want a cleaner target plan, read our take profit guide. Tight targets need clear structure.
When to scale up
Scale only after you prove you can follow rules under pressure. Profit alone is not enough. Consistency matters more than a good week.
- Step 1, micro lots. Trade the smallest size until you log 100 trades with the same rules. No revenge trades. No moving stops. No extra filters.
- Step 2, small increase. Increase size by 10 to 25 percent. Keep the same stop distance and the same daily loss limit. Track another 50 trades.
- Step 3, repeat. If discipline and execution stay stable, increase again. If rule breaks show up, cut size back immediately.
Use a simple pass rule before each size increase. At least 50 trades since the last change. Rule adherence above 95 percent. Costs stable. No change in entry quality. If any fails, stay small.
FAQ
What timeframes work best for beginner scalpers?
Use M1 for entries and M5 or M15 for context. Keep the rules the same across both. Avoid switching timeframes mid-trade. If your spread and execution are inconsistent on M1, move to M5.
Which forex pairs should you scalp?
Start with one major pair with tight spreads and deep liquidity. EURUSD is the usual choice. Add a second pair only after 50 to 100 logged trades with stable costs and stable execution.
How many pips should your stop loss be?
Your stop distance must match recent structure and normal noise. Most beginner scalps fail from stops that sit inside the spread plus random swing. Set the stop where your setup is invalid. Size the trade to that stop.
What risk per trade should you use?
Keep risk small and fixed. Many beginners do best at 0.25 to 0.50 percent per trade. Use the same risk until you log at least 50 trades with above 95 percent rule adherence.
What is a good daily loss limit for scalping?
Set a hard stop for the day. A common range is 1 to 3R, based on your risk per trade. If you hit it, stop trading. Review execution and costs before you trade again.
How do you account for spread and commissions?
Include spread and commissions in every backtest and journal. Your edge must clear costs. If average win is close to average cost, stop. Trade only during high liquidity sessions where spreads stay tight.
How many trades per day should you take?
Cap your trades. Ten is enough for most beginners. More trades raise error rate and costs. Stop early if your execution slips, your entries chase, or you break a rule.
Should you use a fixed take profit or a trailing exit?
Use one exit method and keep it consistent. Fixed targets simplify tracking. Trailing exits increase discretion. Beginners usually improve faster with fixed TP and a clear invalidation stop.
Do you need indicators to scalp?
No. Indicators can help with structure and filters, but they do not remove execution risk. If you use indicators, limit them to one trend filter and one volatility tool. Avoid stacking signals.
What is the fastest way to improve a scalping strategy?
Reduce variables. Trade one pair, one session, one setup, one stop rule, one exit rule. Log every trade. Fix one mistake at a time. Increase size only after 50 trades with above 95 percent rule adherence.
How do you set stop loss and take profit correctly?
Define invalidation first, then place the stop beyond it. Set take profit where price often stalls, or at a fixed R multiple that clears costs. Use a repeatable checklist. See how to set stop loss and take profit.
Conclusion
Forex scalping works when you treat it like a process, not a prediction game. You need one setup, one entry trigger, and one exit plan. You need fixed risk per trade. You need tight execution and clean data.
Your edge comes from consistency. Spread, slippage, and hesitation erase small targets. Keep your trades in the most liquid sessions. Trade one or two pairs. Skip news spikes. If the conditions are not there, you do nothing.
- Keep risk small. Use a fixed percent or fixed cash amount per trade. Never increase it to win back losses.
- Place the stop where your idea breaks. Do not place it where it feels comfortable.
- Take profit with a rule. Use a fixed R multiple or a repeatable stall zone, then stick to it.
- Track rule adherence. Journal every trade. Grade it as followed or broken, then fix one issue at a time.
Final tip. Build one checklist and trade it for 50 trades without changes. If you cannot follow your own rules, nothing else matters. If you can, improve one variable at a time and keep your risk management tight.
-
Stop Loss vs Take Profit: Differences, Examples & Best Practices
3 months ago -
Forex Order Types Explained: Market vs Limit vs Stop Orders
3 months ago -
How to Set Stop Loss and Take Profit (Step-by-Step)
3 months ago -
How to Start Forex Trading Step by Step (Beginner Roadmap)
3 months ago -
Risk Management in Forex for Beginners (Rules That Keep You in the Game)
3 months ago
-
-
- What timeframes work best for beginner scalpers?
- Which forex pairs should you scalp?
- How many pips should your stop loss be?
- What risk per trade should you use?
- What is a good daily loss limit for scalping?
- How do you account for spread and commissions?
- How many trades per day should you take?
- Should you use a fixed take profit or a trailing exit?
- Do you need indicators to scalp?
- What is the fastest way to improve a scalping strategy?
- How do you set stop loss and take profit correctly?
-
-
-
- What timeframes work best for beginner scalpers?
- Which forex pairs should you scalp?
- How many pips should your stop loss be?
- What risk per trade should you use?
- What is a good daily loss limit for scalping?
- How do you account for spread and commissions?
- How many trades per day should you take?
- Should you use a fixed take profit or a trailing exit?
- Do you need indicators to scalp?
- What is the fastest way to improve a scalping strategy?
- How do you set stop loss and take profit correctly?
-
-
How to Place a Forex Trade Step by Step (Your First Trade Explained)
1 month ago -
Forex Trading vs Crypto Trading: Which Market Is Better for Beginners?
1 month ago -
Forex Lot Size Calculator: How to Use It to Size Trades Correctly
3 months ago -
How to Calculate Position Size in Forex (Position Sizing Formula + Examples)
3 months ago -
Forex Leverage Explained: How It Works, Pros, Cons & Examples
3 months ago
-
Is Forex Trading Legal in the United States? Rules, Regulators & What to Know
3 months ago -
Forex Market Hours & Trading Sessions Explained (Best Times to Trade)
3 months ago -
Forex Trading Platforms Comparison: MetaTrader vs cTrader vs TradingView
3 months ago -
What Is a Lot Size in Forex? Lot Types + Quick Examples
3 months ago -
Forex Leverage Explained: How It Works, Pros, Cons & Examples
3 months ago