What Is Hedging in Forex? How It Works + Practical Examples

Forex hedging reduces the impact of price moves on an open position. You place a second trade, or use a derivative, that offsets part or all of your exposure. You do this to control risk, protect floating profit, or keep a trade open through volatility.
This guide explains what hedging in forex is, how it works, and when it makes sense. You will learn the main hedging methods traders use, direct hedging with opposite positions, correlation hedging with related pairs, and hedging with options. You will also see practical examples with position sizing, pip values, and what happens to your net P and L when price moves.
If you are still building core execution skills, start with how to start forex trading.
Key Takeaways
Key Takeaways
- In het kort: Hedging reduces your exposure, it does not remove risk.
- In het kort: Your goal is simple, smooth your P and L when price moves against you.
- In het kort: Every hedge has a cost, spread, swap, option premium, and added complexity.
- In het kort: A hedge changes your net position size, so it changes your pip value and your upside.
- In het kort: Use hedges with a clear plan, entry, exit, and time limit.
- Direct hedging means you open an opposite position on the same pair. It can flatten your net exposure fast. It can also lock in a loss if you freeze a bad entry and never unwind it.
- Correlation hedging means you hedge with a related pair. Correlations shift. Your hedge can fail when the relationship breaks. Use a forex correlation pairs list and recheck it often.
- Options hedging caps risk with defined downside. Your maximum loss becomes known, but you pay premium and time decay.
- Position sizing matters more than the method. If your hedge is too small, it does little. If it is too large, you flip direction and create a new bet.
- Track net P and L. Add both legs, include spread and swap, and review results in pips and account currency.
- Hedge for a reason. Typical reasons include holding through news, reducing drawdown during uncertainty, or bridging time until a technical level breaks or holds.
- Know your broker rules. Some accounts net positions. Others hedge but apply margin rules that can change your required capital.
What Is Hedging in Forex (Definition and Core Purpose)
Plain-English definition for traders and investors
Hedging in forex means you open a second position to offset the price risk of your first position. You do it to reduce how much your account moves when the market moves against you.
In practice, you hedge by using:
- An opposite position in the same pair, long and short at the same time, if your broker allows it.
- A related pair to offset exposure, for example hedging USD risk with another USD pair.
- Derivatives like options or forwards, more common for businesses and larger accounts.
A hedge targets a specific risk. It does not aim to increase your expected return. It aims to control drawdown and stabilize outcomes during uncertainty.
Why forex exposure is unique
- Leverage amplifies moves. A small price change can produce a large percent change in your equity. That makes short-term risk control matter.
- Trading runs 24/5. You can face gaps after the weekend and sharp moves during session opens and data releases.
- Macro drives volatility. Rates, inflation, central bank guidance, and geopolitics can shift price fast and keep it moving for days.
- Costs are continuous. You pay spread and you may pay or earn swap each day. A hedge can reduce price risk but still bleed from costs.
Hedging vs speculation vs diversification
| Approach | Main goal | Typical action |
| Hedging | Reduce a known risk on an existing exposure | Add an offsetting position so net exposure drops |
| Speculation | Profit from a directional or volatility view | Add exposure in the direction you expect |
| Diversification | Reduce portfolio volatility across many outcomes | Spread risk across instruments that do not move the same way |
Hedging is surgical. It focuses on one position or one risk factor. Diversification spreads risk across multiple bets. Speculation increases risk to pursue return.
What a hedge can and cannot do
What it can do
- Cut net directional exposure, so a fast move hurts less.
- Reduce short-term equity swings during news or uncertain levels.
- Buy time to execute your plan, for example waiting for a breakout or breakdown confirmation using tools like Bollinger Bands.
What it cannot do
- Remove risk. You still face spread, swap, slippage, and execution limits.
- Lock in a perfect outcome. Your hedge ratio can be wrong, correlations can break, and volatility can spike.
- Fix a bad entry. A hedge can delay a decision, but you still need a clear exit plan for both legs.
How Forex Hedging Works (The Mechanics of Offsetting Risk)
Net exposure, how opposing positions change your effective risk
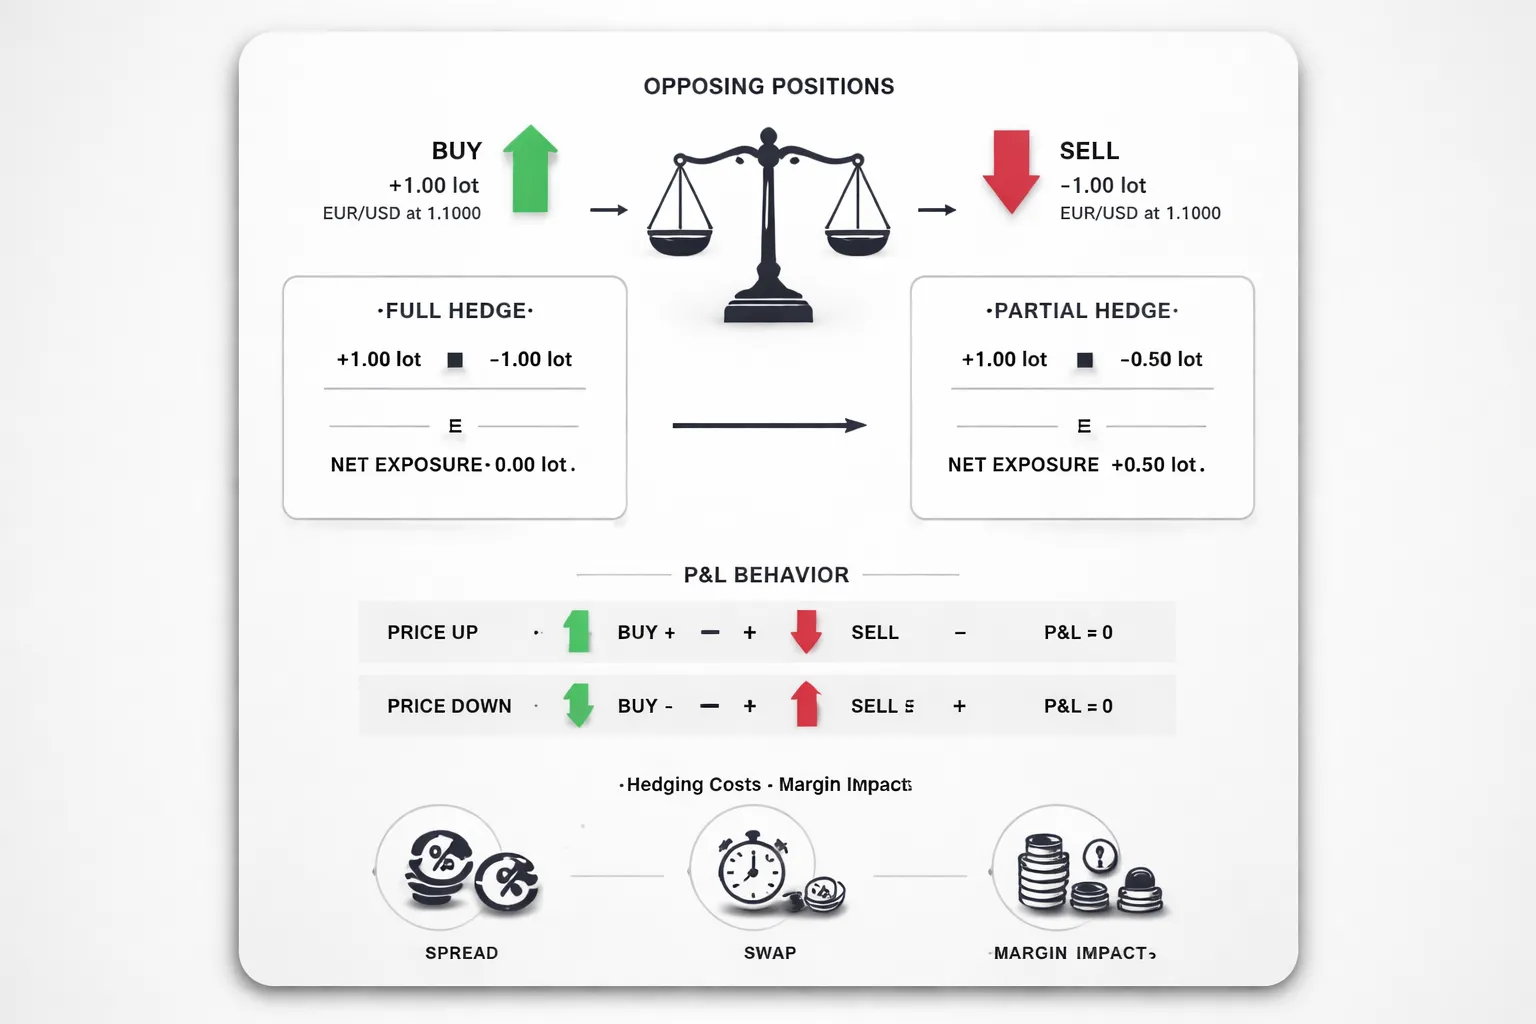
Hedging changes your net position, not your original position.
Start with your base trade. Then add an offsetting leg that reduces the amount of price movement that hits your account.
- Full hedge: Long 1.00 lot EURUSD and short 1.00 lot EURUSD. Net exposure is near zero. Price risk drops, costs stay.
- Partial hedge: Long 1.00 lot EURUSD and short 0.30 lot EURUSD. Net exposure equals 0.70 lot long. You still have directional risk, just smaller.
- Cross hedge: Long EURUSD and short GBPUSD to reduce USD exposure. Net exposure depends on correlation and position size. It is never exact.
Think in net terms. Your effective risk comes from the remaining unhedged size and how tightly the hedge tracks your base trade.
Profit and loss behavior with a hedge
A hedge reshapes your P and L curve.
| Price move | Base position | Hedge leg | Net result |
|---|---|---|---|
| Up | Gains | Loses | Smaller gain or flat, minus costs |
| Down | Loses | Gains | Smaller loss or flat, minus costs |
If you run a full hedge in the same pair, price movement tends to cancel. Your P and L then drifts due to spread, commissions, swaps, and any execution gap between the two entries.
If you run a partial hedge, you keep some upside and some downside. Your net P and L moves like a smaller position. You pay costs on both legs.
With cross hedges, the two legs will not match tick for tick. The gap between them is basis risk. In fast markets that gap can widen.
Time element, holding period and rollovers swaps
Time matters because your hedge has carrying costs.
- Spread and commission: You pay when you open, and again when you close. Two legs means you usually pay twice.
- Swap rollover: You pay or receive overnight funding on each leg. The net swap can be negative even if one side pays.
- Holding period risk: The longer you hold, the more costs dominate. A hedge that looks stable on day one can bleed over a week.
Keep a time limit. If you hedge to wait for confirmation, define the trigger that ends the hedge. Use a clear plan similar to a breakout trading strategy, with rules for when you remove the hedge and how you manage the remaining position.
Margin impact and capital efficiency
Hedging ties up capital. The exact margin impact depends on your broker and regulation.
- Some brokers net margin: They reduce required margin for offsetting positions in the same pair. You still pay spreads and swaps.
- Some brokers gross margin: They charge margin on both legs. Your available margin drops fast. A hedge can increase liquidation risk.
- Correlation hedges: You almost always pay margin on both pairs. You add exposure to two instruments, even if directionally offset.
Check your platform margin preview before you place the second leg. Do not assume a hedge lowers margin. It often does the opposite.
When hedging becomes locking a loss vs managing uncertainty
A hedge manages uncertainty when you use it as a temporary risk throttle.
- You face a scheduled event and you want smaller exposure through the release.
- Your setup stays valid, but you need time for price to confirm direction.
- You plan to scale out, reprice risk, then remove the hedge at a defined level.
A hedge becomes loss locking when you use it to avoid closing a losing trade.
- You open an equal and opposite leg with no rule for removing it.
- You carry a flat net position while swaps and spreads grind the account.
- You end up with two open trades, two decisions, and no exit hierarchy.
Set a single decision point. Choose which leg you will keep if price breaks up, and which leg you will keep if price breaks down. If you cannot write those rules in one sentence each, you are locking a loss.
When Hedging Makes Sense (Use Cases by Trading Objective)
Protecting unrealized gains before major news (CPI, NFP, central bank decisions)
Hedging makes sense when you want to stay in a trade but you do not want a headline to wipe out open profit.
- Objective: reduce event risk without closing the core position.
- When it fits: you hold a swing position into CPI, NFP, FOMC, ECB, BoE, or a rate decision.
- How you execute: hedge smaller than the core, or hedge only during the event window. Remove the hedge after the first post news impulse stabilizes.
- Rule you must write: if price breaks above X, you keep the long and close the hedge. If price breaks below Y, you keep the hedge and close the long.
Practical example. You are long EURUSD from 1.0800 and price trades 1.0950 before NFP. You fear a spike down. You short a smaller EURUSD position minutes before the release. If price rips higher and holds above your invalidation level, you close the short. If price breaks below your stop level on the core idea, you close the long and keep the short for a defined target.
Reducing drawdowns during uncertainty or regime shifts (risk-on, risk-off)
Hedging makes sense when your edge depends on a market regime, and the regime may be changing.
- Objective: cut drawdown while you wait for clarity.
- When it fits: equities and yields swing hard, volatility rises, correlations tighten, and safe havens move together.
- How you execute: reduce directional exposure with a hedge that benefits from the opposite regime. Size it to reduce your portfolio beta, not to flip your bias.
- What to watch: correlation drift. Pairs that usually diversify can move in sync during stress. Use a correlation check before you hedge with a second pair.
Practical example. You hold pro risk positions that depend on risk-on flows. You add a smaller hedge in a defensive currency pair during a volatility spike. If risk-on returns, you remove the hedge. If risk-off persists, you trim the original exposure and let the hedge absorb part of the move. For selecting hedge pairs, use forex correlation logic, not guesswork.
Managing overnight and weekend gap risk
Hedging makes sense when you cannot monitor the market and you face gap risk.
- Objective: limit damage from gaps, thin liquidity, or surprise headlines.
- When it fits: you must hold through rollover, you hold over a weekend, or you hold through a political or geopolitical headline window.
- How you execute: hedge late in the session and define the unwind time. Close or reduce the hedge after the market reopens and spreads normalize.
- Cost reality: you pay extra spread and you may pay swaps on both legs. Your hedge must protect more than it costs.
Practical example. You are long GBPJPY on a multi day setup but you cannot babysit it Sunday open. You place a temporary hedge to reduce net exposure into the weekend. If Monday opens clean, you remove the hedge during normal liquidity. If Monday gaps against your core, the hedge offsets part of the gap while you decide on the next action.
Covering multi-currency portfolio exposure (investors with foreign assets)
Hedging makes sense when FX moves can dominate your investment return.
- Objective: separate asset performance from currency performance.
- When it fits: you own foreign stocks, foreign bonds, or overseas property and your base currency differs.
- How you execute: hedge a percentage of the currency exposure, then rebalance on a schedule. Many investors use partial hedges to avoid constant turnover.
- Key decision: hedge ratio. Full hedges reduce volatility but can remove helpful FX tailwinds.
Practical example. Your base currency is USD and you hold a EUR denominated ETF. A EURUSD drop can erase gains even if the ETF rises in EUR terms. You hedge part of the EUR exposure with a matching FX position so your results track the asset more than the exchange rate.
Business use case, receivables and payables exposure for SMEs and importers and exporters
Hedging makes sense when your profit margin depends on an exchange rate you do not control.
- Objective: lock expected cash flows and protect gross margin.
- When it fits: you invoice in a foreign currency, you pay suppliers in a foreign currency, or you quote long lead time contracts.
- How you execute: hedge specific invoices, or hedge a rolling forecast. Match the hedge size and maturity to the payment date.
- Common mistake: hedging the full forecast when volumes can change. Hedge the confirmed part first, then add coverage as certainty rises.
Practical example. You are a US importer with a 500,000 EUR payable due in 60 days. EURUSD rises and your cost in USD increases. You hedge the payable so the final USD cost stays close to plan. If volumes change, you adjust the hedge to avoid turning a business hedge into a speculative FX position.
Types of Forex Hedging Strategies (Spot, Correlation, and Derivatives)
1) Spot hedge with the same pair, long and short at the same time
You open an opposite position in the same currency pair to reduce net exposure. If you hold 1 lot long EURUSD and you open 1 lot short EURUSD, your directional risk drops near zero. You still pay spread and swaps. You also still carry execution risk if you later unwind one side.
Use this when you need a fast, simple freeze on exposure and you plan to manage the exit later. Do not treat it as a free pause button. Costs keep running.
- Net exposure: Close to zero when sizes match.
- Main costs: Two spreads, two sets of swaps, possible commissions.
- Main risk: You forget to unwind, or you unwind the wrong side first.
Platform constraint: Some brokers run FIFO and netting rules. They will not allow true hedging in one account. They will offset positions instead. If your platform nets trades, you can still hedge, but you must use a different pair, a different instrument, or a separate account structure if allowed.
2) Correlation hedge with multiple pairs
You hedge one currency exposure with another pair that tends to move with it. This is useful when you cannot hedge the exact pair, or when you want to reduce risk while keeping some upside.
Correlation can be positive or negative. Positive correlation means two pairs often move in the same direction. Negative correlation means they often move in opposite directions. Correlations change over time, so you must recheck them and size the hedge with care. Use rolling correlation over a recent window, then stress test with a wider window.
forex correlation helps you avoid hedges that look right but fail when regimes shift.
- Positive correlation hedge: You reduce risk by taking an opposite position in a positively correlated pair.
- Negative correlation hedge: You reduce risk by taking the same direction position in a negatively correlated pair.
- Key sizing input: Correlation and relative volatility. If the hedge pair moves less, you often need a larger size to get similar risk reduction.
3) Using the U.S. dollar as a common factor, overlap across USD pairs
Many exposures share USD risk even when the pairs differ. This creates overlap you can hedge, or it can create hidden concentration.
If you are long EURUSD, you are short USD. If you also go long GBPUSD, you add more short USD. Your book can look diversified but still hinge on USD moves.
You can sometimes hedge USD exposure with another USD pair. Example. Your business has EUR receivables and GBP payables. Both touch USD if you hedge with EURUSD and GBPUSD. You can reduce total USD swings by netting your USD leg, then hedging only the leftover USD exposure.
| Exposure | USD leg | What it means |
|---|---|---|
| Long EURUSD | Short USD | You benefit if USD falls |
| Short EURUSD | Long USD | You benefit if USD rises |
| Long USDJPY | Long USD | You add USD strength exposure |
| Short USDCHF | Short USD | You add USD weakness exposure |
4) Derivatives hedge with options for defined risk
Options can cap your worst case while keeping upside. You pay a premium. That premium is your known cost.
- Protective call: Use when you must buy a foreign currency later. It sets a maximum effective rate. If the currency drops, you can still benefit by buying cheaper in spot and letting the option expire.
- Protective put: Use when you will sell a foreign currency later. It sets a minimum effective rate.
- Collar: Buy protection and sell a further out option to reduce or fund the premium. You cap downside and also cap upside. You trade flexibility for cost control.
Options fit uncertain cash flows. If the amount or timing may change, options reduce the risk of overhedging compared with a fixed forward.
5) Forwards, futures, and NDFs for longer-dated hedges
Businesses often use these tools to lock an exchange rate for a future date.
- Forward: An OTC agreement with a bank to exchange currencies on a set date at a set rate. It matches your amount and date. It can require credit lines and may include collateral terms.
- Futures: Exchange traded contracts with standard sizes and dates. You post margin and face daily mark to market. You may need to roll the contract if your exposure date does not match expiry.
- NDF: A non deliverable forward settles in one currency, often USD, based on the fixing rate. It is common where local currency delivery is restricted or illiquid.
Use forwards and NDFs when you need a clean budget rate for a known payable or receivable. Use futures when you want exchange clearing and can work with standard contract dates.
Practical Hedging Examples (Step-by-Step with Numbers)
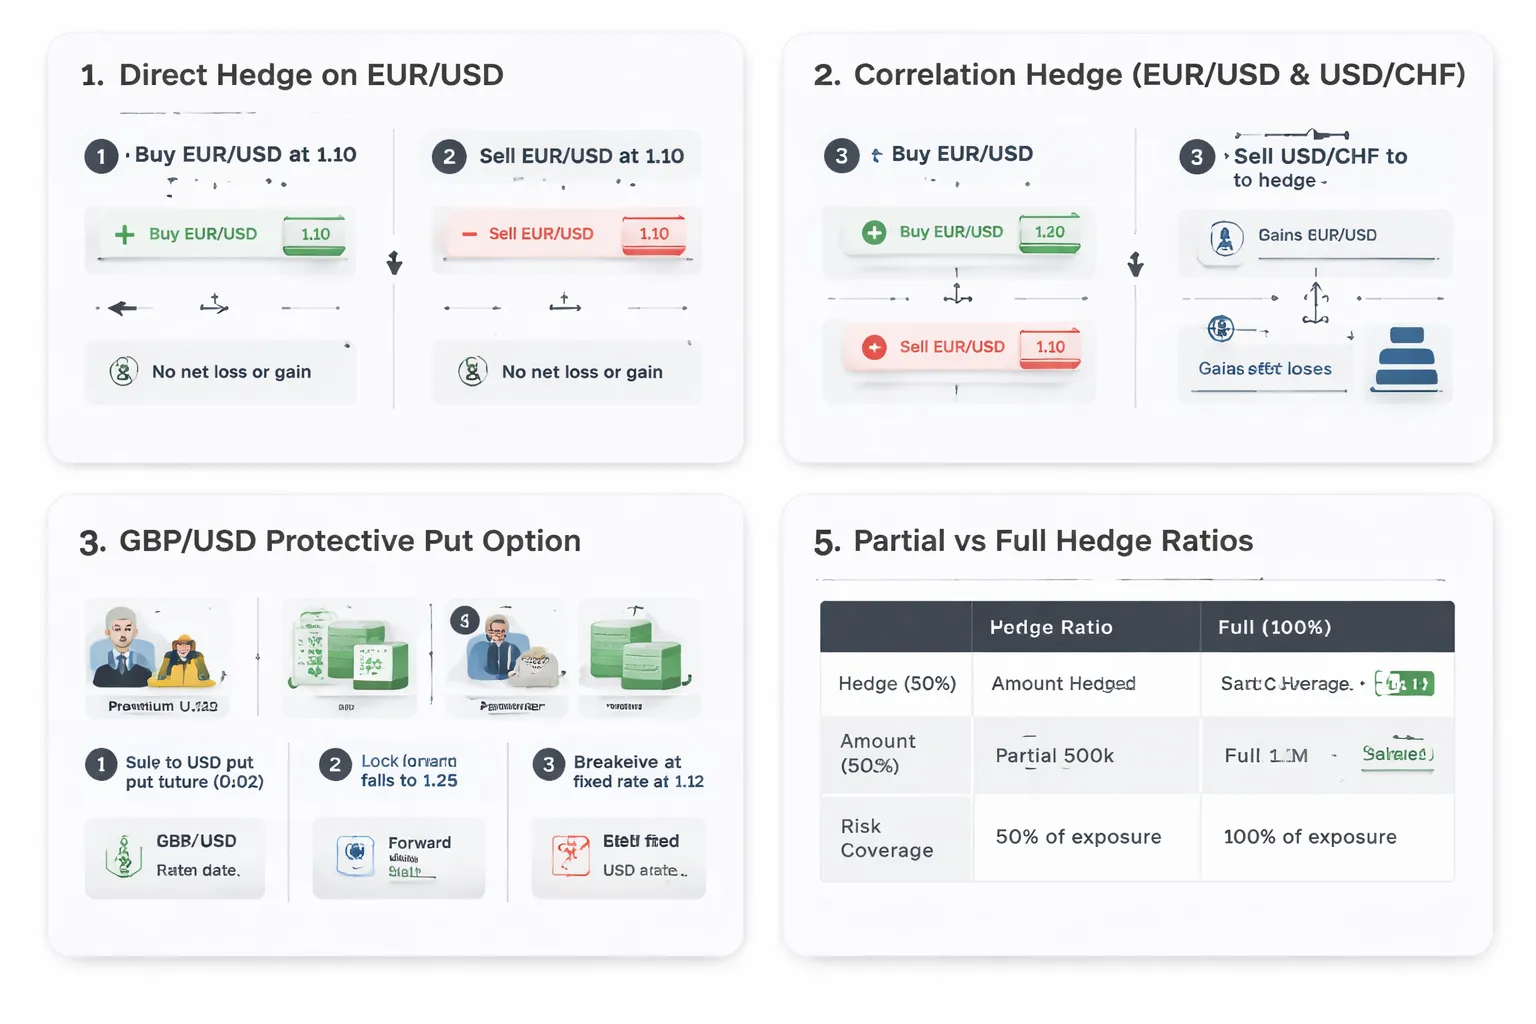
Example 1: Direct hedge to cut event risk on EUR/USD
Setup
- You go long EUR/USD at 1.1000 with 1 standard lot (100,000 EUR).
- USD value per pip for 1 lot in EUR/USD is about $10.
- You hold into a high impact event. You want less directional risk, not a full exit.
Hedge entry
- You open a short EUR/USD hedge of 0.70 lots at 1.1020.
- Your net exposure becomes 0.30 lots long.
Outcomes (PnL in USD, ignoring spreads and swaps)
| Scenario | EUR/USD move | Unhedged PnL (1.00 lot) | Hedged PnL (net 0.30 lot) |
|---|---|---|---|
| Spike up | 1.1000 to 1.1150 (+150 pips) | +1500 | +450 |
| Dump down | 1.1000 to 1.0850 (-150 pips) | -1500 | -450 |
What changed
- You kept the position open but cut event risk by 70 percent.
- You also capped your upside by the same amount.
- You still need an exit plan for both legs, otherwise you can bleed costs from spread and swap.
Example 2: Correlation hedge using EUR/USD and USD/CHF
Logic
- EUR/USD and USD/CHF often move in opposite directions.
- If EUR/USD drops, USD/CHF often rises. A long USD/CHF can offset part of a long EUR/USD loss.
- Correlations change, so you monitor and resize.
Setup
- You are long EUR/USD, 1.00 lot at 1.1000.
- At the time, your 30 day correlation between EUR/USD and USD/CHF is about -0.85.
- You choose a smaller hedge because correlation is not a contract. You hedge 0.60 lots.
Hedge entry
- You buy USD/CHF 0.60 lots at 0.9100.
Outcome example (1 day move)
- EUR/USD falls 100 pips, from 1.1000 to 1.0900. PnL on 1.00 lot is about -$1,000.
- USD/CHF rises 70 pips, from 0.9100 to 0.9170. Pip value for 0.60 lots is about $6 per pip, so PnL is about +$420.
- Net result is about -$580 instead of -$1,000.
Limitations and monitoring
- Correlation can break during CHF specific or EUR specific news.
- Pip values differ by pair and account currency, so your hedge ratio is always an estimate.
- Track rolling correlation and adjust. Use a clear rule, for example rebalance if correlation drops below -0.60.
- For deeper pair combinations, use a forex correlation pairs list to sanity check your hedge idea.
Example 3: Hedging a GBP/USD long with an option
Setup
- You buy GBP/USD at 1.2500 with 1.00 lot (100,000 GBP).
- You want downside protection for 1 month, but you want to keep upside.
Hedge with a put option
- You buy a 1 month GBP/USD put with strike 1.2400.
- Premium is 80 pips.
- Cost in USD is about 80 pips x $10 per pip = $800.
What the option does
- Your worst case exit price becomes near 1.2400, plus the premium cost.
- Your max loss is limited, but not free.
Numbers
| At expiry | Spot move | Spot PnL | Put value | Premium | Net PnL |
|---|---|---|---|---|---|
| 1.2300 | -200 pips | -2000 | +1000 | -800 | -1800 |
| 1.2400 | -100 pips | -1000 | 0 | -800 | -1800 |
| 1.2600 | +100 pips | +1000 | 0 | -800 | +200 |
Breakeven and capped loss
- Upside breakeven becomes 1.2580, your entry 1.2500 plus 80 pips premium.
- Loss is capped relative to an unhedged spot position, but your floor is not the strike. Your premium pushes the floor lower by 80 pips.
- If implied volatility spikes, premium rises. Protection costs more.
Example 4: Exporter hedging future USD revenue with a forward contract
Setup
- Your business will receive $500,000 in 90 days.
- Your costs are in EUR. You fear USD weakness.
- Spot EUR/USD is 1.1000.
- Your bank offers a 90 day forward at 1.1050.
Hedge action
- You sell USD forward and buy EUR forward for $500,000 at 1.1050.
Locked budget rate
- EUR you lock in is $500,000 / 1.1050 = 452,488.69 EUR.
Outcome comparison
| EUR/USD at payment | No hedge EUR proceeds | With forward EUR proceeds | Difference |
|---|---|---|---|
| 1.1500 (USD weaker) | 434,782.61 | 452,488.69 | +17,706.08 |
| 1.0500 (USD stronger) | 476,190.48 | 452,488.69 | -23,701.79 |
What you paid for certainty
- You removed the downside from a weaker USD.
- You gave up gains if USD strengthens.
- This is the core tradeoff of forwards, stable cash flow versus opportunity cost.
Example 5: Partial hedge vs full hedge (hedge ratio changes results)
Setup
- You hold a EUR/USD long of 1.00 lot from 1.1000.
- You hedge by shorting EUR/USD.
- Hedge ratio = hedge lots / original lots.
Compare three hedge ratios
- 0 percent hedge: 0.00 lots short, you stay fully exposed.
- 50 percent hedge: 0.50 lots short, you cut exposure in half.
- 100 percent hedge: 1.00 lots short, you go flat on direction.
Result for a 120 pip move (about $10 per pip per lot)
| Hedge ratio | Net exposure | PnL if +120 pips | PnL if -120 pips |
|---|---|---|---|
| 0% | +1.00 lot | +1200 | -1200 |
| 50% | +0.50 lot | +600 | -600 |
| 100% | 0.00 lot | 0 | 0 |
How to use this
- Use full hedges when you want time, not exposure.
- Use partial hedges when you still want a view, but need smaller drawdowns.
- Set the hedge ratio before you enter, then adjust only on a rule. Random resizing creates hidden risk.
Hedge Ratio and Position Sizing (How Much to Hedge)
Choosing a Hedge Ratio (25%, 50%, 100%)
Your hedge ratio is the percent of your original exposure you offset. Pick it before entry. Tie it to two inputs, volatility and conviction.
- 25% hedge, use when volatility rises but your trade thesis stays intact. Your goal is smaller swings, not a full stop. Common use, before medium impact news or during late trend pullbacks.
- 50% hedge, use when volatility expands and your read weakens. You still want participation, but you want to cut drawdown in half.
- 100% hedge, use when you want time, not exposure. Your goal is to freeze P and L while you wait for clarity, spreads to normalize, or a level to break.
Conviction sets the ceiling. Volatility sets the urgency. If ATR or Bollinger Band width jumps, raise the hedge ratio. If your thesis breaks, exit instead of “hedging forever”.
Position Sizing Basics (Direct Hedge on the Same Pair)
For a direct hedge on the same pair, the sizing is simple. Match lots by ratio.
- Original position, 1.00 lot long EURUSD.
- 50% hedge, open 0.50 lot short EURUSD.
- 100% hedge, open 1.00 lot short EURUSD.
Same pair means same pip value per lot. Your hedge ratio maps cleanly to P and L reduction.
Notional Matching Across Pairs (Pip Value, Contract Size, Base and Quote Effects)
Cross-hedges fail when you size by lots instead of value. Size by risk per pip and currency exposure.
Use this workflow.
- Step 1, convert each leg into account currency per pip. Do not assume $10 per pip unless the quote currency is USD and you trade a standard lot.
- Step 2, match the hedge leg pip value to your target hedge ratio.
- Step 3, check the base and quote currencies. A “similar looking” pair can hedge the wrong leg of your exposure.
Key rules.
- If your account is USD, pairs quoted in USD often have stable pip values. Crosses often do not.
- Contract size stays 100,000 for a standard FX lot, but your pip value changes with price and with the quote currency conversion back to your account.
- When the quote currency is not your account currency, pip value moves as FX rates move. Your hedge ratio drifts.
Beta and Correlation Adjustments (Why 1:1 Often Fails)
In a cross-hedge, the relationship between pairs is not fixed. Correlation can drop, flip, or lag. Volatility can diverge. A 1:1 lot hedge often over-hedges in quiet periods and under-hedges in fast markets.
Use a simple adjustment.
- Hedge lots = Original lots × Hedge ratio × (Original pip value ÷ Hedge pip value) × beta
Beta is the sensitivity of your hedge instrument to your original position. Estimate beta from recent returns, then update on a schedule, not on emotion.
- If beta is 0.7, your hedge moves about 70% as much as the original. You need more size to offset the same move.
- If beta is 1.3, your hedge moves more than the original. You need less size to avoid over-hedging.
Correlation matters because beta breaks when correlation breaks. If correlation drops near zero, your hedge becomes a second trade. If you trade correlated hedges, keep a reference list and check it often. Use this guide for execution details, forex correlation pairs list.
Scenario Analysis and Stress Testing (Best, Worst, Most Likely)
Run your hedge sizing through three scenarios. Use pips, not feelings.
| Scenario | Assumption | What to calculate | Decision |
|---|---|---|---|
| Best case | Market moves your way, volatility stays normal | How much profit you give up due to the hedge | Lower hedge ratio if the give-up is too high |
| Most likely | Chop, slow drift, mean reversion | Net carry, net swap, spread cost, and time to break even | Use partial hedge or tighten risk rules |
| Worst case | Fast move against you, correlation breaks | Net loss at a defined shock, plus slippage buffer | Increase hedge ratio or reduce gross exposure |
Stress test with bigger moves than you expect. Use your pair’s recent high-volatility day as a baseline, then scale it up. Include spread widening and execution delay in the worst case.
Risk Metrics That Help (VaR, Expected Shortfall, MAE)
- VaR, estimates a loss threshold for a chosen time horizon and confidence level. Use it to compare hedge ratios on the same position. Do not treat it as a stop.
- Expected shortfall, estimates the average loss beyond VaR. It punishes tail risk. Use it to detect when a hedge still leaves you exposed to extreme moves.
- MAE (max adverse excursion), measures the worst unrealized loss during the trade. Track MAE for unhedged versus hedged versions of the same setup. Use it to set rules like “hedge at X pips against” or “hedge when MAE exceeds Y% of account”.
Pick one metric and log it. Compare outcomes across hedge ratios. If your MAE drops but your average win collapses, your hedge is too heavy or mistimed.
Costs, Risks, and Trade-Offs of Hedging
Direct costs, spreads, commissions, and option premiums
Hedging adds transactions. Transactions cost money.
- Spread cost. You pay the spread on the hedge leg, and often again when you unwind it. If you open and later close a hedge, you cross the spread twice.
- Commission. If your broker charges commission, you pay it per side. Two legs means more tickets, more commission.
- Slippage. Hedges often trigger during fast moves. Your fill can worsen, which raises your real cost versus your model.
- Option premium. If you hedge with options, the premium is an upfront, known cost. You can cap downside, but you pay for time value and implied volatility.
Track your hedge cost in pips or dollars per hedge cycle. A hedge that cuts MAE but adds too much friction will lower your expectancy.
Carry costs, swaps, rollovers, and slow bleed
Many hedges bleed over time because of carry.
- Swap on spot FX. Holding positions overnight can create a debit on one or both legs. A direct hedge can lock in two swap charges, or reduce your net carry benefit.
- Widened spreads at rollover. Liquidity drops near rollover. Spreads can jump, which makes adjusting or closing the hedge expensive.
- Time decay in options. Long options lose value as time passes. If price does not move enough, theta works against you.
If you hedge for days, you need a time rule. Log swap paid, option decay, and total days hedged. Many traders discover the hedge works on day one and fails by day five.
Basis and tracking risk in correlated hedges
Correlation hedges do not match your exposure tick for tick. You trade a proxy, not the same pair.
- Correlation breaks. Pairs that move together can decouple during news, risk-off moves, or central bank shifts.
- Different volatility. Your hedge pair can move faster or slower than your main pair. Your hedge ratio drifts.
- Different session behavior. One pair can trend in London, the other can chop. Your hedge stops working when you need it.
Measure tracking error. Log the spread between your main position P and L and your hedge P and L. If the gap expands during stress, your hedge is unreliable.
Complexity risk, more moving parts, more execution errors
Hedging raises workload and raises error risk.
- Wrong size. A hedge that is too large kills your upside. A hedge that is too small does little.
- Wrong timing. Late hedges lock in loss. Early hedges cut winners.
- Two exits instead of one. You must decide when to remove the hedge, when to close the core, and in what order.
- Margin and liquidation. Two legs can increase margin use. If margin tightens, you can get forced out at the worst time.
Write rules before you trade. Define entry trigger, hedge ratio, unwind trigger, and max hedge duration. If you do not have those rules, you will improvise under stress.
Regulatory and broker constraints, FIFO, no-hedging rules, and account types
Your ability to hedge depends on your broker and jurisdiction.
- FIFO rules. Some regulators require first in, first out execution. FIFO can block partial closes and make hedge unwinds messy.
- No-hedging rules. Some brokers net positions by default. They will combine long and short into one net position, which removes the hedge structure.
- Account type limits. Netting versus hedging accounts behave differently. Some platforms allow true hedging only on specific account types.
- Instrument limits. Options or CFDs may not be available, or may have different margin and pricing rules.
Confirm your rules before you build a hedge plan. Check whether your account supports hedging, how it handles opposite positions, and how it applies swap and margin. If you are still setting up your workflow, follow this beginner roadmap for starting forex trading and document your broker constraints early.
| Trade-off | What to measure | Failure signal |
|---|---|---|
| Lower MAE | MAE change versus unhedged | MAE drops but net P and L drops more |
| Higher friction | Total spread, commission, slippage per hedge cycle | Costs exceed average MAE reduction value |
| Carry bleed | Swap paid, days hedged, option theta cost | Hedge needs time to work but time makes it worse |
| Tracking error | P and L gap between core and proxy hedge | Correlation breaks during volatile periods |
| Execution risk | Error rate, missed exits, margin usage | More mistakes, more forced closes |
Hedging vs Other Risk Management Tools
Stop-loss vs hedge
A stop-loss cuts the position. A hedge keeps you in the market and adds a second position.
- Speed: A stop executes fast if the market trades through your price. A hedge takes extra clicks, extra sizing, and sometimes extra instruments.
- Slippage: Stops can slip in fast markets. Hedges can also slip, but you control the hedge fill and can choose limit orders.
- Gaps: Stops do not protect you from weekend gaps. The fill can print far from your level. A hedge opened before the close can reduce gap damage, but it will not eliminate it if correlations break or spreads blow out.
- Certainty of outcome: A stop defines your maximum loss in normal conditions, but the exact exit price is uncertain. A hedge can lock a floating loss if you match size and instrument, but your final result depends on how and when you unwind both legs.
If you want a clean, single decision, use a stop. If you need time to manage, and you accept extra costs and complexity, use a hedge.
Reducing leverage and position size
This is the simplest risk tool. It works because it reduces every bad outcome.
- Simplicity: One position, one P and L, one exit plan. Fewer execution errors.
- Protection: Smaller size does not cap losses. It just makes them smaller. You still need an exit level or a time limit.
- Margin: Less leverage lowers margin stress. That reduces forced closes during volatility spikes.
If your hedge exists because the position feels too big, cut the size first.
Diversification across pairs and strategies
Diversification helps when your trades fail for different reasons and at different times. It fails when everything becomes one trade.
- Where it helps: Different pairs with different drivers, and strategies that win in different regimes. Example, one trend system and one mean reversion system.
- Where it does not: High correlation baskets. Many USD legs at once. Risk-on moves where JPY, CHF, and equities all react together. In stress, correlations rise and your “diversified” book can draw down at the same time.
- Practical check: Track pair exposure by currency, not by symbol. EURUSD long and GBPUSD long both concentrate USD short risk.
Alerts and staged exits (scale-out) instead of a hedge
You can reduce risk without adding a second position.
- Alerts: Set price alerts at invalidation levels and liquidity zones. You act with a plan, not emotion.
- Scale-out: Take partial exits as price moves against you or as volatility expands. This cuts exposure while you reassess.
- Tradeoff: You may exit too early and miss a full recovery. You also avoid hedge carry costs and tracking error.
Use staged exits when you want fewer moving parts and a smaller decision surface. If you size exits with volatility, use an ATR-based stop and volatility framework to avoid arbitrary levels.
Combining tools for structured risk
You get the best control when each tool has one job.
- Hedge: Buys time during a known risk window, news, rollover, or when spreads widen.
- Stop: Defines the line where your idea is wrong. It prevents you from “managing” a dead trade for days.
- Time-based exit: Forces a decision if the hedge does not work fast enough. This limits carry bleed and the slow grind that kills expectancy.
| Tool | Best use | Main cost |
|---|---|---|
| Stop-loss | Hard invalidation, fast risk removal | Slippage, gap risk |
| Smaller size | Reduce total damage, reduce margin stress | No hard loss cap |
| Diversification | Smooth returns across uncorrelated edges | Correlation spikes in stress |
| Scale-out | Lower exposure without adding legs | Lower upside if reversal happens |
| Hedge | Temporary risk dampening when you must stay in | Carry, tracking error, execution risk |
Write the rules before you enter. Define hedge trigger, stop level, and maximum hedge time. If you cannot define those in one paragraph, you do not have a hedge plan.
Common Hedging Mistakes (And How to Avoid Them)
Most hedge losses come from loose rules. You hedge because you must stay in the trade, not because you feel pain. Write the rules before you enter. Define your hedge trigger, your stop level on the original position, and your maximum hedge time. If you cannot define those in one paragraph, you do not have a hedge plan.
Over-hedging, turning a directional view into an expensive flat position
Over-hedging happens when your hedge size cancels your core position. You stop trading a view and start paying costs. Your P&L goes flat, but your swaps, spreads, and slippage keep running.
- Mistake: You hedge 100 percent of exposure with a second spot position and then keep both legs open.
- Cost: Two spreads on entry. Two spreads on exit. Often two swap streams. More margin used. More execution risk.
- Fix: Cap hedge size. Many traders keep the hedge at 30 to 70 percent of the core position so you still express direction.
- Fix: Use the hedge to reduce tail risk, then remove it when the trigger condition clears. Do not let it become your new default.
Hedging too late, using a hedge to avoid taking a planned loss
A late hedge often means you skipped your stop. You lock in a bad entry and turn a simple loss into a complex position. You also increase the chance you hold through the worst liquidity and widest spreads.
- Mistake: Price hits your invalidation level, you hedge instead of exiting.
- Cost: You freeze the loss and pay time costs while you wait for a rescue move.
- Fix: Keep a hard stop for the core trade. A hedge does not replace your stop. It only buys time when a specific, pre-defined event risk forces you to stay in.
- Fix: If you hedge near your stop level, set a tighter maximum hedge time. If the market does not stabilize fast, you exit both legs.
Ignoring swaps and volatility, why time decay can dominate results
Carry and volatility can overwhelm the benefit of hedging. In spot FX, you pay or earn swaps each day you hold. In options, implied volatility and time decay drive results even if spot does nothing.
- Mistake: You hold a spot hedge for days without checking net swap on both legs.
- Mistake: You buy options protection after implied volatility spikes, then volatility mean reverts and the option loses value fast.
- Fix: Calculate expected holding cost before you hedge. Treat swap as a daily fee.
- Fix: Tie maximum hedge time to cost. Example rule, if net carry costs exceed X percent of your risk budget, you remove or convert the hedge.
- Fix: If you use options, set a volatility rule. If IV drops below your entry IV by Y points, you reduce or close the hedge.
Assuming correlation is stable, what to watch
Correlation hedges fail when regimes change. Pairs move together until they do not. Your hedge can turn into a second directional bet.
- Mistake: You hedge EURUSD with GBPUSD because they usually correlate, then a UK-specific shock breaks the link.
- What to watch: Risk sentiment shifts. Equity selloffs, VIX spikes, credit stress, and funding pressure can change FX relationships fast.
- What to watch: Central banks. Diverging rate paths, surprise guidance, and intervention risk can override historical correlation.
- What to watch: Crises. War, banking stress, and sudden commodity moves can create one-way flows.
- Fix: Track rolling correlation, not a memory. Use a simple 20 to 60 day window and re-check when volatility jumps.
- Fix: Place stops on the hedge leg too. If the hedge starts adding loss, you cut it.
No exit plan, rules for removing, rolling, or converting the hedge
A hedge without an exit plan becomes a permanent drag. You need rules for removal, roll, or conversion before you enter. Use order types that match the plan, see market vs limit vs stop orders.
| Decision | Use when | Rule you write in advance |
|---|---|---|
| Remove | Event risk passes, volatility normalizes, price returns above your trigger level | Close hedge when price closes back above level L, or when ATR drops below value A, or at time T max, whichever comes first |
| Roll | You must stay hedged, but the instrument expires or costs rise | Roll only once. Roll on a schedule. If roll cost exceeds C, exit the core position instead |
| Convert | Your trade thesis breaks, but you still see a new setup in the opposite direction | Close the original. Keep only the hedge leg if it aligns with a new, documented setup and a new stop |
Keep it mechanical. Trigger, size, stop, and time limit. If one of those is missing, you are improvising under stress.
A Simple Hedge Implementation Checklist (Before, During, After)
Before You Hedge, Define the Risk You’re Hedging
- Event: Name the catalyst. CPI, rate decision, NFP, earnings, fix, weekend gap.
- Timeframe: Set a start and end time. Example, “from 30 minutes before CPI until London close.”
- Maximum acceptable loss: Write the number in account currency and in pips. This is your hard limit across both legs.
- What must be protected: Define the exposure. Open profit, core position, or a future cash flow.
- Hedge objective: Pick one. Cap downside, smooth equity curve, reduce drawdown into news, or lock a rate.
- Failure condition: State what makes the hedge invalid. Example, “correlation breaks,” “spread widens above X,” “swap exceeds X per day.”
Select the Instrument and Structure
- Spot hedge (two positions): Simple and fast. Watch spread, swap, and margin. Best for short time windows.
- Options hedge (if available): Defined risk. You pay premium. Works when you need a hard floor into a known date.
- Forwards or NDFs (mostly for businesses): Locks a future rate. Focus on tenor, settlement date, and credit terms.
- Pair choice: Use the same pair for direct hedges. Use a second pair only if you have tested correlation and you accept basis risk.
- Size rule: Set a hedge ratio. 1.0 means full offset. 0.3 to 0.7 means partial. Write it before entry.
- Cost budget: Define max total cost. Spread plus commissions plus swap plus option premium.
Plan Entries and Exits With Triggers
- Entry trigger: Choose one trigger type and write it down.
- Price: “If price hits X level, place hedge.”
- Time: “At T minus 10 minutes, open hedge.”
- News outcome: “If headline prints above Y, hedge immediately.”
- Stops: Define a stop for each leg. Also define a portfolio stop for combined loss. Use one method and keep it consistent. If you need a refresher, read how to place a stop loss.
- Time limit: Put an expiry on the hedge. Minutes, hours, or a specific session close. No open-ended hedges.
- Exit trigger: Define what ends the hedge.
- Event passes: “After the release and first 15-minute candle closes.”
- Level breaks: “If price closes above X, remove hedge.”
- Cost threshold: “If swap plus spread exceeds X, remove hedge.”
- Conversion rule: If your thesis flips, close the original. Keep only the leg that matches the new setup, with a new stop and new target.
During the Hedge, Monitor the Variables That Break Hedges
- Volatility: Track ATR and session range. Rising volatility increases stop risk and slippage. For options, rising implied volatility changes premium and hedge cost.
- Correlation: If you hedge with a different pair, check real-time correlation. If it drops or flips sign, treat it as a hedge failure.
- Margin: Watch free margin and margin level. A “neutral” hedge can still trigger a margin call if both legs consume margin.
- Swap and roll: Check daily swap on both legs. If carry cost exceeds your budget, close or reduce.
- Liquidity and spread: News widens spreads. If spread exceeds your limit, stop adding, and prioritize risk reduction.
- Execution quality: Record slippage on entries and exits. Large slippage can erase hedge benefit.
After, Review Hedge Effectiveness and Update the Process
| What to measure | How to calculate | What “good” looks like |
|---|---|---|
| Hedge effectiveness | Risk reduced = (unhedged max drawdown estimate) minus (actual max drawdown during hedge window) | Meaningful drawdown reduction relative to cost |
| Total hedge cost | Spread + commissions + swap + slippage + option premium | Within your pre-set cost budget |
| Net P and L impact | (Core P and L + hedge P and L) minus (costs) | Negative is acceptable only if risk reduction met the objective |
| Timing quality | Compare entry time vs trigger, and exit time vs plan | Small deviation, no improvisation |
| Rule adherence | Checklist completion rate and number of overrides | Few overrides, clear notes when they happen |
- Write a one-paragraph debrief: Trigger used, hedge ratio, stops, time limit, result, and one fix for next time.
- Update your thresholds: Max spread, max swap, max slippage, and correlation floor.
- Remove bad habits: If you hedged to avoid taking a planned stop, treat it as a process failure and tighten your rules.
Trusted Context: Hedging for Traders vs Hedging for Businesses
Retail trading perspective, short-term protection and capital preservation
As a trader, you hedge to control short-term damage. You use it when you face a known risk window, a news release, a rollover swap spike, or a volatility regime change. Your goal is simple, keep equity stable so one move does not force a margin call or wipe a week of gains. You usually hedge with a smaller position than the original trade, then you manage the combined exposure like one position. You track net lots, net delta, spread cost, and swap. You set a time limit. You close the hedge when the trigger ends, not when you feel better. If you hedge because you cannot accept your stop, treat it as a rule breach and fix your plan. For core rules, use a clear risk framework like risk management in forex.
Corporate finance perspective, cash flow certainty and budgeting
As a business, you hedge to make cash flows predictable. You hedge invoices, payroll, inventory purchases, and debt service in foreign currency. The target is budget certainty, not profit. You often lock an exchange rate with a forward, or reduce downside with options. You define an exposure date, an amount, and a hedge ratio tied to that exposure. You measure results against a benchmark rate, then report what you achieved. A good hedge can look “bad” if the currency moves in your favor, because the point was to remove surprise, not to win the move.
Hedge effectiveness and documentation, why businesses formalize it
Businesses formalize hedging because they must prove intent, sizing logic, and results. They document the exposure, the instrument, the hedge ratio, and the test for effectiveness. They set limits on counterparties, tenors, and maximum losses. This reduces operational risk and stops “trading” from creeping into treasury. Traders can copy the discipline in a lighter way. Write the trigger, entry, hedge ratio, stop logic, time limit, and exit criteria. Store screenshots and fills. Review slippage, spread, and swap versus your thresholds.
Choosing the right venue, broker, bank, or exchange
| Venue | Best for | Pros | Cons |
|---|---|---|---|
| Retail broker (spot CFDs or spot FX) | Short-term hedges on open trades | Fast execution, small size, flexible exits | Spread and swap can be high, slippage around news, hedging rules vary by broker |
| Bank (forwards, swaps, options) | Corporate exposures tied to invoices and funding | Custom tenors and sizes, clearer cash flow matching | Credit lines needed, wider pricing for small firms, less flexible once set |
| Exchange (currency futures, listed options) | Standardized hedges with transparent pricing | Central clearing, visible order book, defined contract terms | Contract sizing constraints, margin rules, roll dates and liquidity vary |
Risk disclosures, hedging reduces risk but cannot eliminate it
Hedging cuts exposure, it does not remove it. Basis risk can break the hedge if the proxy pair stops tracking. Costs can flip the math, spreads, swaps, commissions, and option premiums. Execution risk matters most in fast markets, you may not get the fill you modeled. Correlations can fail when liquidity thins. If your hedge increases total margin use, it can increase liquidation risk. Treat hedging as a controlled tool with defined limits, and measure it like any other trade.
FAQ
What is hedging in forex?
Hedging in forex means you open a second position to reduce the risk of your first position. You aim to cut your net exposure to price moves. You pay for that risk reduction through spreads, swaps, commissions, or option premiums.
Does hedging guarantee a loss is capped?
No. Your cap depends on the hedge type and execution. Spreads, slippage, and swaps can widen your actual loss. Correlation hedges can fail. Options can cap risk, but you still face premium cost and pricing changes.
Is hedging the same as closing the trade?
No. Closing removes exposure and frees margin. A hedge keeps the position open and adds a second leg. You still hold market, cost, and execution risk. Many traders hedge to stay in a longer-term idea while reducing short-term drawdown.
Can you hedge in the same forex pair?
It depends on your broker and rules. Some brokers net positions, so a hedge becomes a partial close. Others allow “hedge mode” with long and short positions on the same pair. Check margin rules, swap rates, and how P&L is calculated.
How much of a position should you hedge?
Use a hedge ratio based on what you want to reduce. A 100 percent hedge aims to neutralize price risk, but it also locks in costs. Partial hedges, like 30 to 70 percent, often balance protection and flexibility. Size it before you enter.
What are the main costs of hedging?
Spreads on both legs. Swaps on both legs if you hold overnight. Commissions if your account charges them. Options add a premium and sometimes wider spreads. These costs can exceed the benefit if you hedge too often or too long.
When does correlation hedging break?
When the relationship between pairs shifts. That happens in news shocks, risk-off events, and low liquidity periods. The “proxy” pair can move less, move more, or move the opposite way. Track rolling correlation and cut the hedge if it stops behaving.
Does hedging increase margin risk?
It can. Some brokers charge margin on both legs. That raises margin used and can increase liquidation risk in fast moves. Before you hedge, check required margin, worst-case drawdown, and how your broker treats offsetting positions.
Are forex options better than spot hedges?
Options can define risk with a known premium. Spot hedges can drift, cost more over time, and still slip in execution. Options pricing changes with implied volatility, so the hedge value can move even if spot stays flat.
Should you hedge around high-impact news?
Only if you can manage execution risk. Spreads can widen and fills can slip. Your hedge may not execute at your intended price. If you must reduce risk, consider cutting size before the event, then re-enter after liquidity normalizes.
Does hedging help with trend trading?
Sometimes. You can hedge during a pullback, then remove the hedge when price confirms the trend again. Keep the process rule-based. Use a clear trigger, like a moving average reclaim, to avoid turning the hedge into an unplanned second trade.
Related: moving average strategy setups
Conclusion
Conclusion
Hedging in forex cuts exposure. It does not create edge by itself. You pay for it through spread, swaps, and extra complexity.
Use a hedge for one reason, to control risk around uncertainty. Define the hedge before you enter. Write down your trigger to add it, your trigger to remove it, and your max cost in pips or dollars.
- Size first. Reduce position size when you can. Hedge when you cannot cut exposure without breaking your plan.
- Hedge less than 1:1. A partial hedge keeps you in the trade while lowering drawdown.
- Set a time limit. If the hedge stays on too long, it turns into a second trade.
- Track the real cost. Log spread, swap, and slippage on both legs. Compare results to a simple stop loss or a smaller position.
- Respect correlation. If you hedge with a second pair, confirm the relationship and its stability. See forex correlation.
Final tip. Treat hedging like an emergency tool. Use clear rules. Remove it fast when risk normalizes.
-
Stop Loss vs Take Profit: Differences, Examples & Best Practices
4 months ago -
Forex Order Types Explained: Market vs Limit vs Stop Orders
4 months ago -
How to Set Stop Loss and Take Profit (Step-by-Step)
4 months ago -
How to Start Forex Trading Step by Step (Beginner Roadmap)
4 months ago -
Risk Management in Forex for Beginners (Rules That Keep You in the Game)
4 months ago
-
- Protecting unrealized gains before major news (CPI, NFP, central bank decisions)
- Reducing drawdowns during uncertainty or regime shifts (risk-on, risk-off)
- Managing overnight and weekend gap risk
- Covering multi-currency portfolio exposure (investors with foreign assets)
- Business use case, receivables and payables exposure for SMEs and importers and exporters
-
- Choosing a Hedge Ratio (25%, 50%, 100%)
- Position Sizing Basics (Direct Hedge on the Same Pair)
- Notional Matching Across Pairs (Pip Value, Contract Size, Base and Quote Effects)
- Beta and Correlation Adjustments (Why 1:1 Often Fails)
- Scenario Analysis and Stress Testing (Best, Worst, Most Likely)
- Risk Metrics That Help (VaR, Expected Shortfall, MAE)
-
- Over-hedging, turning a directional view into an expensive flat position
- Hedging too late, using a hedge to avoid taking a planned loss
- Ignoring swaps and volatility, why time decay can dominate results
- Assuming correlation is stable, what to watch
- No exit plan, rules for removing, rolling, or converting the hedge
-
- Retail trading perspective, short-term protection and capital preservation
- Corporate finance perspective, cash flow certainty and budgeting
- Hedge effectiveness and documentation, why businesses formalize it
- Choosing the right venue, broker, bank, or exchange
- Risk disclosures, hedging reduces risk but cannot eliminate it
-
- What is hedging in forex?
- Does hedging guarantee a loss is capped?
- Is hedging the same as closing the trade?
- Can you hedge in the same forex pair?
- How much of a position should you hedge?
- What are the main costs of hedging?
- When does correlation hedging break?
- Does hedging increase margin risk?
- Are forex options better than spot hedges?
- Should you hedge around high-impact news?
- Does hedging help with trend trading?
-
How to Place a Forex Trade Step by Step (Your First Trade Explained)
2 months ago -
Forex Trading vs Crypto Trading: Which Market Is Better for Beginners?
2 months ago -
Forex Lot Size Calculator: How to Use It to Size Trades Correctly
4 months ago -
How to Calculate Position Size in Forex (Position Sizing Formula + Examples)
4 months ago -
Forex Leverage Explained: How It Works, Pros, Cons & Examples
4 months ago
-
Is Forex Trading Legal in the United States? Rules, Regulators & What to Know
4 months ago -
Forex Market Hours & Trading Sessions Explained (Best Times to Trade)
4 months ago -
Forex Trading Platforms Comparison: MetaTrader vs cTrader vs TradingView
4 months ago -
Forex Leverage Explained: How It Works, Pros, Cons & Examples
4 months ago -
What Is a Lot Size in Forex? Lot Types + Quick Examples
4 months ago